Sungale CPF1903 User manual
- Category
- Digital photo frames
- Type
- User manual
This manual is also suitable for
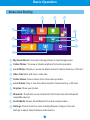
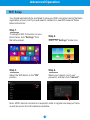
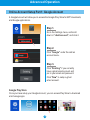
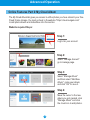
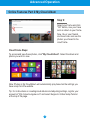
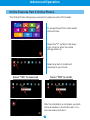
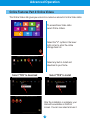
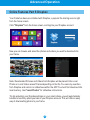
Sungale CPF1903 is a versatile device that combines the functionality of a digital photo frame with internet connectivity and various multimedia features. With its built-in Wi-Fi, you can effortlessly connect to your home network and access a wealth of online content, including photos, videos, and social media platforms. The frame's intuitive interface allows you to easily navigate through your media library, create slideshows, and share your favorite moments with friends and family.
Sungale CPF1903 is a versatile device that combines the functionality of a digital photo frame with internet connectivity and various multimedia features. With its built-in Wi-Fi, you can effortlessly connect to your home network and access a wealth of online content, including photos, videos, and social media platforms. The frame's intuitive interface allows you to easily navigate through your media library, create slideshows, and share your favorite moments with friends and family.


-
 1
1
-
 2
2
-
 3
3
-
 4
4
-
 5
5
-
 6
6
-
 7
7
-
 8
8
-
 9
9
-
 10
10
-
 11
11
-
 12
12
-
 13
13
-
 14
14
-
 15
15
-
 16
16
-
 17
17
-
 18
18
-
 19
19
-
 20
20
-
 21
21
-
 22
22
-
 23
23
-
 24
24
-
 25
25
-
 26
26
-
 27
27
-
 28
28
-
 29
29
-
 30
30
-
 31
31


Sungale CPF1903 User manual
- Category
- Digital photo frames
- Type
- User manual
- This manual is also suitable for
Sungale CPF1903 is a versatile device that combines the functionality of a digital photo frame with internet connectivity and various multimedia features. With its built-in Wi-Fi, you can effortlessly connect to your home network and access a wealth of online content, including photos, videos, and social media platforms. The frame's intuitive interface allows you to easily navigate through your media library, create slideshows, and share your favorite moments with friends and family.
Ask a question and I''ll find the answer in the document
Finding information in a document is now easier with AI
Related papers
-
Sungale CD1900WV+ User manual
-
-
-
Sungale KS782 User guide
-
-
-
-
-
Sungale Cloud Frame KS1016 User guide
-
Other documents
-
Polaroid PDWX-800CD Quick start guide
-
 Benibela JT080M-C01 8 Inch WiFi Smart Cloud Photo Frame Operating instructions
-
Monster OTG Advanced User's Manual
-
Seagate TS-851/32TB-SE Datasheet
-
QNAP TS-870/16TB-RED Datasheet
-
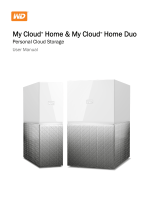 Western Digital MY CLOUD HOME 6TB Owner's manual
-
Samsung 8.0 User manual
-
Samsung SM-T312 User manual
-
QNAP TS-212-E Datasheet
-

