Page is loading ...

Eective/Rev Date: July 31, 2011 1www.homewerksww.com
Instructions
Two Handle Lavatory Faucet
Tools Required
Adjustable Wrench
Groove Joint Pliers
Pipe Wrench
Phillips Screwdriver
Pipe Tape or pipe thread compound
Safety Tips
If you solder the joints during installation of the faucet, the seats,
cartridges, and washers must be removed before using a ame
or the warranty will be voided on these parts.
Protect your eyes with safety glasses when cutting or soldering
water supply lines.
Cover the sink drain to avoid losing parts.
Things You May Need
Installations may vary depending on how the previous faucet was
installed. Supplies necessary for the installation of your faucet are
not all included; however, they are available wherever plumbing
supplies are sold.
Maintenance
Your new lavatory faucet is designed for years of trouble-free
performance.
Keep it looking new by cleaning it periodically with a soft cloth.
Avoid abrasive cleaners, steel wool, and harsh chemicals as
these will dull the nish and void your warranty.
Important Points
Prior to beginning installation, turn o the hot and cold water
lines, then turn on the old faucet to release built-up pressure.
When installing your new faucet, turn the connector nuts nger
tight, then use one wrench to hold the tting and a second
wrench to tighten the nut. Connections that are too tight will
reduce the integrity of the system.
Wrap all threaded connections with PTFE pipe tape available
at your local hardware or plumbing supply store. Always wrap
in a clock-wise direction.
Contact Us
For Customer Service please call 877-319-3757, or go to
homewerksww.com.
Certications
116766 – Chrome less pop-up
116765 – Chrome with pop-up
10-B42-WNCH1-B-Z – Chrome less pop-up
10-B42-WYCH1-B-Z – Chrome with pop-up
CALIFORNIA LEAD
PLUMBING LAW
*Image may vary slightly from actual product

Eective/Rev Date: July 31, 2011 2www.homewerksww.com
Certications
Instructions
Preparation and Assembly
1 2 3
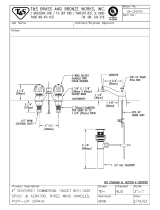
Locate water supply inlet and shut o
water supply valve. These are usually
found under the sink or near the water
heater. Remove old faucet. Clean and dry
sink surface area where new faucet will be
mounted.
Place new faucet through holes in top of sink.
From underside, slide washers onto threaded
rods. Secure with washer and nuts.
Connect water supply lines.
(A) Use 1/2" IPS faucet supply lines or (B)
use coupling nuts (not supplied) with
ball-nose risers (not included).
Turn water supply or shut-o valve back on
and check for leaks. If leaks occur, gently
tighten the faucet connections.
Installation: Pop-Up Drain
4 5 6
Remove ange from pop-up body. Leave
large black washer (not included with
plastic pop-ups) and nut on drain body.
Add PTFE pipe tape to the threads on the
drain body. Add Plumbers Putty to bottom
of ange. Insert threaded end of drain body
up through drain hole and attach ange to
body with ball rod pointing to the rear of
the sink. Tighten the ange.
Unscrew the nut from the pop-up body
and take o the spring clip from the ball
rod (Note: the white packing ring must
remain on the ball rod). Place the nut on
the ball rod. Insert the ball rod into the side
hole of drain, slide the nut on and tighten
securely.
7 8 9
Thread locknut from underside of sink until
rubber washer seats securely inside sink.
Tighten locknut. Wipe o excess putty. If
model has plastic wing nut, tighten securely.
If nut is brass, tighten with a wrench.
Place one end of spring clip on end of ball
rod. Insert rod across and through hole in
lift rod strap. Secure other end.
Insert bottom of lift rod into hole at top of
pop-up strap. Tighten with thumb screw.
Two Handle Lavatory Faucet
116766 – Chrome less pop-up
116765 – Chrome with pop-up
10-B42-WNCH1-B-Z – Chrome less pop-up
10-B42-WYCH1-B-Z – Chrome with pop-up
CALIFORNIA LEAD
PLUMBING LAW

Eective/Rev Date: July 31, 2011 3www.homewerksww.com
Certications
Instructions
Preparation and Assembly cont.
10
Important: After installation is completed remove aerator.
Turn on water supply and allow both hot and cold water to
run for at least one minute each. While water is running, check
for leaks. Replace aerator. Tighten nuts slightly to stop minor
leaks. If problems persist, refer to troubleshooting chart.
Troubleshooting
PROBLEM: Leaks underneath handle.
CAUSE: Bonnet has come loose or O-ring on cartridge is dirty or twisted.
ACTION:
1. Move the handle to the o position. Remove the index buttom and
unscrew the handle screw and remove the handle (Diagram A).
2. Tighten the bonnet by turning it clockwise (Diagram B). Move the
cartridge stem to the on position. The leak should stop draining out
from around the cartridge stem.
3. If the leak does not stop, shut o the water supply. Remove the bonnet
by turning it counter-clockwise. Lift out the cartridge valve (Diagram C).
Inspect the larger O-ring on the cartridge bonnet and the smaller O-ring
on the cartridge stem. Remove any debris from the O-rings. If either
O-ring is twisted, straighten it out. If either O-ring is damaged, replace
the cartridge by calling Customer Service.
4. Position the cartridge back into the faucet body (Diagram D). Make sure
the ridges on the two sides of the cartridge bonnet t into the grooves
on the two sides of the faucet body. Tightly screw the bonnet onto the
faucet body.
5. Re-install the handle.
PROBLEM: Water does not completely shut o.
CAUSE: Rubber valve seat is dirty, stuck, or broken.
ACTION:
1. Shut o the cold water supply. If leak stops, the problem is on the cold
side. If leak continues, the problem is on the hot side. Shut o the hot
water supply to determine if both the cold and hot sided have a problem.
2. Remove the handle on the problem side. Loosen the bonnet by turning
it counter-clockwise (Diagram E). Lift out the cartridge assembly.
3. Inspect the rubber valve seat in the faucet body. If there is debris or
brass scrap on the surface of the seat, remove it. If the rubber seat is
stuck tightly in the water inlet hole, push it gently with a ngertip so
that it moves up and down smoothly. The spring (smaller end up) must
be replaced underneath the valve seat. If the rubber valve seat is worn
out or broken, replace the cartridge by calling Customer Service.
4. Replace the cartridge in the faucet body. Make sure that the ridges on
the two sides of the cartridge bonnet t into the grooves on the two
sides of the faucet body (Diagram F). Tightly screw the bonnet onto
the faucet body.
5. Re-install the handle.
PROBLEM: Faucet leaks around aerator.
CAUSE: Aerator incorrectly tted.
ACTION:
1. Unscrew the aerator by turning it clockwise (Diagram G). Inspect the
black rubber packing inside the aerator. The rubber packing should
be at.
2. Screw the aerator onto the spout end and tighten.
PROBLEM: Improper water pattern.
CAUSE: Aerator dirty or small parts inside aerator improperly installed.
ACTION:
1. Remove the aerator from the spout end by turning it clockwise.
2. Gently ush the small parts inside the aerator to clear away any debris.
3. Re-install the small parts as shown in the exploded diagram (Diagram
H). Metal screens must be at and plastic supporter must be straight.
4. Screw the aerator onto the spout end and tighten.
A B C D
E F G H
Two Handle Lavatory Faucet
116766 – Chrome less pop-up
116765 – Chrome with pop-up
10-B42-WNCH1-B-Z – Chrome less pop-up
10-B42-WYCH1-B-Z – Chrome with pop-up
CALIFORNIA LEAD
PLUMBING LAW

Eective/Rev Date: July 31, 2011 4www.homewerksww.com
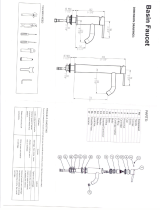
Specications
Physical Characteristics
• Description: 2 acrylic handle lavatory faucet with
4" centerset, and 1/4-turn washerless cartridge
• Max. Flow Rate: 2.2 GPM (8.3 LPM)
• ASME A112.18.1/CSA B125 Certified
• Meets ASNI/NSF 61-9 Low Lead Requirements
• This product complies with 0.25% weighted average lead
content on wetted surfaces.
• Total Weight of Item: 1.91 lbs.
Certications
No. Part Description Material
1 Index H PMMA V040
2 Index C PMMA V040
3 Screw SUS302
4 Handle PMMA V040
5 Bonnet ZZnA14
6 Washer POM
7 Cartridge NBR+SUS304+POM
8 Washer NBR
9 Spring SUS304
10 Escutcheon ZZnA14
11
Body
NBR+SUS302+PPO+3101+
ADC6+Brass
12
Aerator assembly
EPDM E7008F
13 POM+SUS302
14 C37700
15 Base Plate PP+20% CaCO3
16 Mounting nut ABS PA727
17 Pop-up assembly Plastic
18
Lift rod assembly
ABS PA727
19 ABS PA727
116766 – Chrome less pop-up
116765 – Chrome with pop-up
10-B42-WNCH1-B-Z – Chrome
less pop-up
10-B42-WYCH1-B-Z – Chrome
with pop-up
CALIFORNIA LEAD
PLUMBING LAW
01
03
02
04
05
06
07
08
09
10
11
12
13
15
16
17
18
19

Eective/Rev Date: July 31, 2011 5www.homewerksww.com
Rough-In
Certications
Two Handle Lavatory Faucet
116766 – Chrome less pop-up
116765 – Chrome with pop-up
10-B42-WNCH1-B-Z – Chrome less pop-up
10-B42-WYCH1-B-Z – Chrome with pop-up
CALIFORNIA LEAD
PLUMBING LAW
6-1/16"
2-15/16"
7/8"
6-1/16"
1/2" - 14NPSM-2A
55/64" - 27UNS-2B
2-1/8"
3-3/4"
1-3/8"
4-7/16"
5-9/16"
4"
/