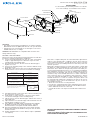
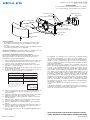
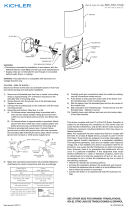
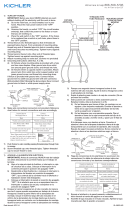
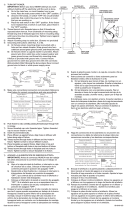
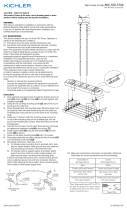
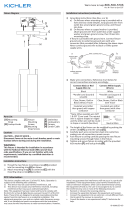
Kichler Lighting 10630PNLED is an LED lighting fixture compatible with electronic low voltage dimmers. It features a white finish and is suitable for both indoor and outdoor use. The fixture is designed for installation in accordance with the National Electric Code (NEC) and all local code specifications, and its supply wires are not intended for use through or concealed behind walls, floors, or ceilings. The fixture includes a mounting strap, threaded pipe, hex nuts, a top plate, an LED module, a cover, a faceplate, a bottom plate, a diffuser, lock-up knobs, a spacer, and wire connectors.
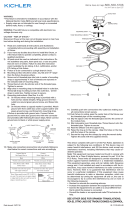
Kichler Lighting 10630PNLED is an LED lighting fixture compatible with electronic low voltage dimmers. It features a white finish and is suitable for both indoor and outdoor use. The fixture is designed for installation in accordance with the National Electric Code (NEC) and all local code specifications, and its supply wires are not intended for use through or concealed behind walls, floors, or ceilings. The fixture includes a mounting strap, threaded pipe, hex nuts, a top plate, an LED module, a cover, a faceplate, a bottom plate, a diffuser, lock-up knobs, a spacer, and wire connectors.


-
 1
1
-
 2
2
-
 3
3
-
 4
4


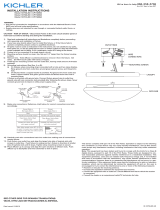
Kichler Lighting 10630PNLED is an LED lighting fixture compatible with electronic low voltage dimmers. It features a white finish and is suitable for both indoor and outdoor use. The fixture is designed for installation in accordance with the National Electric Code (NEC) and all local code specifications, and its supply wires are not intended for use through or concealed behind walls, floors, or ceilings. The fixture includes a mounting strap, threaded pipe, hex nuts, a top plate, an LED module, a cover, a faceplate, a bottom plate, a diffuser, lock-up knobs, a spacer, and wire connectors.
Ask a question and I''ll find the answer in the document
Finding information in a document is now easier with AI
in other languages
Related papers
-
 Kichler Lighting 10797NILED User manual
-
 Kichler Lighting 10790NILED User manual
-
 Kichler Lighting 10763NILED User manual
-
 Kichler Lighting 43603WZC User manual
-
 Kichler Lighting 6040NI User manual
-
 Kichler Lighting 11131AZTLED User manual
-
 Kichler Lighting 10755WHLED User manual
-
 Kichler Lighting 43878WHLED30 User manual
-
 Kichler Lighting 44160CLPLED User manual
-
 Kichler Lighting 42995OZLED User manual


Other documents
-
 Titan Lighting TN-7176 Installation guide
-
Kichler 43855WHLED30T Operating instructions
-
-
-
Lightolier IS:4900 User manual
-
-
-
 Volume Lighting V1033-3 Operating instructions
-
-
Miseno FL96812 Installation guide

