
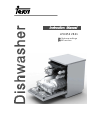
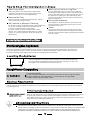
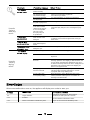
14 place settings
Alt function
LP8 850 VR01

Witheachwashcycle.
For pro gramm es with pre-wash only.
(Follow the user instructions !)
Electric indic ator on control pane l (if pro vided).
Check the rinse aid level
(On models with water softener system only.)
Electric indicator on control panel (if provided).
If there is no salt warning light in the control panel
(for some models), you can estimate when to fill the salt into
the softener by the number of cycles the dishwasher has run.
Check the regeneration
salt le vel
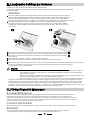
Load the baskets
Select a p rogramme
Close the door, turn on the water tap. The machine will start working
after about 10 seconds.
Running the dishwasher
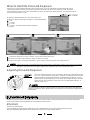
Switch off the applia nce
Turn off the water tap,
unload the baskets
Fill the detergent dispenser
Warning: wait a few minutes (about 15 minutes) before unloading the dishwasher to avoid handling
the dishes and utensils while they are still hot and more susceptible to break.
The y will a lsodry better.Unload the appliance, startingfrom the lower basket.
Changing theprogramme
Add forgottendishes in the
dishwasher.
Scrape off any large amount of leftover food. Soften remnants of burnt food in pans,
then l oad the baskets. Refer to the dishwashe r loading instructions.
Press the Programme Button, the selected programme indicator lights up.
( See the section entitled Operationg instruction )“”
When the working cy cle has finished, the buzzer of the
dishwasher will sound 8 times, the n stop.
Turn off the appliance using the On/Off Button.
If the appliance is switched
off during a wash cycle.
Op en t he do or car ef ull y.
Hots team may esc ape
when thedoor isopened!
If the appliance is switched off during a wash cycle, when switched
on agai n, plea se re-select the washing cycle and operate the dishwasher
according to the original Power-on state.
Switch on the appliance
Open the door, press the On/Off button to switch on the appliance.
For detailedoperatingmethodread the corresponding content onthe instructio nmanual.
1. A running cycle canonly be modified if it hasbeen running for a short time. Otherwise the detergent
m ay have alre ady been released and the water already drained. If this is the case, the detergent
dispenser must be refilled.
2. Open the door, press the program button more than 3 seconds, the machine will be in
standby state, thenyou can change theprogram to the desired cycle setting.
1.Open the door a little to stop the washing.
2.After the spray arms stop working, you can open the door
c ompletely.
3.Add forgotten dishes.
4.Close the door, the dishwasher will run after 10 seconds.
A
B
C

To re view the sec tion on t ro ubleshooting Tip s
willhelpyoutosolve somecommon problems
by yourse lf .
Dear Cus tom er ,
Please carefully readthismanualbefore usingthe
dishwasher,itwill help y ou t ouseandmaintainthe
dishwasher properly.
Passit on toany subsequen towner ofthe app liance.
Thismanualcontains sectionsonsafetyInstructio ns,
Operating Instructions, Installat ionInstructionsand
Trou bl esho o tin g Tip s, et c.
The man ufactu rer, f ollowing apol icyofconst ant
develo pmenta ndu pdating of the product, m ay
make m odifications w ithout gi ving prior notice.
Di shw as h er Fe at ure s.. . ... .. .... . .. ........ . . .. . ...... .. ... 3
A Wa te r So ftener.. .... ...... ....... ..... ...... .. .... ..... ..4、
At tentio n b efor e o rafter loadi ng the Di shwash er
Baskets..........................................................9
FilteringSystem. ..... .......................................15
Caring for the Di shwasher..... ............... ...........16
B L oad in g th e S al t into the S oftene r.... .. . ...... .. . .5、
C FilltheRinseAid Dispenser.........................5、
D Function ofDetergent . ................... ......... ....6
、
Loa dingthe upper Basket... ... .........................10
Loa dingthe LowerBas ket...............................10
CutleryBasket..............................................11
Th ereco mmend ed meth od lo adi ng b ig
dishw are........................................ ........... ....12
WashCycl eTable...................................... ..... 13
Turningon theAppliance................................14
Change theProgramme............... .......... ......... 14
At the endoftheWashCycle........ ...................14
PositioningtheAppliance...............................17
Wate r C o nnec ti on. ... . .. ......... .... ...... .. ... .. .. ..... . .1 8
A bout P owe r C onne c ti on. ... . ..... ...... .... ... .. .... ... 1 7
St art of dishwasher................ ........................19
Beforecalling for servi ce. ......................... .......20
Errorcodes. .................................. ................2 1
Technicalinformation ...... ...............................22
ControlPanel...................................... .............3
K eep it as a r e f er in the l ate r day s .
Ifyou can not solv ethe pro blem sby you rself ,
please ask f or the help o fprofe ssiona l techn icians.
Th is a ppli ance isin tend ed t ob e use din h ou sehold
andsimilar applications suchas:
-s taff kitch en a reas in s hop s,offices and othe r
w orkin gen viro nme nts;
-farm hous es;
-b yclients in hotel s,mot els and othe rres iden tial
t ype env iro nments;
-bedand breakfasttype environments.

This appliance must be grounded. In the event of a
malfunction or breakdown, grounding will reduce
the risk of anelectric shock by providing a path of
least resistance of electric current. This appliance
is equipped with a cord having an equipmen t-
grounding conductor and a grounding plug.
The plug must be plugged into an appropriate outlet
that is installed and grounded in accorda nce with
all local codes and ordinances.
Keep children away from detergent and rin se aid, keep
children away from the open door of the dishwasher,
there could still be some detergent left inside.
Donotabuse,siton,orstandonthedoorordish
rack of the dishwasher.
Do not touch the heating element during or
immediately after use.
(Thi s instruction is only applicable to machines
with a visual heating element.)
Do not wash plastic items unless they are marked
dishwasher safe or the equivalent. For plastic items
n
ot so marked, check the manufacturer's
recommendations.
Use o nly deterge nt and rin se addi tives
desi gn ed for an a utom atic dis hwa sher.
Never us esoap, laun dry dete rg en t, or h and
washi ng deter gent in you r dis hwa sher.Keep
t h ese pr od uct s out of th e reach of childr en.
During installat io n,the power suppl ym ustnot
be exce ssive ly or d angerously be nt or flatten ed.
Do not tamper with controls.
Do not place any heavy objects on or stand on the
door when it is open. The appliance could tip
forward.
When l oading ite ms to be w ashed :
1) L ocate sharp items so t hat they a renot likel y
to damage t he door seal;
2) Warni ng: Kni ves and other u tensils with
shar p points m ustbe loade dinthe ba sket
with their points do wn orplace di n a
horizontal position.
W he n usi ngy our dishwasher, yo us hould
p rev en t pl a stic item s f r o m c oming i n to c ontact
w iththehe ati ngeleme nt.(T his i nst ruct ion is onl y
appli cable to m ac hines with a visual heatin g
el ement. )
Ifthesupplycordisdamaged, itmustbereplaced
bythemanufactureroritsserviceagentora
simi la rly q ual i fied pers on i n orde r t o av oid a
ha zard .
Plea sed isp ose of pack in gm aterials properly.
Use the dishwasher only for its intended function.
Remove the door to the washing compartment when
removing an old dishwasher from service or discarding it.
Dishwash erdeterge ntsare stro ngly alkal in e,they
can be extrem el yda ng erous if swallowed.Avoid
conta ctwith skin and e yes and kee pchildren away
fro m the dish washer when the door is open.
C heck th at th e det erg ent com parm ent is e mpt y
aft er compl etion o fth e wash c ycle .
The a pplianc ei s to be conn ected to the water
mains u sing new hose sets and th atold hose-sets
should no t be reu sed.
The maxi mum nu mb erof place set tings to be
was hed i s14 .
The maxi mum pe rmis sible inlet water pressure is
1Mpa .
The mi nimum perm issible inl etwater pr essure is
0.04Mpa .
Children should be supervised to ensure that they do
not play with the appliance.
This appliance is not intended for use by persons
(including children )with reduced physical, sensory or
mental capabilities, or lack of experience and
knowledge ,unless they have been given supervision
or instruction concerning use of the appliance by a
person responsible for their safety.
When using y our dishw ashe r, foll ow the p r ecaut ions list ed below:
The d oorshoul dnot be left o pen,
since this coul d increase t herisk of trippi ng.
Improper connection of the equipment-grounding
conductor can result in the risk of an electric shock.
Check with a qualified electrician or service
representative if you are in doubt whether the
appliance is properly grounded. Do not modify the
plug provided w ith the appliance; If it does not fit
the outlet. Have a proper outlet installed by a
qualified electrician.
Do not operate your dishwasher unless all
enclosure panels are properly in place. Open
the door very carefully if the dishwasher is
operating, there i s a risk of water squirting out.

D ispo se o fthe dish wa sher pac kag ingmater ial c orrectly.
All pa ckaging material sca n be rec ycled.
Pl ast ic pa rts ar em ark edwith t hes tand ardinternati onal abbrevi ations:
PE fo r polyeth yle ne,e .g.sheet wra ppin gmater ia l
PS for polystyrene,e.g.paddingmaterial
PO M polyox ymethylene, e.g .plastic c lips
PP pol ypr opy lene, e.g . Salt fill er
AB S Acrylo nitri leB utad ieneSty rene ,e.g .Co ntro l Pa nel .
Packagingmaterialcouldbedangerous for children!
Fo rdisposi ng ofpa ckage a nd theappl iance ple ase go to a re cyc ling cen tre. Ther efor e cut
offthe powersupplycable and mak ethe doorclosingdeviceunusable.
Cardboard packaging ismanufactured from recycled paperand shouldbe dispos edin the
w aste paper c ollecti on f or recy cling .
By ensurin gt hispr odu cti s disp osed of c or rectly,you will help pre ven tpotent ialn egat ive
con se que nces f or t heenvi ronment a nd human h eal th,which could ot her wise be c aused
byinappropriatewaste handlingof thisproduct.
Fo rmorede ta iled infor mat ionabout rec ycli ngof t hi s prod uc t, please con tac t your loca l
ci tyof fice and your hou seho ldwast edis posal ser vi ce.
DISPOSAL :Do not dispose th is pr oduct as unsorte dmunicip alwaste. C ollection of such
waste sep ara te ly for spe cialtr eatment is n ecessary.

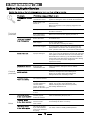
3.Operation Instruction3.Operation Instruction
33
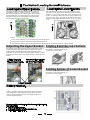
Dishwasher FeaturesDishwasher Features
Control PanelControl Panel
before using it for the first time.
To get the best performance from your dishwasher, read all operating instructions
IMPORTANTIMPORTANT
On/Off Button: To turn on/off the power supply.
Display screen: to show the reminding time
and the state(running state, delay time etc )
Program indicators:
Rinse Aid indicator:
Indicates when the dispenser needs to be refilled.
Add salt indicator:
Indicates when the dispenser needs to be refilled.
Delay time ,Remain time ,or error codes indicator:
11
22
Program step indicators:
Delay Button : To Press the button to delay.
Program Button : To Press the button to select
appropriate Program.
33
44
55
66
Alt function indicator:
Back View
1
2
3
4
5
7
8
9
10
Front view
Lower basket
Salt container
Dispenser
Cup shelf
Spray arms
Filter assembly
Inlet pipe connector
Drain pipe
Upper basket
Cutlery rack
Top spray arm
1
Inner pipe
5
6
7
8
9
10
12
11
3
2
4
6
Alt Button: Dual zone wash function, press the
button to select either upper basket or lower basket
loaded, and the response indicator will blinking.
Pre-wash indicator:
Main-wash indicator:
Rinse indicator:
Drying indicator:
Program end indicator:
Alt
11
22
44 55
66
33
11
12

Th e wat er soften er must be s et m anu ally, using the w ater hard ness dia l.
Th e wat er so ftener is design ed to rem ovemineral sand salts f romt he w ater, wh ich woul dhave
a detrim enta lo r advers e effe ct on the op eration of t he app liance .
Th e higher t he conte nt of the se mine rals and sal ts, the h arder your w ater is .
Th e softener sho uld be adjusted accordin gto the ha rd ness of t he wa ter in you r area. Yo ur lo cal WaterA uthority
can adviseyou onthehardnessofthewaterinyourarea.
AdjustingSalt Consumption
Th e dishwas her is de sig ned to all ow for a djus tment in the amo unt of sa ltco nsumed bas ed onthe ha rdness o f
thewaterused.This is intended tooptimiseandcustomise thelevelo f salt consumption.
WAT ER SOFTENER
Th ehar dne ss of the wa ter v arie sf rom place t o plac e. If hard water i sus ed i nthe dis hwa sher, de pos its w il l
form on th e dish es and uten si ls .
Th eapplian ce i sequipped with asp ecial so ftener that uses asalt c onta iner specific ally des igned to elimi nate
lime an dmi ne ra ls from the wat er.
Contact your l ocal water board f orinform atio n on the hardness of your w atersuppl y.
If your m odeldoesn ot have a ny w ater softener, you mays kip this section.
Clark:Britishdegree
fH: F rench degree
DH: Germ andegree
dH=1.25Clarke=1.78fH=0.178mmol/l
1
The manufa ctory set ting : H4 ( EN 50242)
Be fo re u sing you rdishwashe rfor the first time :
A. Set the wa ter s often er
B. Add 1. 5Kgdishw ash ersalt an dthen ful l fill the salt con tain erwith w ater
C. Filltherinseaiddispenser
D. Fill in d ete rgen t
1. O pen the door , Sw itch on the appl iance;
2. P ress the Pro gram but tonformore than 5s econds to start the wat er sof tener
s etmodel wit hin 60se conds af ter thea ppl ia nce was switched on (Th eS altand
Rinse aidwarning lights willbe on peri odically when itg etin theset model);
3. P ress t he Progr am butto nto select the pr operset acc or ding to y our loca lenvironm en t,
th esetsw ill change in th efollo wing sequence: H1->H 2->H3->H 4->H5 -> H6;
4. P ress the Pow erb utton to e nd th es etup model .
Please followthesteps belowforadjustment insaltconsumption.
dH
mmol /l
0~90~5 0 ~0 .9 4
H1
0
10-20
6-11
1.0-2.0 H2 9
21- 30
12-17 2.1-3.0
H3
12
H4
20
fH
0~6
7-14
15-21
Cla rk e
WATER HARD N E SS
Selec torPosition
Salt consumption
(g ram/ c yc le)
1 8-2 2 3 1-40 2 2-2 8 3 .1 - 4 . 0
41- 60
23-34 4.1-6.0
H5
30
H6
60
29-42
3 5-5 5 6 1-98 4 3-6 9 6 .1 - 9 . 8

1.The salt con tainer must only be refil led w henthe salt wa rn ing light in the control panel com es on.
Depend ing on how w ell t hes alt dissolve s,the sa lt warnin glight ma ystill be on even tho ugh the
salt cont ai ner is fill ed.
If ther eisno sa lt w arning li ght i n the con trol p anel (fo rso me Mode ls),you c an e stim ate when to f ill
the s alt i nto the so ftener by the cycles t hatthe di shwasher has run.
2. If there are spills of the salt, a soa kor a rap idprogram s hould be ru nto remove the exce ssiv esalt.
Always use the salt intende dfor u sewith di shwasher.
The sa lt c ont ain er i slocated ben eath the l ower bas ket and sh ould b efilled a sexplaine d
inthe foll owing:
Attention!
Only use salt spe cif ically desi gne d forthe usei nd ishwa shers! Every ot hertype of
salt no t specif ical ly de sig ned fo rtheu se in ad ishwa sher, espe ciallytable salt, will
damage the w ater soft ener. I n case of d amages caused by t he use of unsuitab le
salt t he ma nufact ure rdoes notgive any wa rranty nor is liable for any damage scaused.
Only f il l wi ths alt just b efore star ting one o f theco mp lete washi ngp rograms.
This wi ll p reve ntanyg rains ofsa ltor salty wate r, w hich ma y have b een spi lled,
remain ing on th e bottom o ft he m achi nefor anype rio doftime, whi ch may cau se
c o rrosio n.
Th er i nse a id i sr elea se dd u ri ngthe fi nal ri nse to pr event wat er fro m for ming drop lets o ny our dis hes, w hich can
leave spots and s treaks. It also improve sdry ing by allow ing wate rtor oll offthe dishes. Your dishwa sher i s
designedto useliquidrinseaids.The rinseaiddispenserislocated inside thedoornext to the detergentdispense r.
To fil l the d ispens er,open the c ap an d pour t he r inse ai d in to the d ispens er until t he le vel i ndi cat or turn s c omplete ly
black. The v olume of the ri nseai dco ntaineris about 110m l.
RinseAid Dispenser
Function ofRinseAid
Rinse ai d is aut oma tic ally added d uring t helast r inse, ensur ing th orough rin sing, and spo tand s treak fr ee dryi ng.
Attention!
Only usebranded rinseaidfor dishwasher. Neverfilltherinseaiddispenserwithanyothersubstances
(e.g. Di shwasher cle aning ag ent, liqu id d eterge nt ).Th is wou ld damag ethe a pp li ance .
3.I fthe mach in e ne eds to be dum ped for ther eas ons o f tra nsit, repair a ndso on ,pleas euset he bi bul ouscloth or
analogtoblotupthewaterin the salt container,andscrew thecaptightly,afterward, transitor repairthemachine.
Af tertr ansi ting or re pairing themach ineandc onf irming it in orde r, load the salt in to the s ofte nera ccor dingto th e
proces sof B. Loadi ng the salt int otheSoften er .Otherw ise ,itc ould bemake the big da ma geto the ma chin e,for
example,rustiness,conkand so on. Such problemsareoutof theguaranteeran ge.
“”
Fullfill the salt con tainer withwater,Itisnormal for asmallamountofwatertocomeoutofthe
s alt c ontain er.
A Af ter th elow erba sket ha sbeen remo ved, un screw and rem ove the cap from the sal tcon ta iner.
C
D Af ter f il ling the co ntainer , scr ewthe c apt ightly b ac k clo ckwise.
E The saltwarning lightwill stopbeing after thesaltcontainer hasbeenfilled withsalt.
F Immedi at elyaft erfil ling t hesalt into the sa lt co ntainer, a washin g progr am sho uld be sta rted
p ro gram Other wise the filt er sys tem, p ump or other im por t ant pa rts of t he ma chin emay b e damag ed
bysalty water.This is outofwarranty.
(Wesuggest to use a short
).
B Pl ace the en dof th efu nnel ( suppli ed) int othe ho le and introd uce abou t 1. 5kg o fdishwasher salt.

To op enthe di spens er,t urn t he ca p tothe "ope n" ( left ) arr ow an d l if tit out.
Po ur th e rin se ai d int o th e dispe nser,being ca ref ul n ot t oove rfill .
Replace the ca pb y in se rting i ta ligned with "open" arrow and turning it to t he cl osed (right) arrow.
Adjusting RinseAid Dispenser
The r inse aid dispe ns er has si x or f ou rsetti ngs.Always star twith t hedispens er
set o n"4". I fsp ot s and poor dr ying are a p rob lem, incre ase the amoun to fri nse
aid d ispensed b y removin g thedi spenser l idand rot ating the d ial to "5". If t he
dishes s till are not d ryi ng pr operlyo rare show s pots, adj ustthe dial to the n ext
highe r lever un til your dish es a respot-f ree. The r ecom men ded set ting is "4".
(Factory valueis "4".)
Increasethe doseifthereare drops of waterorlimespotsonthe dishes after washing.
Reduce itifthere aresticky whitis hstainson your dish esorabluish filmon glasswareor
knife blades.
1
2
3
As th eri nse aid d imi nishes, th esiz eo f th e black do t
ontherinse aidlevel indicator changes,asillustratedbelow.
Full
3/4full
1/2full
1/ 4 full-Should refilltoeliminate spotting
Em pt y
When to Refillthe RinseAid Dispenser
Ifth erei s no ri ns e-aid wa rning ligh tin thec ont rolpanel, y oucan estimate the amount f ro m the col our
ofthe op tical l evel indi cat or C loca ted next to the c ap. When th erinse-a idc ontai ner isful l,th e whole
indicato rwil l be dark . As the r inse -aid dim inishes, th es izeof the dark do tde creases. You shou ld neve r let
t he r i ns e aid l ev el fall 1 / 4 full.
durin gthe nex twash.
Don' tf orget t ore placethe cap be fore you clos edis hwa sher d oor.
Cl ean up an y r ins e ai d sp illed whi le du rin g f i lli ng w i th a n ab so r bent cl oth t o a v oid ex cessi v e f oam i n g
Deterge nt s wi th its chem ic al ingredie nt s a rene cessary to re move di rt,c rush dirt an dtranspo rt it o utof the di shwasher.
Mostof thecommerci al quality detergentsare suitableforthisp urpose.
""
ProperUseofDetergent
Useo nly det ergent s pe cifically m ade for the u sei nd is hwashers. K eep your d etergent fr esh and dr y.
Don't putpowdereddetergentinto thedispenseruntilyou'reready to wash dishes.
Attention!

Amount of DetergenttoUse
Dishwash erde tergent i sco rrosive! Take c are to kee pi t out of reach ofc hildren.
Based ontheir chemicalcomposition,detergentscan besplitin two basictypes:
Detergent tabletsofdifferent brandsdissolve at differentspeeds.Forthisreasonsome
dete rgent ta blet sca nnot diss olve and de velop the irf ull cle anin gpower dur ing s hort
prog ra ms.T here fore plea se u se l ong program swh enu sing d eterg ent t ablets, t o
ensu r e the com pl ete re mov a l of de t erg e n t re si du al s.
Th e dispens er m ust b ere fille dbe fore the start of each wash cy cle f ollowi ngthe i nst ructions
provided i nt he w ash cycl et able . Your dis hwa sher uses le ssde terg ent and rins eaid tha n
Conventionaldis hwasher.Generally, only onetablespoon of detergent is neededfor
anormalwashload. Moreheavily soileditemsneedmore detergent.Alwaysaddthe
dete rgen tj us tbefore star ting th e dishwasher, ot herw ise it coul dg e tda mp a nd w ill n ot
di s sol v e properly.
Concentrated Detergent
DetergentTablets
DetergentDispenser
conventional, alkalinedetergentswithcausticcomponents
l ow a lkali ne c onc entrated d eter ge nts w it h natura l e nzymes
Normally ne wpu lverised det ergent is with out phospha te.T hus the water so ftener fu nction o f
phos ph ate i s not give n. In th i s c a se w e r e comme nd t o f i ll sal t in t h e sa l t co nta i n er e ven when
the h ard ne ssof water is only 6 d H. If dete rgen tsw itho utph osphate are used in the caseof h ard wat er
often wh ites pots app ear on d ishesa nd glasse s. I n th is cas epl ease add m ore d et ergent tor each
better r esu l ts. D et e r gents with o ut chl or ine d o on ly bl e ach a l i ttle. Str o ng and c ol o u red sp o t s wi ll no t
ber emoved complete ly. I nt hi sc ase p lease ch oo s ea p rogram with a hi gher tem perature .
°
Detergents
The rear e 3 sort s of dete rgent s
1.Withphosphateandwithchlorine
2.Withphos phate and wi thout c hlorine
3.Wi thou tph osph ate and without chlor ine
Always a ddth edeterg entjust before st ar ting ea chwash cycle.
Onlyuse branded detergentaidfordishwasher.
If th el id i scl osed: press release button.T hel id will sp ring ope n.

Fillt hed eter gent dispens erw ithd etergen t.
Th e mar k ing i n d i cates th e dosing l evels , as
i ll us tra ted o n t he r ight:
Th ep la ceo f m ain w ash cyc ledete rg ent plac ed.
Th ep la ceo f pr e-wash c ycle det erge ntp laced.
Pleaseo bserve th em anufa ct urer sdo sing and storage
Recommendationsas statedonthedetergent packaging.
Close the lid and press untilit locks in place.
I f th e di sh es a r e h eav i ly so i l ed, plac e an ad ditional
detergen tdo sei n the pre-wash detergent cha mbe r. Th isd eter gent will take effe ctdurin g the pre -washp has e.
A
B
Fillin Detergent
You fi ndin formatio nab ou t the a mo unt o fde tergent for th esi ngle pro gramme ont he last p age .
Pl eas ea ware, tha t accordi ng t othe lev els oiling and the spec ific hardnes sof wa ter d iffer enc esa repo ssib le.
Pleaseobservethemanufacturer's recommendationsonthe detergentpackaging.
A
B

Cutlerywithwooden,horn chinaor
mother -of-pearl handle s
Plast ici te ms that ar enot heat resis tant
Older cutl erywit h glued pa rtst hat a ren ot
temperatureresistant
Bonded c utlery i te ms or dishes
Pewter or coop er ite ms
Crystal gl ass
Steel items s ubject t orust ing
Wooden p latte rs
Items made fromsynthetic fibres
So me ty pes ofg lasses c anb ecome
dull aft era large number of washes
Silv er an da l umi num pa rts ha ve a
tendencytodiscolourduring washing
Glazed patternsmayfade ifmachine
washed frequent ly
Are not suitable
Are oflimited suitability
Dishesand itemsofcutlerymustnot lie insideoneanother, orcover eachother.
To av oidd amage to gl asse s,th eym ust n ot t ouc h.
Lo ad large ite msw hic h are most difficul tto c lea nin tothe lowe rbask et.
The u pper bas ket i sde signed to ho ldm ored eli cate and lighter d ishw are such as glasses , coffee
andtea cups
Lo ng bladed k nives st ored in a n uprigh tpo sition are a p otenti al haza rd!
Lo ng and/or sharp items of cut le ry such as carvi ngkniv esmust be p ositi oned
h orizon ta ll yin the upp erb asket .
P lease do not ove rload yo ur dishw asher. This is i mp or tant forg ood resu lts a ndf or
r easonab leconsu mption of ener gy.
Load h oll owi tems suc has cups ,glasses, pans etc. With the opening f ac ing downwa rds s o t hat
w a t er c ann o t c o ll ec t i n the c ont a i n e r or a de epba se.
Consider buyingutensilswhich are identifiedasdishwasher-proof.
Usea milddetergentthatisdescribedas 'kind todishes'.Ifnecessary, seekfurther
informationfromthedetergent manufacturers.
Forparticular items,select aprogramwithaslowa temperatureaspossible.
To prev en t da ma ge, d o no t t ake gla ssandc utl ery out of the dis hwas her imm ediat el y
aft er t he p rogr amm eh a se nde d.
(For b estperf ormance of t he di shwasher,fol lowthe sel oading gu idelines.
Featu res and appear ance of baske ts and cutl ery ba sket smay vary from y our mod el.)
Scrape off any larg ea mo untso fle ftover fo od. S often remnan ts of b urnt food in pans.
It i sno tnecess ary tor inse t hedish esu nder runni ng water.
Pl ac e obje cts in the dishwa sheri n followi ng way :
1.Items su ch a scups, g la sses, pots /pans, e tc. a re f aced dow nw ards.
2.Curved i tems, or ones wit hreces ses,sh ouldb eloade da sla nts oth at w ater can run off.
3.All u tens ils are st acked secu rely and can not ti po ver.
4.All u tens ils are pl aced in t heway t hat the spray arms can rotat efreel y d ur ingw ashing.
Ve rysm all it em ss houldn otb ewashe din the di shwasher as they c ould ea sily fall out of the basket.
To pre ven twa ter drip pingfr omt he uppe r ba sket into the lower basket, we rec omme nd tha tyou
empty the lower ba sk etfir stan dthe nthe upp erba sket.

Th eu pper bas ket isde sign edt oho ldm ore delic ate
and li ght erd ishware s uch as gl ass es, coffee and
teacups andsaucers, aswellasplates,small bowls
andshallowpans (as long astheyarenot toodirty).
Positionthedishes andco okw aresothatthey will
notgetmovedbythespray ofwater.
We sug ges t tha t yo u pl ace large i tem s a nd t h em ost
difficulttocleanitemsaretobe placedinto thelower
basket : su cha sp ots, pans, lids, serving dishes and
bowls, as shown i n t h e f igure be low. I t i s pref er ab l e to
pla c e s er vi n g d i shes a nd lids o n t he s i de of t h e ra cks
in orde rto a vo idbl ocking t he ro tati on of the top spra y
arm.
Pots,servingbowls,etc,mustalwaysbeplacedtopdown.
Dee p po ts should be sl ante d to allow water t o fl ow out.
Ple ase be r emin ded that:
T heB ottomB as k etf eatur es foldi ng sp i kes so tha t la rge ror mo re po ts a nd p ans can be l oade d.
Foldin g Spikes of Lower Basket
Fo rbetter stacki ng of pots and pa ns,
the spi kesc anb ef olded do wn as
sho w in the p ict ure rig ht.
Folding back the cup shelives
Fo r bett er s tack ing ofpo ts and p ans,
th e sp ikes can be f olded dow n a s
showin the pic t u re ri gh t.
Cutleryshouldbe placed inthecutlery rackseparately
f rom each oth er i n th e ap propr iate pos ition s, a ndd o
m ake sure th eute nsilsd o not nest together,th isma y
causebadperformance.
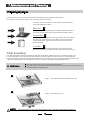
Adjusting the Upper Basket
The h eig htof t he upper ba sket can be adjus tedi nord ert o
create mor esp ace for large uten sils b oth for the upp er
/lower b asket. The height o f t he upp er ba sketca nb e
adjusted by l iftu pt he bask etf or the upper posi tion, and up
press the hand let o lowe rthe upper basket, s ee the pict ure
bel ow:

Turning On the ApplianceTurning On the Appliance
Starting a cycle wash
Draw out the lower and upper basket, load the dishes and push them back.
It is commended to load the lower basket first, then the upper one (see the section entitled
Loading the Dishwasher ).
Pour in the detergent (see the section entitled Salt, Detergent and Rinse Aid ).
Insert the plug into the socket. The power supply is 220-240 VAC /50 HZ, the specification
of the socket is 10A 250VAC. Make sure that the water supply is turned on to full pressure.
Open the door, press the ON/OFF Button, and the display will turn on.
Press the program Button to selected your desired program.
If a program is selected, the response light will light. Then close the door, the dishwasher begins
to start.
1
2
3
4
5
6.Starting a washing program6.Starting a washing program
1111
NOTE:NOTE:
*EN 5 0242 : This programme is the test cycle. The information for comparability test
in accordance with EN 50242, as follows:
Capacity: 14 setting
Position Upper basket: upper wheels on rails
Rinse aid setting: 6
Pl:0.49w; Po:0.45w.
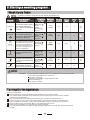
Wash Cycle TableWash Cycle Table
NOTE:NOTE:
Means: need to fill rinse into the Rinse-Aid Dispenser.
( )
Detergent
pre/main
Detergent
pre/main
Cycle Selection
Information
Cycle Selection
Information
ECO
ProgramProgram
Intensive
Normal
(*EN 5 0242)
Running
time(min)
Running
time(min)
Water
(L)
Water
(L)
Energy
(Kwh)
Energy
(Kwh)
Rinse
Aid
Rinse
Aid
(or3in1)
5/30g
Rapid
Pre-wash(50 )
Wash (65 )
Rinse
Rinse
Rinse(65 )
Drying
Pre-wash( 45 )
Wash (55 )
Rinse
Rinse (65 )
Drying
Pre-wash
Wash (50 )
Rinse(65 )
Drying
Wash (40 )
Rinse
Rinse (45 )
185
175
175
40
1.3
0.93
1.6
0.6
17
14
10
10
Description
of Cycle
Description
of Cycle
1Hour
Pre-wash(50 )
Wash(60 )
Rinse (60 )
Drying
60
10
1.15
30g
Glass
Pre-wash
wash(45 )
Rinse
Rinse(60 )
Drying
115
0.87
14
(or3in1)
5/30g
(or3in1)
5/30g
5/30g
(or3in1)
5/30g
For normally soiled loads,
such as pots, plates,glasses
and lightly soiled pans.
For heaviest soiled crockery,
and normally soiled pots
pans dishes etc with dried
on soiling.
For lightly soiled loads that
do not need excellent drying
efficiency.
A shorter wash for lightly
soiled loads and quick wash.
For lightly soiled crockery
and glass
This is standard programme,
it is suitable to clean normally
soiled tableware and it is the
most efficient programme in
terms of its combined energy
and water consumption for
that type of tableware.

W h en t h e workin g c ycle h as fini s hed, the bu z zer o f t he di s hw a she r wi ll s o u nd f or 8 sec o n d s , th en s top. Tu rn o ff
t he a ppli ance usi ng th eO N/O FFb utt on,sh ut o ff th ewa te rs upp ly and op ent he d oor of t he di shwashe r.
Wait for a f ewmi nutes b ef or e unlo adin gth edi shwashe rto a voidha ndlin gth edi shes and ut ensils wh ile th ey
are still h ot a ndm ore susc eptible tobr eak age. The ywi llal sod ry bet ter.
SwitchOfftheDishwasher
The p ro graml igh tis on but i sn otblin king, only in th is case the programm eh ase nded .
On/Off1.Sw itch off the dishwa sher by p re ssing the But to n.
2.Turnoffthewatertap!
Openthedoorcarefully.
Hot di shes are sensi tive to kn ocks.The di shes shou ld therefor eb ea llowed to cool down around 15 minut es
beforeremovingfrom the appliance.
Open t hed ishwasher's door, l eave it aj arand wai ta few minut es before r emoving t he dishes. In this way t hey
will be cooler and the drying will b eim proved.
Unloadingthedishwasher
Iti s normal that the dishw as her is wet in side.
Empty the low erba sketf irst a nd then t he up peron e.T hisw ill avoid water dripping from t he upper Basket on to
the dishes in the low er on e.
Wa sh th earm s in soa pya ndw arm wa tera ndu sea sof tbru sht o
cleanthejets.Replacethem afterrinsing themthoroughly.
When following this procedure from step 1 to step 3, the filter system will be removed;
when following it from Step 3 to Step 1, the filter system will be installed.
It is d an gero u s to ope n the door w hen w as hi ng , be c a use the hot water ma y s cald you .
Ifyou open thedoor dur ing a w ashcycle, t hemachinewill pause. The program lightw ill
stopblinking and thebuzzerwill moo ing every minuteunless youclose the door .After
you c lose t he doo r ,the m achin e will ke epo n w orki ngaf te r 10 sec on ds.
Premis e:
Acycl e that is under way c anon ly be mod ified if it ha s on ly been r unn ing for a s hor t t ime. O therw is e, the
de tergent m ay hav ea lread ybeen re lea sed, and the applian ce m ay have alre ady dr ain ed the w ash wa ter.
If t his is t he case,th edete rgent d isp enser mu stbe refil led( see the sec tio n ent itled " Load ing the
Det ergent " ).
Ope nt hedo or , the machin ewi llpa use, press th ep ro gram butt on more t han
3s t hen you can cha nge the pro gram t oth ede sired cycle setti ng (see the s ection en titled " St arting a w ash
cycle. . .").
1
2
Aforgotten dish can be added any time before the detergent cup opens.
Add forgotte n dishes.
Close the door, the dishwashe r will run
after 10 seconds.
After the spray arms stop working, you can open the door
completely.
2
3
Open th e door a little .
1
4
Ifyourmodelhas brokenremember function, the machinewillgoon tofinish theselected
program .
after the powe rcut

The filter prev ent sl arger remn ant sof food or o ther obj ects from gett ing inside th epu m.
Theresidues may blockthefilter, inthiscasethey must be removed.
The fi lter syst em c onsi sts ofa coar se fi lter, a flat (Main f ilter )
A n da mi c rofi lter( F i ne fi l ter).
Food and soil particles trapped inthisfilter arepulverizedby a
specia l jet ont he l owe r spr aya rma ndw ashedd own t od rain.
Lar g er i tem s, s uch as pie c esof bo ne s or gl ass, tha t could bl o ck
thedrainaretrappedin the coarse filter. To remove theitems
caugh t by t he filter,gen tly s que eze the t ap o nth et op of this
filterandliftout.
Thisfilter holdssoilandfood residuesinthe sumpareaand
preventsitfrom beingredepositonthe dishes during washcycle.
Main filter
1
Coarse filter
2
Fine filter
3
2
3
1
Filterassembly
The filter effi ciently re mo ves f ood part icle sfro mt he wa shw ate r, all owing it to be rec ycle dd ur ing t he cycl e.
F or bes t perform a n c e an d resul ts, t he fil ter m ust be clea n ed r eg ul ar l y. For th is reas on, it is a go od id ea to
r emo ve t hela rger foo dpa rticl estr app edin the filte raft ereach was hcyc leb yrin sing t he s em icirc ular f il ter an d
c up u nderru nnin gw at er.To re moveth ef ilt er de vic e,p ull t hec up ha ndle in t heu pwardd irection.
T he dish was her must ne ver beus ed w i tho ut the filt er s.
Imp ro per repl ac emen tof the f ilter may red uce the performanc elevel o fthe app lia nce
and damage dishesand utensils.
1
2
St ep 1 Turn t he fi lter i n ant i-clo ckwis ed irection,:
St ep 2 lif t the filter assy up:
When following this procedure from step 1 to step 2, the filter system will be removed;
when following it from Step 2 to Step 1, the filter system will be installed.

Th e cont ro l p ane l can be clea ned by u sing a lig htly dampen edc loth .
Aft ercle aning, m ake sure t o dry it tho roug hly.
For the ex t e rior, use a good app liance po li s h wax.
Neveru ses harp object s,sco uring pa ds o rh arsh c lea ners ona ny part o ft hedi shwasher.
ProtectAgainst Freezing
1.Cutoff the electricalpower tothedishwasher.
2.Turn of fth ewat ersu ppl yan ddisco nnect th ewat eri nl etpi pe from the water val ve.
3.Drain th ewater from t he inlet p ip e an dwat erva lve. (U se a p an to gathe r th ewat er)
4.Reconnect t he water inl etpi pe to the wate rval ve.
5.Remove the filter at the bottom o f the t ub and use a spong eto soak up wate rin t he s ump.
pl ease take frost pr ot ection meas ures o nt he di shwasher in wi nter. Ev ery fter washing c ycles,
pl ease oper ateas follow s
time a
:
Cleaning the Filter
CleaningThe Door
To c l ean th e c o ars efil t er and t he fi ne filt e r, us e a cl eanin g bru sh . Reas sem ble t hef il t er part s as shown in t h e figur es
on th e la st pa ge a nd r eins ert t he e ntire assem bly in the dis hwa sher,po sitio nin g i ti n i tss eat and pres sing dow nwar ds.
Whencleaning thefilters, don't knock on them.Otherwise, thefilters could b e
contorted andtheperformance ofthedishwashercouldbe decreased.
To clean thee dge around t hed oor, you sho uldu seo nly a sof twa rm, d am pcl oth.
To avoid pene trati ono f wa ter in tot hed oor l ock and elect rical componen ts,d o not
usea spr ay c le aner of any kind.
Never u sea spr ay c leaner t ocl ean t he d oor panel asi tm ay dam age the door loc k
and electricalcomponents.
Ab rasive ag entso r som epaper towels s hou ldnot b eu sed b ecau seo f th eri sko f
sc r a t c hi ng o r l eavin g spot s on t he s tain les s stee l sur fa ce.
Cleaning the SprayArms
I fyour dishwa shercannot w ork beca use of the ice,
pl ease con tact professi onal ser vice persons.
It i s ne cessary to cl e an th e sp r ay ar ms reg ular ly for har d
water chemicalswillclogthesprayarmjetsandbearings.
- Inspec t t he filters fo rblo ckinga ftere very tim et he dis hwa she rha sbe enused .
- By uns crewing the c oar se fi lter, you can rem ove the filter system .Re mov ea nyfoo dre mnants and
cleanthefilters underrunningwater.
Remarks:
Theentirefilterassemblyshouldbe cleanedonce a week.
Toremovethelowersprayarm,pull outthespray armupward.
To r e move th e u pper s p raya rm , h o ld the n u t, rotate th e arm
clockwise toremoveit.
Washthe ar ms in soap yan dwar mwat eran duse a soft br ush t o
clean the jets. Replace them af ter r insing the mth orough ly.

Itisrecommend thatyourun awashcycle with the
dish washer e mpt yan dthe nre mov eth eplu gf romt he
socket, t urn o ff th ewa ter supp ly and le ave the door of
t he applian c e sl ight ly open. T h is will h elp t h e door
sealsto lastlongerandprevent odoursfromforming
withinthe appliance.
If th e app liance must be move d, t ryt o keep it in the
verticalposition.Ifabsolutelynecessary,itcanbe
positi oned on its back.
Oneofthefactorsthatcauseodourstoforminthe
dishwasher is foo dth atr emain str app edin the s eals.
Periodic cle aning with a d amp sponge will p reve nt t his
f r o m occu rring.
Ensu reth ev oltage a ndf requenc yo f thep ower be ing corresp ond sto
t hose on t he ratin gplate . Only in sert the p lug into an elec trical so cke t whi ch is ea rthed
pr op erly. Ift heel ectrical socket t o whi ch thea pplianc emu st b ec onn ected is not
appropriatefortheplug, replacethe socket, ratherthan usingaadaptors orthelikeas
they couldcauseoverheating andburns.
Plea selook at th era ting label to know t he r at ing v olta ge a nd c on nect t he dishw asher to t he app ropr iate pow er s uppl y.
Use the r equ ired fuse 1 0 amp ,tim ed ela yf use or circui tbre ak err ecommended and provide separate circuit s ervi ng
only this appl ia nce.
Posi tion the ap plianc ei n the d esired lo cation.T he back sho uld r est ag ainst t hew all behin dit, and the side s,
along the adj acent ca bi netso rwa lls.T he d is hwash er is equippe dwi thwater supply a nd d rain hos es th atcan
be pos itioned either tot he righ tor the l eft s ides to facilit atep ro peri nstallati on.
O nce th e appl iancei s pos itione dfor levell in g,t hehei ghtof the dishw ashe r
m ay be a ltered v ia ad just ment o f the scre wing level o fthe fee t. In any case,
th eappl ia nce sho uld not b eincl ined more t han 2 .
For personal safety:
DO NOT USE AN EXTENSION CORD OR AN ADAPTER PLUG WITH THIS APPLIANCE.
DO NOT, UNDERANY CIRCUMSTANCES, CUTOR REMOVETHE EARTHING
CONNECTION FROM THE POWER CORD.
Befo re cl eaning or p erformi ng ma inten ance, alw ays
remove th eplug f romt he socket.
Tocleanthe exteriorandrubber parts ofthe dishwasher,
donot use solventsor abrasivecleaningproducts.
O nly u se a cloth with w arm soapy wate r.
To r em ove s pots ors t ain s f rom the sur f ace oft h e
in teri or, us ea clot hdamp ened wit hw at erana l ittle
v inega r, o ra clean ing pro duct mad es peci fical lyf or
dishwashers.
Remove the Plug
No Solve nts orAb ras ive Cl eanin g
Mov ing theApplia nce
Seals
Aft er ever ywash, turn off t hew ater sup ply t o the
applia nce and leave th e doo rs lightly op en sot ha t
m oisturea nd odour sa ren ot tra ppe din side.
After EveryWash
Whennot inUse foraLongTime
This appliance must be earthed. In the event of a malfunction or breakdown, earthing will reduce the risk of
electric shock by providing a path of least resistance for the electric current. This applia nce is equipped with a
cord having an equipment-earthing conductor and an earthing plug. The plug must be plugged into an
appropriate outlet that is installed and earthed in accordance with all local standards and requirements.

for personal safety:
DO NOT USE AN EXTENSION CORD OR AN ADAPTER PLUG WITH THIS APPLIANCE.
DO NOT, UNDER A NY CIRCUMSTANCES, CUT OR REMOVE THE
FROM THE POWER CORD.
EAR THING
CONNECTION
Improper connection of the equipment earthing conductor can result in the risk of an
electric shock.
Check with a qualified electrician or service representative if you are in doubt whether the
appliance is properly earthed.
Do not modify the plug provided with the appliance. If the plug does not fit properly to the
outlet, please have a qualified electrician to install a proper outlet.
Insert the drainhoseintoa drainpipe witha minimumdiameterof 40mm, orlet it runinto the sink,making sureto
avoid bendi ngo rcri mpi ngit .T he to pof the ho semus t be les s th an10 00 mm.
Ah ose t hat a tta ches to a sin k spray c anb urs ti fi t is in stalled o n the sa mew ate r line as thed ishwash er. If your si nk
has on e,it is re com mended that the hose be d isco nne cted an dthe hole plu gge d.
Pull The safety supply hoses completely out from storage compartment located at rear of dishwasher.
Turn water full y on before s tarting the dishwasher.
1
T ighter the screws of the safety supply hose to the faucet with thread 3/4inch.
Th e sa fe ty supply h ose cons ists oft he doubl e wa lls.T he hose 's sy ste mguaran tees i ts i ntervent ion b yb lock ing t he
flow of wate rin case of thes upply ho seb reaki nga nd whe nthe air spa ceb et we ent hes upply hose i tself a nd the ou te r
corruga tedhos e is fullo fwat er.
Turn off the water.
Unscrew the safety supply hose from the faucet.
2
1
2
3
Theappliancemustbeconnectedtothewatermainsusingnewhose-sets.
The o ld hose- sets sho uld n ot b ere used.
Water pressure mustb e be tween0 ,04 MPa and 1 MPa. If t he pressu re is below the
minimumconsultourServiceDepartmentforadvice.
Connec tth e cold water s uppl yho seto at hread ed 3 /4(i nch) c on nect oran dm ake sure t hat i tis fastened tight lyin pl ace.
Ifthewater pipesare newor have not been usedfor an extended period oftime,letthe water runto makesurethat the
water is cle ara nd fre eof i mp uritie s.If t his precauti onis not taken, t here isa ri sk t hatt hew ater inle t can get blocked
and dam a g e the ap pl i ance.

Thefollowingthingsshould bechecked beforestarting thedishwasher.
The contentof this manual is very he lpf ulto the u sers.
After installation, please make sure to keep this manual.
1
Thedishwasher is leveland fixed properly
2
T he i nlet va lve is ope n
3
There is aleakage at theconnectionsof theconducts
4
Thewiresaretightlyconnected
5
The poweris switched on
6
The i nlet and dr ain hos es are knott ed
7
Allpackingmaterialsandprintingsshouldbe taken out fromthe dishwasher
ExtensionHose
Ifyou needa drainhoseextension,make sure tousea similar drain hose.
It mu stb e no lon ger t han 4 met res ;otherw ise the c leaning effe ctof t he dishw as her coul d be reduced .
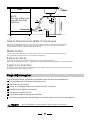
Wa t e r O u t l e t
Connect the wate rd rain h os e.Th edr ainh ose mu stbe cor rect lyfit tedt o avoi dw ate r lea ks.
Ensur ethat th ew ater dra inh ose i sno tkin ked or s quashed .
I f the s i nk is 1000 h igh er f rom t he fl oor, the exc ess w a ter in hoses ca nno t b e drai ne d directl y
into the sink.Itwillbe necessary todrainexcesswaterfromhosesintoabo wlorsuitable
conta ine r that is held outsi de and lower th ant he s ink.
How toDrain ExcessWaterFromHoses
Syphon Connection
Th e w ast e connec ti on must b e at a height l e s s than 100 0 mm (maxi mu m) fr om t hebo ttom o f t he d i s h.
The w at erdr ain h ose sho uld bef ixed .
A
Counter
Front
Drain pipe
NOTE
The top of the hose
must beless than
1000mm.
B
φ 40m m
Page is loading ...
Page is loading ...
Page is loading ...
Page is loading ...
Page is loading ...
Page is loading ...
Page is loading ...
-
 1
1
-
 2
2
-
 3
3
-
 4
4
-
 5
5
-
 6
6
-
 7
7
-
 8
8
-
 9
9
-
 10
10
-
 11
11
-
 12
12
-
 13
13
-
 14
14
-
 15
15
-
 16
16
-
 17
17
-
 18
18
-
 19
19
-
 20
20
-
 21
21
-
 22
22
-
 23
23
-
 24
24
-
 25
25
-
 26
26
-
 27
27


Ask a question and I''ll find the answer in the document
Finding information in a document is now easier with AI
Related papers
Other documents
-
Brandt VH1472J User manual
-
Becken MAQ LAVAR LOICA DWD147 ANDAMAN IX Owner's manual
-
White-Westinghouse WDFC12JGCWD Owner's manual
-
-
Groupe Brandt DFH14102W Owner's manual
-
Whirlpool ADP 590 IX User guide
-
-
Campomatic DW909E DW909XE Owner's manual
-
Elba EDW-B1461 Owner's manual
-
Daewoo DDW-M1215 User manual