Page is loading ...

220/240 and 100 VAC Models
©2001 Vita-Mix Corporation.No part of this publication may be reproduced or transmitted in any form or
by any means, electronic or mechanical, including photocopy, recording or any information storage and retrieval system
without the written permission of the Vita-Mix Corporation.
VITA-MIX
®
CORPORATION
International Foodservice Division
8615 Usher Road, Cleveland, Ohio 44138-2103 USA
Printed in U.S.A
XBS011 05/01
Touch and Go
TM
Blending Station
®
High Performance Commercial Blender
Owner’s Manual
Read And Save These Instructions
INTERNATIONAL
FOODSERVICE
Blending Station
®
On-Counter:
Height of unit closed: 54.56 cm • Shipping weight: 9.534 kg
Dimensions 54.56 cm H x 23.45 cm W x 25.86 cm D
Blending Station In-Counter:
Height of unit above counter: 44.45 cm closed
Depth of unit below counter: 14.4 cm • Shipping Weight: 8.172 kg
Dimensions: 45.03 cm H x 23.45 cm W x 25.86 cm D
NOTE: For In-Counter Installation refer to pages 8-10.
Power Requirements:
Volts: 220/240 VAC, 50 or 60 Hz, 1073-1178 Watts
100 VAC, 60 Hz, 900 Watts (Japan)
Warranty Information:
Call or check with your local distributor for details of any available warranty.
Provisions of any warranty are void if your Touch and Go
TM
Blending
Station
®
has been subjected to obvious abuse, negligence, accident,
alteration, or failure to follow operating instructions, or product exposure
to abnormal or extreme conditions. Cosmetic changes such as discoloration
of parts of the product in the hands of the user or the effects of the use of
abrasive cleaners will not be warranted or considered defects. The cleaning
or removal of food products along with any damage caused by allowing
them to build-up is not covered by any warranty. Improper installation of
the in-counter model is not covered by this warranty. Also a warranty is void
if the Blending Station is put into a sound reduction chamber or otherwise
prevented from receiving proper cooling. In the event your Vita-Mix
®
appliance
needs service or repair, please call Vita-Mix Service at
+
1(440) 235-5494 for a
local distributor. In Latin America call
+
1(440) 235-0214 for a local distibutor.
S
pecifications

13. Always operate with the lid in place.
14. WARNING: When processing hot liquids:
• The 2-part latching lid must be securely in place. This allows steam
to escape naturally, and will prevent the lid from coming off when
the machine is turned on.
• Use caution with hot liquids. Spraying from under the lid plug can
occur, or escaping steam may cause scalding.
• Do not process hot liquids with the non-latching lid.
15. Display window area will scratch when contacted with a scouring pad or
sharp object. Use a soft cloth to wipe the control panel area clean.
16. The optional interlock switch on some 220/240 VAC Blending Stations
®
will prevent the machine from running unless the cover door is
completely closed.
17. The Blending Station cannot be cleaned with a water jet.
SAVE THESE INSTRUCTIONS
2 3
1. Read all instructions.
2. To protect against risk of electrical shock, do not put motor base in
water or other liquid.
3. Close adult supervision is necessary when appliance is used by or
near children.
4. Unplug the power cord from the wall outlet when the Touch and Go
TM
Blending Station
®
is not in use, before putting on or taking off parts, and
before cleaning other than washing the container.
5. Never contact moving parts.
6. Do not operate any appliance with a damaged cord or plug or after
the appliance malfunctions or is dropped or damaged in any manner.
For information on a local distributor call Vita-Mix Service at
+
1
(
440
)
235-5494.For Latin America call
+
1
(
440
)
235-0214.
7. The use of attachments not recommended or sold by Vita-Mix
Corporation may cause fire, shock, or injury.
8. Do not use outdoors.
9. Do not let the power cord hang over edge of table or counter,
or touch hot surfaces.
10. Keep hands and utensils out of container while motor is running
to prevent the possibility of severe personal injury and/or damage
to the Blending Station. Arubber scraper may be used, but only
when the Blending Station is not running.
11. CAUTION:Blade is sharp.Handle carefully.
•Never try to remove blade while container is sitting on the motor base.
• Do not operate with loose, knicked or damaged blades.
•To reduce the risk of personal injury, never place blade assembly on
motor base without blender container properly attached.
12. The maximum normal load is equivalent to the liters listed on the
container, 2 L, 1.5 L, 1.25 Land substantially less with thick mixtures.
IMPORTANT SAFEGUARDS

Touch and Go
TM
Blending Station
®
ON/OFF switch - Located on the side of the Motor Base the ON/OFF
switch controls the power to the machine. With the machine plugged in,
switch the machine to ON to ready the machine for blending.
START/STOP button - Pressing START/STOP once starts and runs the
machine and turns the blades. Press the START/STOP button again to
stop the machine and the blades. (NOTE: Pressing one of the PRE-SET
PROGRAM buttons, while the motor is running, will also stop the machine.)
SPEED CONTROL button - Press the ▲ button to gradually increase the
speed of the blades in increments of 1%, up to 100%. Press the ▼ button
to gradually decrease the speed of the blades in increments of 1%, down
to 7%. SPEED CONTROLis used to set the blending speed of the PULSE
buttons (See Instructions, pg.15) and the START/STOP button (See
Instructions, pg. 15). NOTE: These settings will reset if the power is shut off.
PRE-SET PROGRAM buttons - These buttons, numbered 1 thru 6, are
pre-programmed blending cycles designed for the most commonly made
drinks. Depending on the viscosity of the drink you are creating, pressing
one of the six PRE-SET PROGRAM buttons will run the machine for a
full cycle. The machine will stop by itself when the cycle is complete.
Acycle varies in speed and length, see the Instructions on page 14 for
a complete description of the range of each PRE-SET button.
Start/Stop
Speed Control
Six Factory Pre-Set
Programs
Owner Controls
High/Low Pulse
Display Window
C
ontrol Panel
Due to the difference of recipes, your results may vary.
See page 6 for information on Custom Programming these six buttons.
DISPLAY WINDOW-This area depending on what button is pressed,
displays a variety of operation messages. A‘Ready’
message appears when there is power to the machine.
OWNER CONTROLS- Acontrol panel accessible by pressing the Vita-Mix logo.
• Press once to reveal the mode message. Press button

6 7
4. Within 10 seconds the SIX PRE-SET
buttons will be re-programmed and the
DISPLAY WINDOW will read ‘Saved’then
‘Ready’. If nothing happens when the
programming chip is fully inserted, turn the
chip in the opposite direction and try again.
3. Remove the programming chip and return
it to the original package.
5. Press one of the six PRE-SET buttons to
reveal, in the DISPLAY WINDOW, the
name of the program/drink.
6. Carefully place the Blending Station motor
back into the hole in the counter.
NOTE: If for any reason the programmed
times are incorrect, they can be reset to
the original factory settings following the
instructions below.
Resetting the PRE-SET buttons to the original
factory settings
WARNING: Reverting your PRE-SET PROGRAM buttons to the
original factory setting, will erase any programming installed with a
custom program chip.
1. Enter the OWNER CONTROLS (press the Vita-Mix Logo) and press the
PRE-SET buttons 1 and 6 when the DISPLAY WINDOW says ‘Mode’.
2. Press the Vita-Mix Logo two more times to reveal the instructions on
resetting the PRE-SET buttons.
3. Press and hold the #4 button until the DISPLAY WINDOW reads
‘Restoring Please Wait’. The PRE-SET buttons are now reset to the
original factory settings.

IN-COUNTER
HOLE
Cut
14 cm wide x
19 cm deep
19 cm
deep
14 cm wide
30.48 cm 30.48 cm
Additional Unit
(if applicable)
Additional Unit
(if applicable)
24.3 cm
44.45 cm
14.4 cm
15.2 cm
54.7 cm
31.75 cm
I
n-Counter Installation
8 9
Preparing the counter area:
• Before cutting holes, make sure that there is adequate clearance under
the counter for the motor. The motor will extend about 14.4 cm below the
counter but it is best to allow at least 25.4 cm from the under-counter to
shelves or any other equipment under the counter. Also, when using the
removable cover design, the back of the hole must be at least 15.2 cm
from any wall to allow for cover door clearance.
• An extra 16.5 cm of open space, above the top of the cover will be needed
for placement and removal of the In-Counter machine and for custom
programming the SIX PRE-SET Buttons.
• If installing unit into a closed cabinet, use a 10.1 cm diameter flexible vinyl
duct (dryer hose) to vent exhaust. Attach the vinyl duct to the bottom of
your In-Counter Touch and Go
TM
Blending Station
®
by forcing the end of
the hose over the exhaust baffle of the unit. Run the vinyl duct out of the
cabinet for proper ventilation. Do not vent hose into a wall, ceiling, or a
concealed space of a building. Multiple units should not vent to a common
manifold unit but to separate places. If running your Blending Station
causes a suction on your cabinet door, place a spacer in the door frame
to allow proper intake of air.
Do not use hose clamps or equivalent to attach exhaust hose
on machine.
• When cutting holes for placement of multiple In-Counter units, position
the edge of the machines at least 30.48 cm apart to ensure quick cleaning
and proper venting between machines.
• In-Counter installation also requires you to have at least one outlet per
machine under the counter, available within six feet of the Blending
Station. Consult an electrician for proper electrical needs.
• The In-Counter Blending Station also requires a foam gasket (provided
in the machine’s original package) to be placed between the machine
and the counter. See page 10 for instructions.
Electrical requirements:
• Volts: 220/240 VAC • 50 or 60 Hz. • 1073-1178 Watts
• Volts: 100 VAC, 60 Hz., 900 Watts (Japan)
Blending Station dimensions:
• 44.45 cm high with lid closed
• 54.7 cm high with lid open
• Case depth: 31.75 cm with handle
• Case width: 24.3 cm
• Depth below counter: 14.4 cm
• Recommended distance between machines: 30.48 cm from the edge of
each machine or as far apart as possible.

THREE PRONG
ADAPTERS ARE NOT TO
BE USED IN CANADA.
10 11
lending Tips
1. If your recipe freezes up, try reducing the amount of ice. Compared
to other blenders, you do not need as much ice to make an equally
frozen drink in a Touch and Go
TM
Blending Station.
®
2. Place liquids and soft foods in your container first. Hard items and ice
should be placed last.
3. Whole, hard or frozen ingredients should be small. Solid frozen fruit is
extremely difficult to blend. For best results use semi-frozen fruit. Using
same size batches of semi-frozen fruit and ice will keep your drinks
consistent. If you notice chunks, reevaluate the batch size.
4. When creating recipes, always allow for enough liquid to ease the
blending process. For recipes with minimal liquid, use the SPEED
CONTROLbuttons to run the machine on its lowest settings until it is
processing smoothly. Finish blending by using one of the PRE-SET
PROGRAMS that best matches the drinks viscosity.
Maintenance Tips:
• NEVER bang the container against a surface to loosen the ingredients.
Remove the container from the base and use a rubber spatula to remove
thick mixtures from the bottom of your container.
• NEVER shake or rattle a container in use while seated on the motor base.
• NEVER remove the container before the machine has come to a
complete shop.
• NEVER start the motor before the container is in place.
The instructions appearing in this Owner’s Manual cannot cover
every possible condition and situation that may occur.Common
sense and caution must be practiced when operating and
maintaining any appliance.
B
Gasket Installation Instructions:
1. Follow the instructions on page 8 on preparing the counter area for
the installation of your In-Counter Touch and Go
TM
Blending Station
®
.
Also, use the Template Sheet (provided in your machine’s original package)
to assist you in the placement and ventilation of your machine.
2. Peel off the white paper on the back of the black In-Counter Gasket
Foam Pad to reveal the adhesive backing.
3. Place adhesive side down onto the counter being careful to match up
the gasket hole with the hole you have cut in the counter.
4. When you have matched up the holes, firmly press down on all sides
so that the gasket is firmly attached.
5. Fold flap inside the hole down towards the ground.
6. Insert your Touch and Go Blending Station inside the hole, making sure
the flap is down snug against the machine.
7. Do not secure the machine to counter with bonding materials.
This gasket was designed to protect your machine from water
damage and to reduce noise. Failure to properly install this gasket
could result in moisture damage.
I
n-Counter Gasket
FLAP
Fold down inside hole after gasket
is firmly attached to the counter.
Front
Back
GASKET HOLE
Match up with hole cut in counter.

Tamper
Two-part Lid
1.5 Liter Polycarbonate container
The two part lid is easy to clean and easy to put on,
take off and seal.
• To remove fully latched lid, squeeze tabs
together on both sides of the container, pull
upward and off.
• Twist the center lid plug to fasten or remove.
NOTE:To make new lids easier to insert and remove, rub a light coating of
cooking oil around bottom where it seals.Place it in container for several
minutes, remove and lightly wipe oil off lid.
Two-part Lid
2 Liter Polycarbonate container
The two part lid is easy to clean and easy
to put on and take off. (Note: Brand new
lids are a little stiff. This is temporary.)
• The lid has a continuous rim which
latches inside the container tabs.
Push one side of the rim under one
tab, and with the heel of your hands
push down, over the opposite tab,
to snap lid into position.
• To remove lid, place hands around
the lid, pressing thumbs above
one of the container tabs. Push
in and lift off.
• Twist the center lid plug to fasten
or remove.
One Piece Lid (optional)
2 Liter Polycarbonate container
The one piece lid is easy to clean and easy to put
on and take off.
(Note: Brand new lids are a little stiff. This is temporary.)
• There is no latch on this lid.
• Add ingredients through port on top.
CAUTION: Do not use non-latching lid when processing hot ingredients.
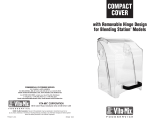
Cover with Removable Hinge Design
Cover Door:
• The cover door can be removed by opening it until the curved bottom
of the cover and the back cover form a 90˚ angle. Then lift straight up.
(Figure D)
• To reinstall the cover door, align the hinge opening with the hinge on
the back cover and slide the two together.
Back Cover:
• The back cover can be removed by loosening the two screws in the
back of the machine. Then lightly tap or pull the back cover toward
the front of the machine until it loosens from the grooves on the base.
(Figure E)
• To reinstall the back cover slide on to the base until latched in place.
Reinstall screws.
• The back cover should only be removed if in need of replacement.
CUPS
Figure A
Figure C
Figure D
Figure E
Back Cover
Back Cover
Figure B
12 13
To secure lid plug, rotate it
so one tab locks between the
stops on top of rubber lid.
Always latch lid when
processing hot liquids.
Press in
above
container
tab to
remove
lid
Rim
Container
Tab
L
id Assembly
90˚
Cover Door

4. Select desired programmed setting by pressing any of the Pre-Set
Buttons 1 through 6. The machine will begin immediately to cycle
through the selected program, and turn off when the program is complete.
Each button has a different pre-selected combination of speed and length
for blending.
NOTE: If you detect a change in the sound of the machine or if a hard or
foreign object comes into contact with the blades, do not serve the drink.
Inspect your blade assembly for loose, knicked or missing parts. If parts are
loose, missing or knicked replace with a new blade assembly. (See page 17).
5. Once one of the six PROGRAMMED buttons is pushed the machine will
start and stop automatically. By pressing another PROGRAMMED button
or the START/STOP button, the machine will stop the blending cycle.
6. During any of the blending cycles, by pressing the PULSE (H) button the
speed of the blending can increase up to 100% of the motor speed. By
pressing the PULSE (L) button during a blending cycle the speed of the
motor can be decreased down to 7%. Once released the motor speed
will revert back to the blending cycle of the PRE-SET PROGRAM.
NOTE:The PULSE high(H) and low(L) speed is set by using the SPEED
CONTROLbuttons. To set, while pressing and holding a PULSE button,
press the SPEED CONTROL▲ or ▼ button until the desired motor speed
is reached. The PULSE speed will remain at this setting until changed again
with the SPEED CONTROL buttons.
7. When the cycle is complete the blender stops, wait until blade comes
to a complete stop before removing the lid and/or container from the
motor base.
8. Remove the container, pour, garnish and serve the drink.
How to operate your Blending Station
®
using the
Start/Stop and Speed Control button.
Although using the PRE-SET PROGRAMMED buttons is highly recommended
for the best drink, occasionally a drink may need special attention. By using
the START/STOP button and the SPEED CONTROLbutton you can manually
control the speed of the Blending Station.
How to operate your Blending Station
®
using the
six Pre-Set Programmed buttons.
The following is the basic factory settings of the six PRE-SET buttons
(your machines PRE-SET buttons may be different if your Blending Station
was programmed specifically for your business).
• Button 1: (:15) Blends thin drinks with just juice and ice.This program
will quickly ramp to a high blending speed for 15 seconds.
• Button 2: (:20) Blends light coffee drinks.Button 2 will ramp the blending
speed to medium for six seconds and ramp up to high for 14 seconds.
• Button 3: (:32) Creates a specialty drink with a thick viscosity. Button 3
runs at a medium speed, ramps down, then increases to high speed,
and finishes the drink at medium speed.
• Button 4: (:34)This cycle is good for ice cream and regular coffee drinks
that need a little longer blending. Button 4 increases to medium speed
for four seconds then ramps up slowly to a high speed for 14 seconds.
•Button 5: (1:35) Blend a regular smoothie for an extended cycle.Button
5 runs for 45 seconds on a medium speed and then increases
in speed and runs on high for 50 seconds.
•Button 6:(:25) Blend thick frozen fruits & hard ingredients for a thick
but consistent smoothie. Button 6 gradually ramps up the blending
speed, maintaining intermediate speeds and gradually progressing
until it reaches full speed.
1. Place liquids and soft foods in the machines container first, solid items
and ice last. Prepare food by cutting or breaking into 1-3 inch pieces.
Frozen fruit, especially, should be as small as practical. Thawed or
partially thawed fruit is recommended. We recommend PRE-SETbutton
5 or 6 for heavy-duty blending.
2. Set the container on the motor base by aligning it over the centering pad
anchored to the base. (Motor must be completely stopped before posi-
tioning container). Containers are not to be used for hard, dry
materials. Avoid running the Blending Station with container empty.
3. Always use a lid when blending. If blending hot ingredients, the lid must be
securely in place.
14 15
I
nstructions
CONTINUED ON PAGE 16

1. Follow steps one through three of ‘Using The Pre-Set Programmed
buttons’section on page 14.
2. The speed of the motor can be changed with:
3. The PULSE buttons can also be used to temporarily increase the motor
speed or decrease the motor speed. (See HIGH/LOW PULSE button
description on page 5.)
4. When done blending press the START/STOP button to stop the motor.
Wait until blade comes to a complete stop before removing the lid
and/or container from the motor base.
5. Remove the container from the motor base and serve the drink.
NOTE: On all units the built-in thermal sensor keeps track of how hot the
motor gets and will warn the user and eventually shut down the motor if the
motor is overheating. When overheated the display will instruct the user to
remove the container and run the machine until cool. This takes about a
minute. See page 23 “Cooling the motor” for complete instructions.
When overheating occurs, review your techniques and instructions. The
motor may be getting hot when your recipes are too thick. Consider adding
more liquid or consult Vita-Mix for further assistance.
Retainer Nut Removal
• The retainer nut is easily removed using a
15 cm screwdriver.* Turn container upside
down and insert screwdriver shaft between
the lobe and drive spline. Push the screwdriver
handle counterclockwise to loosen nut. Once
loosened, remove by hand.
• To replace, position retainer nut on top of
blade assembly and hand tighten. Then, using
the screwdriver, tighten clockwise until it
stops. If it is not tight enough, you will notice
increased container noise.
*For best results we
recommend using a
Retainer Nut Wrench
in place of a screwdriver.
To order ask for item #1222
Blade Agitator Assembly. Use caution when
handling the blade; it is sharp. When inserting the
blade assembly through the container bottom, grip
the blades with a soft cloth, align the flat sides of the
blade assembly with the flat sides of the container.
Place the retainer nut back on the inserted blade
assembly and tighten clockwise. Do not force. Do
not attempt to disassemble blade assembly.
Drive Spline. Mates with drive socket on the motor
base to turn the blade. NOTE: Removing and
replacing your container while the coupling is still
rotating will strip the drive spline “teeth”. (This part
is NOT removable.)
Retainer Nut. Must be snug. Use the available
retainer nut wrench for best results. (Refer to the
diagram below to remove or replace.)

Item# Part
#752 2 liter - Container without lid assembly or blade assembly
#755 2 liter - Lid plug
#756 2 liter - Container, blade assembly & lid assembly
#1191 2 liter - 2-piece lid assembly
#1192 2 liter - Lid only (no plug)
PLS145 2 liter - 1-piece non-latching rubber lid
#1159 1.5 liter - Lid plug
#15502 1.5 liter - Container only
#15506 1.5 liter - Container, blade & lid assembly
#15507 1.5 liter - 2-piece lid assembly
#18002 Back cover and cover door with removable hinge design
#18003 Cover door with removable hinge design
#18004 Back cover with removable hinge design
#791 Sound reducing centering pad
#802 Drive socket
#836 Heavy-duty retainer nut
#1151 Agitator assembly (ice blades)
#1222 Retainer nut wrench
KIT107 Metal Screws - (2) 3.5 mm x 8 mm
RBB161 In-Counter Gasket Foam Pad
NOTE: Blade Assembly, Drive Socket and Retainer Nut are compatible
on either the polycarbonate or stainless steel containers. Other
than the Drive Socket, Blade Assembly and Retainer Nut, this
unit is not user serviceable.
18 19
P
arts List

Container
1. To clean: Fill pitcher 1/4 full with warm (43˚C) water and add a couple
drops of dish soap.* Return container to motor base and firmly position
the two part lid. Run machine for 30 seconds. Empty container. Repeat
this step.
*NOTE: Polycarbonate container, cover and thermoplastic rubber lid
are dishwasher safe. However, to prolong the life of these parts, Vita-Mix
®
recommends using a low pH balance soap. For maximum container life,
do not use standard dishwasher soaps which contain a high pH balance.
2. Fill pitcher 3/4 full with warm (43˚C) water (do not add soap). Return
container to motor base and firmly position the two part lid. Run machine
for 30 seconds. Empty container.
3. If any solid residue remains, remove the blade agitator assembly (see
page 17) and wash all container parts in warm soapy water. Rinse and
drain. Reassemble before next step.
Do NOT soak the blade agitator assembly.
4. To sanitize: If all solid residue is gone after step 2 or after completion
of step 3, fill container 3/4 full with a sanitizing solution mix.** Return
container to motor base and firmly position the two part lid. Run machine
on HIGH for 30 seconds. Empty container.
5. Return container to motor base and run machine empty for an additional
5 seconds. Do not rinse after sanitizing.
**Recommended sanitizing solution: 1-1/2 teaspoons Chlorox
®
institutional
bleach in 2 liters water.
Important: Check your blades daily for loose,knicked or missing
parts. If you find something is loose,knicked or missing,replace
the blade assembly before use.Do not tighten hex-headed screw
(on top of blade assembly).If loose, replace blade assembly.
Care Note
Do not let mixtures, liquids and food products dry within the container. Rinse
throughout use. Drying product may lock around the blade and weaken/tear
the bearings seal when restarted. Do not place containers in the freezer.
Extremely low temperature combined with hot ingredients and/or the
immediate rapid action of the blade may crack the container.
Motor Base
1. Unplug the power cord.
2. Wash outside surface with a damp soft cloth or sponge, which has been
rinsed in a mild solution of liquid dish soap (Ivory Liquid
®
or equivalent)
in warm water. NEVER IMMERSE MOTOR BASE IN WATER OR
OTHER LIQUID.
3. Polish with a soft cloth.
Control Panel
Gently wash the front panel with a soft cloth and a low pH balance soap,
being careful not to scratch the Display Window.
NOTE: Be sure to wring excess water out of cloth or sponge when cleaning
around the controls, drive socket or any electrical part.
Lid
Separate the lid and plug, then wash in warm soapy water. Rinse clean
under running water and dry. Reassemble before use. (See pages 12 & 13).
Cover Door
The cover can be removed (See page 13) and cleaned by placing under
running water and washing with a soft cloth. Wipe dry and place back
on the base.
20 21
C
are and Cleaning

T
roubleshooting
22 23
Cooling the motor:
If the machine has overheated:
• The motor will stop and the message “MOTOR HAS
OVERHEATED REMOVE THE CONTAINER, THEN PRESS
START”, will scroll across the display window, while the words
“HOT SHUTDOWN” will remain in the display window alerting
you of the problem.
• The machine will not run until the container is removed and
the motor has cooled. Remove the container, shut the cover
door and press the START/STOP button, and run the machine
for two minutes.
• When the motor is cool “READY” will appear in the display
window.
If you cannot fix your machine with these suggestions, contact your dealer
or contact Vita-Mix International at +1(440) 235-5494 for a local distributor,
for Latin America call +1(440) 235-0214, or visit us at www.vitamix.com
THERMAL SENSOR FAIL-
URE
MOTOR HAS OVERHEATED
REMOVE..
READY
Top nine problems you can fix on your own:
1.Problem:
• Display Panel reads
Solution #1:
Turn the machine off and on again to reset
the programming
Solution #2:
Contact your dealer or local distributor.
2.Problem:
• loud noise from blender container
blade area
• container blades do not spin
• increased vibration
• leaking from bottom of container
Solution #1:
Broken or worn Drive Socket. Replace (Item
# 802). Instructions are included with part.
Solution #2:
Check blade assembly for loose, damaged
or knicked components and replace.
Solution #3:
Tighten retainer nut on the bottom of
the container
3.Problem:
• loud grinding noise from the blender
motor
Solution #1:
Due to some faulty motor bearings your
machine may need to be repaired. Contact
your dealer or local distributor.
5.Problem:
• machine starts then shuts off
Solution #1:
Check to make sure there is power to the
machine.
Solution #2:
Contact your dealer or local distributor.
6.Problem:
• Display Panel reads
Solution #1:
Let the machine cool down for an hour then
restart.
Solution #2:
Contact your dealer or local distributor if the
machine does not work after sitting at room
temperature for 24 hours.
4.Problem:
• Machine will not run
• Display screen does not say ‘READY’
Solution #1:
Double-check to make sure power cord is
firmly in power outlet.
Solution #2:
Check to make sure the ON/OFF switch is in
the ON position.
Solution #3:
Turn the ON/OFF switch to off, then on, to
reboot the electronics.
7.Problem:
• Machine is running irregular
• Display panel reads garbage
• “NO PROGRAM” is displayed when a
button is pushed
• Button pressed starts the wrong
program
• Machine starts by itself
• a specific program button is defective
• machine was turned off for a day,
week or month and turned on, there
was no power
• machine did not work right out of
the box
• machine works but no information
displayed on screen
• program buttons run the blender on
the same speed
Solution #1:
Turn the machine off and on again to reset
the programming
Solution #2
Reset the machine to its original factory
settings. (Follow the instructions on page 7)
Solution #3:
Try plugging the machine into a new outlet.
Solution #4:
Contact your dealer or local distributor.
8.Problem:
• Display panel reads
Solution #1:
Anew programming chip is needed. Contact
your dealer or local distributor.
9.Problem:
• Machine stops in the middle of its
blend cycle and resets; display panel
reads “VITA-MIX GENERAL
PROGRAM” then “READY”
Solution #1:
Plug the machine into its own power supply
Solution #2:
Make sure the machine is not running on a
long extension cord
MOTORLOCKED PROGRAM
TERMINATED
CORRUPT DATA

©2001 Vita-Mix Corporation.No part of this publication may be reproduced or transmitted in any form or
by any means, electronic or mechanical, including photocopy, recording or any information storage and retrieval system
without the written permission of the Vita-Mix Corporation.
VITA-MIX
®
CORPORATION
International Foodservice Division
8615 Usher Road, Cleveland, Ohio 44138-2103 USA
Printed in U.S.A
XBS011 05/01
Blending Station
®
On-Counter:
Height of unit closed: 54.56 cm • Shipping weight: 9.534 kg
Dimensions 54.56 cm H x 23.45 cm W x 25.86 cm D
Blending Station In-Counter:
Height of unit above counter: 44.45 cm closed
Depth of unit below counter: 14.4 cm • Shipping Weight: 8.172 kg
Dimensions: 45.03 cm H x 23.45 cm W x 25.86 cm D
NOTE: For In-Counter Installation refer to pages 8-10.
Power Requirements:
Volts: 220/240 VAC, 50 or 60 Hz, 1073-1178 Watts
100 VAC, 60 Hz, 900 Watts (Japan)
Warranty Information:
Call or check with your local distributor for details of any available warranty.
Provisions of any warranty are void if your Touch and Go
TM
Blending
Station
®
has been subjected to obvious abuse, negligence, accident,
alteration, or failure to follow operating instructions, or product exposure
to abnormal or extreme conditions. Cosmetic changes such as discoloration
of parts of the product in the hands of the user or the effects of the use of
abrasive cleaners will not be warranted or considered defects. The cleaning
or removal of food products along with any damage caused by allowing
them to build-up is not covered by any warranty. Improper installation of
the in-counter model is not covered by this warranty. Also a warranty is void
if the Blending Station is put into a sound reduction chamber or otherwise
prevented from receiving proper cooling. In the event your Vita-Mix
®
appliance
needs service or repair, please call Vita-Mix Service at
+
1(440) 235-5494 for a
local distributor. In Latin America call
+
1(440) 235-0214 for a local distibutor.
S
pecifications
/