"2/1-4
3/8"
3/8"
13-3/8"
8-1/4"
2"
12-1/2"
6-1/4"
"23/72-9
"4/1-4
3/8"
13-3/8"
Publish No: 31-41080
12″
4″
B.
A.
Printed in China PN: 261800313994
3/8″″ TO EDGE
CUT HOLE THROUGH REAR WALL FOR EXHAUST ADAPTOR
REAR WALL TEMPLATE
30
″ MINIMUM WIDTH REQUIRED
1
(
)
尺寸:770*505mm
NOTE: IT IS VERY IMPORTANT TO READ AND FOLLOW THE DIRECTIONS IN THE INSTALLATION
INSTRUCTIONS BEFORE PROCEEDING WITH THIS TOP CABINET TEMPLATE.
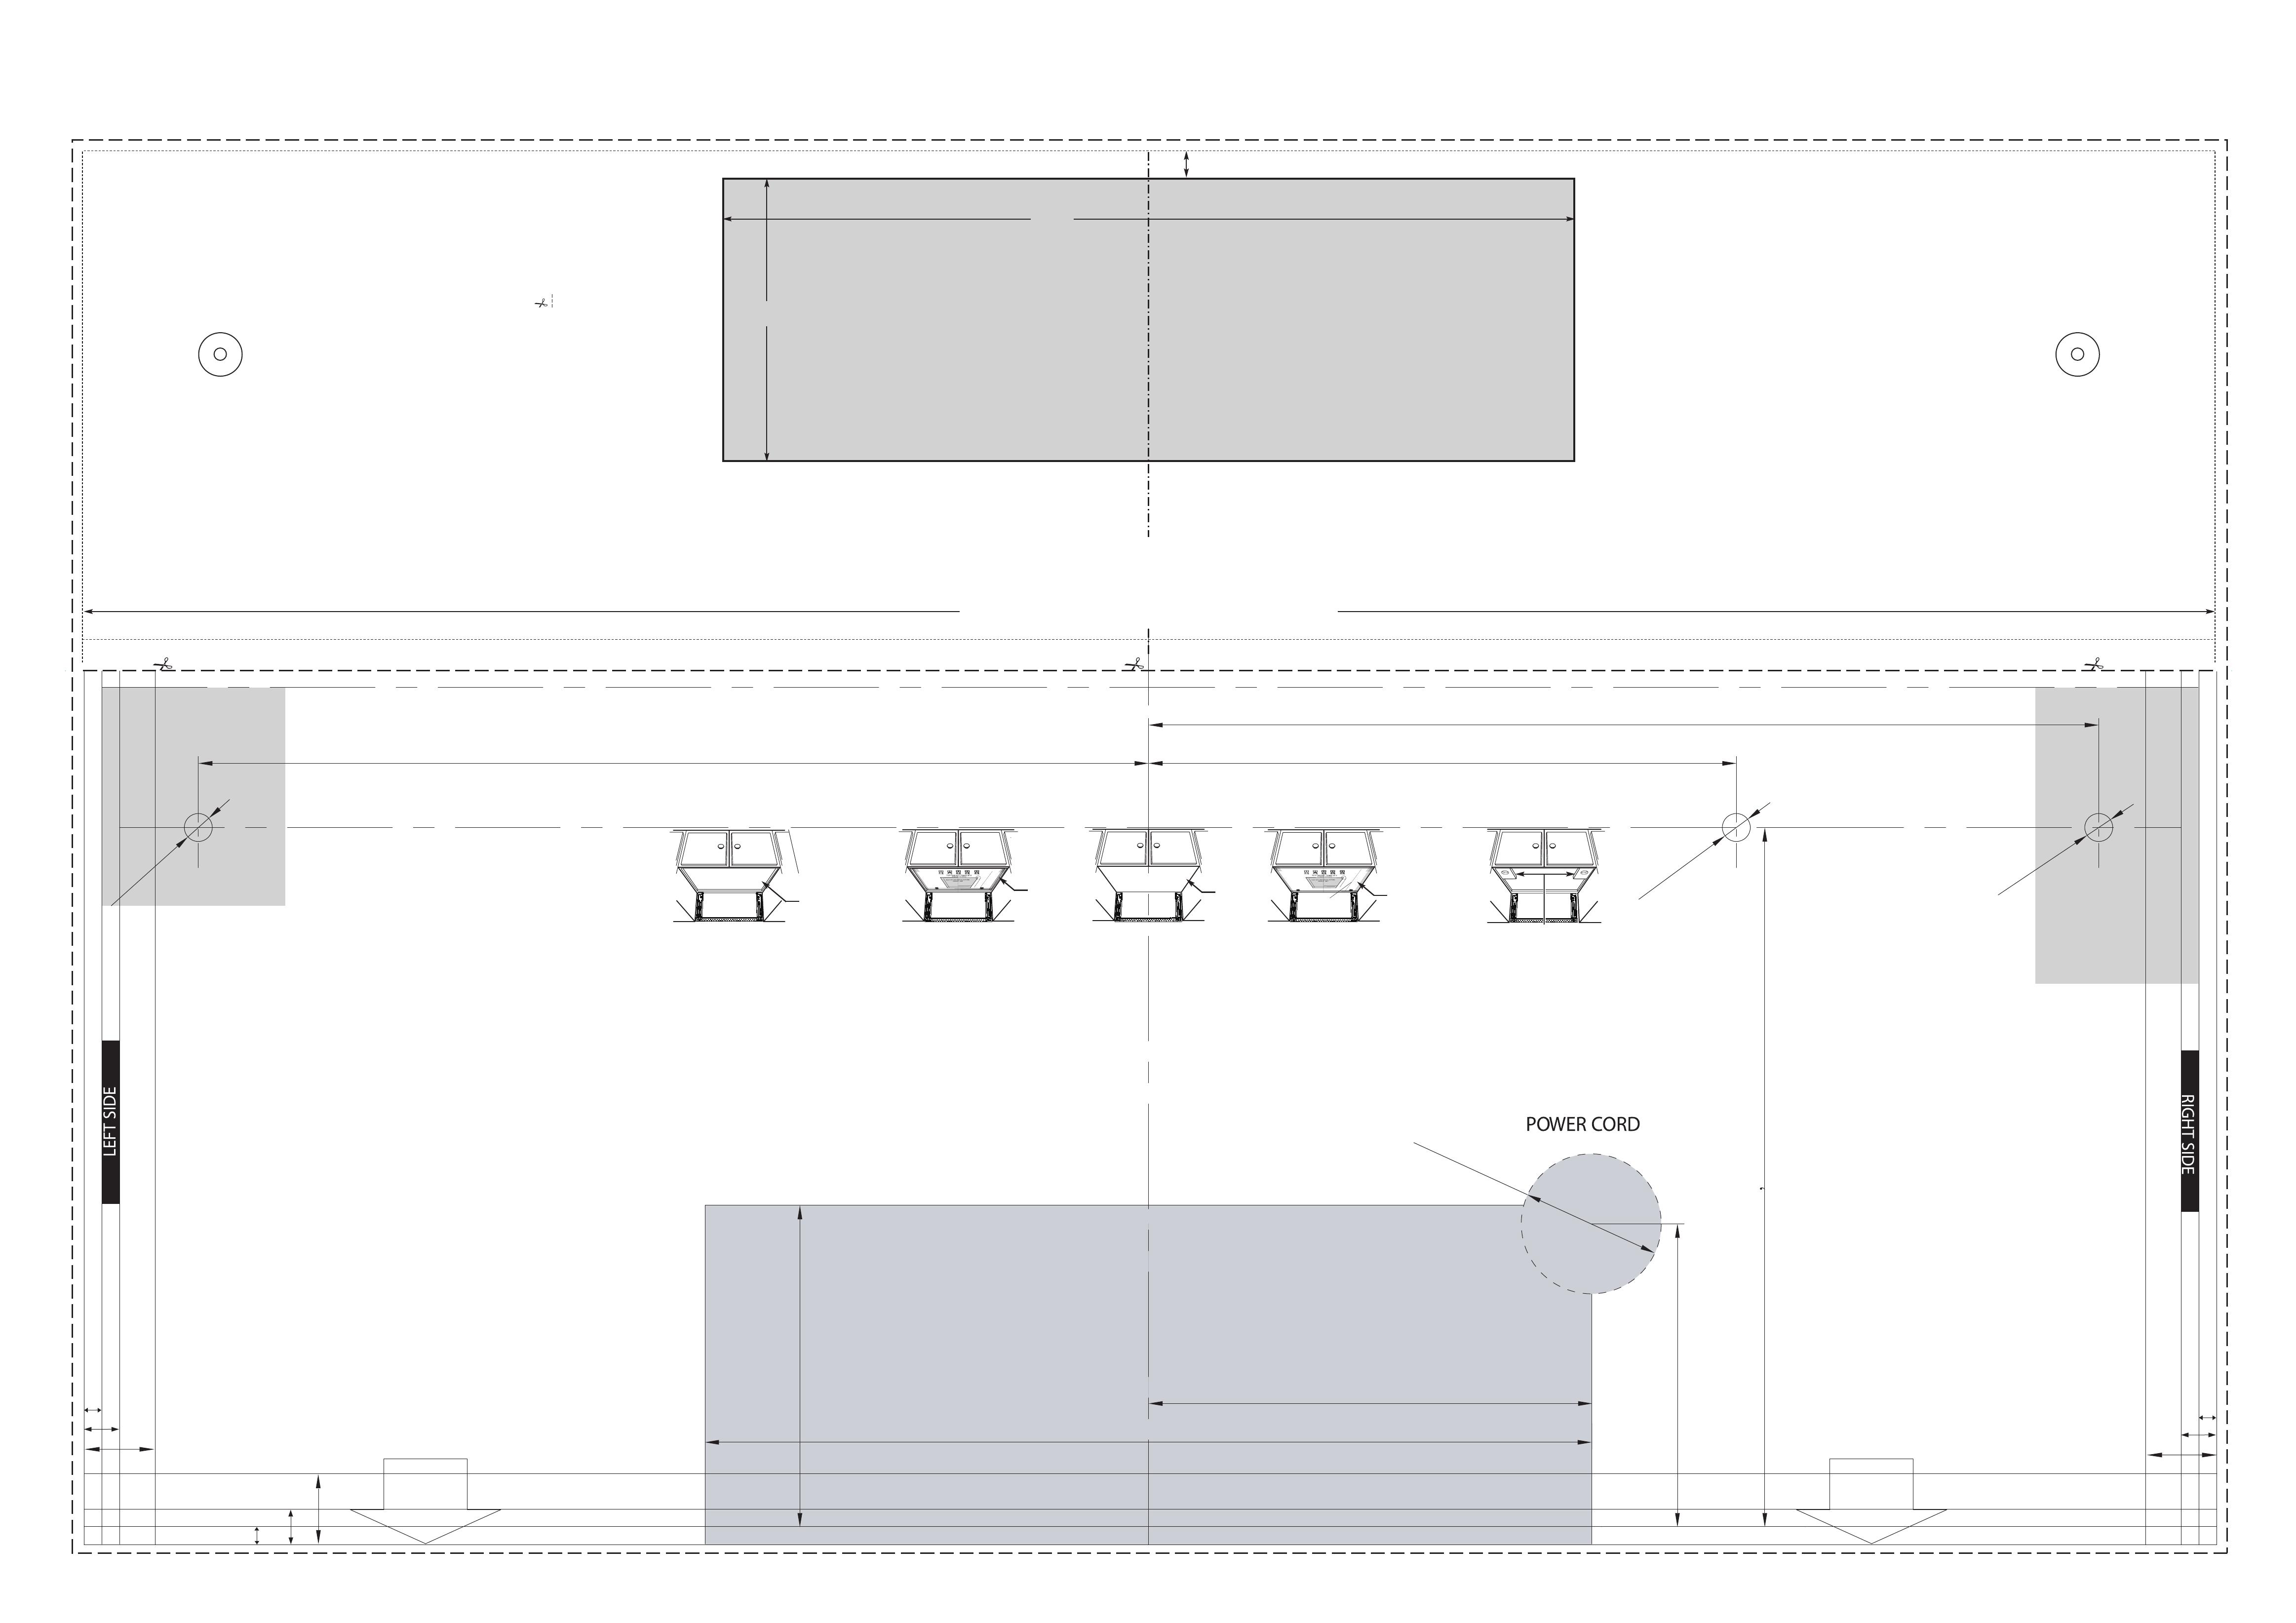
This template is used to locate the power cord clearance hole, cabinet mounting holes, and the vertical
exhaust cutout.
1. Determine if your cabinet has a recessed area (Fig. 1) or a smooth, flat bottom (Fig. 3). If smooth, tape
template onto the bottom surface (Fig. 4) and proceed to Step 3.
2. If it is recessed, cut the edges of the template to fit in the recessed bottom of the cabinet. It is
important that the edges of the cabinets permit level installation of the oven. Follow directions below
for cutting and mounting:
RECOMMENDED CUTTING PROCEDURE
Measure cabinet thickness of the sides A & C and the back B. Cut the edge of the template to
allow for cabinet thickness (guideline is marked in 1⁄4″ increments for your convenience).
NOTE: On some cabinets a small bracket or glue block is used between the overhang and the
underside of the cabinet bottom. Cut the template to fit around the bracket or glue block so
that template will lie flat against the bottom of the cabinet.
Tape the Top Cabinet Template to the underside of the top cabinet in the recessed area. (Fig. 2)
NOTE: Make sure the rear of the template touches the back wall (for smooth, flat bottom cabinets) or
the back of the recess (for recessed bottom cabinets) after cutting the edges of the template.
3. Drill 3/8″ diameter holes at A., B. & C.
CAUTION: Wear safety goggles when drilling holes in the cabinet bottom.
4. Cut out the 2″ diameter hole at D for power cord. If cabinets are metal, use the nylon grommet (see
the Parts Included section in the Installation Instructions) to surround the opening to protect the cord.
5. FOR VERTICAL EXHAUST ONLY. (Skip for horizontal exhaust or recirculation exhaust.)
Cut out shaded area labeled E. in the cabinet bottom for Vertical (Outside) Exhaust location.
6. Remove the top cabinet template.
7. For recessed cabinets, make 2 filler blocks out of scrap wood the size of the shaded areas F. & G.
These filler blocks must have a thickness equal to the depth of the cabinet recess. Drill 3/8″ diameter
holes in these blocks to line up with A. & C. Place the blocks so that the holes in each block line up with
the corresponding holes in the cabinet. The filler blocks should be at the same level as the bottom edge
of the wall cabinet frame (Fig. 5).
8. Return to and proceed with the Installation Instructions.
Recessed
Bottom
Cabinet
Recessed
Bottom
Cabinet
With
Template
Smooth
Flat Bottom
Cabinet
NOTE: IT IS VERY IMPORTANT TO READ AND FOLLOW THE DIRECTIONS IN THE INSTALLATION
INSTRUCTIONS BEFORE PROCEEDING WITH THIS TOP CABINET TEMPLATE.
This template is used to locate the power cord clearance hole, cabinet mounting holes, and the vertical
exhaust cutout.
1. Determine if your cabinet has a recessed area (Fig. 1) or a smooth, flat bottom (Fig. 3). If smooth, tape
template onto the bottom surface (Fig. 4) and proceed to Step 3.
2. If it is recessed, cut the edges of the template to fit in the recessed bottom of the cabinet. It is
important that the edges of the cabinets permit level installation of the oven. Follow directions below
for cutting and mounting:
RECOMMENDED CUTTING PROCEDURE
Measure cabinet thickness of the sides A & C and the back B. Cut the edge of the template to
allow for cabinet thickness (guideline is marked in 1⁄4″ increments for your convenience).
NOTE: On some cabinets a small bracket or glue block is used between the overhang and the
underside of the cabinet bottom. Cut the template to fit around the bracket or glue block so
that template will lie flat against the bottom of the cabinet.
Tape the Top Cabinet Template to the underside of the top cabinet in the recessed area. (Fig. 2)
NOTE: Make sure the rear of the template touches the back wall (for smooth, flat bottom cabinets) or
the back of the recess (for recessed bottom cabinets) after cutting the edges of the template.
3. Drill 3/8″ diameter holes at A., B. & C.
CAUTION: Wear safety goggles when drilling holes in the cabinet bottom.
4. Cut out the 2″ diameter hole at D for power cord. If cabinets are metal, use the nylon grommet (see
the Parts Included section in the Installation Instructions) to surround the opening to protect the cord.
5. FOR VERTICAL EXHAUST ONLY. (Skip for horizontal exhaust or recirculation exhaust.)
Cut out shaded area labeled E. in the cabinet bottom for Vertical (Outside) Exhaust location.
6. Remove the top cabinet template.
7. For recessed cabinets, make 2 filler blocks out of scrap wood the size of the shaded areas F. & G.
These filler blocks must have a thickness equal to the depth of the cabinet recess. Drill 3/8″ diameter
holes in these blocks to line up with A. & C. Place the blocks so that the holes in each block line up with
the corresponding holes in the cabinet. The filler blocks should be at the same level as the bottom edge
of the wall cabinet frame (Fig. 5).
8. Return to and proceed with the Installation Instructions.
Smooth
Flat Bottom
Cabinet
With
Template
NOTE: IT IS VERY IMPORTANT TO READ AND FOLLOW THE DIRECTIONS IN
THE INSTALLATION INSTRUCTIONS BEFORE PROCEEDING WITH THIS TOP
CABINET TEMPLATE.
This template is used to locate the power cord clearance hole, cabinet mounting holes, and the vertical
exhaust cutout.
1. Determine if your cabinet has a recessed area (Fig. 1) or a smooth, flat bottom (Fig. 3). If smooth, tape
template onto the bottom surface (Fig. 4) and proceed to Step 3.
2. If it is recessed, cut the edges of the template to fit in the recessed bottom of the cabinet. It is
important that the edges of the cabinets permit level installation of the oven. Follow directions below
for cutting and mounting:
RECOMMENDED CUTTING PROCEDURE
Measure cabinet thickness of the sides A & C and the back B. Cut the edge of the template to
allow for cabinet thickness (guideline is marked in 1⁄4″ increments for your convenience).
NOTE: On some cabinets a small bracket or glue block is used between the overhang and the
underside of the cabinet bottom. Cut the template to fit around the bracket or glue block so
that template will lie flat against the bottom of the cabinet.
Tape the Top Cabinet Template to the underside of the top cabinet in the recessed area. (Fig. 2)
NOTE: Make sure the rear of the template touches the back wall (for smooth, flat bottom cabinets) or
the back of the recess (for recessed bottom cabinets) after cutting the edges of the template.
3. Drill 3/8″ diameter holes at A., B. & C.
CAUTION: Wear safety goggles when drilling holes in the cabinet bottom.
4. Cut out the 2″ diameter hole at D for power cord. If cabinets are metal, use the nylon grommet (see
the Parts Included section in the Installation Instructions) to surround the opening to protect the cord.
5. FOR VERTICAL EXHAUST ONLY. (Skip for horizontal exhaust or recirculation exhaust.)
Cut out shaded area labeled E. in the cabinet bottom for Vertical (Outside) Exhaust location.
6. Remove the top cabinet template.
7. For recessed cabinets, make 2 filler blocks out of scrap wood the size of the shaded areas F. & G.
These filler blocks must have a thickness equal to the depth of the cabinet recess. Drill 3/8″ diameter
holes in these blocks to line up with A. & C. Place the blocks so that the holes in each block line up with
the corresponding holes in the cabinet. The filler blocks should be at the same level as the bottom edge
of the wall cabinet frame (Fig. 5).
8. Return to and proceed with the Installation Instructions.
1’’
1/2’’
1/4’’
1’’
1/2’’
1/4’’
1’’
1/2’’
1/4’’
LINE UP WITH
PREVIOUSLY
DRILLED HOLE.
NOTE: IT IS VERY IMPORTANT TO READ
AND FOLLOW THE DIRECTIONS IN THE
INSTALLATION INSTRUCTIONS BEFORE
PROCEEDING WITH THIS REAR WALL
TEMPLATE.
CUT WALL TEMPLATE FROM TOP CABINET
TEMPLATE ALONG WITH THE DASHED
CUTTINGLINE. REFER TO
This template is for locating the horizontal exhaust
cutout. Do not use this template for vertical or
recirculation exhaust.
1.Place the template flat against the rear wall, aligning
the circles A. and B. with the corresponding holes
previously drilled in the rear wall for holes A. and B.
of the wall plate.
2.With the template aligned to the holes. tape the
template to the rear wall.
3.Use a saber or keyhole saw to cut out the shaded
area F. through the rear wall.
4.Remove the template from the rear wall.
5.RETURN TO AND PROCEED WITH THE
INSTALLATION INSTRUCTIONS
F. CUT OUT FOR HORIZONTAL
OUTSIDE EXHAUST
CAUTION– IF EXHAUST ADAPTOR IS POSITIONED OUTSIDE
RECOMMENDED DIMENSION,GREASE-LADEN AIR WILL
DISCHARGE INTO HOUSE STRUCTURE.
LINE UP WITH
PREVIOUSLY
DRILLED HOLE.
CUT ALONG THIS LINE
CUT ALONG THIS LINE
CUT ALONG THIS LINE CUT ALONG THIS LINE
WALL WALL
TOP CABINET TOP CABINET TOP CABINET TOP CABINET TOP CABINET
10 1/2” (26.67cm)
to rea wall
must be maintained
FIGURE 1
FIGURE 2 FIGURE 3 FIGURE 4
FILLER BLOCKS
FIGURE 5
DRILL
DIAMETER 3/8"
FILLER
BLOCK
AREA
F.
A.
B.
C.
D.
DRILL
DIAMETER 3/8"
DRILL
DIAMETER 3/8"
FILLER
BLOCK
AREA
G.
TOP CABINET TEMPLATE
E. CUT OUT FOR VERTICAL (OUTSIDE)
EXHAUST ONLY
CUT HOLE THROUGH CARBINET BOTTOM FOR EXHAUST ADAPTOR
DRILL
DIAMETER 2"
Publish No: 31-41080

