Page is loading ...

PSS-110 MKIII V1
Highlite International B.V. – Vestastraat 2 – 6468 EX – Kerkrade – the Netherlands
Ordercode: D2611
MANUAL
ENGLISH

1
PSS-110 MKIII
Ordercode: D2611
Table of contents
Warning ............................................................................................................................................................................... 2
Safety Instructions ......................................................................................................................................................... 2
Operating Determinations .......................................................................................................................................... 4
Connection with the mains......................................................................................................................................... 4
Return Procedure .......................................................................................................................................................... 5
Claims .............................................................................................................................................................................. 5
Description of the device ................................................................................................................................................. 6
Overview ........................................................................................................................................................................ 7
Backside ......................................................................................................................................................................... 8
Top ................................................................................................................................................................................... 9
Microphone .................................................................................................................................................................11
Installation .........................................................................................................................................................................11
Inserting/Replacing the Microphone Battery ........................................................................................................12
Adjusting Input Gain ...................................................................................................................................................12
Set Up and Operation .....................................................................................................................................................12
Connection ..................................................................................................................................................................12
Battery Operation .......................................................................................................................................................13
Microphone Operation .............................................................................................................................................13
Frequency Range .......................................................................................................................................................15
Tips for Achieving Maximum Performance ............................................................................................................15
USB Player Operation .................................................................................................................................................16
Selecting Tracks ........................................................................................................................................................16
Starting/Stopping Playback ...................................................................................................................................16
Adjusting Volume .....................................................................................................................................................16
Playback Modes ......................................................................................................................................................16
Recording ..................................................................................................................................................................16
Connection Example ......................................................................................................................................................17
Connection Cables .........................................................................................................................................................18
Maintenance ....................................................................................................................................................................19
Replacing the Fuse .....................................................................................................................................................19
Troubleshooting ...............................................................................................................................................................19
No Sound ......................................................................................................................................................................19
Product Specifications ....................................................................................................................................................20
Notes ..................................................................................................................................................................................22

2
PSS-110 MKIII
Ordercode: D2611
Warning
Unpacking Instructions
Immediately upon receiving this product, carefully unpack the carton and check the contents to ensure
that all parts are present, and have been received in good condition. Notify the dealer immediately and
retain packing material for inspection if any parts appear damaged from shipping or the carton itself
shows signs of mishandling. Save the carton and all packing materials. In the event that a fixture must be
returned to the factory, it is important that the fixture be returned in the original factory box and packing.
Your shipment includes:
● DAP Audio PSS-110 MKIII
● 2 x antenna
● 1 x microphone
● IEC power cable (1,5 m)
● User manual
Safety Instructions
Every person involved with the installation, operation and maintenance of this system has to:
● be qualified
● follow the instructions of this manual
Before your initial start-up, please make sure that there is no damage caused by transportation. Should
there be any, consult your dealer and do not use the system.
To maintain perfect condition and to ensure a safe operation, it is absolutely necessary for the user to
follow the safety instructions and warning notes written in this manual.
Please consider that damages caused by manual modifications to the system are not subject to
warranty.
This system contains no user-serviceable parts. Refer servicing to qualified technicians only.

3
PSS-110 MKIII
Ordercode: D2611
IMPORTANT:
The manufacturer will not accept liability for any resulting damages caused by the non-observance of
this manual or any unauthorized modification to the system.
● Never let the power cord come into contact with other cables! Handle the power cord and all
connections with the mains with particular caution!
● Never remove warning or informative labels from the unit.
● Never use anything to cover the ground contact.
● Never leave any cables lying around.
● Do not connect this system to a dimmer pack.
● Do not open the device and do not modify the device.
● Only use device indoors, avoid contact with water or other liquids.
● Always disconnect power from the mains, when system is not used. Only handle the power cord by
the plug. Never pull out the plug by tugging the power cord.
● Always operate the unit with the AC ground wire connected to the electrical system ground.
● Avoid flames and do not put close to flammable liquids or gases.
● Avoid ground loops! Always be sure to connect the power amps and the mixing console to the
same electrical circuit to ensure the same phase!
● The best way (even if not always feasible) to avoid ground loops is to connect the electric ground of
all the equipment to a single central point (“star” system). In this case, the central point can be the
mixer.
● Avoid installing your equipment very near radio or TV sets, mobile phones, etc., as these can cause
RF (radio frequency) interference.
● Before changing your grounds around, always turn your amplifiers down.
● Before connecting or disconnecting the power cord, make sure that the power switch is in the OFF
position.
● Before switching on or off make sure the sound system’s amplifiers are off or turned down: this will
avoid signal peaks, which are annoying and sometimes dangerous (particularly for speaker
enclosures).
● Do not connect (parallel or series) an amplifier output with any other amplifier output.
● Do not drive the inputs with a signal level higher than required to drive the equipment to full output.
● Do not run the output of any amplifier channel, back into another channel’s input.
● Do not switch the system on and off in short intervals, as this would reduce the system’s life.
● Extreme frequency boosts in connection with a high input signal level may lead to overdriving your
equipment. Should this occur, it is necessary to reduce the input signal level by using the INPUT
control.
● If device is dropped or struck, disconnect mains power supply immediately. Have a qualified
engineer inspect for safety before operating.
● If the system has been exposed to drastic temperature fluctuation (e.g. after transportation), do not
switch it on immediately. The arising condensation water might damage your system. Leave the
system switched off until it has reached room temperature.
● If your DAP Audio device fails to work properly, discontinue use immediately. Pack the unit securely
(preferably in the original packing material), and return it to your DAP Audio dealer for service.
● In system setup, the amplifier's output power must be set 50%-100% higher than the loaded
loudspeakers’ rated power.
● Make sure that the available voltage is not higher than stated on the rear panel.
● Make sure that the power cord is never crimped or damaged. Check the device and the power
cord from time to time.
● Make sure that the signals into the mixer are balanced, otherwise hum could be created.
● Make sure that there is sufficient room on all sides of the system for air circulation.
● Make sure you do not use the wrong kind of cables or defective cables.
● Make sure you use DI boxes to balance unbalanced signals; All incoming signals should be clear
● Please turn off the power switch, when changing the power cord or signal cable, or select the input
mode switch.
● Prevent distortion! Make sure that all components connected to the PSS have sufficient power rating.
Otherwise distortion will be generated because the components are operated at their limits.
● Repairs, servicing and electric connection must be carried out by a qualified technician.
● Sometimes, when you want to send one signal to more than one amplifier, you should use a signal
distributor.

4
PSS-110 MKIII
Ordercode: D2611
● To avoid or solve hum and buzzing troubles, try different combinations of lifting grounds on units that
are supplied with ground lift switches or make sure all chassis are connected to earth ground, either
through the AC power cord ground or by the front panel rack mount screws.
● To emphasize a frequency range, you do not necessarily need to move its respective sliding control
upwards; try lowering surrounding frequency ranges instead. This way, you avoid causing the next
piece of equipment in your sound path to overdrive. You also preserve valuable dynamic reserve
(“headroom”).
● For replacement use fuses of same type and rating only.
● WARRANTY: Till one year after date of purchase.
Operating Determinations
This system is not designed for permanent operation. Consistent operation breaks will ensure that the
system will serve you for a long time without defects.
If this system is operated in any other way, than the one described in this manual, the product may suffer
damages and the warranty becomes void.
Any other operation may lead to dangers like short-circuit, burns, electric shock, etc.
You endanger your own safety and the safety of others !
Improper installation can cause serious injuries to people and/or damage of property !
Connection with the mains
Connect the device to the mains with the power-plug.
Always pay attention, that the right color cable is connected to the right place.
International
EU Cable
UK Cable
US Cable
Pin
L
BROWN
RED
YELLOW/COPPER
FASE
N
BLUE
BLACK
SILVER
NULL
YELLOW/GREEN
GREEN
GREEN
EARTH
Make sure that the device is always connected properly to the earth!
Improper installation can cause serious injuries to people and/or damage of property !

5
PSS-110 MKIII
Ordercode: D2611
Return Procedure
Returned merchandise must be sent prepaid and in the original packing, call tags will not be issued.
Package must be clearly labeled with a Return Authorization Number (RMA number). Products returned
without an RMA number will be refused. Highlite will not accept the returned goods or any responsibility.
Call Highlite 0031-455667723 or mail aftersales@highlite.com and request an RMA prior to shipping the
fixture. Be prepared to provide the model number, serial number and a brief description of the cause for
the return. Be sure to properly pack fixture, any shipping damage resulting from inadequate packaging is
the customer’s responsibility. Highlite reserves the right to use its own discretion to repair or replace
product(s). As a suggestion, proper UPS packing or double-boxing is always a safe method to use.
Note: If you are given an RMA number, please include the following information on a piece of paper
inside the box:
01) Your name
02) Your address
03) Your phone number
04) A brief description of the symptoms
Claims
The client has the obligation to check the delivered goods immediately upon delivery for any short-
comings and/or visible defects, or perform this check after our announcement that the goods are at their
disposal. Damage incurred in shipping is the responsibility of the shipper; therefore the damage must be
reported to the carrier upon receipt of merchandise.
It is the customer's responsibility to notify and submit claims with the shipper in the event that a fixture is
damaged due to shipping. Transportation damage has to be reported to us within one day after receipt
of the delivery.
Any return shipment has to be made post-paid at all times. Return shipments must be accompanied with
a letter defining the reason for return shipment. Non-prepaid return shipments will be refused, unless
otherwise agreed in writing.
Complaints against us must be made known in writing or by fax within 10 working days after receipt of the
invoice. After this period complaints will not be handled anymore.
Complaints will only then be considered if the client has so far complied with all parts of the agreement,
regardless of the agreement of which the obligation is resulting.

6
PSS-110 MKIII
Ordercode: D2611
Description of the device
Features
The DAP Audio PSS-110 MKIII is the successor of the PSS series with a completely new design in a
lightweight ABS housing. It is a portable PA system powered by an internal battery. When used on mains
power, the battery will be charged automatically. The built-in charger has an overload protection, a
circuit and a battery level indicator. The device is equipped with a USB player, a wireless microphone, a
4-channel audio mixer for the microphone and line signals. On the mixer, you can set master volume,
bass and treble as well as a talkover function. Use the dedicated line output to connect the PSS-110 MKIII
with a second PA system. It is a very easy all-in-one concept, suitable for venues where you do not have
access to a mains power supply: fair events, theme parks, sport events, outdoor church services, street
musicians, product presentations.
● Power supply: 220-240V AC, 50/60Hz
● Battery: 22,2V (Lithium battery)
● System type: 2-Way Active Vented Speaker
● Transducer Low: 10" Woofer, 1,5" Voice coil
● Transducer driver: 1" Ferrite Driver, 1" Voice coil
● Horn coverage: 90ºH x 45ºV
● Frequency response(-6dB): 65Hz-20kHz
● Crossover frequency: 5kHz
● Max SPL: 117dB Max
● AMP power output: RMS: 200W(AC)(LF-Class D 135W&HF-Class D 65W)
● Equalizer controls: Bass: ±10dB (@100Hz); Treble: ±10dB (@10kHz)
● External controls: Master volume controls: Mic & Line
● AUX volume controls: Wireless volume control, Voice priority switch
● Power indicators: Recharge indicator, Battery level indicators
● RF signal indicators
● Voice priority: MIC1 and wireless
● Signal to noise ratio: Mic: >70dB
● Line: >75dB
● Battery charging time: <5 hours
● Battery life: >3 hours (regular play)
● Microphone batteries: 2 x AA (LR 6) not included
● Wireless frequency band: 615-638MHz
● Built-in player: MP3/USB player
● Housing: Plastic cabinet, trapezoidal, metal grille, rubber feet, handle
● Color: Black
● Mounting: 35-mm standard pole-mount
● Fuse: T1AL/250V
● Dimensions: 300 x 290 x 910 mm (LxWxH)
● Weight: 13 kg

7
PSS-110 MKIII
Ordercode: D2611
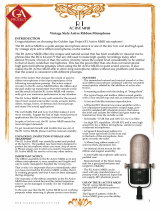
Overview
Fig. 01
01) Handle
02) Antenna
03) Tweeter
04) Woofer

8
PSS-110 MKIII
Ordercode: D2611
Backside
Fig. 02
05) UP button
06) SET button
07) DOWN button
08) Module eject button
09) LCD receiver display
10) Microphone clamp
11) Microphone holder
12) Power switch ON/OFF
● ON: Power on
● OFF: Power off
● RECHARGE: Use this option in order to recharge the internal battery.
13) 220-240V IEC power connector IN + Fuse T1AL/250V

9
PSS-110 MKIII
Ordercode: D2611
Top
Fig. 03
14) LCD display
15) Antenna connector
16) Play/Pause button
17) Previous track button
Press the button to skip to a previous track.
Press and hold down the button to decrease the volume.
18) USB A connector IN
Connect a USB flash drive containing music files (mp3).
19) Antenna connector
20) Next track button
Press the button to skip to a next track.
Press and hold down the button to increase the volume.
21) Repeat button
22) Power/Stop button
Press the button once in order to stop playback.
Press and hold down the button for 2 seconds in order to switch the USB player ON/OFF.
23) Record button

10
PSS-110 MKIII
Ordercode: D2611
Fig. 04
24) CH2 volume control
Turn the control to set the volume of CH2.
25) CH1 volume control
Turn the control to set the volume of CH1.
26) CH1 Line/Mic button
Select the input source for channel 1 (Line/Mic).
27) Microphone XLR/jack combo IN
This combined jack can be used for connecting a mono signal source, for example an XLR
microphone. You can also use the ¼" jack connector to connect line-level signal sources.
28) 3,5 mm jack connector – AUX IN
Connect an auxiliary device, for example a smartphone.
29) CH2 RCA unbalanced – AUX IN
Connect line signal.
30) Treble control
31) 6,3 mm jack connector – Line OUT
Connect to the line input of a mixer. If you use the PSS together with DAP Splash active speakers, use
a mono-to-mono jack cable.
32) Bass control
33) Voice priority button
● When the button is in ON position: the microphone signal will have the highest priority. Upon
receiving a microphone signal, AUX and MP3 signals will be muted (ducking).
● When the button is in OFF position: the microphone signal will have the same output level as AUX
and MP3. All those signals will be output simultaneously.
34) Master volume control
Turn the control to set the master volume.
35) LED battery level indicator
36) USB volume control
Turn the control to set the USB player volume.
37) LED recharge indicator
While recharging, the indicator will light up red. When the battery is fully charged, it will light up
green.
38) LED power indicator

11
PSS-110 MKIII
Ordercode: D2611
Microphone
Fig. 05
39) LED status indicator
● Green: Normal operation
● Red: Mute
● Red (flashing): Low battery
40) Power/Mute switch
Press and hold down the button for 3 seconds to turn the microphone on/off.
Press the button to mute/unmute the microphone.
41) IR sensor
42) Input gain control
43) Plastic screwdriver
44) Battery housing
Installation
Remove all packing materials from the PSS-110 MKIII. Check that all foam and plastic padding is
removed. Connect all cables.
Always disconnect from electric mains power supply before cleaning or servicing.
Damages caused by non-observance are not subject to warranty.

12
PSS-110 MKIII
Ordercode: D2611
Inserting/Replacing the Microphone Battery
Fig. 06
Fig. 07
01) Turn the battery cover clockwise, in order to loosen it. Remove the battery cover (Fig. 06).
02) Pull upwards on the holding pin and, at the same time, pull the battery holder down, in order to gain
access to the battery housing (Fig. 07).
03) Insert 2 AA (LR 6) batteries into the battery housing, paying attention to the polarity markings (+/-).
04) Close the battery housing and replace the battery cover. Tighten the battery cover by turning it
counterclockwise.
Adjusting Input Gain
Fig. 08
Fig. 09
01) Turn the battery cover clockwise, in order to loosen it. Remove the battery cover (Fig. 08).
02) Use the included plastic screwdriver (43) to set the transmitter’s input sensitivity (Fig. 09).
03) Close the battery housing and replace the battery cover. Tighten the battery cover by turning it
counterclockwise.
Set Up and Operation
Before plugging the unit in, always make sure that the power supply matches the product specification
voltage. The power supply is printed on the back of the device.
Do not attempt to operate an 115V specification product on 230V power, or vice versa.
Connection
01) Set the power switch (12) to OFF position, in order to turn the PSS off.
02) Connect the PSS to the other devices which you plan to use.
CAUTION: Make sure that the power is off, when connecting the cables.

13
PSS-110 MKIII
Ordercode: D2611
Battery Operation
01) When the battery level indicator (35) lights up red, the battery is almost flat and needs to be
recharged.
02) Make sure that the power switch (12) is in OFF position and plug one end of the included IEC to
Schuko power cable into the IEC input connector (13). Plug the other end into an appropriate power
supply.
03) Set the power switch (12) to RECHARGE position.
04) Observe the recharge indicator (37). While recharging, the indicator will light up red. When the
battery is fully charged, it will light up green.
05) Unplug the IEC to Schuko power cable. If the battery is fully charged, the PSS can run on battery
power for approximately 3 hours, depending on the volume level.
Note:
The battery in the PSS should not be fully depleted. Charge it when it is low, but do not let it drain fully.
On the other hand, constant top-off charging of a battery is never good.
Any charging adds heat which degrades a battery. Storage in a cool place slows the aging process of
lithium-ion. Manufacturers recommend storage temperatures of 15°C.
Microphone Operation
01) Turn the PSS on by setting the power switch (12) to ON position.
02) Turn the microphone on by pressing and holding down the power/mute switch (40) for 3 seconds.
The LED status indicator (39) will light up green.
03) Press the UP/DOWN buttons (05/07) in order to choose one of the 100 channels (see page 15 for the
frequency range chart). Alternatively, press and hold down the UP button (05) for 6 seconds, for
quick channel search. The display (09) will show:
04) Once you have chosen a channel, press and hold down the UP button (05) for 3 seconds. The
currently chosen channel’s number will start blinking.
05) Remove the battery cover (Fig. 10). Otherwise it will not be possible to pair the devices.
06) Place the microphone’s IR sensor (41) close to the display (09), in order to pair the speaker with the
microphone (Fig. 11).
Fig. 10
Fig. 11

14
PSS-110 MKIII
Ordercode: D2611
07) Once the microphone has been paired, the display (09) will show:
08) Replace the battery cover and turn it counterclockwise, in order to tighten it.
09) Press the SET button (06). The display will show:
10) Press the UP/DOWN buttons (05/07) in order to set the volume. The adjustment range is from OFF to
loud.
11) Press the SET button (06) again. The display will show:
12) In order to eliminate the risk of interference, press the UP/DOWN buttons (05/07) to set the squelch.
The adjustment range is from low to high threshold. The higher the threshold, the more unwanted
signals will be phased out. If it does not solve the problem, set the microphone and the PSS to a
different channel.
Note:
If the squelch threshold is set too high, the transmission range will be reduced. Therefore, always set
the squelch to the lowest possible setting.
13) Press the SET button (06) again.
14) You can now speak into the microphone.
15) In order to choose another channel, repeat steps 3-14.

15
PSS-110 MKIII
Ordercode: D2611
Frequency Range
00 – 615,125MHz
01 – 615,350MHz
02 – 615,575MHz
03 – 615,800MHz
04 – 616,025MHz
05 – 616,250MHz
06 – 616,475MHz
07 – 616,700MHz
08 – 616,925MHz
09 – 617,150MHz
10 – 617,375MHz
11 – 617,600MHz
12 – 617,825MHz
13 – 618,050MHz
14 – 618,275MHz
15 – 618,500MHz
16 – 618,725MHz
17 – 618,950MHz
18 – 619,175MHz
19 – 619,400MHz
20 – 619,625MHz
21 – 619,850MHz
22 – 620,075MHz
23 – 620,300MHz
24 – 620,525MHz
25 – 620,750MHz
26 – 620,975MHz
27 – 621,200MHz
28 – 621,425MHz
29 – 621,650MHz
30 – 621,875MHz
31 – 622,100MHz
32 – 622,325MHz
33 – 622,550MHz
34 – 622,775MHz
35 – 623,000MHz
36 – 623,225MHz
37 – 623,450MHz
38 – 623,675MHz
39 – 623,900MHz
40 – 624,125MHz
41 – 624,350MHz
42 – 624,575MHz
43 – 624,800MHz
44 – 625,025MHz
45 – 625,250MHz
46 – 625,475MHz
47 – 625,700MHz
48 – 625,925MHz
49 – 626,150MHz
50 – 626,375MHz
51 – 626,600MHz
52 – 626,825MHz
53 – 627,050MHz
54 – 627,275MHz
55 – 627,000MHz
56 – 627,725MHz
57 – 627,950MHz
58 – 628,175MHz
59 – 628,400MHz
60 – 628,625MHz
61 – 628,850MHz
62 – 629,075MHz
63 – 629,300MHz
64 – 629,525MHz
65 – 629,750MHz
66 – 629,975MHz
67 – 630,200MHz
68 – 630,425MHz
69 – 630,650MHz
70 – 630,875MHz
71 – 631,100MHz
72 – 631,325MHz
73 – 631,550MHz
74 – 631,775MHz
75 – 632,000MHz
76 – 632,225MHz
77 – 632,450MHz
78 – 632,675MHz
79 – 632,900MHz
80 – 633,125MHz
81 – 633,350MHz
82 – 633,575MHz
83 – 633,800MHz
84 – 634,025MHz
85 – 634,250MHz
86 – 634,475MHz
87 – 634,700MHz
88 – 634,925MHz
89 – 635,150MHz
90 – 635,375MHz
91 – 635,600MHz
92 – 635,825MHz
93 – 636,050MHz
94 – 636,275MHz
95 – 636,500MHz
96 – 636,725MHz
97 – 636,950MHz
98 – 637,175MHz
99 – 637,400MHz
It is possible that the PSS-110 MKIII will not function properly within certain frequencies.
It may be caused by the presence of other digital equipment producing interference.
Try testing all the available frequency presets until you find the one which functions
properly.
Tips for Achieving Maximum Performance
● Make sure you can always see the receiver antenna from the transmitter position.
● Keep the distance between the PSS antennas and the microphone as short as possible.
● Point the PSS antennas away from each other, at a 45° angle from vertical position.
● Avoid placing the antennas in the vicinity of metal surfaces and obstructions.
● Recharge the battery as soon as you receive a low-battery alarm.
● Perform a walk-through before performance or presentation. If dead spots are found, adjust the
location of the PSS. If dead spots remain, mark and avoid them.

16
PSS-110 MKIII
Ordercode: D2611
USB Player Operation
Fig. 12
01) Press and hold down the power/stop button (22) for 2 seconds in order to turn the USB player on.
02) Insert a USB flash drive into the USB slot (18).
03) The device will now search for the supported music files (mp3).
Selecting Tracks
01) Press the (17) button to skip to a previous track.
02) Press the (20) button to skip to a next track.
03) Playback will begin automatically, once a new track has been selected.
Starting/Stopping Playback
01) Press the (16) button to start playback.
02) Press the (16) button again to pause playback.
03) Press the (16) button again to resume playback.
04) Press the (22) button to stop playback.
Adjusting Volume
01) Press and hold down the (17) button to decrease the volume.
02) Press and hold down the (20) button to increase the volume.
03) The adjustment range is between 0-15, from OFF to loud.
Playback Modes
01) Repeatedly press the button to select the desired playback mode.
02) There are 4 playback modes:
Repeats a single track several times
Repeats all tracks
A
Plays all tracks once, in random order (Shuffle)
No symbol
Plays all tracks once, in the order of appearance (Normal)
Recording
01) Press the Record (23) button to enter recording.
02) Press the Record (23) button again to start recording.
03) Speak into the microphone.
04) Press the (22) button to stop recording.
05) The recorded files will be saved on the inserted USB flash drive.

17
PSS-110 MKIII
Ordercode: D2611
Connection Example
Fig. 13

18
PSS-110 MKIII
Ordercode: D2611
Connection Cables
Take care of your cables, always holding them by the connectors and avoiding knots and twists when
coiling them: This gives the advantage of increasing their life and reliability.
Periodically check your cables. A great number of problems (faulty contacts, ground hum, discharges,
etc.) are caused entirely by using unsuitable or faulty cables.
Unbalanced
Balanced
For these applications the unit provides 1/4" TRS and XLR connectors to easily interface with
most professional audio devices. Follow the configuration examples below for your particular
connection.

19
PSS-110 MKIII
Ordercode: D2611
Maintenance
The DAP Audio PSS-110 MKIII requires almost no maintenance.
However, you should keep the unit clean.
Disconnect the mains power supply, and then wipe the cover with a damp cloth. Do not immerse in
liquid. Do not use alcohol or solvents.
Keep connections clean. Disconnect electric power, and then wipe the audio connections with a damp
cloth. Make sure connections are thoroughly dry before linking equipment or supplying electric power.
Replacing the Fuse
Power surges, short-circuit or inappropriate electrical power supply may cause a fuse to burn out. If the
fuse burns out, the product will not function whatsoever. If this happens, follow the directions below.
01) Unplug the unit from electric power source.
02) Insert a screwdriver into the slot in the fuse cover. Gently pry up the fuse cover. The fuse will come
out.
03) Remove the used fuse. If brown or unclear, it is burned out.
04) Insert the replacement fuse into the holder where the old fuse was. Reinsert the fuse cover. Be sure to
use a fuse of the same type and specification. See the product specification label for details.
Troubleshooting
No Sound
Always check if all the cables and cords are connected. Always turn off power to the area before
checking the wires, to prevent electric shock.
If everything works properly and there is still no sound, revisit the manufacturer’s instructions to make sure
they were followed during installation. If everything was installed correctly and there is still no sound, you
may want to consider bringing in a professional to take a look at your speaker.
If the speaker does not operate properly, refer servicing to a technician.
Suspect three potential problem areas as: the battery, the speaker, the fuse.
01) The battery. Check if the battery is fully charged. If it is not, it needs to be recharged. See page 13 for
battery operation.
02) The speaker. Return the PSS to your DAP Audio dealer.
03) The fuse. Replace the fuse. See page 19 for replacing the fuse.
04) If all appears to be O.K., turn the unit on again.
05) If you are unable to determine the cause of the problem, do not open the PSS, as this may damage
the unit and the warranty will become void.
06) Return the device to your DAP Audio dealer.
/