Page is loading ...

Thank You For Choosing Kohler Company
Thank you for choosing Kohler Company. Your Kohler Company product reflects the
true passion for design, craftsmanship, artistry, and innovation Kohler Company stands
for. We are confident its dependability and beauty will surpass your highest expectations,
satisfying you for years to come.
All the information in this guide is based upon the latest product information available
at the time of publication. At Kohler Company, we strive to fulfill our mission of
improving the level of gracious living for each person who is touched by our products
and services. We reserve the right to make changes in product characteristics, packaging,
or availability at any time without notice.
Please take a few minutes to review this guide. If you encounter any installation or
performance problems, please call 1-800-4-KOHLER from within the USA, 1-800-964-5590
from within Canada, or 001-877-680-1310 from within Mexico.
Merci d’avoir choisi la compagnie Kohler
Merci d’avoir choisi la compagnie Kohler. Votre produit de la compagnie Kohler reflète la
véritable passion du design, d’artisanat, d’art et d’innovation représentant la compagnie
Kohler. Nous sommes confiants que sa fiabilité et beauté surpasseront vos exigences les
plus élevées, vous satisfaisant pendant les années à venir.
Toute l’information dans ce guide est basée sur la dernière disponible au moment de la
publication. A la compagnie Kohler, nous aspirons à remplir notre mission d’améliorer le
niveau de vie gracieux pour chaque individu affecté par nos produits et services. Nous
nous réservons le droit d’apporter des modifications aux caractéristiques, emballages et
disponibilités des produits à tout moment, et ce sans préavis.
Veuillez prendre s’il vous plaît quelques minutes pour étudier ce guide. En cas de
problème d’installation ou de performance, veuillez composer le 1-800-4-KOHLER à
partir des É.U., le 1-800-964-5590 à partir du Canada, ou le 001-877-680-1310 à partir du
Mexique.
Gracias por elegir los productos Kohler
Gracias por elegir los productos de Kohler. Su producto de Kohler Company refleja la
verdadera pasión por el diseño, la mano de obra, la artesanía y la innovación que
forman parte de Kohler Company. Estamos seguros que su confiabilidad y belleza
excederán sus más altas expectativas, dándole satisfacción por años.
Toda la información que aparece en la guía está basada en la información más reciente
disponible al momento de publicación. En Kohler Company, nos esforzamos por alcanzar
nuestra misión de mejorar el nivel del buen vivir de quienes disfrutan de nuestros
productos y servicios. Nos reservamos el derecho de efectuar cambios en las
características, embalaje o disponibilidad del producto en cualquier momento, sin previo
aviso.
Dedique unos minutos para leer esta guía. Si tiene algún problema de instalación o
funcionamiento, llámenos al 1-800-4-KOHLER desde los EE.UU., 1-800-964-5590 desde
Canadá, ó 001-877-680-1310 desde México.
1090854-2-B 2 Kohler Co.

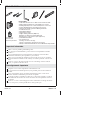
Tools/Outils/Herramientas
Important Information
Observe all local plumbing and building codes.
It is strongly recommended that a professional mason and plumber install this
product.
We recommend that the enclosed installation procedures be followed. Other
installation methods may be acceptable for your situation.
Before you proceed with this installation: Frame in the shower alcove, install the
curb, and install 2x10 lumber in the stud bays around the perimeter of the shower
base.
Kohler Co. reserves the right to make revisions in the design of drains without
notice, as specified in the Price Book.
Renseignements importants
Respecter tous les codes de plomberie et de bâtiment locaux.
Il est fortement recommandé qu’un maçon et plombier professionels installent ce
produit.
Nous recommandons que les procédures d’installation incluses soient suivies.
D’autres méthodes d’installation peuvent être acceptables.
Avant de procéder à l’installation: Cadrer l’alcove de douche, installer la courbe et
une lambourde de 2x10 dans les rails de montants autour du périmètre de la base
de douche.
Kohler Co. se réserve le droit d’apporter toutes modifications au design des drains
et ceci sans préavis, comme spécifié dans le catalogue des prix.
Plus/Plus/Más:
• 2x10 Lumber/Planche de 2 x 10/Postes de madera de 2x10
• Binding Adhesive/Adhésif de scellage/Adhesivo de unión
• Building Paper/Papier de construction/Papel de construcción
• Cement Board/Plaque de ciment/Panel de cemento
• Galvanized Lath/Latte galvanisée/Malla galvanizada
• Inset/Enclave/Inserto
• Mortar/Mortier/Mortero
• Rags/Chiffons/Trapos
• Support Framing Materials (Optional)
Matériels de cadrage de support (Optionnel)
Material para la estructura de soporte (Opcional)
• Sealant/Mastic/Sellador
• Tile and Tile Tools
Carrelage et outils à carrelage
Azulejo y herramientas de instalación del azulejo
• Waterproof Membrane/Membrane étanche/Membrana impermeable
PVC Cement
Ciment PVC
Cemento para PVC
Kohler Co. 3 1090854-2-B
Page is loading ...

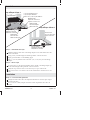
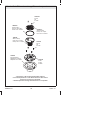
Roughing-In/Plan de raccordement/Diagrama de instalación
K-9136
5-3/8" (13.7 cm) D.
Ø 5-3/8" (13.7 cm)
5-3/8" (13,7 cm) D.
4-1/4" (10.8 cm) D.
Ø 4-1/4" (10.8 cm)
4-1/4" (10,8 cm) D.
4-1/4" (10.8 cm) D.
Ø 4-1/4" (10.8 cm)
4-1/4" (10,8 cm) D.
4-9/16" (11.6 cm)
4-9/16" (11.6 cm)
6-1/2" (16.5 cm) D.
Ø 6-1/2" (16.5 cm)
6-1/2" (16,5 cm) D.
2-3/8" (6 cm) D.
Ø 2-3/8" (6 cm)
2-3/8" (6 cm) D.
3" (7.6 cm) D.
Ø 3" (7.6 cm)
3" (7,6 cm) D.
2-3/8" (6 cm) D.
Ø 2-3/8" (6 cm)
2-3/8" (6 cm) D.
3" (7.6 cm) D.
Ø 3" (7.6 cm)
3" (7,6 cm) D.
4-3/16"
(10.6 cm)
4-1/8"
(10.5 cm)
K-9135
Collar with Threads Facing Up
Collier avec filetages vers le haut
Collarín con roscas hacia arriba
Collar with Threads Facing Up
Collier avec filetages vers le haut
Collarín con roscas hacia arriba
Collar with Threads Facing Down
Collier avec filetages vers le bas
Collarín con roscas hacia abajo
Collar with Threads Facing Down
Collier avec filetages vers le bas
Collarín con roscas hacia abajo
4-3/16"
(10.6 cm)
2-1/4" (5.7 cm) Min
3-3/8" (8.6 cm) Max
1-1/2" (3.8 cm) Min
2-9/16" (6.5 cm) Max
2-1/8" (5.4 cm) Min
3-1/4" (8.3 cm) Max
1-3/8" (3.5 cm) Min
2-7/16" (6.2 cm) Max
4-1/8"
(10.5 cm)
Kohler Co. 5 1090854-2-B

Installation
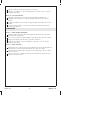
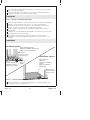
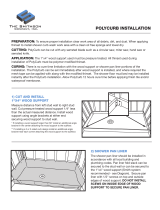
Step 1 — Building Paper Layer
Staple building paper to the subfloor of the shower base. Do not cover the drain
outlet with building paper.
Step 2 — Prepare Tile-In Drain
Remove the screws from the strainer plate. Set the screws, plate, ring, and body
aside.
Remove the screws from the collar to separate the collar from the flange adapter.
Set the screws and collar aside.
Apply PVC cement to the outside of the flange adapter where the flange adapter
and drain outlet will meet.
Insert the flange adapter into the drain outlet.
Partially thread the four screws into the flange adapter.
Place a rag in the drain outlet to prevent mortar from falling into the drain outlet.
Building Paper
Papier de construction
Papel de construcción
Drain Outlet
Sortie de drain
Salida del desagüe
Drain Outlet
Sortie de drain
Salida del desagüe
Step 1/Étape 1/Paso 1 Step 2/Étape 2/Paso 2
Apply PVC cement.
Appliquer du ciment PVC.
Aplique cemento para PVC.
Flange Adapter
Adaptateur de bride
Adaptador de la brida
Collar/Collier/Collarín
Screws/Vis/Tornillos
Screws/Vis/Tornillos
Plate/Plaque/Placa
Body/Corps/Cuerpo
Ring/L'anneau/Anillo
Subfloor
Plancher
Subpiso
1090854-2-B 6 Kohler Co.
Page is loading ...

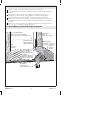
Installation
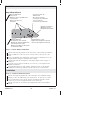
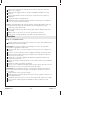
Step 3 — Galvanized Lath Layer
Mark the height of the bottom of the flange adapter on the wall furthest from the
center of the drain.
Using a level, mark this height around the perimeter of the shower base.
Staple galvanized lath over the building paper.
Cuta7″ (17.8 cm) diameter hole in the lath 1/2″ (1.3 cm) away from the flange
adapter.
Step 4 — Mortar Layer
Trowel mortar over the galvanized lath from the outside of the flange adapter up
to the marked height of the perimeter of the shower base.
Verify the slope of the mortar is even. Fill in any low spots with mortar.
Allow the mortar to cure. Refer to the mortar manufacturer’s instructions for cure
time.
Installation
Étape 3 — Couche de latte galvanisée
Marquer la hauteur de la base de l’adaptateur de bride sur le mur le plus éloigné
du centre du drain.
Avec un niveau à bulle, marquer la hauteur autour du périmètre de la base de
douche.
Building Paper
Papier de construction
Papel de construcción
7" (17.8 cm) diameter hole.
7" (17,8 cm) de diamètre.
Orificio de 7" (17,8 cm) de diámetro.
Lath/Grille/Malla
Marked height
Hauteur marquée
Altura marcada
Mortar Layer
Couche de mortier
Capa de mortero
Drain Outlet
Sortie de drain
Salida del desagüe
Flange Adapter
Adaptateur de bride
Adaptador de la brida
Flange Adapter
Adaptateur de bride
Adaptador de la brida
Step 3/Étape 3/Paso 3
Step 4/Étape 4/Paso 4
1090854-2-B 8 Kohler Co.
Page is loading ...

Installation
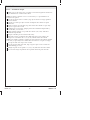
Step 5 — Prepare Waterproof Membrane
Measure and mark the perimeter of the shower base on the waterproof membrane.
Mark an additional 8″ (20.3 cm) out for each wall and 16″ (40.6 cm) out at the
curb.
Using a straightedge and a utility knife, cut the waterproof membrane to size. Do
not puncture the waterproof membrane when cutting.
Measure and mark the circumference of the flange adapter on the waterproof
membrane.
Using the excess waterproof membrane, cut a circle 2″ (5.1 cm) larger than the
marked circumference.
Using binding adhesive for PVC sheeting, adhere this circle over the marked
circumference of the flange adapter. This will reinforce the seal at the drain.
Installation
Étape 5 — Préparer la membrane étanche
Mesurer et marquer le périmètre de la base de douche sur la membrane étanche.
Marquer 8″ (20,3 cm) additionnels pour chaque mur et 16″ (40,6 cm) à la courbe.
Avec un rebord droit et un couteau, découper la membrane étanche à la taille
voulue. Ne pas percer la membrane étanche lors de la découpe.
Mesurer et marquer la circonférence de l’adaptateur de bride sur la membrane
étanche.
Cut a 8-1/2" (21.6 cm)
diameter hole.
Découper un orifice de
8-1/2" (21.6 cm) de diamètre.
Corte un orificio de
8-1/2" (21,6 cm) de diámetro.
Mark an additional 8"
(20.3 cm) out.
Marquer 8" (20,3 cm) additionnels
vers l'extérieur.
Marque a 8" (20,3 cm)
adicionales.
Mark an additional
16" (40.6 cm) out at curbside.
Marquer 16" (40,6 cm) additionnels
vers l'extérieur à la courbe.
Marque a 16" (40,6 cm) adicionales
en el lado del bordillo.
Waterproof membrane
Membrane étanche
Membrana impermeable
Flange Adapter Location
Emplacement d'adaptateur de bride
Ubicación del adaptador de la brida
Step 5/Étape 5/Paso 5
1090854-2-B 10 Kohler Co.
Page is loading ...

Installation (cont.)
Apply CPE sealant around the drain.
Step 7 — Waterproof Membrane Layer
With assistance, lift the waterproof membrane in place. Align the center of the
reinforced drain seal on the waterproof membrane with the bolts in the flange
adapter.
Working from the drain outlet to the walls, smooth out any bubbles from under
the waterproof membrane.
Secure the waterproof membrane to the perimeter of the shower base with CPE
solvent glue on the backside. Ensure the waterproof membrane is tight in each
corner.
Staple the waterproof membrane to the perimeter of the shower base. Do not
staple below the top of the curb.
Cut away the waterproof membrane at the screw locations on the flange adapter.
Cut away the waterproof membrane at the drain outlet.
Installation
Étape 6 — Couche d’adhésif de contrecollage
Avec une truelle à encoche, appliquer de l’adhésif de contrecollage à la courbe, au
périmètre de la base de douche et au-dessus du mortier.
Appliquer du mastic CPE autour du drain.
Étape 7 — Couche de membrane étanche
Avec de l’assistance, soulever la membrane étanche en place. Aligner le centre du
joint renforcé de drain sur la membrane étanche avec les boulons dans
l’adaptateur de bride.
En travaillant de la sortie du drain aux murs, lisser toute bulle d’en-dessous de la
membrane étanche.
Sécuriser la membrane tanche au périmètre de la base de douche avec de la colle
CPE à l’arrière. S’assurer que la membrane étanche soit serrée à chaque angle.
Agrafer la membrane étanche au périmètre de la base de douche. Ne pas agrafer
sous le dessus de la courbe.
Découper la membrane étanche aux emplacements de vis sur l’adaptateur de
bride.
Découper la membrane étanche à la sortie du drain.
Instalación
Paso 6 — Capa de adhesivo de laminado
Con una llana enmuescada, aplique adhesivo de laminado al bordillo, al perímetro
de la base de la ducha, y arriba del mortero.
Aplique sellador CPE alrededor del desagüe.
Paso 7 — Capa de la membrana impermeable
Con ayuda, coloque la membrana impermeable en su lugar. Alinee el centro del
sello del desagüe reforzado en la membrana impermeable con los pernos en el
adaptador de la brida.
1090854-2-B 12 Kohler Co.

Instalación (cont.)
Trabajando desde la salida del desagüe a las paredes, alise las burbujas que pueda
haber debajo de la membrana impermeable.
Fije la membrana impermeable al perímetro de la base de la ducha con pegamento
de solvente CPE en el lado posterior. Asegúrese de que la membrana impermeable
esté bien fija en cada esquina.
Engrape la membrana impermeable al perímetro de la base de la ducha. No
engrape más abajo de la parte superior del bordillo.
Corte la membrana impermeable en los lugares para tornillo del adaptador de la
brida.
Corte la membrana impermeable en la salida del desagüe.
Installation
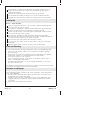
Step 8 — Assemble Drain
Measure the thickness of the tile, then refer to the ″Roughing-In″ section to
determine the orientation of the collar.
NOTE: The collar is shown with the threads facing down. The installation procedures
still apply.
Place the collar over the screws, then lock the collar in place by turning it
clockwise.
Tighten the screws to secure the collar to the flange adapter. Do not overtighten.
1/4"
(6 mm)
1-1/2"
(3.8 cm)
1-1/2" (3.8 cm)
Step 8/Étape 8/Paso 8
Drain Outlet
Sortie de drain
Salida del desagüe
Flange Adapter
Adaptateur de bride
Adaptador de la brida
Collar/Collier/Collarín
Screws
Vis
Tornillos
Plate/Plaque/Placa
Body/Corps/Cuerpo
Ring
L'anneau
Anillo
Cement Board
Plaque de ciment
Panel de cemento
Kohler Co. 13 1090854-2-B

Installation (cont.)
Insert an inset into the drain, then fill the shower base with water. Allow the
water to sit overnight.
Check for leaks. Apply patches of waterproof membrane and CPE solvent, if
necessary.
Install cement board to the shower walls 1/4″ (6 mm) above the waterproof
membrane.
Prepare the curb for installing the tile.
Thread the body to the flange adapter until the top of the body is a minimum of
1-1/2″ (3.8 cm) above the shower base.
NOTE: For brushed finishes: Be sure the direction of the brushed finish on the ring
and the plate are flowing in the same direction when setting them into place.
Set the ring on the strainer body.
Set the plate inside the ring, then secure the plate with two Phillips head screws
(provided).
Mark a point on one wall 1-1/2″ (3.8 cm) up from the shower base.
Using a level, mark the perimeter of the walls from this marked point.
Installation
Étape 8 — Assembler le drain
Mesurer l’épaisseur du carrelage, puis se référer à la section ″Raccordement″ pour
déterminer l’orientation du collier.
REMARQUE: Le collier est illustré avec les filetages vers le bas. Les procédures
d’installation s’appliquent tout de même.
Placer le collier sur les vis, puis verrouiller le collier en place en le tournant vers
la droite.
Serrer les vis pour sécuriser le collier à l’adaptateur de bride. Ne pas trop serrer.
Insérer une enclave dans le drain, puis remplir la base de douche avec de l’eau.
Laisser reposer l’eau la nuit.
Vérifier s’ilyadesfuites. Appliquer des patches de membrane étanche et de
solvant CPE si nécessaire.
Installer du ciment aux murs de douche à 1/4″ (6 mm) au-dessus de la membrane
étanche.
Préparer la courbe pour installer le carrelage.
Visser le corps à l’adaptateur de bride jusqu’à ce que le dessus du corps soit à un
minimum de 1-1/2″ (3,8 cm) au-dessus de la base de douche.
REMARQUE: Pour des finitions brossées: S’assurer que la direction de la finition
brossée sur l’anneau et celle de la plaque soient de même orientation lors de leur
mise en place.
Mettre l’anneau sur le corps de la crépine.
Mettre la plaque à l’intérieur de l’anneau, puis sécuriser la plaque avec deux vis à
tête Phillips (fournies).
Marquer un point sur le mur à 1-1/2″ (3,8 cm) au-dessus de la base de la douche.
Avec un niveau à bulle, marquer le périmètre des murs à partir de ce point
marqué.
1090854-2-B 14 Kohler Co.
Page is loading ...

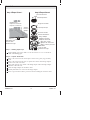
Installation
Step 9 — Tile Layer
Spread tile spacers over the weep holes of the drain. This will prevent mortar
from plugging the holes.
Using mortar, build the shower base up approximately half way between the
shower base and the marked perimeter.
Cover the mortar bed with metal lath, keeping the metal lath 1/2″ (1.3 cm) away
from the strainer body.
Using mortar, build up the shower base up to the marked perimeter. Slope the
mortar lower around the strainer ring to allow space for the thickness for the tile.
Allow the mortar to cure overnight before installing the tiles.
Using a thinset mortar, install the floor tile and the entire shower alcove.
Grout, clean, and seal all tile in the shower area.
Installation
Étape 9 — Couche carrelage
Étaler les espaceurs de carrelage sur les barbacanes du drain. Ceci évitera que le
mortier ne bouchent les orifices.
Avec du mortier, construire la base à approximativement mi-chemin entre la base
de douche et le périmètre marqué.
Couvrir le lit de mortier avec une latte métallique, en gardant cette dernière à
1/2″ (1,3 cm) du corps de la crépine.
Plate
Plaque
Placa
1-1/2"
(3.8 cm)
Step 9/Étape 9/Paso 9
Lath/Grille/Malla
Mortar Cement
Mortier
Cemento mortero
Mortar Thinset
Mortier
Mortero para azulejo
Tile
Carrelage
Azule
jo
1090854-2-B 16 Kohler Co.

Installation (cont.)
Avec du mortier, construire la base de douche au périmètre marqué. Baisser le
mortier autour de l’anneau de la crépine afin de permettre de l’espace pour
l’épaisseur du carrelage.
Permettre au mortier de prendre la nuit avant de poser les carreaux.
Avec du mortier fin, installer le carrelage au sol et l’alcove entière de douche.
Appliquer du coulis, nettoyer et sceller tout le carrelage dans la zone de douche.
Instalación
Paso 9 — Capa de azulejo
Separe los espaciadores de azulejo sobre los orificios de drenaje del desagüe. Esto
evitará que el mortero tape los orificios.
Con el mortero aumente hacia arriba la base de la ducha hasta aproximadamente
la distancia media entre la base de la ducha y el perímetro marcado.
Cubra la capa de moretero con la malla metálica, manteniendo la malla metálica a
1/2″ (1,3 cm) del cuerpo de la coladera.
Con el mortero aumente hacia arriba la base de la ducha hasta el perímetro
marcado. El mortero debe tener una inclinación hacia abajo alrededor del anillo de
la coladera para dejar espacio para el espesor del azulejo.
Deje curar el mortero toda la noche antes de instalar el azulejo.
Con un mortero para azulejo, instale el azulejo del piso y de todo el encajonado
de la ducha.
Aplique boquilla, limpie y selle todo el azulejo en el área de la ducha.
Care and Cleaning
For best results, keep the following in mind when caring for your KOHLER product:
•
Always test your cleaning solution on an inconspicuous area before applying to
the entire surface.
•
Wipe surfaces clean and rinse completely with water immediately after applying
cleaner. Rinse and dry any overspray that lands on nearby surfaces.
•
Do not allow cleaners to soak on surfaces.
•
Use a soft, dampened sponge or cloth. Never use an abrasive material such as a
brush or scouring pad to clean surfaces.
•
The ideal cleaning technique is to rinse thoroughly and blot dry any water from
the surface after each use.
For detailed cleaning information and products to consider, visit www.kohler.com/clean.
To order Care & Cleaning information, call 1-800-456-4537.
Entretien et nettoyage
Pour de meilleurs résultats, prendre ce qui suit en considération lors de l’entretien de
votre produit KOHLER:
•
Toujours tester la solution de nettoyage sur une surface la moins évidente avant
de l’appliquer sur la totalité de la surface.
•
Essuyer les surfaces et rincer complètement avec de l’eau immédiatement après
l’application de nettoyant. Rincer et sécher tout éclaboussement sur les surfaces
avoisinantes.
•
Ne pas laisser les nettoyants sur les surfaces.
Kohler Co. 17 1090854-2-B

Entretien et nettoyage (cont.)
•
Utiliser une éponge ou un chiffon doux et humide. Ne jamais utiliser de matériau
abrasif tel que brosse ou éponges à récurer pour nettoyer les surfaces.
•
La technique idéale de nettoyage est de bien rincer et de sécher toute eau de la
surface après chaque usage.
Pour l’information détaillée de nettoyage et des produits à considérer, visiter
www.kohler.com/clean. Pour commander des informations d’entretien et de nettoyage,
composer le 1-800-456-4537.
Cuidado y limpieza
Para obtener los mejores resultados, tenga presente lo siguiente al limpiar su producto
KOHLER:
•
Siempre pruebe la solución de limpieza en un área oculta antes de aplicarla a toda
la superficie.
•
Limpie con un trapo las superficies y enjuague completa e inmediatamente con
agua después de aplicar el limpiador. Enjuague y seque las superficies cercanas
que se hayan rociado.
•
No deje por tiempo prolongado los limpiadores en las superficies.
•
Utilice una esponja o trapo suave y húmedo. Nunca utilice materiales abrasivos
como cepillos o estropajos de tallar para limpiar las superficies.
•
La técnica de limpieza ideal es enjuagar completamente y secar dando toques
suaves el agua de la superficie después de cada uso.
Para obtener información detallada de limpieza y los limpiadores a considerar, visite
www.kohler.com/clean. Para solicitar información sobre el cuidado y la limpieza, llame
al 1-800-456-4537.
One-Year Limited Warranty
KOHLER plumbing products are warranted to be free of defects in material and
workmanship for one year from date of installation.
Kohler Co. will, at its election, repair, replace or make appropriate adjustment where
Kohler Co. inspection discloses any such defects occurring in normal usage within one
(1) year after installation. Kohler Co. is not responsible for removal or installation costs.
Use of in-tank toilet cleaners will void the warranty.
To obtain warranty service contact Kohler Co. either through your Dealer, Plumbing
Contractor, Home Center or E-tailer, or by writing Kohler Co., Attn.: Customer Service
Department, 444 Highland Drive, Kohler, WI 53044, USA, or by calling 1-800-4-KOHLER
from within the USA, 1-800-964-5590 from within Canada and 001-877-680-1310 from
within Mexico.
Implied warranties including that of merchantability and fitness for a particular
purpose are expressly limited in duration to the duration of this warranty. Kohler Co.
and/or seller disclaims any liability for special, incidental or consequential damages.
Some states/provinces do not allow limitations on how long an implied warranty lasts,
or the exclusion or limitation of special, incidental or consequential damages so these
limitations and exclusions may not apply to you. This warranty gives you specific legal
rights. You may also have other rights which vary from state/province to state/province.
This is Kohler Co.’s exclusive written warranty.
1090854-2-B 18 Kohler Co.
Page is loading ...
Page is loading ...
Page is loading ...
Page is loading ...
Page is loading ...
Page is loading ...
-
 1
1
-
 2
2
-
 3
3
-
 4
4
-
 5
5
-
 6
6
-
 7
7
-
 8
8
-
 9
9
-
 10
10
-
 11
11
-
 12
12
-
 13
13
-
 14
14
-
 15
15
-
 16
16
-
 17
17
-
 18
18
-
 19
19
-
 20
20
-
 21
21
-
 22
22
-
 23
23
-
 24
24


Ask a question and I''ll find the answer in the document
Finding information in a document is now easier with AI
in other languages
- français: Kohler K-9135-2BZ Guide d'installation
- español: Kohler K-9135-2BZ Guía de instalación
Related papers
-
Kohler K-8799-2BZ User manual
-
Kohler 8801-BV Installation guide
-
-
-
-
-
-
Kohler K-8804-2BZ Installation guide
-
Kohler K-1842-47 Installation guide
-
Other documents
-
 Neodrain Square Shower Drain Installation guide
-
 Neodrain 24-Inch Linear Shower Drain Installation guide
-
QM USA Corp 88.100.04 BZ Installation guide
-
Signature Hardware 404961 Installation guide
-
eModernDecor TZSD-6-SQ Installation guide
-
eModernDecor ALD-48-ST Installation guide
-
Camco 45191 Installation guide
-
Signature Hardware 446695 Installation guide
-
Delta B10912-3838 Installation guide
-
 PolyCurb CRB60 Installation guide


