
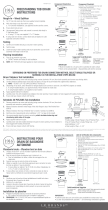
Installation Guide
Drop-In Bath with Airjets
K-1112, K-1114, K-1122,
K-1124, K-1160, K-1162,
K-1164, K-1244, K-1257,
K-1337, K-1357
M product numbers are for Mexico (i.e. K-12345M)
Los números de productos seguidos de M corresponden a México
(Ej. K-12345M)
Français, page ″Français-1″
Español, página ″Español-1″
1034591-2-F

IMPORTANT SAFETY INSTRUCTIONS
Read all instructions before using or installing this product.
WARNING: When using electrical products, basic precautions should always be followed,
including the following:
DANGER: Risk of electric shock. Connect only to a circuit protected by a ground-fault
circuit-interrupter (GFCI) or residual current device (RCD). Grounding is required. The unit should
be installed by a qualified service representative and grounded.
WARNING: Risk of electric shock. A licensed electrician must route all electrical wiring and
connections for this product. Improper installation will create an electrical hazard and may not
comply with local building and electrical codes.
WARNING: Risk of electric shock. Disconnect power before servicing.
WARNING: Risk of injury or property damage. Please read all instructions thoroughly before
beginning installation, including the following requirements.
WARNING: Risk of property damage. Building materials and wiring should be routed away from
the blower motor body and other heat-producing components of the unit.
NOTICE: Follow all local plumbing and electrical codes.
NOTICE: An access panel is required to service the pump/control. The access panel size must be a
minimum of 20″ (50.8 cm) in width, and 15″ (38.1 cm) in height.
Save these instructions.
Product Information
Electrical Requirements
WARNING: Risk of burns, fire, electric shock, or injury to persons. Do not operate the pump if
the pump supply cord is damaged. For proper guidance to have this product repaired, please call:
1-800-4-KOHLER from within the USA, 1-800-964-5590 from within Canada, or 001-877-680-1310
from within Mexico.
The installation must have a Class A Ground-Fault Circuit-Interrupter (GFCI) or Residual Current Device
(RCD). The GFCI or RCD protects against line-to-ground shock hazard. Use a 120 V, 15 A, 60 Hz dedicated
service for the bath with airjets.
Product Notices
NOTICE: Keep the area around the blower motor clean and free of debris. Ensure that the area around the
blower motor is free of sawdust, insulation, dirt, or other small loose debris. Such material could clog the
blower motor air ducts and reduce the air flow through the blower.
Factory-Assembled Features
Factory installed components include blower motor with power supply cord, check valve, air piping, user
keypad, and keypad cable. Other than power wiring and plumbing, no assembly is needed.
1034591-2-F 2 Kohler Co.

Product Information (cont.)
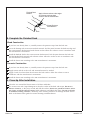
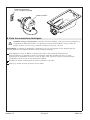
Connections and Service Access
NOTICE: Provide unrestricted service access to the blower motor and check valve. The access must be
located immediately next to the blower motor. Study the roughing-in information packed with the bath.
Before installation, ensure that there is proper access to the blower motor and final connections. If the blower
motor is installed in an enclosed area, an access panel is required at the blower motor. This panel should be
18″ (45.7 cm) wide and 14″ (35.6 cm) high minimum.
Table of Contents
IMPORTANT SAFETY INSTRUCTIONS ................................................ 2
Product Information ............................................................... 2
Electrical Requirements .......................................................... 2
Product Notices ................................................................ 2
Factory-Assembled Features ...................................................... 2
Connections and Service Access ................................................... 3
Tools and Materials ............................................................... 3
Before You Begin ................................................................. 4
Prepare the Site ................................................................. 5
Prepare the Site - Concrete Construction ............................................... 6
Prepare the Bath with Airjets ........................................................ 6
Secure the Unit .................................................................. 7
Option Using a Cement or Mortar Bed ............................................... 7
Option Using Construction Adhesive ................................................. 7
Option Using Silicone Sealant ..................................................... 8
Install the Plumbing ............................................................... 8
Make Electrical Connections ......................................................... 9
Test Run the Bath with Airjets ....................................................... 10
Complete the Finished Deck ........................................................ 11
Clean-Up After Installation ......................................................... 11
Confirm Proper Operation .......................................................... 12
Fill the Bath .................................................................. 12
Troubleshooting Procedure ......................................................... 14
Troubleshooting Guide .......................................................... 14
Tools and Materials
Pencil
Safety Glasses Level
Silicone Sealant Measuring Tape
Pipe Wrench
Plus:
• Drop Cloth
•
Construction Adhesive (Optional)
• Cement or Mortar (Optional)
• 2x4's or 2x6's
• Hammer
• Flat-Blade Screwdriver
• #6 Large-Head Galvanized Nails
• Conventional Woodworking Tools
and Materials
Kohler Co. 3 1034591-2-F

Before You Begin
NOTICE: Do not lift the bath with airjets by the piping or blower motor, or use the piping or blower
motor for structural support of the bath.
We recommend this bath with airjets for drop-in installation.
Please read these instructions carefully to familiarize yourself with the required tools, material, and
installation sequences. Follow the sections that pertain to your particular installation. This will help
you avoid costly mistakes. In addition to installation instructions, read all operating and safety
instructions.
The variety of installations possible with this bath may require framing procedures other than those
described in this manual.
Inspect the bath with airjets for damage before you begin installation.
Both concrete and wood frame construction techniques are discussed in this manual.
You must install this bath to an adequately supported, level subfloor.
Confirm adequate mounting and connection space for the faucet specified for your installation.
An optional accessories kit is available for relocating the blower motor. Refer to the back cover for
contact information if this kit is desired but was not ordered. If relocating the blower motor, follow
the instructions that came with the kit while performing this installation.
Kohler Co. reserves the right to make revisions in the design of products without notice, as specified
in the Price Book.
1034591-2-F 4 Kohler Co.

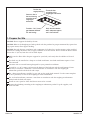
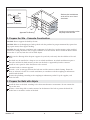
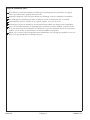
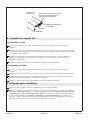
1. Prepare the Site
NOTICE: Do not support the bath by the rim.
NOTICE: Refer to the Roughing-in Guide packed with this product for proper minimum lbs/square foot
(kg/square meter) floor support loading.
NOTICE: Provide adequate ventilation and a minimum of 15 cubic feet (.4 cubic meters) in the installed
location for cooling the motor and to supply sufficient air for the blower. Do not install the blower motor
closer than 1″ (2.5 cm) from the wall or other objects.
Make sure the floor offers adequate support for your bath, and verify that the subfloor is flat and
level.
This bath may be installed in a drop-in or island installation. An island installation requires a four
side surround.
Construct 2x4 or 2x6 stud framing designed for your particular installation.
Provide for a 1/16″ (2 mm) gap between the bottom of the bath rim and the stud framing. Frame
the floor, or construct a frame for a raised installation in accordance with the roughing-in
information packed with the bath with airjets.
For a drop-in installation, carefully lay out and cut the rough deck material. Use the cutout template
if one is provided, or refer to the roughing-in cutout information.
For an island installation, construct a 2x4 frame in accordance with the roughing-in information
packed with the bath with airjets.
Install an access panel to allow the blower motor to be serviced.
Position the plumbing according to the roughing-in information packed. Cap the supplies, and
check for leaks.
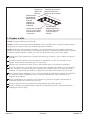
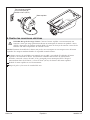
Frame the floor
according to the
roughing-in information.
Position the
rough plumbing.
Verify that the subfloor
offers adequate support,
and is flat and level.
Provide a 1/16" (2 mm)
gap between the bath
rim and framing.
Construct 2x4 or
2x6 stud framing
according to the
roughing-in
information.
Kohler Co. 5 1034591-2-F

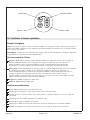
2. Prepare the Site - Concrete Construction
NOTICE: Do not support the bath by the rim.
NOTICE: Refer to the Roughing-in Guide packed with this product for proper minimum lbs/square foot
(kg/square meter) floor support loading.
NOTICE: Provide adequate ventilation and a minimum of 15 cubic feet (.4 cubic meters) in the installed
location for cooling the motor and to supply sufficient air for the blower. Do not install the blower motor
closer than 1″ (2.5 cm) from the wall or other objects.
Make sure the flooring offers adequate support for your bath, and verify that the subfloor is flat and
level.
This bath may be installed in a drop-in or in an island installation. An island installation requires a
four side surround. In both instances, make sure the deck is supported by brick or concrete.
Install an access panel to allow the blower to be serviced.
Construct brick or concrete supports.
Provide a 1/16″ (2 mm) gap between the bath rim and the concrete or brick framing. Frame the
floor, or construct a frame for a raised installation, in accordance with the roughing-in information
packed with the bath.
Position the plumbing according to the roughing-in information packed. Cap the supplies, and
check for leaks.
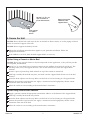
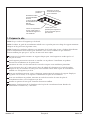
3. Prepare the Bath with Airjets
Install the drain to the bath according to the drain manufacturer’s instructions. Do not connect the
trap at this time.
Position a clean drop cloth or similar material in the bottom of the bath to protect the finish. Be
careful not to scratch the surface of the bath.
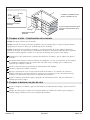
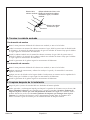
1/16"
(2 mm)
Typical
access
panel
Bath may be installed next
to the wall or as an island
installation.
Install an access panel to allow
the pump to be serviced.
Bath
Approved Tile Backing
Brick
Tile
Approved Tile Backing
Brick
Tile
1034591-2-F 6 Kohler Co.

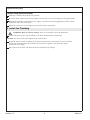
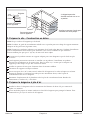
4. Secure the Unit
NOTICE: Do not lift the bath with airjets by the air channels or blower motor, or use the piping or blower
motor for structural support of the bath.
NOTICE: Do not support the bath by the rim.
Choose the installation option that best applies to your particular installation. Follow the
appropriate instructions.
If the subfloor is not level, shim the bath support blocks as necessary.
Option Using a Cement or Mortar Bed
NOTICE: Do not use gypsum cement or drywall compound for this application, as they will not provide
an acceptable, durable bond.
Spread a 2″ (5.1 cm) thick layer of cement or mortar on the subfloor where the bath will be set. This
will help secure, level, and support the unit. Clear all the material away from the support block
locations.
Position a piece of plastic drop cloth material on top of the cement or mortar bed.
With help, carefully lift the bath into place, and make sure the support blocks do not rest in the bed
material.
Insert the drain tailpiece into the trap. Make sure the bath is level and resting on all support blocks.
Remove the protective tape from the rim. Apply a continuous bead of high-quality silicone sealant
around the entire rim of the bath.
Allow the sealant to cure according to the manufacturer’s instructions.
Option Using Construction Adhesive
Apply a generous amount of high-quality construction adhesive to the bottom of the support blocks.
With help, carefully lift the bath into position.
Insert the drain tailpiece into the trap. Make sure the bath is level and resting on all support blocks.
Remove the protective tape from the rim. Apply a continuous bead of high-quality silicone sealant
around the entire rim of the bath.
Allow the sealant to cure according to the manufacturer’s instructions.
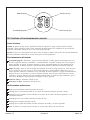
Clear spaces
for support
blocks.
Apply construction
adhesive to the
support blocks.
Spread a 2" (5.1 cm)
layer of cement or
mortar bed material.
Kohler Co. 7 1034591-2-F

Secure the Unit (cont.)
Option Using Silicone Sealant
With help, carefully lift the bath into position.
Insert the drain tailpiece into the trap. Make sure the bath is level and resting on all support blocks.
Remove the protective tape from the rim. Apply a continuous bead of high-quality silicone sealant
around the entire rim of the bath.
Allow the sealant to cure according to the manufacturer’s instructions.
5. Install the Plumbing
WARNING: Risk of property damage. Ensure a watertight seal on the bath drain.
Connect the drain to the trap according to the drain manufacturer’s instructions.
NOTICE: An access panel will simplify future maintenance.
Install the faucet valving according to the faucet manufacturer’s instructions. Do not install the
faucet trim until instructed. Open the hot and cold water supplies, and check the supply
connections for leakage.
Run water into the bath, and check the drain connections for leakage.
1034591-2-F 8 Kohler Co.

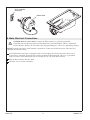
6. Make Electrical Connections
DANGER: Risk of electric shock. Connect the blower motor to a properly grounded,
grounding-type receptacle protected by Ground-Fault Circuit-Interrupters (GFCI’s) or Residual
Current Devices (RCD’s). Do not remove the plug grounding pins. Do not use grounding adapters.
NOTE: The bath with airjets model number is printed on a label near the blower motor. This label also
identifies the electrical rating.
Your Kohler bath with airjets is equipped with a cord and plug. The blower motor has been wired
at the factory. A licensed electrician must install a dedicated GFCI-protected, 120 V, 15 A, grounded
outlet. Locate the outlet behind the bath and within 24″ (61 cm) of the blower motor.
Plug the blower motor into this outlet.
Clean the area of all dust and debris.
Blower Motor
GFCI-Protected
Receptacle
Kohler Co. 9 1034591-2-F

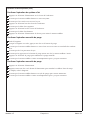
7. Test Run the Bath with Airjets
For information on unit operation, refer to the ″Confirm Proper Operation″ section.
Check all electrical connections, and make sure the electrical power to the bath with airjets is on.
Make sure all piping connections in the air harness are secure.
Verify that the blower motor is secure.
Temporarily remove the plastic drop cloth or other protective sheeting from the bath.
Fill the bath to a level at least 2″ (5.1 cm) above the top of the highest airjet.
Check the drain piping for leaks. Repair any leaks.
Operate the bath and check for air flow through the airjets. Check the air piping for air leaks.
Stop the bath and drain the water.
Return the plastic drop cloth or other protective sheeting to the bath.
Purge Mode
On/Off
Increases Flow
Decreases Flow
1034591-2-F 10 Kohler Co.

8. Complete the Finished Deck
Wood Construction
If you have not already done so, carefully remove the protective tape from the bath rim.
Cover the framing with water-resistant deck material. Seal the joints between the bath rim edge and
the water-resistant deck material with silicone sealant. Allow the sealant to cure in accordance with
the manufacturer’s instructions.
Install the finished deck to the water-resistant deck material. Seal the joints between the bath rim
and the finished deck material with silicone sealant. Allow the sealant to cure in accordance with
the manufacturer’s instructions.
Install the faucet trim according to the trim manufacturer’s instructions.
Concrete Construction
If you have not already done so, carefully remove the protective tape from the bath rim.
Apply mortar and tile to the wall and surround material as needed.
Apply a bead of sealant where the tile meets the bath surface. Allow the sealant to cure in
accordance with the manufacturer’s instructions.
Install the faucet trim according to the trim manufacturer’s instructions.
9. Clean-Up After Installation
Clean the area around the blower motor of all dust and debris.
Use warm water and a liquid detergent to clean the surface of the bath with airjets. Do not use
abrasive cleansers, as they may scratch and dull the surface. Do not use powdered cleaners unless
the cleaner is fully dissolved in water. Solid substances could block the airjets. Do not use bleach
or ammonia cleaning solutions. Chemically active cleaning solutions can damage the bath surface.
Refer to the homeowners guide for normal cleaning recommendations.
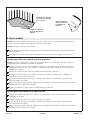
Bath
Framing
Finished Deck
Material
Apply silicone sealant to the edges
of the water-resistant deck
material and the finished deck.
Water-Resistant
Deck Material
Kohler Co. 11 1034591-2-F

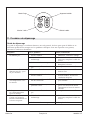
10. Confirm Proper Operation
Fill the Bath
NOTICE: Ensure that the area around the blower motor is free of sawdust, insulation, dirt, or other small
loose debris. Such material could clog the blower motor air ducts and reduce the air flow through the
blower motor.
NOTE: Please read these steps carefully before you operate your bath with airjets. Troubleshoot any
problems using the ″Troubleshooting″ section.
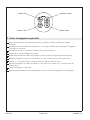
Keypad Operation
On/Off - Turns the blower motor on and off. Pressing the switch once starts the blower motor at a
midrange speed. Pressing the button again stops the blower motor. The blower motor automatically
stops after about 20 minutes of operation. The blower motor can be restarted by pressing the
On/Off button.
Purge Mode - Initiates the purge cycle manually. The purge cycle blows any residual water out of
the air channels after the bath has been drained. Pressing the button once starts the blower motor at
low-speed. The blower motor stops automatically after about two minutes. Pressing the button
again before the cycle ends will stop the blower motor. Note that this product also has an automatic
purge cycle, which initiates about 30 minutes after the blower has stopped.
Increases Flow - Increases the air flow.
Decreases Flow- Decreases the air flow.
Preliminary Checks
Temporarily remove all access panels.
Verify that the union connection at the check valve is securely hand tightened.
Verify that the screws are installed in the PVC air piping at the blower motor and at the check
valve.
Verify that cable ties support the air piping.
Verify that the blower motor is secure.
Verify that the keypad cable is securely connected at the user keypad and at the blower motor.
Fill the bath to a level at least 2″ (5 cm) above the top of the highest airjet.
Confirm Air System Operation
Purge Mode
On/Off
Increases Flow
Decreases Flow
1034591-2-F 12 Kohler Co.

Confirm Proper Operation (cont.)
Press the power button on the user keypad.
Observe that the blower motor starts at a midrange speed.
Observe that air is blowing through all of the airjets.
Press the up button on the user keypad.
Verify that the air flow increases.
Press the down button on the user keypad.
Verify that the air flow decreases.
Press the power button on the keypad to stop the blower motor.
Confirm Manual Purge Operation
Drain the bath.
When the bath has drained, press the purge button once.
Observe that the blower motor starts at low speed and blows any residual water from the air
channels.
Observe that air comes out of the airjets.
Verify that pressing the purge button again stops the blower motor.
Press the purge button to restart the manual purge.
Observe that the blower motor stops automatically after about two minutes.
Confirm Automatic Purge Operation
Press the power button.
Press the power button again to turn off the blower. Note the time.
If filled, drain the bath.
Observe that the blower motor starts in the purge cycle after about 30 minutes.
Observe that the blower motor stops automatically after about two minutes.
Kohler Co. 13 1034591-2-F

11. Troubleshooting Procedure
Troubleshooting Guide
This troubleshooting guide is for general aid only. A Kohler Authorized Service Representative or qualified
electrician should correct any electrical problems. For warranty service, contact your dealer or wholesale
distributor.
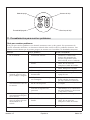
Symptoms Probable Causes Recommended Action
1. Bath with airjets does not
start.
A. No power to blower motor. A. Set/reset GFCI or ELCB breaker;
check wiring.
B. User keypad cable loose or
damaged.
B. Check wire connections. If
necessary, replace user keypad
cable.
C. User keypad does not work. C. Check wire connections. Replace
user keypad.
D. Blower motor does not work. D. Replace blower motor.
2. Blower motor starts, but
there are few or no
bubbles.
A. Blower motor is disconnected. A. Connect blower motor to air
harness.
B. Blower motor air flow is
restricted.
B. Clean the area around the blower
motor. Ensure adequate
ventilation.
3. Bath stops automatically
before 18 minutes.
A. GFCI or ELCB trips. A. Identify source of fault and
correct.
B. Motor overheated and protection
device activated.
B. Check for blockage at motor
vents. Remove blockage and
allow motor to cool.
4. Bath does not stop
automatically after 22
minutes.
A. Blower motor does not work. A. Replace blower motor.
5. Blower motor does not
stop when power button
on user keypad is
pressed.
A. User keypad cable loose or
damaged.
A. Check wire connections. If
necessary, replace user keypad
cable.
B. User keypad does not work. B. Replace user keypad.
6. Blower motor operates
but variable speed feature
does not work.
A. User keypad cable loose or
damaged.
A. Check wire connections. If
necessary, replace user keypad
cable.
B. User keypad does not work. B. Replace user keypad.
C. Blower motor does not work. C. Replace blower motor.
Purge Mode
On/Off
Increases Flow
Decreases Flow
1034591-2-F 14 Kohler Co.

Troubleshooting Procedure (cont.)
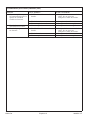
Symptoms Probable Causes Recommended Action
7. Automatic purge cycle
does not occur.
A. Blower motor does not work. A. Replace blower motor.
8. Manual purge cycle does
not work.
A. User keypad cable loose or
damaged.
A. Check wire connections. If
necessary, replace user keypad
cable.
B. User keypad does not work. B. Replace user keypad.
C. Blower motor does not work. C. Replace blower motor.
Kohler Co. 15 1034591-2-F
Page is loading ...
Page is loading ...
Page is loading ...
Page is loading ...
Page is loading ...
Page is loading ...
Page is loading ...
Page is loading ...
Page is loading ...
Page is loading ...
Page is loading ...
Page is loading ...
Page is loading ...
Page is loading ...
Page is loading ...
Page is loading ...
Page is loading ...
Page is loading ...
Page is loading ...
Page is loading ...
Page is loading ...
Page is loading ...
Page is loading ...
Page is loading ...
Page is loading ...
Page is loading ...
Page is loading ...
Page is loading ...
Page is loading ...
Page is loading ...
Page is loading ...
Page is loading ...
Page is loading ...
-
 1
1
-
 2
2
-
 3
3
-
 4
4
-
 5
5
-
 6
6
-
 7
7
-
 8
8
-
 9
9
-
 10
10
-
 11
11
-
 12
12
-
 13
13
-
 14
14
-
 15
15
-
 16
16
-
 17
17
-
 18
18
-
 19
19
-
 20
20
-
 21
21
-
 22
22
-
 23
23
-
 24
24
-
 25
25
-
 26
26
-
 27
27
-
 28
28
-
 29
29
-
 30
30
-
 31
31
-
 32
32
-
 33
33
-
 34
34
-
 35
35
-
 36
36
-
 37
37
-
 38
38
-
 39
39
-
 40
40
-
 41
41
-
 42
42
-
 43
43
-
 44
44
-
 45
45
-
 46
46
-
 47
47
-
 48
48


Ask a question and I''ll find the answer in the document
Finding information in a document is now easier with AI
in other languages
- français: Kohler K-1122-G-96 Guide d'installation
- español: Kohler K-1122-G-96 Guía de instalación
Related papers
-
Kohler K-1357-GRA-0 Installation guide
-
Kohler 1446-NA Installation guide
-
Kohler 877-96 Installation guide
-
-
Kohler K-716-47 Installation guide
-
Kohler 710-W-0 Installation guide
-
-
-
-
Other documents
-
Sterling 77301100-0 Installation guide
-
-
 Instant Mosaic 07102 Installation guide
-
B-Air BA-VP-50H-GY-18 User manual
-
-
H2flo FCSPS6012 Installation guide
-
Pylex 12098 Installation guide
-
i-box WJ202B Podium2 Portable Bluetooth Speaker User manual
-
 PACE supply FTD5135 Operating instructions
-
ProFlo FADS Installation guide

