12x12 Transom Top
Installation Instructions
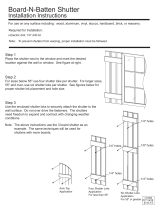
Fig. 1 (back of assembly)
Fig. 2 (front of assembly)
Step 1
Attach the Transom Top to the shutter by using the clips
provided. Align the shutter and the Transom Top on a
flat surface. Join them together by pushing each
clip on as far as it will go. Use 2 clips per Transom
Top. See Figure 1 at right for clip placement.
Step 3
Fastening the Transom Top to the wall is just
like fastening the shutter. With the shutter in
location against the wall, drill through the
Transom Top and wall a total of 3 1/4" with a
1/4" drill bit. See Figure 2 at right for proper
Shutter Lok location.
Step 4
Grasp the Shutter-Lok by supporting the
shank, and push it through the shutter hole
and into the wall surface. Tap the Shutter Lok
gently with a hammer to snug the shutter
against the siding. Do not over tighten , or
this will cause the shutter to dimple.
Step 2
Fasten the shutter to the wall using the
instructions supplied with the shutter.
Clip
1/4" hole
support rib will
need to be removed
-
 1
1
Builders Edge 050051412002 Installation guide
- Type
- Installation guide
- This manual is also suitable for
Ask a question and I''ll find the answer in the document
Finding information in a document is now easier with AI
Related papers
-
Builders Edge 050051412004 Installation guide
-
Builders Edge 088140059002 Installation guide
-
Builders Edge 050041400122 Installation guide
-
Builders Edge 1131467991 Installation guide
-
Builders Edge 010120060028 Installation guide
-
Builders Edge 060020665034 Installation guide
-
Builders Edge 9131212046 Specification
-
Builders Edge 060010665009 Installation guide
-
Builders Edge 060010933004 Installation guide
-
Builders Edge 180010009008 Installation guide
Other documents
-
 Vantage 8214075046 Installation guide
-
Ekena Millwork LL1S12X05500WI Installation guide
-
Craftsman 225582590 Owner's manual
-
KidKraft F24953 Installation guide
-
Andersen TW3042 User manual
-
Ply Gem VIN301259 93 Specification
-
KidKraft Falcon Ridge Wooden Swing Set - Assembly Included Assembly Instruction
-
Andersen CW135 R User manual
-
KidKraft McKinley Wooden Swing Set / Playset Assembly Instruction
-
 Cedar Summit Weston Lodge Deluxe Wooden Swing Set / Playset Installation And Operating Instructions Manual


