Page is loading ...

-1- elkhome.com
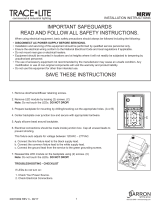
1. Position mounting bracket (A) so threaded ends
of attached xture mounting screws (E) are
facing out.
2. Carefully pull house wires through large hole in
mounting bracket (A).
3. Align holes in mounting bracket (A) with holes
in junction box. Make sure xture mounting
screws (E) are level.
4. Thread each junction box screw (B) into holes in
mounting bracket (A) and into holes in junction
box. Tighten junction box screws (B) to secure
mounting bracket (A) to junction box. CAUTION:
Make sure house wires are pulled completely
through hole in mounting bracket. DO NOT
pinch wires between mounting bracket and wall.
A
E
JUNCTION
BOX
ITEM#: 45091/1
WARNING: DISCONNECT POWER AT THE MAIN
FUSE BOX BEFORE INSTALLATION.
WARNING:
This xture is intended for installation in
accordance with the National Electrical Code
(NEC) and all local code specications. If you are
not familiar with code requirements, installation
by a certied electrician is recommended.
Before assembly, remove all parts and part
packages from box. If anything is missing, please
contact the retailer from which the product was
purchased.
5. Strip 3/4” of insulation from ends of xture
wires.
6. Slightly loosen ground screw on mounting
bracket (A). Do not completely remove ground
screw. Wrap house ground wire (copper) around
ground screw, leaving enough ground wire
to attach to xture ground wire. Twist end of
xture ground wire and end of house ground
wire together. Twist wire nut (C) onto ends of
wires. Completely tighten wire nut (C). Reference
chart below for correct wire connections.
B
B
ANY QUESTIONS CALL: 800-613-3261
M-F 8:00AM-6:00PM ET
E
Connect Supply (House) Ground Copper Wire to:
Bare Copper Wire or,
Bare Silver Wire or,
Green Insulated Wire.
GROUND
SCREW
A
HOUSE GROUND
WIRE (COPPER)
FIXTURE
GROUND
WIRE
C

-2- elkhome.com
10. Place backplate (D) over mounting bracket (A).
Pass holes in backplate (D) over ends of xture
mounting screws (E). CAUTION: Do not pinch
wires between backplate and wall.
11. Screw one threaded cap (F) onto end of each
xture mounting screw (E). Tighten both
threaded caps (F) to secure xture (D) to wall.
DO NOT over tighten.
12. Screw recommended bulb (E26 Edison bulb type,
not included.) into socket. Verify correct bulb
wattage marked on socket of xture. WARNING:
DO NOT exceed maximum bulb wattage.
7. Twist end of house lead wire (black) and end
of xture lead wire together. Twist wire nut (C)
onto ends of wires. Completely tighten wire nut
(C). Twist end of house neutral wire (white) and
end of xture neutral wire together. Twist wire
nut (C) onto ends of wires. Completely tighten
wire nut (C). Reference chart to the right for
correct wire connections.
8. Wrap electrical tape (not included) around wire
nuts (C) and wires. Ensure wires are securely
fastened into wire nuts.
9. Carefully push all wires and wire nuts into
junction box.
ITEM#: 45091/1
FIXTURE LEAD WIRE HOUSE LEAD WIRE
(BLACK)
FIXTURE GROUND
WIRE
HOUSE GROUND
WIRE (COPPER)
FIXTURE NEUTRAL
WIRE HOUSE NEUTRAL WIRE
(WHITE)
Connect Black Lead
Supply (House) Wire to:
Connect White Neutral
Supply (House) Wire to:
Black Wire or,
*Parallel Cord
(Round and Smooth) or,
Insulated Wire
(other than green)
with Copper Conductor.
White Wire or,
*Parallel Cord
(Square and Ridged) or,
Insulated Wire
(other than green)
with Silver Conductor.
*When parallel wire (SPT 1 & SPT 2) is used:
The lead wire is round in shape or smooth.
The neutral wire is square in shape or ridged.
No printed words on
wire insulation or,
Printed words on
wire insulation or,
E
A
BULB
D
F
E
Instructions for Mounting Fixture Outdoors
or in Wet Location
1. Mounting surface should be clean, dry, at
and 1/4” larger than canopy on all sides. Any
gaps between mounting surface and canopy
exceeding 3/16” should be corrected as
required.
2. Apply silicone caulking compound around top
and sides of canopy where back of canopy
meets wall surface to prevent water from
seeping into junction box. Leave bottom
unsealed so moisture can drain out.
MAINTENANCE NOTE: Only use a soft damp cloth
to clean xture as needed. DO NOT use harsh
chemicals on xture. Harsh chemicals may
damage xture.
Coastal conditions may cause mineral and residue
build-up on xture. It is recommended that
customers in coastal areas clean all external
surfaces of xture once every two weeks with a
wet cloth.
/