Page is loading ...

E-MANUAL
imagine the possibilities
Thank you for purchasing this Samsung product.
To receive more complete service, please register
your product at
www.samsung.com/register
Model _____________ Serial No. _____________

Contents
Channel Menu
• Using the INFO button (Now & Next guide) 1
• Using Channel menu (Watch TV) 2
• Memorizing channels 16
• Other Features 19
Basic Features
• Picture Menu 20
• Sound Menu 36
Preference Features
• Network Menu
for LCD 550 series and above
48
• System Menu 75
• Support Menu 96
Advanced Features
• My Contents 104
• Anynet+ 131
• AllShare™
for LCD 550 series and above
145
Other Information
• Troubleshooting 149
• Anti-theft Kensington Lock 168
• Licence 170

▶
English
❑ Using the INFO button (Now & Next guide)
The display identifies the current channel and the status of certain audio-video
settings.
The Now & Next guide shows daily TV program information for each channel
according to the broadcasting time.
●
Scroll ◄, ► to view information for a desired program while watching the
current channel.
●
Scroll ▲, ▼ to view information for other channels. If you want to move to the
currently selected channel, press the ENTER button.
*
It may differ depending on the model.
SPA-LA-0003

◀ ▶
English
◀
English
❑ Using Channel menu (Watch TV)
O
MENU
m
→
Support
→
Contents Home
→
ENTER
E
Press the CONTENT button to select Watch TV, then select the desired menu.
Each screen will be displayed.
■
Guide
The EPG (Electronic Program Guide)
information is provided by broadcasters.
Using program schedules provided by
broadcasters, you can specify programs
you want to watch in advance so that
the channel automatically changes to
the selected program channel at the
specified time. Program entries may
appear blank or out of date depending
on a channel status.
Guide
Schedule Manager
Channel List
Channel Manager
My Contents
Watch TV
Source

▶
English
◀ ▶
English
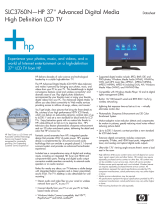
Using Guide
A
C B D
Sche. Mgr
AC
B
D
-24 Hours
A
C
B D
+24 Hours
AC B
D
Ch.Mode
Information Page Schedule
DTV Air 3 RCN MPEG4 HD
Home and Away
6:00 am - 6:30 am
ATLÉTICO MG X CORINTHIANS(HD)
Today
No Information
No Information
No Information
No Information
1 Caracol MPEG2
2 RCN MPEG2
3 RCN MPEG4
4 PRUEBA HD
5 QVC
6 R4DTT
▼
6:00 am 6:30 am 7:00 am 7:30 am
Tine Team
Fiv... No Information Dark Angel
JORNAL DA GLOBAL
3 RCN MPEG4 HD
Guide
Mon,25 Jan 6:38 am
Channel View - All
Home and...
*
It may differ depending on the model.
1 2 3 54 6 7

◀ ▶
English
◀
English
1
A
C B D
Red (Sche. Mgr): Moves to the Schedule List in Schedule Manager.
2
AC
B
D
Green (-24 Hours): Viewing the list of programs to be broadcasted before 24
hours.
3
A
C
B D
Yellow (+24 Hours): Viewing the list of programs to be broadcasted after 24
hours.
4
AC B
D
Blue (Ch.Mode): Select the type of channels you want to display on the Channel
List window.(All, TV, Radio, Data/Other, Favorites 1-5)
5 j (Information): Displays details of the selected program and let you make a
manual booking.
6 (Page): Move to previous or next page.
7 (Watch / Schedules)
●
When selecting the current program, you can watch the selected program.
●
When selecting the future program, you can reserve to watch the selected
program. To cancel the schedule, press the ENTER button again and select
Cancel Schedules.

▶
English
◀ ▶
English
■
Schedule Manager
Cancel or set the Timer Viewing to display the channel you want at the intended
time.
Using Timer Viewing
You can set a desired channel to be displayed automatically at the intended time.
Set the current time first to use this function.
1. Press the ENTER
E
button to add add programme to schedule manually.
2. Press the
◄/►/▲/▼
button to set the Antenna, Channel, Repeat, Date,
Start Time.
●
Antenna: Select the desired broadcasting signal.
●
Channel: Select the desired channel.

◀ ▶
English
◀
English
●
Repeat: Select Once, Manual, Sat~Sun, Mon~Fri or Everyday to set at
your convenience. If you select Manual, you can set the day you want.
N
The (
) mark indicates the day you’ve selected.
●
Date: You can set the desired date.
N
It is available when you select Once in Repeat.
●
Start Time: You can set the start time you want.
N
If you want to edit or cancel the schedule, select the reserved schedule on
the Schedule List, and select the Edit or Cancel Schedules.

▶
English
◀ ▶
English
■
Channel List
You can view channel information, All,
TV, Radio, Data/Other, Analog or
Favorites 1-5.
N
When you press the CH LIST
button on the remote control,
Channel List screen will be
displayed at once.
●
All: Shows all currently available
channels.
●
TV: Shows all currently available TV channels.
●
Radio: Shows all currently radio channels.
●
Data/Other: Shows all currently available MHP or other channels.
●
Analog: Shows all currently available analog channels.
●
Favorites 1-5: Shows all favorite channels.
Air
AC B D
Antenna
AC B D
Program View
L
Ch.Mode
E
Watch
Page
Channel List
All
1 Air
2
Air
3
Air
4 Air
5 Air
6 Air
7 Air
8 Air
9 Air

◀ ▶
English
◀
English
N
Favorites 1-5 will be displayed when you set Add to Favorites.
N
If you want to view favorite channels you added, press the CH LIST button
and use
L
(Ch.Mode) button to move Favorites 1-5.
N
Using the color buttons with the Channel List.
●
AC B D
Red (Antenna): Switches to Air or Cable.
●
A
C
B D
Yellow (Program View /Channel View): Displays the program when
digital channel is selected. Returns to the channel view.
●
L
(Ch.Mode / Channel): Move to the All, TV, Radio, Data/Other or
Favorites 1-5.
N
When you press the
A
C
B D
(Program View) button, you can move to
other channels using
L
(Channel) button.

▶
English
◀ ▶
English
●
●
E
(Watch / Information): Watches the channel you select. / Displays
details of the selected program.
●
k●
(Page): Move to next or previous page.
Channel Status Display Icons
Icon Operations
An analog channel.
A reserved program.
A locked channel.

◀ ▶
English
◀
English
How to use Timer Viewing in Channel List (digital channels only)
When you set the Timer Viewing in Channel List, you can only set the program in
Program View.
1. Press the CH LIST button, then select a desired digital channel.
2. Press the
A
C
B D
(Program View) button.
3. Press the
▲
/
▼
buttons to select the desired program, then press the
E
(Information) or INFO button.
4. Select Timer Viewing, then press the ENTER
E
button when done.
N
If you want to cancel Timer Viewing, follow steps 1 through 3. Select Cancel
Schedules.

▶
English
◀ ▶
English
■
Channel Manager
You can edit the channel to your preference.
●
( ) Channels: Shows the channel
list according to the channel type.
●
( ) Favorites 1-5: Shows favorite
channels.
N
Using the color buttons with the
Channel Manager.
●
A
C B D
Red (Antenna): Switches to
Air or Cable.
●
AC B
D
Blue (Sorting): Changes the list ordered Channel Number, Channel
name.
Air
AC B D
Antenna
AC B D
Sorting
E
Select
Tools
R
Return
Channel Manager
Added Ch.
Seclected item: 2 Channel number
1/1 page
3 ---- Air
4 ---- Air
5 ---- Air
6 ---- Air
7 ---- Air
8 ---- Air
9 ---- Air
10 ---- Air
11 ---- Air
12 ---- Air
13 ---- Air
14 ---- Air
15 ---- Air
16 ---- Air
17 ---- Air
18 ---- Air

◀ ▶
English
◀
English
Channel Status Display Icons
Icon Operations
An analog channel.
A channel selected.
F
A channel set as a Favorites.
A locked channel.
Displays the Channel Manager option menu.
Channel Manager Option Menu
Set each channel using the Channel Manager menu options (Watch, Add to
Favorites/Edit Favorites, Lock/Unlock, Edit Channel Name/Edit Channel Number,
Delete, Deselect All, Select All). Option menu items may differ depending on the
channel status.

▶
English
◀ ▶
English
1. Select a channel and press the TOOLS button.
2. Select a function and change its settings.
●
Watch: Watch the selected channel.
●
Add to Favorites/Edit Favorites: Set channels you watch frequently as Favorites.
1. Select the Add to Favorites/Edit Favorites, then press the ENTER
E
button.
N
If the channel is already added to favorite channel, Edit Favorites will be
shown. Add or Delete the selected channel in Favorites 1-5.
2. Press the ENTER
E
button to select Favorites 1-5, then press the OK
button.
N
One favorite channel can be added in several of Favorites among
Favorites 1-5.

◀ ▶
English
◀
English
●
Lock/Unlock: Lock a channel so that the channel cannot be selected and viewed.
N
NOTE
●
This function is available only when the Channel Lock is set to On.
●
The PIN input screen appears. Enter your 4-digit PIN, the default of which
is “0-0-0-0”. Change the PIN using the Change PIN option.
●
Edit Channel Name (analog channels only): Assign your own channel name.
●
Edit Channel Number (digital channels only): Edit the number by pressing the
number buttons desired.
N
Some area may not be able to support Edit Channel Name and Edit
Channel Number function.

▶
English
◀ ▶
English
●
Delete: Delete or add a channel to display the channels you want.
●
Deselect All: Deselect all the selected channels.
N
You can only select Deselect All when one or more channels are selected.
●
Select All: Select all the channels in the channel list.

◀ ▶
English
◀
English
❑ Memorizing channels
O
MENU
m
→
Channel
→
ENTER
E
■
Antenna (Air / Cable)
Before your television can begin memorizing the available channels, you must
specify the type of signal source that is connected to the TV (i.e. an Air or a
Cable system).

▶
English
◀ ▶
English
■
Auto Tuning
Scans for a channel automatically and stores in the TV.
N
Automatically allocated program numbers may not correspond to actual
or desired program numbers. If a channel is locked, the PIN input window
appears.
N
If the antenna is connected to ANT 2 IN (CABLE), select Cable and if it is
connected to ANT 1 IN (AIR), select Air.
When Antenna Source is set to Air or Cable:
When selecting Air: Provide a value to scan for Digital and Analog channels.
When selecting Cable: Provide a value to scan for Analog channels.
–
Analog Cable System: Select the Analog Cable System among STD,
HRC, and IRC by pressing the
▲
,
▼
,
◄
or
►
button, then press the
Search button.

◀ ▶
English
◀
English
■
Digital Manual Tuning
Scans for a digital channel manually and stores in the TV. Press the
A
C B D
(New)
button to search the digital channels by adjusting the Channel or Frequency.
N
If a channel is locked, the PIN input window appears.
N
Digital Manual Tuning is only available in digital TV mode.
●
Channel: Set the channel number using the
▲
,
▼
or number (0~9)
buttons.
●
Frequency: Set the frequency using the number buttons.
■
Channel Add/Delete
(analog channels only)
You can delete or add a channel to display the channels you want. This function
is only available in the Tools menu.
/