Trendnet RB-TV-IP572WI User manual

Category
Security cameras
Type
User manual

This manual is also suitable for

© Copyright 2011TRENDnet. All Rights Reserved.
TRENDnet User’s Guide
Table of Contents
i
Contents
Product Overview ........................................................................... 1
Package Contents .......................................................................................................... 1
Features ......................................................................................................................... 1
Product Hardware Features........................................................................................... 2
Application Diagram ...................................................................................................... 4
Installation ...................................................................................... 5
Wired Connection ..................................................................................................... 5
WPS Connection ........................................................................................................ 5
Starting the Setup Wizard ............................................................... 6
Configuration ................................................................................ 11
Setup Wizard ............................................................................................................... 12
System ......................................................................................................................... 15
Network................................................................................................................... 17
Wireless Setup......................................................................................................... 19
Dynamic DNS ........................................................................................................... 19
Video and Audio .......................................................................................................... 20
Video and Audio: ..................................................................................................... 20
Day/Night Mode ...................................................................................................... 21
Audio Setup ............................................................................................................. 21
Image Setup ............................................................................................................ 21
Action ........................................................................................................................... 22
Recording ................................................................................................................ 22
Video Clip ................................................................................................................ 24
Snapshot ................................................................................................................. 26
SD Management...................................................................................................... 26
Motion Detection ........................................................................................................ 27
Tools ............................................................................................................................ 28
System ..................................................................................................................... 28
Firmware Upgrade .................................................................................................. 28
Advanced ..................................................................................................................... 29
Device Info .............................................................................................................. 29
Log ........................................................................................................................... 29
How to setup/access the camera remotely .................................... 30
Technical Specifications ................................................................ 33
Troubleshooting ........................................................................... 37
© Copyright 2013 TRENDnet. All Rights Reserved.
TRENDnet User’s Guide
TV-IP572W / TV-IP572WI
1
Product Overview
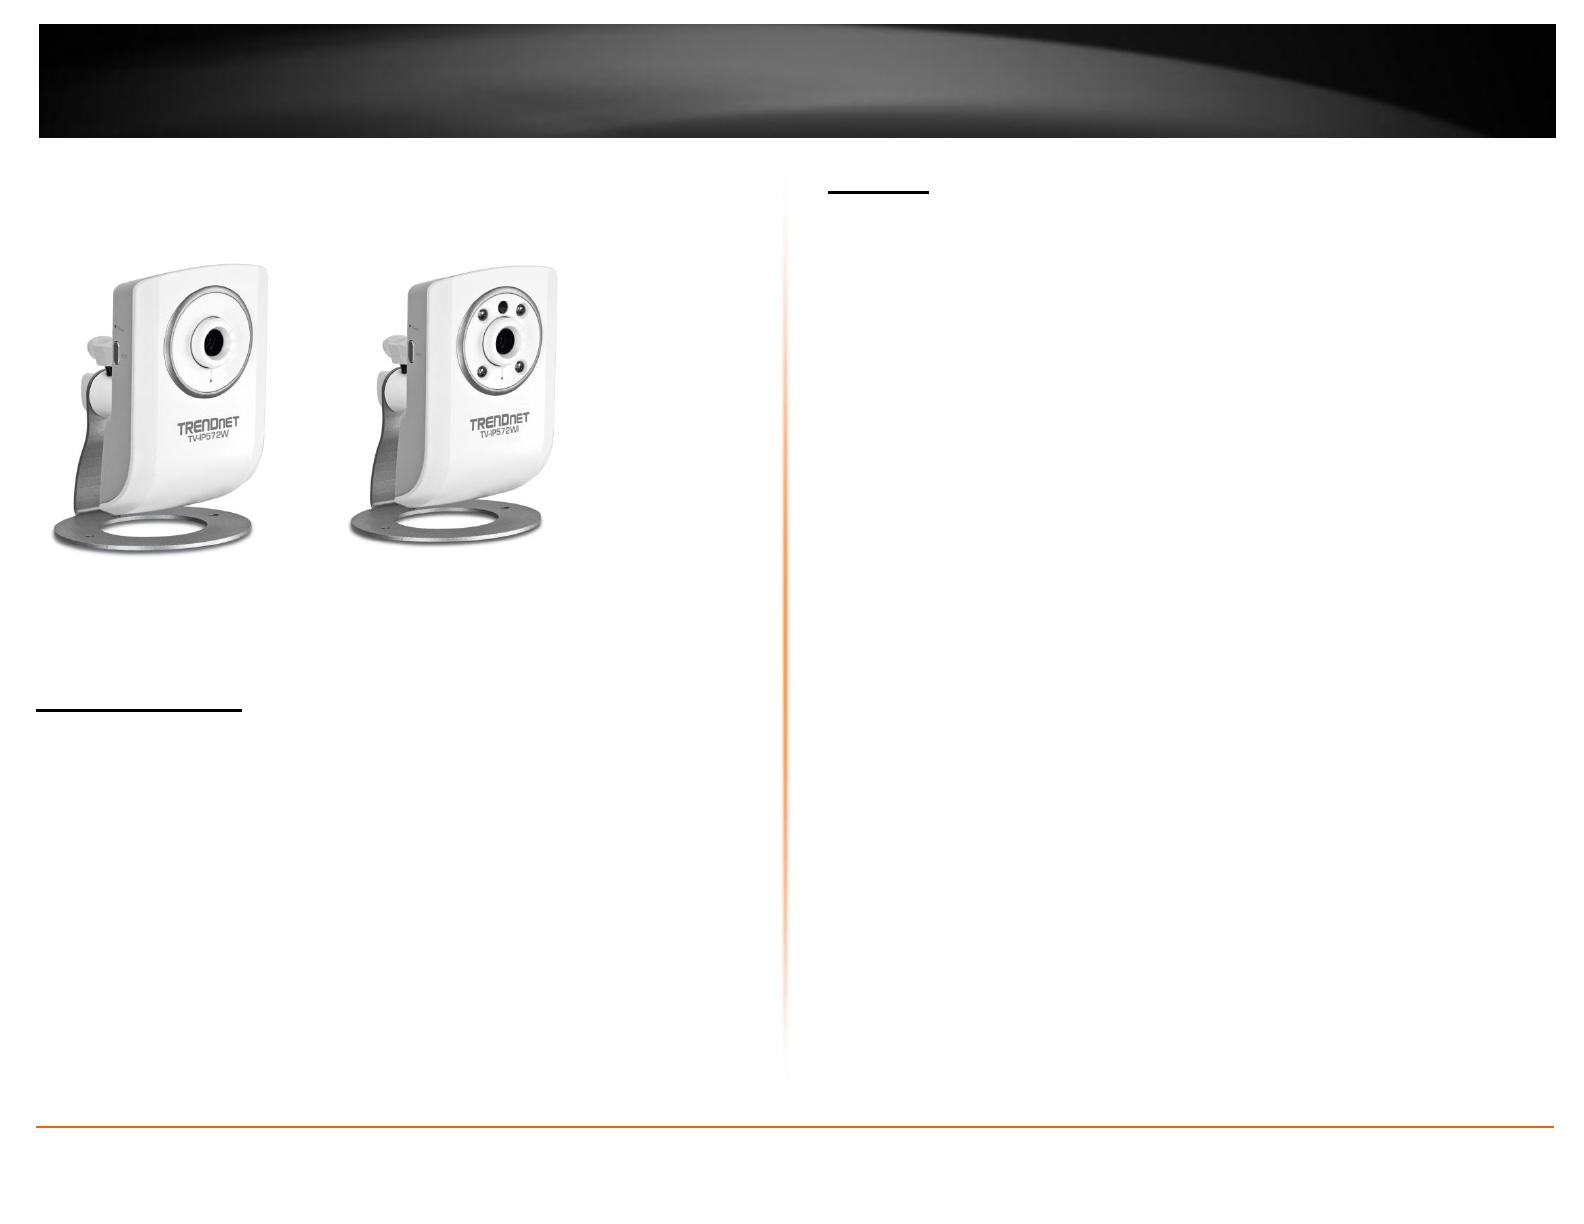
TV-IP572W TV-IP572WI
Package Contents
In addition to your camera, the package includes:
Muti-Language Quick Installation Guide
CD-ROM (Utility &User’s Guide)
Network cable (1.5m / 5ft)
Power adapter (5V DC, 1.2A)
If any package contents are missing or damaged, please contact the retail store, online
retailer, or reseller/distributor that the item was purchased.
Features
TV-IP572W
The Megapixel Wireless N Internet Camera, model TV- IP572W, transmits real-time
Megapixel video over the Internet.
Wireless n technology provides unsurpassed wireless coverage and improved streaming
video quality. Add this camera to your wireless network at the touch of a button with
Wi-Fi Protected Setup (WPS).
Record 1280 x 800 Megapixel (WXGA) video at up to 30 frames per second (fps).
Manage up to four video profiles to record HD video while streaming low resolution
video to a compatible smart phone at the same time. Manage up to 32 TRENDnet
cameras with the included complimentary camera management software. Advanced
features include adjustable motion detection recording areas, email alerts, scheduled
recording sessions, H.264/MPEG-4/MJPEG image compression, date-and-time overlays,
a Micro-SD card slot for backup storage, two-way audio (speakers not included), an
adjustable lens, and four times digital zoom. A wall/ceiling mounting kit is included and
the camera’s off white housing blends into most environments.
TV-IP572WI
The Megapixel Wireless N Day/Night Internet Camera, model TV- IP572WI, transmits
real-time Megapixel video over the Internet. Record indoor video in complete darkness
for distances of up to 7.5 meters.
Wireless n technology provides unsurpassed wireless coverage and improved streaming
video quality. Add this camera to your wireless network at the touch of a button with
Wi-Fi Protected Setup (WPS).
Record 1280 x 800 Megapixel (WXGA) video at up to 30 frames per second (fps).
Manage up to four video profiles to record HD video while streaming low resolution
video to a compatible smart phone at the same time. Manage up to 32 TRENDnet
cameras with the included complimentary camera management software. Advanced
features include adjustable motion detection recording areas, email alerts, scheduled
recording sessions, H.264/MPEG-4/MJPEG image compression, date-and-time overlays,
a Micro-SD card slot for backup storage, two-way audio (speakers not included), an
adjustable lens, and four times digital zoom. A wall/ceiling mounting kit is included and
the camera’s off white housing blends into most environments.
© Copyright 2013 TRENDnet. All Rights Reserved.
TRENDnet User’s Guide
TV-IP572W / TV-IP572WI
2
Product Hardware Features
Rear Panel View
LAN Port Connect Ethernet cables to your wired network devices.
Power Port Connect the included power adapter from your camera to an
available power outlet.
Note: Use only the adapter that came with your camera.
Front Panel View
IR LED Built-in 4 IR LED for night vision uses. (For TV-IP572WI)
Light Sensor Detects the light source to turn IR on or off.
Microphone Built-in microphone; can be turn on or off.
Focus Ring Turn to adjust the focus of the camera.
Power -This LED indicator is solid blue when your camera is powered on.
Otherwise if this LED indicator is off, there is no power to your camera.
Link This LED indicator is blinking orange when there is connection/data to
your camera.
IR LED
Power port
Ethernet port
Light Sensor
Microphone
Camera Lens
Focus Ring
© Copyright 2013 TRENDnet. All Rights Reserved.
TRENDnet User’s Guide
TV-IP572W / TV-IP572WI
3
Side Panel View
Reset Button Use an item such as a paperclip to push and hold this button for
3 seconds and release to reset your camera to its factory defaults.
WPS (Wi-Fi Protected Setup) Push and hold this button for 3 seconds to
activate WPS. The button LED is blinking green when WPS is activated.
Side Panel View
Line out Use this to plug in a 3
rd
party speaker.
Micro SD slot Insert a Micro-SD card to store camera video files.
Reset
WPS
Line out
Mini SD card slot
© Copyright 2013 TRENDnet. All Rights Reserved.
TRENDnet User’s Guide
TV-IP572W / TV-IP572WI
4
Camera Stand
Metal Stand- This base allows the camera to stand upright.
Adjustable Arm- Screw the arm through the metal stand hole. Use the
adjustable screw to turn it up or down.
Washer- Place the washer between the camera and the Plastic Bolt
Plastic Bolt- Place the plastic bolt after the washer and screw the adjustable
arm in place.
Application Diagram
© Copyright 2013 TRENDnet. All Rights Reserved.
TRENDnet User’s Guide
TV-IP572W / TV-IP572WI
5
Installation
Wired Connection
1. Connect the Ethernet Cable
If you intend to use the network camera as a wired device, connect one end of
the included Ethernet cable into the Ethernet port on the rear panel of the
camera and connect the other end to an available port on your network. If you
prefer to use the camera on a wireless network, see below for instructions on
connecting the power adapter.
2. Attach the Power Supply
Attach the included power supply to the DC5V 1.2A receptor on the rear panel
of the camera and then connect it to a wall outlet or power strip. A blue LED
will light up under the lens indicating that the camera has power.
WPS Connection
An alternative method of connecting your camera to your network is by using WPS. WPS
is a quick, simple and secure method of adding devices to a network. If you have a
router which supports WPS follow the steps below, otherwise, please use the wired
mode of setting up the camera.
1. Attach the Power Supply
2. Press the WPS button on your wireless device then press the WPS button on
the camera.
© Copyright 2013 TRENDnet. All Rights Reserved.
TRENDnet User’s Guide
TV-IP572W / TV-IP572WI
6
Starting the Setup Wizard
Insert the included CD-ROM into your CD/DVD drive. The Install Wizard program will run
automatically.
Note: If the Install Wizard does not run, you may have autorun disabled on your
machine. In this case, browse to the CD drive and run InstallWizard.exe to begin the
installation wizard.
Begin by selecting Setup Wizard and follow the on-screen steps to continue the
installation.
When the installation of the Setup Wizard is complete, run the Setup Wizard:
1. Click Start > Programs >TRENDnet>SetupWizard>SetupWizard. The TRENDnet
Setup Wizard appears.
2. Connect an RJ-45 cable from a switch/router to the Ethernet port on the back
of the camera and connect the AC power adapter to the camera. Click Next to
proceed.
3. From the list of cameras that appears, select the camera you wish to configure
and click Next to continue. If your camera is not listed, ensure that it is
connected to both power and the network and click to re-scan
the network for your camera.
© Copyright 2013 TRENDnet. All Rights Reserved.
TRENDnet User’s Guide
TV-IP572W / TV-IP572WI
7
4. Login to your camera by entering the ID and Password. By default, both the ID
and Password are set to admin. Click Next to continue.
5. Enter a name for the camera in the Camera Name field. The name will be used
to identify your camera on the network. Enter the correct time for the camera
for the time zone it is in. If your camera is in the same time zone as the
computer you are using, click the icon to copy the local time
to the camera. Click Next to continue.
6. It is strongly recommended that you change your password to secure the
camera from being accessed by others. Check the Change Password box and
enter the new password in both password fields to confirm the new password.
Click Next to continue.
7. Select a connection option: (example uses DHCP connection type)
PPPoE: Select this option if your camera is directly connected to a DSL modem
and your ISP requires a PPPoE authentication to the Internet.
DHCP: Select this option if your camera is connected to a router and DHCP is
enabled.
Fixed IP: Select this option if your camera is directly connected to a DSL modem
and your ISP has supplied you with a fixed IP for your Internet connection.
Select the radio button for your connection type and click Next to continue.
© Copyright 2013 TRENDnet. All Rights Reserved.
TRENDnet User’s Guide
TV-IP572W / TV-IP572WI
8
8. Select whether you want to use the camera over an wireless connection or on a
wired connection. Click No, I don’t want to use wireless for the camera. Then
click Next to continue. (skip to step 12 for wireless configuration)
9. A summary screen of the settings you have chosen appears. Click Next to
continue.
10. After the Setup Wizard configures the camera, the wizard starts to setup
process.
11. When the Setup Wizard has finished, the configuration is complete and the
following screen appears:
You are now ready to use your camera.
Click the IP address link or the link button to access the camera’s
advanced configuration page.
© Copyright 2013 TRENDnet. All Rights Reserved.
TRENDnet User’s Guide
TV-IP572W / TV-IP572WI
9
12. When selecting the wireless setup chooses “I want to use wireless for the
camera, click Next to continue.
Wireless Connection
Find the access point (AP) you wish to connect to from the Available AP drop
down menu.
In most cases you should leave the Channel set to Auto as the AP will
determine the channel of operation.
Select the type of authentication and encryption required by the access point
and enter the Key required to connect.
13. A summary screen of the settings you have chosen appears. Click Next to
continue.
14. After the Setup Wizard configures the camera, a screen prompting you for the
connection method appears.
Check the radio button for the method of connection you want to use for your camera
and click Next to continue.
© Copyright 2013 TRENDnet. All Rights Reserved.
TRENDnet User’s Guide
TV-IP572W / TV-IP572WI
10
15. Connecting over wireless
Disconnect the Ethernet cable from the camera and wait for 1 minute for the
camera to turn to wireless mode then click Next to continue.
When the Setup Wizard has finished, the configuration is complete. If there is
no wireless connection found, the following screen will appear:
When the Setup Wizard has finished, the configuration is complete. If there is a
wireless connection found, the following screen will appear:
© Copyright 2013 TRENDnet. All Rights Reserved.
TRENDnet User’s Guide
TV-IP572W / TV-IP572WI
11
Configuration
After completing the Setup Wizard, you are ready to use your camera. The camera’s
built-in Web configuration utility is designed to allow you to easily access and configure
your TV-IP572W or TV-IP572WI camera. Open a web browser such as Internet Explorer®
and enter the IP address of your camera. To log in, use the User name admin and the
password you created in the Setup Wizard. If you did not create a password, the default
password is admin. After entering your password, click OK.
The home page for the TV-IP572W or TV-IP572WI appears.
An explanation of Live View
Live view has many options. Lets take a closer look.
Snapshot takes a picture of the camera’s recordings
Profiles select from different resolutions settings
Full Screen Mode Toggles between full screen mode and normal mode
Storage Folder Select storage destination
Speaker button Turns speaker feature on/off
Microphone Turns microsphone feature on/off
Zoom buttons To zoom in on the live view
Record press to record the camera video
© Copyright 2013 TRENDnet. All Rights Reserved.
TRENDnet User’s Guide
TV-IP572W / TV-IP572WI
12
Setup Wizard
To view the Setup Wizard settings:
1. Login to the camera as described in the section Using the web-based
configuration interface.Click on the Setup tab on the left panel.
2. Click Wizard. The Welcome to Internet Connection Setup Wizard screen
appears.
From the menu on the right side of the screen, click Next to start the Setup Wizard.
Step 1: LAN Settings
This screen provides two connection options: DHCP Connection and Static IP Address.
In DHCP Connection all fields are non-existent cause your router selects an IP address
for you. Under Static IP address field to enter the IP address details yourself according
to what your network provider gave you. Select the appropriate option and click Next to
continue.
© Copyright 2013 TRENDnet. All Rights Reserved.
TRENDnet User’s Guide
TV-IP572W / TV-IP572WI
13
Step 2: Internet Settings
This screen provides PPPoE settings and allows the camera to be connected directly to
your ADSL modem. Click the Enable checkbox to setup PPPoE. Enter a username and
password. If your internet connection doesn’t call for PPPoE deselect the Enable
checkbox and click Next
Step 3: DDNS Settings
This screen provides DDNS settings. Click the Enable checkbox to setup DDNS. Once you
have clicked Enable, select your DDNS Server and enter your Server Address. Enter a
Host Name, User Name, and Password. Verify the password by entering your details
again and then enter the Timeout settings in hours. Click Next to continue. If you do not
want to use the DDNS settings uncheck the Enable checkbox and click Next.
© Copyright 2013 TRENDnet. All Rights Reserved.
TRENDnet User’s Guide
TV-IP572W / TV-IP572WI
14
Step 4: Camera Name Settings
This screen provides Camera Name settings. In the Camera Name field type the name
you wish to assign to the camera and click Next to continue.
Step 5: Time Zone Settings
This screen provides Time Zone settings. From the Time Zone drop-down list, select
your time zone. Click Enable Daylight Saving if you are going to use that time method
and select either Auto Daylight Saving or Set date and time manually. Click Next to
continue.
© Copyright 2013 TRENDnet. All Rights Reserved.
TRENDnet User’s Guide
TV-IP572W / TV-IP572WI
15
Step 6: Setup Complete
This screen provides Configuration Settings. The final screen shows the information you
have just configured. Click Back to make changes, Apply to set the changes and Cancel
to exit without saving the settings.
The camera will gather and rebootthe camera to its new settings
System
System is divided into two main sections Admin and Time & Date. The Admin section
is where all Device Management configurations are handled.
Device Management consists of Admin Password Settings:
Admin Password Settings: Here you can change the administrator password settings.
Enter the Old Password, New Password, and Confirm New Password in their respective
fields.Click Save to continue.
© Copyright 2013 TRENDnet. All Rights Reserved.
TRENDnet User’s Guide
TV-IP572W / TV-IP572WI
16
Add User Account: Here you can add users who want to view images on the W/WI
Enter a User Name, Password, and Verify the New Password.Click Add to continue.
User List: Here you can select a user and click the Delete button to remove the user
from your list.
Authentication: Here you have three options to authenticate. RTSP Authentication,
HTTP Authentication, and Snapshot. Click the checkbox to enable each authentication
process or leave them blank. Click Save to continue.
The camera allows users to access the video directly
For Internet Explorer, http://camera ip/directview/tvaview.cgi
For Non Internet Explorer, http://camera ip/directview/tvjview.cgi
When HTTP Authentication is enabled, user name and password are required to access
the direct view page.
Device Settings: Here you can change the Camera Name, click OSD to enable the Label
Name and check Time Stamp to singe times into your images. The LED light has three
options from the drop-down list: Power/Link, Off, or Flicker. The options are self-
explanatory. Click Save to continue.
The next configurable section under System is Time and Date. If you didn’t set the time
and date settings in the Setup Wizard, you can change them here.
© Copyright 2013 TRENDnet. All Rights Reserved.
TRENDnet User’s Guide
TV-IP572W / TV-IP572WI
17
Under Time Configuration, select a Time Zone from the drop-down list. Click the
checkbox next to Enable Daylight Saving to enable this function and choose either Auto
Daylight Saving or Set DST Manually. Click Apply to continue.
Under Automatic Time Configuration, click the Synchronize with NTP Server checkbox
if you wish to sync your W/WI with your NTP server. Click Apply to continue.
Under Set Date and Time Manually, click the Setup Date and Time Manually checkbox
if you wish to set the time by yourself. From the drop-down list on all settings, select
your time and click Apply to continue or click Copy Your Computer’s Time Settings.
Network
This screen shows the LAN Settings. If you didn’t set your LAN settings in the Setup
Wizard, you can set them up here.
Under LAN Settings, select either DHCP Connection or Static IP Address. If you want to
setup PPPoE, click the PPPoE checkbox and enter the Username, Password, confirm the
Password and click Apply. The Status will change from Disabled to Enabled.
© Copyright 2013 TRENDnet. All Rights Reserved.
TRENDnet User’s Guide
TV-IP572W / TV-IP572WI
18
Under Port Settings, select the HTTPPort (80 is the default) and also select the
RTSPPort(554). Under UPnP, click the UPnP checkbox if you want to enable this
function. Click the UPnP Port Forwarding checkbox if you want to enable to set the
ports. Select the External HTTP port (the default is set) and select the RTSP port (the
default is set at 554). If you are using a MAC check the Bonjour checkbox to enable this
function. Click Apply to set the changes.
© Copyright 2013 TRENDnet. All Rights Reserved.
TRENDnet User’s Guide
TV-IP572W / TV-IP572WI
19
Wireless Setup
This screen shows the Wireless Settings. Click the Wireless checkbox to enable wireless.
Complete the details in the fields according to your router. Enter a Network Name,
under Site Survey select the SSID from the drop-down list or rescan your network
settings. Select the Wireless Mode from the drop-down list (Infrastructure, Ad-Hoc
mode). Select your Security Mode from the drop-down list. Select from WEP/WPA-
PSK/WPA2-PSK. Finally enter the security key. Click Apply to accept the changes.
WEP Wired Equivalent Privacy is a security protocol for wireless local area networks
defined in the 802.11b standard. WEP provides the same level of security as that of a
wired LAN.
WPA-PSK - is a more secured method of wireless encryption. With WPA-PSK you don’t
provide your router with an encryption key but rather a paraphrase.
WPA2-PSK highly secured method of wireless encryption.
Dynamic DNS
Also under Network Settings is Dynamic DNS. If you have not enabled this function in
the Setup Wizard click the DDNS checkbox to enable Dynamic DDNS. Select your DDNS
server from the drop-down list and fill in the parameters from these fields: Host Name,
User Name, Password, Confirm Password, and Timeout. Click Apply to set these
changes and continue.
  • Page 1 1
  • Page 2 2
  • Page 3 3
  • Page 4 4
  • Page 5 5
  • Page 6 6
  • Page 7 7
  • Page 8 8
  • Page 9 9
  • Page 10 10
  • Page 11 11
  • Page 12 12
  • Page 13 13
  • Page 14 14
  • Page 15 15
  • Page 16 16
  • Page 17 17
  • Page 18 18
  • Page 19 19
  • Page 20 20
  • Page 21 21
  • Page 22 22
  • Page 23 23
  • Page 24 24
  • Page 25 25
  • Page 26 26
  • Page 27 27
  • Page 28 28
  • Page 29 29
  • Page 30 30
  • Page 31 31
  • Page 32 32
  • Page 33 33
  • Page 34 34
  • Page 35 35
  • Page 36 36
  • Page 37 37
  • Page 38 38
  • Page 39 39
  • Page 40 40
  • Page 41 41
  • Page 42 42
  • Page 43 43

Trendnet RB-TV-IP572WI User manual

Category
Security cameras
Type
User manual
This manual is also suitable for

Ask a question and I''ll find the answer in the document

Finding information in a document is now easier with AI