Philips HTS3300K/51 User manual
- Category
- DVD players
- Type
- User manual
This manual is also suitable for

1
3139 115 2xxx1
DVD HOME THEATER SYSTEM
Thank you for choosing Philips.
Need help fast?
Read your Quick-Use Guide and/or User Manual first for quick
tips that make using your Philips product more enjoyable.
If you have read your instructions and still need assistance,
you may access our online help at www.philips.com/support
HTS3300K
User Manual 4
PУКОВОДСТВО ПОИЬЗОВАТЕИЯ 46

2
3139 115 2xxx1
LASER
Type Semiconductor laser
GaAlAs
Wave length 650~660 nm (DVD)
784~796 nm (CD)
Output Power 7 mW (DVD)
10 mW (VCD/CD)
Beam divergence 60 degree
Manufactured under license from
Dolby Laboratories. “Dolby”, “Pro
Logic” and the double-D symbol are
trademarks of Dolby Laboratories.
Manufactured under license from
Digital Theater Systems, Inc. U.S. Pat.
Noís. 5,451,942; 5,956,674; 5,974,380;
5,978,762; 6,226,616; 6,487,535 and
other U.S. and world-wide patents
issued and pending. “DTS” and “DTS
Digital Surround” are registered
trademarks of Digital Theater Systems,
Inc. Copyright 1996, 2003 Digital Inc.
All Rights Reserved.
For Customer Use:
Read carefully the information located at
the bottom of your DVD system and
enter below the Serial No. Retain this
information for future reference.
Model No. DVD VIDEO HTS3300K
Serial No. ___________________
‘CONSUMERS SHOULD NOTE THAT NOT ALL HIGH
DEFINITION TELEVISION SETS ARE FULLY
COMPATIBLE WITH THIS PRODUCT AND MAY CAUSE
ARTIFACTS TO BE DISPLAYED IN THE PICTURE. IN
CASE OF 525 OR 625 PROGRESSIVE SCAN PICTURE
PROBLEMS, IT IS RECOMMENDED THAT THE USER
SWITCH THE CONNECTION TO THE ‘STANDARD
DEFINITION’ OUTPUT. IF THERE ARE QUESTIONS
REGARDING OUR TV SET COMPATIBILITY WITH THIS
MODEL 525p AND 625p DVD PLAYER, PLEASE
CONTACT OUR CUSTOMER SERVICE CENTRE’.
DivX
®
, DivX Certified, and
associated logos are
trademarks of
DivXNetworks, Inc and are
used under license.
As an ENERGY STAR
®
partner;
Philips has determined that this
product meets the ENERGY STAR
®
guidelines for energy efficiency.
CAUTION
Use of controls or adjustments or
performance of procedures other than
herein may result in hazardous
radiation exposure or other unsafe
operation.
Microsoft, Windows Media, and the
Windows logo are trademarks, or
registered trademarks of Microsoft
Corporation in the United States
and/or other countries
Утилизация старого устройства
(Русский)
Bаше устройство спроектировано и изготовлено из
высококачественных материалов и компонентов, которые можно
утилизировать и использовать повторно.
Eсли товар имеет символ с зачеркнутым мусорным ящиком на колесах,
это означает, что товар соответствует Eвропейской директиве
2002/96/EC.
Ознакомьтесь с местной системой раздельного сбора электрических и
электронных товаров. Cоблюдайте местные правила.
Утилизируйте старые устройства отдельно от бытовых отходов. Правильная
утилизация вашего товара позволит предотвратить возможные отрицательные
последствия для окружающей среды и человеческого здоровья.

3
3139 115 23271
English
Русский
Index
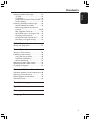
English ----------------------------------------- 4
Русский-------------------------------------- 46

4
English
Contents
General Information
Supplied accessories ................................... 6
Cleaning discs............................................... 6
Setup .............................................................. 6
Basic Connections
Step 1: Placing the speakers and
subwoofer ..................................................... 7
Step 2: Connecting the speakers and
subwoofer ..................................................... 8
Step 3: Connecting to TV .......................... 9
Option 1: Using Composite Video
socket (CVBS)......................................... 9
Option 2: Using Y Pb Pr sockets ......... 9
Step 4: Connecting FM/MW antennas ... 10
Step 5: Connecting the power cord ..... 10
Connection to External Devices
Connecting an audio/video device ........ 11
Remote Control......................... 12–13
Main Unit ............................................... 14
Getting Started
Step 1: Inserting batteries into the
remote control .......................................... 15
Using the remote control to
operate the system .............................. 15
Step 2: Switching on the DVD system .. 15
Switching to Eco Power standby
mode ....................................................... 15
Step 3: Setting the TV ............................... 15
Setting up Progressive Scan feature
(for Progressive Scan TV only) .......... 16
Selecting the matching colour
system ..................................................... 17
Setting the TV Display ......................... 17
Step 4: Setting language preferences ..... 18
On-Screen Display (OSD) language . 18
Audio, Subtitle and Disc menu
languages ................................................ 18
Disc Operations
Playable discs .............................................. 19
Playing discs ................................................ 19
Auto Eco Power standby mode ........ 20
Basic playback controls ............................ 20
Selecting various repeat/shuffle
functions ...................................................... 20
Other operations for video playback
(DVD /VCD/SVCD) ................................. 21
Using the Disc Menu (for DVD only) 21
Viewing playback information ............ 21
Advancing by frame ............................. 22
Resuming playback from the last
stopped point ........................................ 22
Zooming in ............................................ 22
Changing sound track language ......... 22
Changing subtitle language
(DVD only) ............................................ 22
Preview Function (VCD only) ........... 23
Playing MP3/Windows Media™ Audio/
JPEG/MPEG-4 disc ..................................... 24
Playing MP3 music and JPEG
picture simultaneously ........................ 24
Playing a picture disc (slide show) ......... 25
Preview Function .................................. 25
Zoom picture ........................................ 25
Rotating/Flipping the picture ............. 25
Supported JPEG picture formats ...... 25
Playing a DivX disc .................................... 26
Playing a Karaoke disc .............................. 27
Microphone Setting ............................. 27
DVD Setup Menu Options
Accessing General Setup Page ............... 28
Locking/Unlocking the disc
for viewing ............................................. 28
Dimming system’s display panel ........ 28
Programming disc tracks (not
for Picture CD/MP3) .......................... 29
OSD language ....................................... 29
Screen Saver – turning on/off ........... 30
DivX(R) VOD registration code ....... 30
Accessing Audio Setup Page ................... 31
Speakers Volume/Speakers Delay ...... 31
Night mode – turning on/off ............ 31
CD Upsampling .................................... 31

English
5
Contents
Accessing Video Setup Page .................... 32
TV Type ................................................... 32
TV Display ............................................. 32
Progressive function-turning on/off . 32
Picture Setting....................................... 33
Accessing Preference Setup Page .......... 34
Audio, Subtitle, Disc Menu ................. 34
Restricting playback by Parental
Control ............................................ 34–35
PBC (Playback Control) ...................... 35
MP3/JPEG menu– turning on/off ..... 35
Changing the Password....................... 36
Setting the DivX Subtitle font ........... 36
Restoring to original settings ............ 36
Other Functions
Setting the Sleep timer ............................ 37
Tuner Operations
Tuning to radio stations ........................... 38
Presetting radio stations .......................... 38
Using the Plug and Play ....................... 38
Automatic presetting .......................... 39
Manual presetting ................................. 39
Selecting a preset radio station ............. 39
Deleting a preset radio station .............. 39
Changing tuning grid ................................. 39
Sound and Volume Controls
Individual speakers volume adjustment 40
Selecting surround sound ........................ 41
Selecting digital sound effects ................. 41
Volume Control ......................................... 41
Troubleshooting ......................... 42–43
Specifications ...................................... 44
Glossary .................................................... 45
Language Code ........................ 91

6
English
Supplied accessories
Composite Video
cable (Yellow)
Audio Cable
FM wire antenna
MW loop antenna
Remote control
and two batteries
(12nc: 3139 258 70101)
Cleaning discs
To clean a disc, use a micro fibre cleaning
cloth and wipe the disc from the center
to the edge in a straight line.
CAUTION!
Do not use solvents such as benzene,
thinner, commercially available cleaners,
or anti-static sprays intended for discs.
Since the optical unit (laser) of the DVD
system operates at a higher power than
regular DVD or CD players, cleaning CDs
intended for DVD or CD players may
damage the optical unit (laser). Therefore,
refrain from using a cleaning CD.
General Information
Setup
Finding a suitable location
– Place the set on a flat, hard and stable
surface. Do not place the set on a carpet.
– Do not position the set on top of
other equipment that might heat it up
(e.g., receiver or amplifier).
– Do not put anything under the set
(e.g., CDs, magazines).
– Install this unit near the AC outlet and
where the AC power plug can be reached
easily
Space for ventilation
– Place the apparatus in a location with
adequate ventilation to prevent internal
heat build up. Allow at least 10 cm (4.5”)
clearance from the rear and the top of
the set and 5cm (2.3”) from the left and
right to prevent overheating.
10cm (4.5")
10cm (4.5")
5cm (2.3")
5cm (2.3")
Avoid high temperatures, moisture,
water and dust
– Apparatus shall not be exposed to
dripping or splashing.
– Do not place any sources of danger on
the apparatus (e.g., liquid filled objects,
lighted candles).

English
7
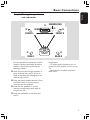
REAR RREAR L
FRONT RFRONT L
CENTER
SUBWOOFER
For best possible surround sound, all the
speakers (except subwoofer) should be
placed at the same distance from the
listening position.
1 Place the front left and right speakers at
equal distances from the TV and at an
angle of approximately 45 degrees from
the listening position.
2 Place the centre speaker above the TV or
the DVD system so that the centre
channel’s sound is localised.
3 Place the rear speakers at normal
listening ear level facing each other or
hang on the wall.
4 Place the subwoofer on the floor near
the TV.
Basic Connections
Helpful Hints:
– To avoid magnetic interference, do not
position the front speakers too close to your
TV.
– Allow adequate ventilation around the
DVD system.
Step 1: Placing the speakers
and subwoofer
1
33
1
2
4

8
English
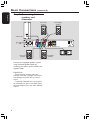
Basic Connections (continued)
Connect the supplied speakers system
using the fixed speaker cables by
matching the colours of the sockets and
speaker cables.
Helpful Hints:
– Ensure that the speaker cables are
correctly connected. Improper connections
may damage the system due to a short-
circuit.
– To prevent unwanted noise, do not place
the subwoofer too close to the DVD system,
AC power adaptor, TV or any other radiation
sources.
Step 2: Connecting the
speakers and
subwoofer
Front Right
Speaker
Rear Right
Speaker
Rear Left
Speaker
Centre Speaker
Subwoofer
Front Left
Speaker
DVD System
1
Pb
Pr
Y
L
R
FRONT RFRONT L
REAR RREAR L
CENTER

English
9
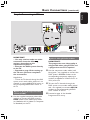
Basic Connections (continued)
IMPORTANT!
– You only need to make
one video
connection from the following
options, depending on the
capabilities of your TV.
– Connect the DVD system directly
to the TV.
– Proceed to page 15 for setting up
the TV once you have completed
the connections.
Helpful Hint:
– To hear the TV channels through this DVD
system, use the audio cables (white/red - not
supplied) to connect AUDIO-TV IN sockets to
the corresponding AUDIO OUT sockets on
the TV.
Option 1: Using Composite Video
socket (CVBS)
● Use the supplied composite video cable
(yellow) to connect the DVD system’s
CVBS socket to the video input socket
(or labelled as A/V In, Video In, Composite
or Baseband) on the TV.
Step 3: Connecting to TV
OR
Option 2: Using Y Pb Pr sockets
IMPORTANT!
The progressive scan video quality is
only possible when using Y Pb Pr and
a progressive scan TV is required.
1 Use the component video cables (red/
blue/green - not supplied) to connect the
DVD system’s Y Pb Pr sockets to the
corresponding component video input
sockets (or labelled as Y Pb/Cb Pr/Cr or
YUV) on the TV.
2 To hear the TV channels through this
DVD system, use an audio cables (white/
red - not supplied) to connect AUX IN
sockets to the corresponding AUDIO
OUT sockets on the TV.
3 Proceed to page 16 for detailed
Progressive Scan set up.

10
English
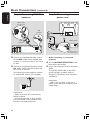
Basic Connections (continued)
1 Connect the supplied MW loop antenna
to the MW socket. Place the MW loop
antenna on a shelf, or attach it to a stand
or wall.
2 Connect the supplied FM antenna to the
FM socket. Extend the FM antenna and
fix its ends to the wall.
For better FM stereo reception, connect
an external FM antenna (not supplied).
Helpful Hints:
– Adjust the position of the antennas for
optimal reception.
– Position the antennas as far as possible
from your TV, VCR or other radiation source
to prevent unwanted interference.
After everything is connected
properly,
1 Set the VOLTAGE SELECTOR to the
local power line voltage.
2 Plug in the AC power cord to the power
outlet.
The red Eco Power LED on the DVD
system will light up. Never make or
change any connections with the power
switched on.
Helpful Hint:
– Refer to the type plate on the rear or
bottom of the system for identification and
supply ratings.
MW
antenna
fix the claw
into the slot
Step 4: Connecting FM/MW
antennas
FM
antenna
Pb
Pr
Y
1
➠
2
Step 5: Connecting the
power cord
TV
Pb
Pr
Y
L
R
VOLTAGE SELECTOR
2
1
DVD system
at the bottom of
the DVD system

English
11
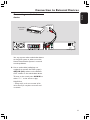
Connection to External Devices
You can connect other audio/video device
to the DVD system in order to use the
Home Theatre Audio System’s surround
sound capabilities.
● Use an audio cable (red/white, not
supplied) to connect the DVD system’s
AUX IN (R/L) sockets to the AUDIO
OUT sockets on the audio/video device.
To listen to the sound, press AUX/DI to
select “AUX” as the source to play.
Helpful Hint:
– Always refer to the user manual of the
other devices for complete connection and
use details.
Connecting a audio/video
device
AUDIO OUT
Pb
Pr
Y
L
R
Audio/Video
Device
DVD System

12
English
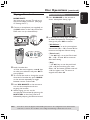
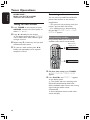
Remote Control
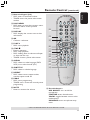
* = Press and hold the button for more than two seconds.
!
5
6
7
8
9
0
3
4
1
2
@
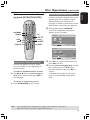
1 B
– Switches to Eco Power standby mode, or
turns on the system.
2 Source buttons
DISC : switches to DISC source mode.
TV: switches to TV source mode.
The sound from TV will come out
through the DVD system.
TUNER: toggles between FM and MW
band.
AUX/DI: switches to external mode.
3 VOL +-
– Adjusts the volume level.
4 1 2 3 4
– DISC: selects movement direction in the
menu.
– TUNER: use 3 4 to start auto searching,
use 1 2 to tune the radio frequency up/
down.
5 S / T
– DISC: *searches backward/forward or
selects a track.
– TUNER: selects a preset radio station.
6 PAUSE Å
– DISC: pauses playback.
7 SETUP
– DISC: enters or exits system setup menu.
8 ZOOM
– DISC: enlarges a picture on the TV screen.
9 SLEEP
– Sets the sleep timer function.
0 TV VOL +-
– Adjusts TV volume (Philips TV only).
! SURR
– Selects multichannel surround or stereo
mode.
@ SOUND
– Selects a predefined sound effect.

English
13
Remote Control (continued)
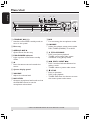
* = Press and hold the button for more than two seconds.
# Numeric Keypad (0-9)
– DISC: enters a track/title number.
– TUNER: enters the preset radio station
number.
$ DISC MENU
– DISC: enters or exits disc contents menu.
For VCD, selects various preview
function.
% DISPLAY
– DISC: displays the current status or disc
information.
^ OK
– Confirms a selection.
& PLAYÉ
– DISC: starts playback.
* STOPÇ
– Exits an operation.
– DISC: stops playback.
– DISC: holding down the button will open
or close the disc tray.
– TUNER: *erases a preset radio station.
( AUDIO
– DISC: selects an audio language (DVD/
VCD) or an audio channel (CD).
) SUBTITLE
– DISC: selects a subtitle language.
¡ REPEAT
– DISC: selects various repeat modes;
switches repeat mode off.
™ PROG
– DISC: starts programming.
– TUNER: starts *automatic/ manual preset
programming.
£ MUTE
– Mutes or restores the volume.
#
^
&
*
(
)
¡
≤
™
£
$
%
≤ Karaoke buttons
MIC ON/OFF: turns on/off the
microphone.
FEATURE: enters karaoke menu.
VOCAL: toggles between various audio
mode options.
KARAOKE: enters microphone setup
menu.

14
English
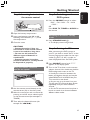
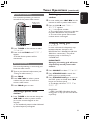
Main Unit
1 STANDBY ON (B)
– Switches to Eco Power standby mode, or
turns on the system.
2 Disc tray
3 OPEN CLOSE 0
– Opens/Closes the disc tray.
4 ECO POWER indicator
– Lights up when in Eco Power standby
mode.
5 iR
– Point the remote control towards this
sensor.
6 System display panel
7 VOLUME
– Adjusts the volume level.
8 MIC LEVEL
– Activates microphone level mode and use
the VOLUME control to set the
microphone volume level.
1
2
3
6
4
7
9
0
!
58
@
#
9 MIC
– For connecting the microphone socket.
0 SOURCE
– Selects the relevant active source mode:
DISC, TUNER (FM/MW), TV or AUX.
! ÉÅ PLAY/PAUSE
– DISC: starts/pauses playback.
– TUNER: starts preset radio station
installation in Plug & Play mode.
@ S PREV / NEXT T
– DISC: *searches backward/forward or
selects a track.
– TUNER: selects a preset radio station.
# Ç STOP
– Exits an operation.
– DISC: stops playback.
– TUNER: hold down this button to erase
the current preset radio station.
* = Press and hold the button for more than two seconds.

English
15
Getting Started
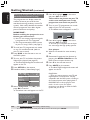
Step 1: Inserting batteries into
the remote control
1
3
2
1 Open the battery compartment.
2 Insert two batteries type R06 or AA,
following the indications (+-) inside
the compartment.
3 Close the cover.
CAUTION!
– Remove batteries if they are
exhausted or if the remote control
is not to be used for a long time.
– Do not use old and new, or
different types of batteries in
combination.
– Batteries contain hazardous
chemical substances, so they should
be disposed of properly.
Using the remote control to
operate the system
1 Aim the remote control directly at the
remote sensor (iR) on the front panel.
2 Select the source you wish to control by
pressing one of the source select buttons
on the remote control (for example TV,
TUNER).
3 Then select the desired function (for
example É,
S,
T).
Step 2: Switching on the
DVD system
● Press the SOURCE control to select :
DISC ™ FM ™ MW ™ TV ™ AUX
™ DISC ....
OR
Press DISC, TV, TUNER or AUX/DI on
the remote.
Switching to Eco Power standby
mode
● Press STANDBY ON (B).
➜ The display screen will go blank.
Step 3: Setting the TV
After connecting the DVD system to
your TV, you have to switch the TV to the
correct programme number for the input
socket (e.g. ‘EXT’, ‘0’, ‘AV’) in order to
view the playback from the DVD system.
1 Press SOURCE control until “DISC”
appears on the display panel.
2 Turn on the TV and set it to the correct
video-in channel. You should see the blue
DVD background screen on the TV.
➜ Usually this channel is between the
lowest and highest channels and may be
called FRONT, A/V IN, VIDEO. See your
TV manual for more details.
➜ Or, you may go to channel 1 on your
TV, then press the Channel down button
repeatedly until you see the Video In
channel.
➜ Or, the TV remote control may have a
button or switch that chooses between
different video modes.

16
English
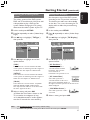
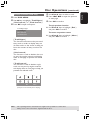
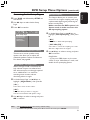
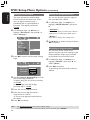
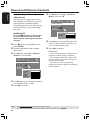
Setting up Progressive Scan feature
(for Progressive Scan TV only)
The progressive scan display twice the
number of frames per seconds than
interlaced scanning (ordinary normal TV
system). With nearly double the number
of lines, progressive scan offers higher
picture resolution and quality.
IMPORTANT!
Before enabling the progressive scan
feature, you must ensure :
1) Your TV can accept progressive signals,
a progressive scan TV is required.
2) You have connected the DVD system
to your TV using Y Pb Pr (see page 9).
1 Turn off your TV progressive scan mode
or turn on interlaced mode (refer to
your TV user manual).
2 Press DISC on the remote to turn on
the DVD system.
3 Turn on your TV and select the correct
Video Input channel (see page 15).
➜ The blue DVD background screen will
appear on the TV.
4 Press SETUP on the remote.
5 Press 2 to select { Video Setup Page }.
Video Setup Page
TV Type
TV Display
Progressive
Picture Setting
On
Off
6 Select { Progressive } > { On }, then
press OK to confirm.
➜ The below menu will appear on the TV.
HINTS:(refer to the owner's manual)
ACTIVATING PROGRESSIVE:
1. Ensure your TV has progressive scan.
2. Connect with YPbPr(GBR) video cable.
3. If there is a blank screen on normal TV,
wait 15 seconds for auto recover.
Cancel
OK
7 Press 1 to highlight
OK
in the menu
and press OK to confirm.
There will be no picture on your TV
at this state until you turn on the
progressive scan mode on your TV.
8 Turn on your TV progressive scan mode
(refer to your TV user manual).
➜ The below menu will appear on the TV.
Confirm again to use progressive scan
If picture is good press OK on remote
Cancel
OK
9 Press 1 to highlight
OK
in the menu
and press OK to confirm.
➜ The set up is complete now and you
can start enjoy the high quality picture.
If no picture:
● Wait for 15 seconds for auto recovery.
OR
1 Deactivate Progressive Scan feature by
pressing the OPEN CLOSE 0 on the
DVD system to open the disc tray.
2 Press 1 on the remote control.
3 Press MUTE on the remote.
➜ The blue DVD background screen will
appear on the TV.
Helpful Hint:
– There are some progressive scan TV and
High-Definition TV sets that are not fully
compatible with this DVD system, resulting in
the unnatural picture when playing back a
DVD VIDEO disc in the progressive scan
mode. In such a case, turn off the
progressive scan feature on both the DVD
system and your TV set.
Getting Started (continued)
TIPS: The underlined option is the factory default setting.
To return to the previous menu, press 1. To remove the menu, press SETUP.

English
17
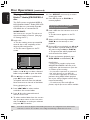
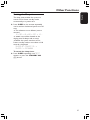
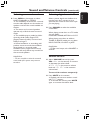
Getting Started (continued)
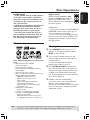
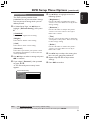
Selecting the matching colour
system
The colour system of the DVD system,
DVD and TV should match. Only then will
it be possible to play a DVD on this
system. Before changing the TV system,
determine the colour system of your TV.
1 In disc mode, press SETUP.
2 Press 2 repeatedly to select { Video Setup
Page }.
3 Use 34 keys to highlight { TV Type },
then press 2.
Video Setup Page
TV Type
TV Display
Progressive
Picture Setting
PAL
NTSC
Multi
4 Use 34 keys to highlight one of the
options below:
{
PAL }
Select this if the connected TV has the PAL
colour system. It will change the video signal of
an NTSC disc and output it to PAL format.
{ NTSC }
Select this if the connected TV has the NTSC
colour system. It will change the video signal of
a PAL disc and output it to NTSC format.
{ Multi }
Select this if the connected TV is compatible
with both NTSC and PAL (multi-system).
The output format will be in accordance with
the video signal of the disc.
5 Select a setting and press OK.
➜ Follow the instructions shown on the
TV to confirm the selection (if any).
➜ If a blank/distorted TV screen appears,
wait for 15 seconds for auto recovery.
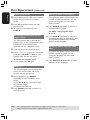
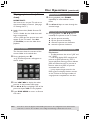
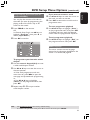
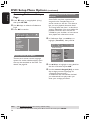
Setting the TV Display
Set the aspect ratio of the DVD system
according to the TV you have connected.
The format you select must be available
on the disc. If it is not, the setting for TV
display will not affect the picture during
playback.
1 In disc mode, press SETUP.
2 Press 2 repeatedly to select { Video Setup
Page }.
3 Use 34 keys to highlight { TV Display },
then press 2.
Video Setup Page
TV Type
TV Display
Progressive
Picture Setting
4:3 Pan Scan
4:3 Letter Box
16:9 Wide Screen
4 Use 34 keys to highlight one of the
options below:
{
4:3 Pan Scan }
Select this if you have a
conventional TV and want
both sides of the picture
to be trimmed or
formatted to fit your TV screen.
{ 4:3 Letter Box }
Select this if you have a
conventional TV. In this case, a
wide picture with black bands on
the upper and lower portions of the TV screen
will be displayed.
{ 16:9 Wide Screen }
Select this if you have a wide-
screen TV.
5 Select a setting and press OK.
TIPS: The underlined option is the factory default setting.
To return to the previous menu, press 1. To remove the menu, press SETUP.

18
English
Getting Started (continued)
Step 4: Setting language
preferences
You can select your preferred language
settings so that this DVD system will
automatically switch to the language for
you whenever you load a disc. If the
language selected is not available on the
disc, the disc’s default language will be
used instead.
The OSD (On-Screen Display) language
for the system menu will remain as you
set it, regardless of the default and
optional disc languages.
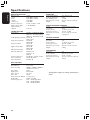
On-screen display (OSD) language
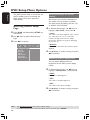
1 In disc mode, press SETUP.
2 Press 2 to select { General Setup Page }.
3 Use 34 keys to highlight { OSD
Language }, then press 2.
G
e
n
e
r
a
l
S
e
tup
P
a
g
e
D
i
s
c
L
o
ck
D
i
s
p
l
a
y
D
i
m
P
r
og
r
a
m
O
S
D
L
a
ngu
a
g
e
S
c
r
ee
n
S
a
v
e
r
D
i
v
X
(
R
)
V
O
D
C
od
e
E
ng
li
s
h
E
s
p
a
n
õ
l
F
r
a
n
ç
a
i
s
P
o
r
t
ugu
ê
s
4 Use 34 keys to select a language and
press OK to confirm.
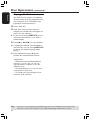
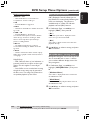
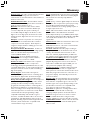
Audio, Subtitle and Disc menu
languages
1 Press Ç twice to stop playback (if any),
then press SETUP.
2 Press 2 repeatedly to select
{ Preference Page }.
3 Use 34 keys to highlight one of the
options below, then press 2.
–{ Audio } (disc’s soundtrack)
–{ Subtitle } (disc’s subtitles)
–{ Disc Menu } (disc’s menu)
Preference Page
Audio
Subtitle
Disc Menu
Parental
PBC
MP3/JPEG Nav
Password
DivX Subtitle
Default
4 Use 34 keys to select a language and
press OK to confirm.
If the language you want is not in
the list, then select { Others }.
Use the numeric keypad (0-9) on the
remote to enter the 4-digit language code
‘XXXX’ (see page 91) and press OK to
confirm.
5 Repeat steps 3~4 for other settings.
TIPS: The underlined option is the factory default setting.
To return to the previous menu, press 1. To remove the menu, press SETUP.

English
19
Disc Operations
IMPORTANT!
– If the inhibit icon (ø or X) appears
on the TV screen when a button is
pressed, it means the function is not
available on the current disc or at
the current time.
– DVD discs and players are designed
with regional restrictions. Before
playing a disc, make sure the disc is
for the same zone as your player.
– Do not push on the disc tray or
put any objects other than discs on
the disc tray. Doing so may cause
the disc player to malfunction.
Playable discs
SUPER VIDEO
Your DVD home theatre system will
play:
– Digital Versatile Discs (DVDs)
– Video CDs (VCDs)
– Super Video CDs (SVCDs)
– Finalised DVD+Recordable[Rewritable]
(DVD+R[W])
– Audio Compact Discs (CDs)
– MP3 discs, Windows Media™ Audio, picture
(Kodak, JPEG) files on CD-R(W).
– JPEG/ISO 9660/UDF format
– JPEG resolution support up to
3072 x 2048
– Supported sampling frequencies :
32 kHz, 44.1 kHz, 48 kHz
– Supported Bit-rates : 32~256 (kbps),
variable bit rates
– MPEG-4 files on CD-R[W]:
– Simple profile
– Advanced simple profile (640-480)
– DivX disc on CD-R[W]/DVD+R[W]:
– DivX 3.11, 4.x and 5.x
– GMC (Global Motion Compensation)
and QP (Quarter Pixel) not supported.
Region Codes
DVDs must be labelled for ALL
regions or Region 5 in order to
play on this DVD system. You
cannot play discs that are labelled
for other regions.
Helpful Hints:
– It may not be possible to play CD-R/RW or
DVD-R/RW in all cases due to the type of
disc or condition of the recording.
– If you are having trouble playing a certain
disc, remove the disc and try a different one.
Improperly formatted discs will not play on
this DVD system.
Playing discs
1
Press SOURCE control until “DISC”
appears on the display panel (or press
DISC on the remote).
2 Turn on the TV power and set to the
correct Video In channel. (See page 15
“Setting the TV”).
➜ You should see the blue DVD
background screen on the TV.
3 Press OPEN CLOSE 0 to open the
disc tray and load a disc, then press the
same button again to close the disc tray.
➜ Make sure the disc label is facing up.
For double-sided discs, load the side you
want to play facing up.
4 Playback will start automatically.
➜ If a disc menu shows on the TV, see
page 21 “Using the Disc Menu”.
➜ If the disc is locked by parental control,
you must enter your six-digit password.
(See pages 34~35).
TIPS: Some discs cannot be played on this DVD system due to the configuration and characteristics
of the disc, or due to the condition of recording and authoring software that was used.
5
ALL

20
English
Auto Eco Power standby mode
This is a power-saving feature, the system
will automatically switch to Eco Power
standby mode if you do not press any
buttons within 30 minutes after a disc has
stopped playing.
Basic playback controls
Pausing playback
● During playback, press 2; (or ; on the
remote).
➜ To resume normal playback,
press 2; (or PLAY B on the remote).
Selecting another track/chapter
● Press S / T or use the numeric
keypad (0-9) to key in a track/chapter
number.
➜ If repeat track mode is active, pressing
S / T will replay the same track/
chapter.
Searching backward/forward
● Press and hold S / T.
To resume normal playback, press 2; (or
PLAY B on the remote).
➜ While searching, pressing S / T
again will decrease/increase the search
speed.
Stopping playback
● Press Ç.
Disc Operations (continued)
Selecting various repeat/
shuffle functions
● While playing a disc, press REPEAT on
the remote repeatedly to choose a repeat
play mode.
DVD
™ RPT ONE (repeat chapter)
™ RPT TT (repeat title)
™ SHUFFLE (random play)
™ RPT SHF (repeat random play)
™ RPT OFF (exit repeat mode)
VCD/SVCD/CD
™ RPT ONE (repeat track)
™ RPT ALL (repeat disc)
™ SHUFFLE (random play)
™ RPT SHF (repeat random play)
™ RPT OFF (exit repeat mode)
MP3/DivX/Windows Media™ Audio
™ RPT ONE (repeat track)
™ RPT ALL/FLD (repeat folder)
™ SHUFFLE (random play)
™ RPT OFF (exit repeat mode)
Helpful Hint:
– VCDs do not allow repeat playback as
long as the PBC mode is switched on.
TIPS: The operating features described here might not be possible for certain discs.
Always refer to the instructions supplied with the discs.
Page is loading ...
Page is loading ...
Page is loading ...
Page is loading ...
Page is loading ...
Page is loading ...
Page is loading ...
Page is loading ...
Page is loading ...
Page is loading ...
Page is loading ...
Page is loading ...
Page is loading ...
Page is loading ...
Page is loading ...
Page is loading ...
Page is loading ...
Page is loading ...
Page is loading ...
Page is loading ...
Page is loading ...
Page is loading ...
Page is loading ...
Page is loading ...
Page is loading ...
-
 1
1
-
 2
2
-
 3
3
-
 4
4
-
 5
5
-
 6
6
-
 7
7
-
 8
8
-
 9
9
-
 10
10
-
 11
11
-
 12
12
-
 13
13
-
 14
14
-
 15
15
-
 16
16
-
 17
17
-
 18
18
-
 19
19
-
 20
20
-
 21
21
-
 22
22
-
 23
23
-
 24
24
-
 25
25
-
 26
26
-
 27
27
-
 28
28
-
 29
29
-
 30
30
-
 31
31
-
 32
32
-
 33
33
-
 34
34
-
 35
35
-
 36
36
-
 37
37
-
 38
38
-
 39
39
-
 40
40
-
 41
41
-
 42
42
-
 43
43
-
 44
44
-
 45
45


Philips HTS3300K/51 User manual
- Category
- DVD players
- Type
- User manual
- This manual is also suitable for
Ask a question and I''ll find the answer in the document
Finding information in a document is now easier with AI
Related papers
-
Philips HTS3300/93 User manual
-
-
Philips HTS5310S User manual
-
-
-
-
-
Philips HTS3107/98 User manual
-
-
Other documents
-
Yamaha DVX-C300 User manual
-
-
Etec DVA286 User manual
-
Magnavox MRD100 User manual
-
JVC GGT0362-001A-H User manual
-
ELECTROCOMPANIET EMP 1 Owner's manual
-
-
-
 Musical Fidelity A3.2 CD User manual
-
 KEF Audio KIT100 User manual

