Page is loading ...

D
.....1
I
.....5
N
.....9
GR
.....13
TR
.....17
BG
.....21
RO
.....25
GB
.....2
NL
.....6
FIN
.....10
CZ
.....14
SK
.....18
EST
.....22
CN
.....26
F
.....3
S
.....7
PL
.....11
H
.....15
SLO
.....19
LV
.....23
RUS
.....27
E
.....4
DK
.....8
UAE
.....12
P
.....16
HR
.....20
LT
.....24
Design & Quality Engineering GROHE Germany
99.033.031/ÄM 216860/02.10
Eurosmart Cosmopolitan
Eurosmart Cosmopolitan
32 879
32 880
D
.....1
I
.....5
N
.....9
GR
.....13
TR
.....17
BG
.....21
RO
.....25
GB
.....2
NL
.....6
FIN
.....10
CZ
.....14
SK
.....18
EST
.....22
RUS
.....26
F
.....3
S
.....7
PL
.....11
H
.....15
SLO
.....19
LV
.....23
RUS
.....27
E
.....4
DK
.....8
UAE
.....12
P
.....16
HR
.....20
LT
.....24

I
E
D
1
7
m
m
4
6
Please pass these instructions on to the end user of the fitting.
S.v.p remettre cette instruction à l'utilisateur de la robinetterie!
Bitte diese Anleitung an den Benutzer der Armatur weitergeben!
30 879
32 880
1
A
B
X
2
3
C
1
2
m
m
7
3mm
2
,
5
m
m
2
,
5
m
m
5

2
GB
Application
Can be used in conjunction with:
• Pressurised storage heaters
• Thermally controlled instantaneous heaters
• Hydraulically controlled instantaneous heaters
Operation with unpressurised storage heaters (= open water
heaters) is not possible.
Technical data
• Flow pressure
- min. 0.5 bar
- recommended 1 - 5 bar
• Operating pressure max. 10 bar
• Test pressure 16 bar
A pressure reducing valve must be fitted in the supply line if
static pressures exceed 5 bar to satisfy noise level ratings.
Avoid major pressure differences between hot and cold water
supply.
• Flow rate at 3 bar flow pressure: approx. 27 l/min
• Temperature
Hot water inlet: max. 80 °C
Recommended (energy saving): 60 °C
Scalding protection possible by fitting a temperature limiter
(see Replacement parts, fold-out page II, Prod. no.: 46 308).
• Water connection hot - left
cold - right
Note:
Only one outlet is allowed to be used on fitting 32 880.
The 2nd outlet socket on the housing must be sealed with the
plug supplied (apply sealing to plug).
This fitting can be combined with head and hand shower sets
by using a 3-way diverter.
Important note:
Never install shut-off valves in the outlet pipe (mixed
water) downstream of any built-in mixer.
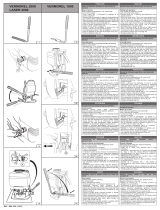
Installation
Prepare the wall for the installation.
• Prepare the holes for the single lever mixer and slots for the
pipes.
Align single lever mixer using fitting template and fit,
see fold-out page I, Figs. [1] to [3].
• Permissible tolerances are given on the dimensional
drawing.
• The arrow on the fitting template must point upwards.
• To align place a spirit level on the cam on the fitting
template (A), see Fig. [1].
• The housing is provided with pre-drilled holes to facilitate
mounting the fitting to the wall.
• The finished surface of the wall (B) must lie within the
area (X) of the fitting template, see Fig. [2].
• The cold water supply must be connected on the right, hot
water supply on the left.
Connect pipes.
• The plug (C), loosely installed in the fitting 32 880, must be
installed and sealed in the unused outlet (upper or lower),
see Fig. [3].
Open cold and hot-water supply and check connections
for water-tightness.
Flush pipes thoroughly.
Plaster and tile the wall.
Do not remove the fitting template before final installation.
Final installation
Remove fitting template.
Note:
First fit the diverter (D) if installing trim set 32 879, see fold-out
page I, Fig. [4].
1. Remove screw plug (E) .
2. Screw diverter (D) into position using 17mm socket spanner
and tighten.
Flow rate limiter
This mixer is fitted with a flow rate limiter, permitting an
infinitely variable individual reduction in flow rate. The highest
possible flow rate is set at the factory before despatch.
The use of flow rate limiters in combination with hydraulic
instantaneous heaters is not recommended.
To activate, see Fig. [5].
Install escutcheon and lever, see Figs. [6] and [7].
If the escutcheon will not slide far enough onto the cap, you
must also install an extension (see replacement parts on
fold-out page II, Prod. no.: 46 191 = 25mm / 46 343 = 50mm).
Additionally seal the top edge of the escutcheon with silicone
when fitting against a particularly rough surface (deep tile
joints, highly textured tile).
Check mixer for correct operation, see fold-out page III,
Fig. [8].
Function of automatic diverter (D), see Fig. [9].
Pulling the lever will release water delivery.
On the bath mixer, water will always emerge from the lower
outlet first (e.g. bath outlet).
Pressing diverter (D) shuts off the flow of water to the bath and
delivers water to the shower outlet.
When the mixer is closed, the diverter is released
automatically so that when the mixer is opened again, water
will always emerge from the lower outlet first (e.g. bath outlet).
Maintenance
Inspect and clean all parts, replace as necessary and lubricate
with special grease.
Shut off hot and cold water supply.
I. Replacement of the cartridge (F), see fold-out page III,
Figs. [10] to [12].
Observe the correct installation position!
Ensure that the cartridge seals engage in the grooves of the
housing. Fit screws (G) and tighten evenly and alternately.
II. Diverter (D), see fold-out page III, Figs. [10] to [12].
Replacement parts, see fold-out page II (* = special
accessories).
Care
For directions on the care of this fitting, refer to the
accompanying Care Instructions.
/