LUBY Wi-Fi Connectivity User manual
- Category
- Robotic vacuum cleaners
- Type
- User manual
This manual is also suitable for

Input: 100-240V ~ 50/60Hz
Output: 19V 0.6A

.............................................................................................
..................... .. .................................................................................
1
4
6
8
15
Main body and accessories
Main body diagram and water tank component
Charging base
Remote controller
Main body buttons
Quick start guide
Start/Pause/Sleep
Water tank component
Cleaning mode
Cleaning of left and right brushes
Cleaning of garbage box and strainer
Maintenance of duster cloth
Cleaning of sensor lens and charging electrode
...... ...............................................................................
..
.
4
...................................................
5
.. ..........................................
...............................................................
6
.... ................................................................................................
.......... .. ........................................................................................
.
.
.
7
..............................................................................................................
......................
..................................................................................
..
8
.. ...................................................................................................
9
........ ... ..................................................................................
10
..................... ......... ............................................................................
11
............
................... ........ .... .........................................................
.. .......................................................................
....
15
...................................................................
15
16
16
17
........ ...........................................................................
.................................................
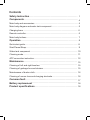
Safety Instruction
Components
Contents
Operation
Maintenance
................................ . ... .... ..............................................................
Common fault
......................... .. ..............................................................
18
Battery replacement
...................... ..............................................................
18
Product specifications
APP connection instruction
.....................................................................................
12

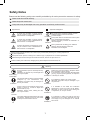
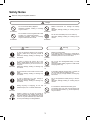
Please read the following safety notes carefully and abide by all routine preventive measures for safety.
Please read this manual carefully.
Please keep this manual well.
This product may be damaged due to any operation inconformity to this manual.
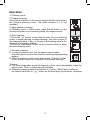
Expressions Symbols & Diagrams
Danger
Prohibition
Indication
Note
Note
Warning
Serious injuries include: blindness, burn, electric injury, fracture and poisoning, etc. involving sequela and
long-time hospitalization.
Staff injuries include: injuries, including burn or electric injury, to people who do not need hospitalization.
Material damages include: damages to household furniture, finance and pets and so on.
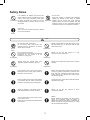
Notes on safety use of the host, charging dock, power adapter and accessories, etc.
Warning
Prohibition
Prohibition
Prohibition
Prohibition
Dismantling
is forbidden
Indication
AC
Dust
removal
It means that casualties or serious injuries
may be caused in case of disobedience to
this instruction or maloperation.
It means that casualties or serious injuries
may be caused in case of disobedience to
this instruction or maloperation.
It means that injuries and damage of goods
may be caused in case of disobedience to
this instruction or maloperation.
This symbol refers to prohibited (forbidden) conducts.
Detailed prohibition contents are indicated in
or near the diagram.
This symbol aims at calling your attention
(warning). Specific attention contents are
indicated in or near the diagram.
Do not dismantle, repair or refit the product by
yourself.
Otherwise, the product may be damaged and
you may be injured.
If there is dust on the metal part of the power
socket or around it, it must be wiped and
cleaned with dry mop.
Otherwise, electric shock, heating and fire,
etc. may be caused.
This product shall be used as a power adapter
configured by the manufacturer only.
Otherwise, the product may be damaged or
fire may be caused.
Please don’t use the product in the place where
fire or explosion may be caused.
If the product is used in the place with flammable
gas, e.g. propane gas and gasoline, an explosion
or fire may be caused.
It is forbidden to stand or sit on this product.
Otherwise, the product may be damaged or you
may fall down.
It is forbidden to use metal and conductive
substances to touch the contact of the battery.
Otherwise, in case of a short circuit, heating, fire
or explosions, etc. may be caused.
It is forbidden to wash and soak the host and
charger with a lot of water. Otherwise, the host
and charger may be damaged for an internal
short circuit.
The power adapter shall be between AC 100V
and 240Vac. Please insert it into the socket
correctly and avoid children touch it.
This symbol refers to conducts that must be (need
to be) implemented compulsorily.
Specific compulsory conducts are indicated in or
near the diagram.
Safety Notes
1

Safety Notes
Note
Prohibition
Prohibition
Prohibition
Prohibition
Prohibition
Indoor
Do not
touch
Prohibition
Prohibition
It is forbidden to damage and process the
power cable. Do not put a weight on the power
cable or heat, drag or bend the power cable
forcefully. Otherwise, the power line may be
damaged and fire or electric shock, etc. may
be caused.
Do not touch it with a wet hand.
Do not touch it with a wet hand in the
charging process. Otherwise, an electric
shock may be caused.
Do not expose to sunshine.
This product is a kind of precise electronic
equipment. Do not expose it in the
sunshine for a long time.
Please keep this product away from
cigarettes, lighters and other open fire.
If the product is not in use for a long time.
Please turn off the power supply switch at
the bottom of the machine.
Please carefully check if the power adapter
is connected with the power socket well.
Otherwise, the battery may be damaged.
When the dustbin is full, please clean up
dust rubbish and then use the machine.
The use temperature scope of this product
is from 0ºC to 40 ºC.
Please do not use it in the high temperature
environment.
Please put this product in the place where it may
fall down easily (e.g. on the desk, chair or high
stand in the room).
Please do not use this product in a wet
environment (e.g. bathroom).
Please do not clean this product when it is being
charged.
Before using this product, please remove all wear
goods (e.g. glass cup and lamp) on the floor and
those that may entangle the side brush and air
suction channel, (e.g. electric wire, paper scraps
and window curtain).
This product may not be able to stride the vertical
step about 8mm high.
Please do not use the machine to clean
construction rubbish.
Battery
Please dismantle the battery from the machine
before it is scrapped. When the battery is
dismantled, please ensure that it is switched off.
Please recycle the scrapped battery for safety
and environmental protection.
Do not touch.
When the product is operating and sweeping,
please pay attention to the safety of babies,
children and old people and avoid someone
tripping. Please do not touch wheels and side
brushes by hand, so as to avoid being hauled in
and injured, and pay more attention to children.
Indoor use
This is an indoor household product. Please
do not use it outdoors.
2

Safety Notes
3
Notes on using rechargeable batteries
Danger
Note Warning
Do not deliver or save it together with metal
products, e.g. necklace and hairpin.
Otherwise, leakage, heating or cracking
may be caused for short circuit.
In case of abnormal heating in the charging
process, please stop using the product at
once.
Otherwise, leakage, heating or cracking may
be caused.
In order to prolong the service life of the
battery, please take it out and put it in a cool
and dry environment if you do not use it for a
long time.
Otherwise, leakage, heating or cracking may
be caused.
Do not immerse or it into water or touch it with
water.
Otherwise, leakage, heating or cracking may
be caused.
In case of abnormity (e.g. color change or
deform), be sure to stop using it.
Otherwise, leakage, heating or cracking may
be caused.
During recycling or scrapping, do not use
adhesive tapes, etc. to insulate electrodes.
Heating, cracking or fire may be caused in
case of touching other metals. Please bring
the waste battery to the maintenance service
center or recycler authorized by LUBY Robot
or scrap it according to local legislations.
Do not use other battery adapters.
Otherwise, leakage, heating or cracking
may be caused.
Battery box deformation
If the battery pack is deformed or expanded or
electrolyte flows out, it is forbidden to charge and
install the product for use to avoid risks.
Do not use the rechargeable battery on other
equipment.
The rechargeable battery applies to LUBY smart
sweeping robot only.
If the battery leakage touches skin or clothes, do
not use clean water for washing at once.
If you do not pay enough attention, chafing may
be caused.
Do not hit against the battery strong or throw it
away.
Otherwise, leakage, heating or cracking may be
caused.
It is forbidden to dismantle the battery pack.
The battery pack may crack, the electrolyte may
flow out and serious risks, e.g. fire and explosion,
may be caused.
Do not throw the battery into fire or heat it up.
Otherwise, leakage, heating or cracking may be
caused.
Neither short-circuit nor damage the battery
rudely.
Otherwise, leakage, heating or cracking may be
caused.
Prohibition Prohibition
Prohibition
Prohibition
Indication Prohibiti
on
Prohibiti
on
Indication
Prohibiti
on
Prohibiti
on
Indication
Indication

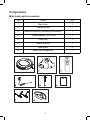
No. Items
Qty
1 Main body
1
1
1
1
1
2
1
2 Charging base
3 Remote controller (excluding the battery)
4 Power adapter (19V 0.6A)
1
5 Clean tool
6 User’s Manual
7 Side brush
8 Water tank component
Components
Main body and accessories
4

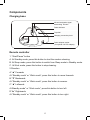
Components
Main body diagram
Water tank component
Infrared signal receiver
Suspension sensor
Universal wheel
Right brush
Suction inlet
Right wheel
Bottom shell
Scraper
Power switch
Rotary cover
Garbage box
Primary strainer
Efficient strainer
Efficient holder
Garbage box
Power adapter
socket
Water tank
Left wheel
Battery cover
Left brush
Automatic charging
electrode
Bumper
Button
Rotary cover
Velcro 1
Velcro 2
Velcro 3
Velcro 4
Velcro 5
Water tank
Duster cloth
Installation method of water tank
Sealing cap of
water tank
5

Components
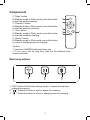
Remote controller
1. “Start/Pause” button
A. At Standby mode, press this button to start the random cleaning.
B. At Sleep mode, press this button to switch from Sleep mode to Standby mode.
C. At Work mode, press this button to stop cleaning.
2.Direction
A.“▲” Forwards
At “Standby mode” or “Work mode”, press this button to move forwards.
B.“▼” Backwards
At “Standby mode” or “Work mode”, press this button to reverse.
C.“◄” Leftwards
At Standby mode” or “Work mode”, press this button to turn left.
D.“►” Rightwards
At “Standby mode” or “Work mode”, press this button to turn right.
Charging base
Infrared navigation signal
transmitting window
Power indicator
Top shell
Charging connection piece
Power adapter socket
(for special 19V DC adapter)
6

Components
Main body buttons
1. ''WiFi" button:If this button always onlight, it means the machine
networking success.
2. '' ": Press this button to start or pause the cleaning.
3. '' ": Press this button to return to charging base for charging.
3. “Edge” button
At Standby mode or Work mode, press this button
to start the border cleaning.
4. “Powerful” button
At Standby mode or Work mode, press this button
to start the powerful cleaning.
5. “Auto” button
At Standby mode or Work mode, press this button
to start the schedule cleaning.
6. “Return” button
At Standby mode or Work mode, press this button
to return to charging base for charging.
Caution:
1. Insert two AAA/R03 batteries before use.
2. If it is not in use for long time, take out the batteries from
remote controller.
Return
Start
Edge
Auto
Powerful
Pause
6
1
2
3 4
5
7

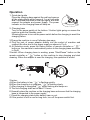
Operation
Quick start guide
Place the charging base against the wall and remove
all the obstructions within range of 1 m at both side
and 2 m ahead as shown on the right figure, and then
connect the adapter and power supply. The power
indicator on the charging base will keep on.
Charging base
Turn on the power switch at the bottom. 3 button lights going on means the
machine enter the Standby mode.
!Warning Be sure to turn on the power switch before the charging to avoid the
charging failure.
A.When the battery is low, “ ” is flashing quickly.
B.When the charging is in progress, “ ” is flashing slowly.
C.After charging is completed, “ ” stops flashing and keeps on.
D.The first charging shall last at least 12 hours.
E.
Generally place the machine on the charging base and ensure that the charging
base is connected to the power supply.
F.Check the charging status after battery has run out.
G.If the product is not in use for long time, turn off the power switch first.
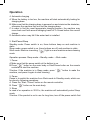
2.
A.
B.
Plug the jack of power adapter directly into the socket of machine and
connect the other end to the power supply as shown in Fig.A.
At Selection mode, press the Return button of remote controller or “ ”
button on the machine to automatically return to the charging base as shown
in Fig.B
!Caution: When charging base is working, press “Start/Pause” button on the
remote controller or “ ” button on the machine to stop charging and start
cleaning. When the adapter is used for charging, this operation is invalid.
3.Charge the machine in one of following two ways.
!Caution:
Charging base
1.
8

Operation
When the battery is too low, the machine will start automatically looking for
charging base.
Make sure that the charging base is powered on and minimize the obstacles,
otherwise the machine may not find the charging base.
In order to find the most appropriate charging position, the machine may
move back and forth around charging base for 3-4 times before the normal
charge.
Automatic return may fail if the water tank is installed.
2. Start/Pause/Sleep
Standby mode: Power switch is on, three buttons keep on and machine is
static.
Sleep mode: power switch is on, three buttons are off, and machine is static.
Work mode: Machine is working, (“ ”) light is on and machine enters cleaning
mode.
Make sure that the power switch at the bottom is on.
Press “ ” button on the main body or Start/Pause button on the remote
controller to start the machine.
!Caution: If the machine is in Sleep mode, press “ ” button to wake the
machine, and press it again to start cleaning.
3. Sleep
In case of no operation in 20-25 s, the machine will automatically enter Sleep
mode.
!Caution: If the product is not in use for long time, turn off the power switch first.
Pause is to switch the machine from Work mode to Standby mode, which can
be done by following operations:
A. Press the “Start / Pause” button on the remote controller.
B. Press “ ” button on the main body.
A.
B.
A.
B.
C.
D.
4. Automatic charging
Operation process: Sleep mode→Standby mode →Work mode
1. Power
2. Pause
9

Operation
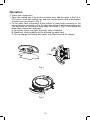
Water tank component
Open the sealing cap at the bottom of water tank, add the water to the 1/2 or
2/3 volume, close the sealing cap, and then lay the duster cloth at the bottom
of water tank (as shown in Fig.1).
Fit the water tank component at the bottom of main body according to the
arrow direction (as shown in Fig.2), insert two pillars of water tank component
into two holes on the base of main body (as shown in Fig.2 ) and fasten the
water tank component with base.
A. Automatic return may fail if the water tank is installed.
B. Machine's climbing ability will be affected by water tank.
C. Do not charge the battery with water tank fitted to avoid the danger.
Filler
Fig.1
Fig.2
3.
1.
2.
10

Operation
1.Z shape cleaning
Press the auto button on the remote control and the robot enters
the Z-shape cleaning mode. The mode remains if it is not
switched.
2. Edge (Border) cleaning
At Standby mode or Work mode, press Border button on the
remote controller to start cleaning along the longest border.
3. Auto cleaning
Press the “ ” button on the robot to enter the auto cleaning
mode: z shape cleaning edge cleaning ( the robot returns to
the charging station, if any, or returns to the starting point in the
absence of a charging station).
Press the Start/Pause button on the remote control to enter
the auto cleaning mode.
4. Powerful cleaning
A. In case of extreme dust, the fan speed may increase
automatically to conduct the intensive cleaning along spiraling
pattern.
B. With the machine on the dusty area, press “Powerful” button
on the remote controller to conduct the intensive cleaning.
4. Cleaning mode
!Caution:
A. The robot stops when powerful cleaning is done, and automatically enters the
select mode. Then, it needs manual operation..
B. Whatever cleaning mode the machine is in, press “Start/Pause” button on
the remote controller or “ ” button on the main body to pause the operation.
11

Operation
12
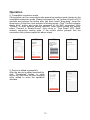
5. APP connection instruction
1. Download and install the “Tuya Smart” APP. You can connect your phone to
the wireless network in your home, and then search for “Tuya Smart” in
Application Store to download and install.
2. Register with mobile phone / E-mail. Enter your mobile phone number /
E-mail firstly, after receiving the verification code, enter the password to
complete registration.
3. Add floor mopping robot
Enter “Tuya Smart” APP, click “Add
Device” on homepage or click “+” in
upper right corner to enter device
adding interface. Choose “Small Home
Appliance”, then choose “Robot
Vacuum”.
4. General Connection mode
Please long press the “ ” button on
host for 3-5 seconds, release “ ”
button after you have heard “ding-dong”
sound for times. At this time, the host
indicator is blinking fast. Click “Confirm
indicator rapidly blink” button and enter
the password of the WiFi connected.
Click “Confirm” to enter connection
waiting status. If the mobile phone
prompts the connection fails, please
repeat the above steps.

Operation
13
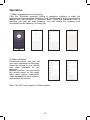
5. Compatible connection mode
If the product can’t be connected under general connection mode, please try the
compatible connection mode. Please long press the “ ” button on host for 8-10
seconds and release the button after you have heard “ding-dong” sound for
three times. At this time, host indicator is blinking slowly. Click “Confirm indicator
slowly blink” button and enter the password of the WiFi connected. Click
“Confirm” to enter network setting interface, enter mobile phone wifi setting,
select “Connect to SmartLift-xxxx”, then return to “Tuya Smart” APP. Enter
network connection waiting state. If the mobile phone prompts that the
connection fails, please repeat the above steps.
6. Device is added successfully.
After the device is added successfully,
click “Completed” button to enter
device list, then click the floor mopping
robot added to enter the operation
interface.

14
Operation
7. Make an appointment for cleaning
Click the “Schedule cleaning” button in operation interface to enter the
appointment timing addition interface. Click “Add Schedule” button to select the
startup time and number of repetition days. Once the scheduled time is
reached, the host will start cleaning. You can delete the cleaning time
scheduled just by deleting it in timing list.
8. Other interfaces
A.Personal center: you can set
your user nickname on this page,
share the device to your friends
and make feedback for use
opinions.
B.More interface: you can modify
the device name on this page,
learn about device information,
make feedback for users’ opinion,
and remove the device.
Note: The WIFI only support 2,4Ghz network.

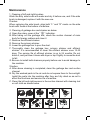
Maintenance
1. Cleaning of left and right brushes
Wash the dirty side brush with water and dry it before use, and if the side
brush is damaged, replace it with the new one.
!Caution:
When replacing the side brush, align both “L” and “R” marks on the side
brush with those at the bottom of machine.
Cleaning of garbage box and strainer as below
Open the rotary cover at the “ ” indication.
After taking out the garbage box, check the suction channel of main
body for foreign matters and clean it.
Remove the efficient strainer.
Remove the primary strainer.
Lower the garbage box to pour the dust.
Thoroughly clean the garbage box, primary strainer and efficient
strainer. It is recommended to clean the efficient strainer once 15-30
days. The service life of efficient strainer is up to 24 months. Do not
brush it, and just blow it clean with dryer or tap it lightly to cause the dust
to fall.
Be sure to install both strainers properly before use to avoid damage to
the machine.
After above cleaning is completed, clean the garbage box and suction
channel.
Dry the washed parts in the air and do not expose them to the sunlight.
Install the parts into the machine after they are fully dried so as not to
affect the functions and service life of machine.
Clean the left and right sensors in the suction channel with cleaning tool
or soft cloth as shown below.
2.
A
B.
C.
A.
B.
C.
D.
E.
F.
!Caution:
G.
Open it from this place
15

Maintenance
* Do not use the dripping cloth to avoid the slippery during the process of
cleaning.
* Application range: wooden floor, tile, marble, painted hard floor, etc.
Take off the duster cloth, rinse it clean and dry it in the air as shown in
Fig. J (by reference to page12).
Gently scrub the sensor and charging electrode with the cleaning tool or
soft cloth as shown below.
Clean the charging connector on the charging base with the cleaning tool
or soft cloth as shown below.
4. Cleaning of sensor lens and charging electrode.
B.
Gently scrub the sensor and charging electrode with the cleaning tool or
soft cloth as shown below.
A.
3. Maintenance of duster cloth
!Caution:
Sensor
Sensor
Electrode
Charging
connector
16

!Caution:
If the problem is still not resolved, try the following operations:
Turn off the power switch at the bottom of main body and restart the
machine.
If the problem still exists, send the machine to the after-sale service center.
Common Fault
Table of warning codes
In case of common faults of machine, determine the causes based on the
following phenomenons and solve the problems as shown in the table
below.
Overload and failure of left driving wheel Check the left wheel
Check the right wheel
Turn on the power switch
at the bottom
Check the left side brush
Check the right side brush
Check the fan
Power less than 20%
Put the machine back to
charging base or directly
charge it (see Items A
and B at Point 3 of Start
Guide on Page 8 )
Put the main body back
on the ground
Overload and failure of right driving wheel
Overload and failure of left side brush wheel
Overload and failure of right side brush wheel
Power switch at the bottom is off in the
charging
Garbage box is full of dust or suction
channel is clogged
Fan overload, or no fan sound or significantly
reduced sound
Clear the garbage box
and clean up the suction
channel
Collision switch is abnormal and the
machine keeps colliding against an obstacle
or reversing
Check the front bumper
for sensitivity and foreign
matter
Put the main body back
on the ground
Ground checking is abnormal, and the
machine stops working with the buzzing
sound
Left and right driving wheels are suspended
in the air and stop working with the
continuous buzzing sounds
1.
2.
17

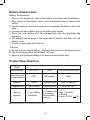
■ Storage temperature of the product is from 0 to 40.
Model
Input voltage
DC14.4V
Size W320xD320xH85 mm
Total rated pow-
er consumption
25W
2.8kgNet weight
Made in China Charging type Auto or manual
Charging time
Battery
capacity
240-360 min
Li-ion battery
2,600mAh
AC Adapter type
(for charging
Rechargeable
battery)
Cleaning time About 90 min
Battery Replacement
Product Specifications
Do not use non-original battery, otherwise the machine may be burned out.
The first charging shall last at least 12 hours.
Recycle the replaced battery in an environment-friendly way.
Remove the screws of cover at the bottom of machine with screwdriver.
After taking out the battery cover, pull the insulated strip to take out the
battery.
Gently break the connection plug latch to separate the battery with main
body.
Connect the new battery plug to the main body socket.
Place the new battery into the compartment with the inscribed side
upwards.
Put straight and squeeze in the wires next to battery and then lock the
battery cover.
Power on and check the machine.
Battery Replacement
!Caution:
1.
2.
3.
4.
5.
6.
7.
A.
B.
C.
18
Input: 100-240V
~50/60Hz,
Output: DC19V 0.6A
Page is loading ...
-
 1
1
-
 2
2
-
 3
3
-
 4
4
-
 5
5
-
 6
6
-
 7
7
-
 8
8
-
 9
9
-
 10
10
-
 11
11
-
 12
12
-
 13
13
-
 14
14
-
 15
15
-
 16
16
-
 17
17
-
 18
18
-
 19
19
-
 20
20
-
 21
21


LUBY Wi-Fi Connectivity User manual
- Category
- Robotic vacuum cleaners
- Type
- User manual
- This manual is also suitable for
Ask a question and I''ll find the answer in the document
Finding information in a document is now easier with AI
Other documents
-
 Lefant M501-B User guide
-
 MyGenie 251187 User manual
-
INSE E3 Plus User manual
-
 Sevenhugs Smart Remote Operating instructions
-
Shenzhen 2020X580S6 User manual
-
Pyle PUCRC750 User manual
-
 Elephants Foot eDiverter Photo Step By Step Instruction Booklet
-
 A&S Neatsvor V390 User manual
-
Roborock S7C-W, S7C-B Laser Navigation Intelligent Robot Vacuum Cleaner User manual
-
Somnox Sleep Robot User manual


