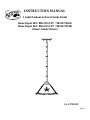
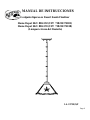
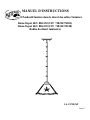
Hampton Bay 17201 is a wireless, remote control ceiling fan with a brushed nickel finish and five reversible blades in weathered oak and matte black finishes. It includes a six-speed DC motor and is Wi-Fi enabled, allowing you to control the fan from anywhere using your smartphone or the included remote control. The fan also has a built-in LED light kit, which can be dimmed and color-changed using the remote control.
Hampton Bay 17201 is a wireless, remote control ceiling fan with a brushed nickel finish and five reversible blades in weathered oak and matte black finishes. It includes a six-speed DC motor and is Wi-Fi enabled, allowing you to control the fan from anywhere using your smartphone or the included remote control. The fan also has a built-in LED light kit, which can be dimmed and color-changed using the remote control.


-
 1
1
-
 2
2
-
 3
3
-
 4
4
-
 5
5
-
 6
6
-
 7
7
-
 8
8
-
 9
9
-
 10
10
-
 11
11
-
 12
12
-
 13
13
-
 14
14
-
 15
15
-
 16
16
-
 17
17
-
 18
18
-
 19
19
-
 20
20
-
 21
21
-
 22
22
-
 23
23
-
 24
24


Hampton Bay 17201 is a wireless, remote control ceiling fan with a brushed nickel finish and five reversible blades in weathered oak and matte black finishes. It includes a six-speed DC motor and is Wi-Fi enabled, allowing you to control the fan from anywhere using your smartphone or the included remote control. The fan also has a built-in LED light kit, which can be dimmed and color-changed using the remote control.
Ask a question and I''ll find the answer in the document
Finding information in a document is now easier with AI
in other languages
- français: Hampton Bay 17201 Guide d'installation
- español: Hampton Bay 17201 Guía de instalación
Related papers
-
 Hampton Bay 17209 Installation guide
-
 Hampton Bay 17208 Installation guide
-
 Hampton Bay 27131 Installation guide
-
 Hampton Bay 23009 Installation guide
-
 Hampton Bay HD490708 Installation guide
-
 Hampton Bay 17011 Installation guide
-
 Hampton Bay 15183B Installation guide
-
 Hampton Bay RFSW30030LRS-MS Installation guide
-
 Hampton Bay 05660 Installation guide
-
 Hampton Bay 27154 Installation guide


Other documents
-
Design House 578419 Operating instructions
-
ROOMS TO GO 90682949 Assembly Instructions
-
Portfolio CPR1OSB Installation guide
-
Trend TF70036 User manual
-
-
Satco 60-6115 Operating instructions
-
Nuvo Lighting 60/548 Installation guide
-
 Park Harbor PHVL3193ORB Installation guide
-
-
 Park Harbor PHVL3053PC Installation guide

