Page is loading ...

Troubleshooting
LED indicator on the remote illuminates, but the remote won’t
control the fan. The remote may need to be re-synced.
The remote is synced to the receiver at the factory. Occasionally,
power surges can cause the remote to become un-synced. Whenever
necessary, follow the syncing instructions below.
SYNCING INSTRUCTIONS:
Turn o the main power, then turn it back on. Within 30 seconds, press
and hold the high and low speed buttons on the remote at the same
time for 5 seconds. The LED indicator will ash 3 times, signaling a
successful synchronization. Once complete, the fan will start on the low
speed with the light (if applicable) o.
The LED indicator on the remote does not illuminate.
The battery most likely needs to be replaced or it is not oriented
correctly in the battery compartment. If battery is depleted rapidly,
ensure one of buttons is not stuck in the down position.
The LED indicator stays on.
Ensure one of buttons is not stuck in the down position.
Remote controls more than one fan.
Turn o the power to the fans you don’t want synced. Follow the syncing
instructions listed above. Then, turn on the power to the other fans.
Dimming feature does not function.
Ensure the “D/CFL” button in the battery compartment is set to the “D”
position and the bulbs are incandescent or other dimmable bulbs.
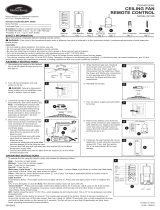
REMOTE OPERATING INSTRUCTIONS & TROUBLESHOOTING
1
2
3
4
5
6
Front Back
Battery
LED Indicator
LED Indicator
Fan Power
Operating Instructions
To operate the fan using the remote, press and relearse the
following buttons:
1 - High fan speed
2 - Medium fan speed
3 - Low fan speed
4 - Fan Power: Turns the fan o.
Light Delay O Mode - Press and hold the fan power
button (4) for ve seconds, which will turn o light after
one minute. The LED indicator on the remote will ash
four times to conrm mode setting.
5 - Light Control: Incandescent Bulbs - Press light control to
turn lights o and on. Press and hold light control to dim
or brighten the lights. CFL - Turns lights on and o. Note:
The dimmer function does not work with standard CFL.
6 - D/CFL Switch: Switch should be set to “CFL” to corre-
spond with standard CFL; set to “D” for incandescent
and other dimmable bulbs.

REMOTE CONTROL INSTALLATION INSTRUCTIONS
1. Wire the receiver and fan.
Make the following wire connections according to
the diagram and the following steps:
• Connect the Green wires from the downrod and
the mounting bracket to the Bare/Green (ground)
supply wire.
• Connect the Blue from the receiver to the Blue
fan wire.
• Connect the White wire (white label) from the
receiver to the White fan wire.
• Connect the Black wire from the receiver to the
Black fan wire.
• Connect the Black wire (red label) from the
receiver to the Black (hot/power) supply wire.
• Connect White wire (red label) from the receiver
to the White (neutral) supply wire.
Black (hot/power)
White (neutral)
Bare/Green
(ground)
White
Black
Black
Black
White
Blue
Blue
White
Green
Green
Receiver
1
2
3
4
5
6
Front Back
Battery
LED Indicator
LED Indicator
Fan Power
2. Install the battery.
Remove the battery cover from the back of the remote. Insert the battery
into the remote; ensure polarity of battery matches the polarity indicated
in the battery compartment -- positive (+) to positive (+) and negative
(-) to negative (-). Replace the battery cover and press the fan power
button on the remote to ensure the LED indicator illuminates and the
remote turns on the fan.
Important: Once the remote is installed, it is best to avoid using the wall
switch to turn the fan on. The wall switch can send a small power surge
to the fan causing the fan to become unsynced.
WARNING: To reduce the risk of re or electric shock, do NOT use a
full-range dimmer to control fan speed.
/