Yamaha CLP-170 Owner's manual

Category
Digital pianos
Type
Owner's manual
Owner's Manual
IMPORTANT
Check your power supply
Make sure that your local AC mains voltage matches the voltage specified on the name plate
on the bottom panel. In some areas a voltage selector may be provided on the bottom panel of
the main keyboard unit near the power cord. Make sure that the voltage selector is set for the
voltage in your area. The voltage selector is set at 240V when the unit is initially shipped. To
change the setting use a "minus" screwdriver to rotate the selector dial so that the correct voltage
appears next to the pointer on the panel.
Clavinova Web site (English only)
http://www.yamahaclavinova.com/
Yamaha Manual Library
http://www2.yamaha.co.jp/manual/english/
M.D.G., Pro Audio & Digital Musical Instrument Division, Yamaha Corporation
C
2002 Yamaha Corporation
V914960 ???AP???.?-0?C0 Printed in Indonesia
DIC 338
CLP-170
CLP-150
CLP-170/CLP-150
SPECIAL MESSAGE SECTION
PRODUCT SAFETY MARKINGS:
Yamaha electronic
products may have either labels similar to the graphics
shown below or molded/stamped facsimiles of these
graphics on the enclosure. The explanation of these
graphics appears on this page. Please observe all cautions
indicated on this page and those indicated in the safety
instruction section.
See bottom of Keyboard enclosure for graphic symbol markings
The exclamation point within the
equilateral triangle is intended to alert
the user to the presence of important
operating and maintenance (servic-
ing) instructions in the literature
accompanying the product.
The lightning flash with arrowhead
symbol, within the equilateral trian-
gle, is intended to alert the user to the
presence of uninsulated “dangerous
voltage” within the product’s enclo-
sure that may be of sufficient magni-
tude to constitute a risk of electrical
shock.
IMPORTANT NOTICE:
All Yamaha electronic products
are tested and approved by an independent safety testing
laboratory in order that you may be sure that when it is
properly installed and used in its normal and customary
manner, all foreseeable risks have been eliminated. DO
NOT modify this unit or commission others to do so
unless specifically authorized by Yamaha. Product perfor-
mance and/or safety standards may be diminished.
Claims filed under the expressed warranty may be denied
if the unit is/has been modified. Implied warranties may
also be affected.
SPECIFICATIONS SUBJECT TO CHANGE:
The
information contained in this manual is believed to be
correct at the time of printing. However, Yamaha reserves
the right to change or modify any of the specifications
without notice or obligation to update existing units.
ENVIRONMENTAL ISSUES:
Yamaha strives to pro-
duce products that are both user safe and environmentally
friendly. We sincerely believe that our products and the
production methods used to produce them, meet these
goals. In keeping with both the letter and the spirit of the
law, we want you to be aware of the following:
Battery Notice:
This product MAY contain a small non-
rechargable battery which (if applicable) is soldered in
place. The average life span of this type of battery is
approximately five years. When replacement becomes
necessary, contact a qualified service representative to
perform the replacement.
Warning:
Do not attempt to recharge, disassemble, or
incinerate this type of battery. Keep all batteries away
from children. Dispose of used batteries promptly and as
regulated by applicable laws. Note: In some areas, the
servicer is required by law to return the defective parts.
However, you do have the option of having the servicer
dispose of these parts for you.
Disposal Notice:
Should this product become damaged
beyond repair, or for some reason its useful life is consid-
ered to be at an end, please observe all local, state, and
federal regulations that relate to the disposal of products
that contain lead, batteries, plastics, etc.
NOTICE:
Service charges incurred due to lack of knowl-
edge relating to how a function or effect works (when the
unit is operating as designed) are not covered by the man-
ufacturer’s warranty, and are therefore the owners respon-
sibility. Please study this manual carefully and consult
your dealer before requesting service.
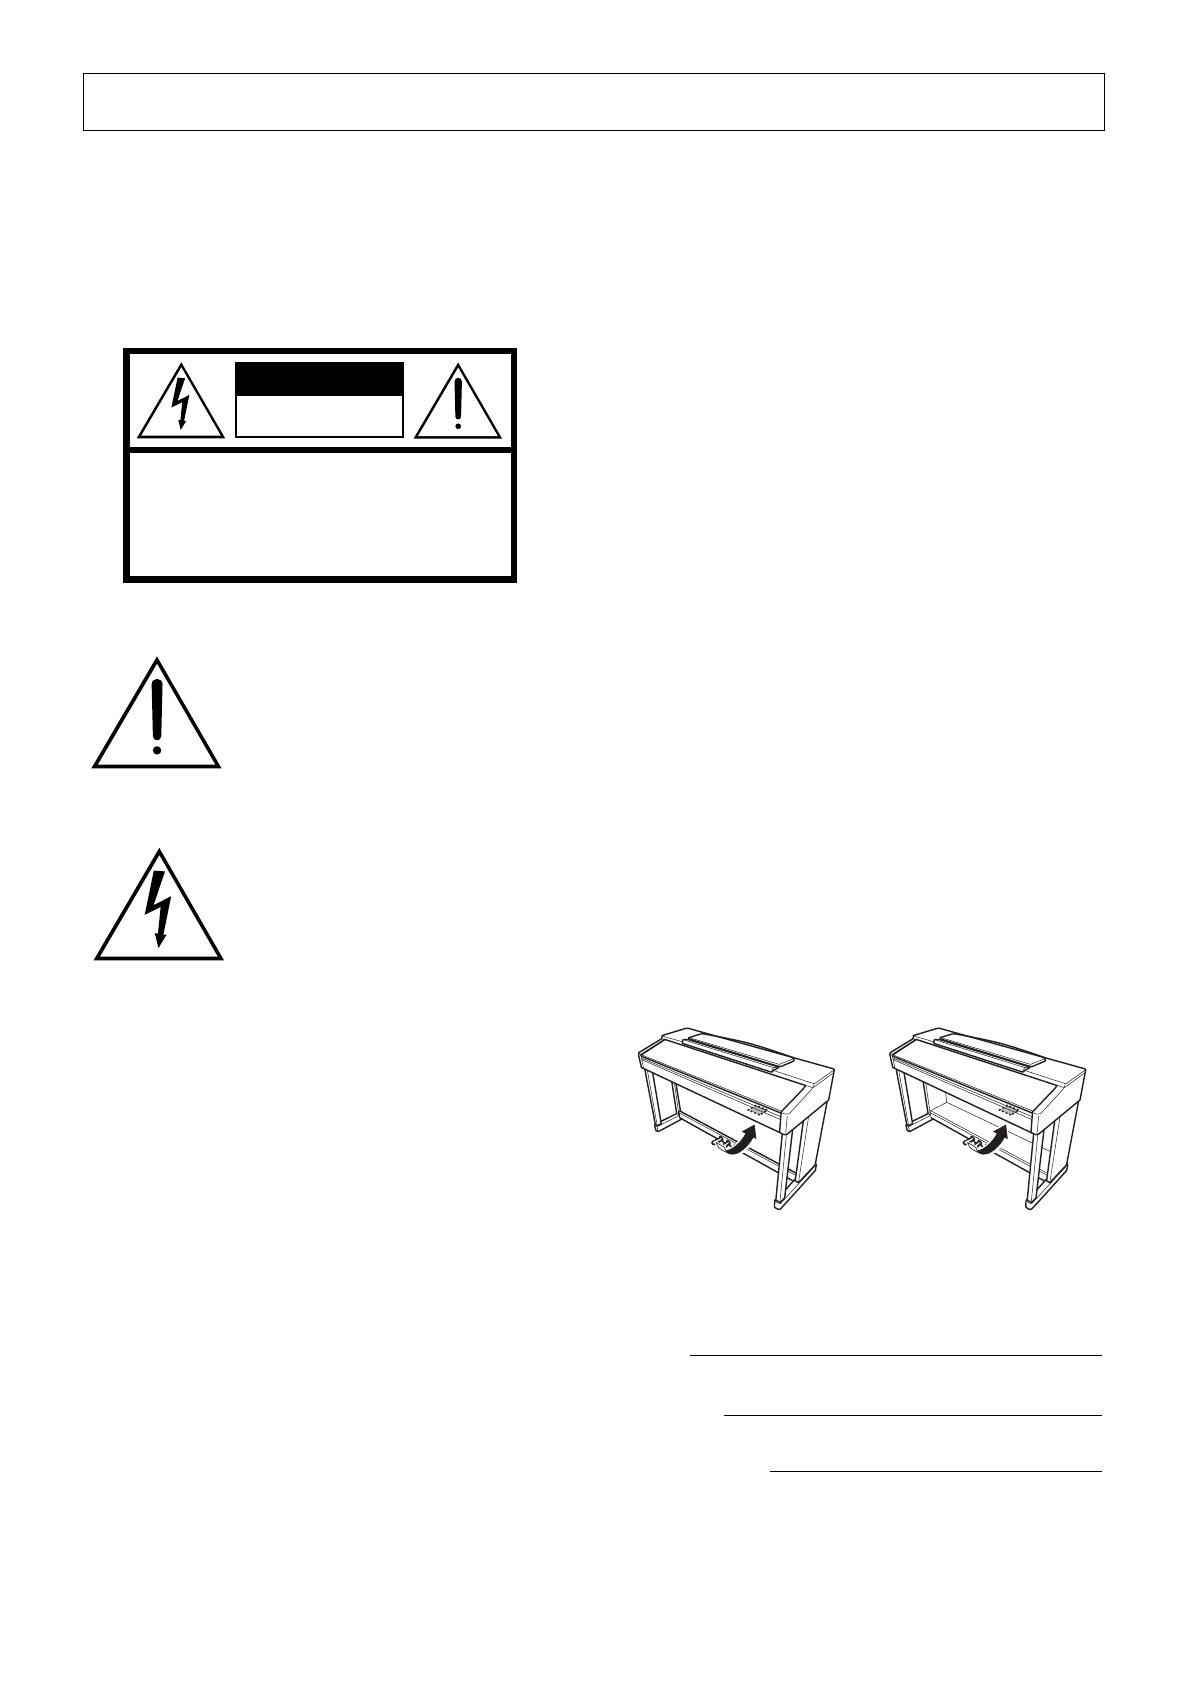
NAME PLATE LOCATION:
The graphic below indi-
cates the location of the name plate. The model number,
serial number, power requirements, etc., are located on
this plate. You should record the model number, serial
number, and the date of purchase in the spaces provided
below and retain this manual as a permanent record of
your purchase.
CAUTION
RISK OF ELECTRIC SHOCK
DO NOT OPEN
CAUTION: TO REDUCE THE RISK OF ELECTRIC SHOCK.
DO NOT REMOVE COVER (OR BACK).
NO USER-SERVICEABLE PARTS INSIDE.
REFER SERVICING TO QUALIFIED SERVICE PERSONNEL.
CLP-170
Model
Serial No.
Purchase Date
CLP-150
92-469
1
Introduction
CLP-170/150
3
PRECAUTIONS
PLEASE READ CAREFULLY BEFORE PROCEEDING
* Please keep this manual in a safe place for future reference.
WARNING
Always follow the basic precautions listed below to avoid the possibility of serious injury or even death
from electrical shock, short-circuiting, damages, fire or other hazards. These precautions include, but
are not limited to, the following:
Only use the voltage specified as correct for the instrument.
The required voltage is printed on the name plate of the
instrument.
Check the electric plug periodically and remove any dirt or
dust which may have accumulated on it.
Use only the supplied power cord/plug.
Do not place the power cord near heat sources such as
heaters or radiators, and do not excessively bend or otherwise
damage the cord, place heavy objects on it, or place it in a
position where anyone could walk on, trip over, or roll anything
over it.
Do not open the instrument or attempt to disassemble the
internal parts or modify them in any way. The instrument
contains no user-serviceable parts. If it should appear to be
malfunctioning, discontinue use immediately and have it
inspected by qualified Yamaha service personnel.
Do not expose the instrument to rain, use it near water or in
damp or wet conditions, or place containers on it containing
liquids which might spill into any openings.
Never insert or remove an electric plug with wet hands.
Do not put burning items, such as candles, on the unit.
A burning item may fall over and cause a fire.
If the power cord or plug becomes frayed or damaged, or if
there is a sudden loss of sound during use of the instrument,
or if any unusual smells or smoke should appear to be caused
by it, immediately turn off the power switch, disconnect the
electric plug from the outlet, and have the instrument
inspected by qualified Yamaha service personnel.
CAUTION
Always follow the basic precautions listed below to avoid the possibility of physical injury to you or
others, or damage to the instrument or other property. These precautions include, but are not limited
to, the following:
When removing the electric plug from the instrument or an
outlet, always hold the plug itself and not the cord. Pulling by
the cord can damage it.
Remove the electric plug from the outlet when the instrument
is not to be used for extended periods of time, or during
electrical storms.
Do not connect the instrument to an electrical outlet using a
multiple-connector. Doing so can result in lower sound quality,
or possibly cause overheating in the outlet.
Read carefully the attached documentation explaining the
assembly process. Failure to assemble the instrument in the
proper sequence might result in damage to the instrument or
even injury.
Do not expose the instrument to excessive dust or vibrations,
or extreme cold or heat (such as in direct sunlight, near a
heater, or in a car during the day) to prevent the possibility of
panel disfiguration or damage to the internal components.
Do not use the instrument in the vicinity of a TV, radio, stereo
equipment, mobile phone, or other electric devices.
Otherwise, the instrument, TV, or radio may generate noise.
Do not place the instrument in an unstable position where it
might accidentally fall over.
Before moving the instrument, remove all connected cables.
Do not place the instrument against a wall (allow at least 3 cm/
one-inch from the wall), since this can cause inadequate air
circulation, and possibly result in the instrument overheating.
Power supply/Power cord
Do not open
Water warning
Fire warning
If you notice any abnormality
Power supply/Power cord
Assembly
Location
(1)B-7
1/2
4 CLP-170/150
Before connecting the instrument to other electronic
components, turn off the power for all components. Before
turning the power on or off for all components, set all volume
levels to minimum. Also, be sure to set the volumes of all
components at their minimum levels and gradually raise the
volume controls while playing the instrument to set the desired
listening level.
In the case of a model with a polished finish, gently remove
dust and dirt with a soft cloth. Do not wipe too hard since
small particles of dirt can scratch the instrument's finish.
When cleaning the instrument, use a soft, dry or slightly damp
cloth. Do not use paint thinners, solvents, cleaning fluids, or
chemical-impregnated wiping cloths.
•Take care that the key cover does not pinch your fingers, and
do not insert a finger or hand in any gaps on the key cover or
instrument.
•Never insert or drop paper, metallic, or other objects into the
gaps on the key cover, panel or keyboard. If this happens, turn
off the power immediately and unplug the power cord from the
AC outlet. Then have the instrument inspected by qualified
Yamaha service personnel.
Do not place vinyl, plastic or rubber objects on the instrument,
since this might discolor the panel or keyboard.
In the case of a model with a polished finish, bumping the
surface of the instrument with metal, porcelain, or other hard
objects can cause the finish to crack or peel. Use caution.
Do not rest your weight on, or place heavy objects on the
instrument, and do not use excessive force on the buttons,
switches or connectors.
Do not operate the instrument for a long period of time at a
high or uncomfortable volume level, since this can cause
permanent hearing loss. If you experience any hearing loss or
ringing in the ears, consult a physician.
Do not place the bench in an unstable position where it might
accidentally fall over.
Do not play carelessly with or stand on the bench. Using it as
a tool or step-ladder or for any other purpose might result in
accident or injury.
Only one person should sit on the bench at a time, in order to
prevent the possibility of accident or injury.
In the case of a model which the height adjustable bench
included, do not attempt to adjust the bench height while
sitting on the bench, since this can cause excessive force to
be imposed on the adjustment mechanism, possibly resulting
in damage to the mechanism or even injury.
If the bench screws become loose due to extensive long-term
use, tighten them periodically using the included tool.
Saving and backing up your data
Current data (see page 46) is lost when you turn off the power
to the instrument. Save the data to a floppy disk (CLP-170)/
the storage memory (see page 46).
Saved data may be lost due to malfunction or incorrect
operation. Save important data to a floppy disk (CLP-170).
Backing up the floppy disk (CLP-170)
•To protect against data loss through media damage, we
recommend that you save your important data onto two floppy
disks.
Yamaha cannot be held responsible for damage caused by improper use or modifications to the instrument, or data that is lost or
destroyed.
Always turn the power off when the instrument is not in use.
Connections
Maintenance
Handling caution
Using the bench (If included)
Saving data
(1)B-7 2/2
CLP170,150E.book Page 4 Thursday, May 30, 2002 10:41 AM
CLP-170/150
5
Thank you for choosing the Yamaha Clavinova CLP-170/150. In order to make the most of your
Clavinovas performance potential and features, please read this Owner’s Manual thoroughly,
and keep it in a safe place for later reference.
About this Owner’s Manual and Reference Booklet
This manual consists of four main sections: “Introduction, “Basic Operation, “Detailed Settings, and Appendix.
Also, a separate “Reference Booklet” is provided.
Introduction:
Please read this section first. In the Application Index” section on page 10 and “Features on
page 14, you can learn how to use the Clavinova and its functions in particular situations.
Basic Operation:
This main section explains how to use the basic functions. Refer to this section while you
play the Clavinova. If you have questions or come across the words you do not know, refer
to the section entitled “Questions about Operations and Functions on page 102, or the
“Index” on page 118.
Detailed Settings:
This section explains how to make detailed settings for the Clavinovas various functions.
Refer to this section as necessary.
Appendix:
This section introduces troubleshooting, a description of preset voices, and other reference
material.
Reference Booklet:
XG Voice List, MIDI Data Format, etc.
The models CLP-170/150 will be referred to as the CLP/Clavinova in this Owner’s Manual.
The illustrations and LCD screens as shown in this Owner’s Manual are for instructional purposes only,
and may appear somewhat different from those on your instrument.
Copying of the commercially available software is strictry prohibited except for your personal use.
Trademarks
Apple and Macintosh are trademarks of Apple Computer, Inc., registered in the U.S. and other countries.
Windows is the registered trademark of Microsoft® Corporation.
All other trademarks are the property of their respective holders.
COPYRIGHT NOTICE
This product incorporates and bundles computer programs and contents in which Yamaha owns copy-
rights or with respect to which it has license to use others’ copyrights. Such copyrighted materials include,
without limitation, all computer software, MIDI files, WAVE data and sound recordings. Any unauthorized
use of such programs and contents outside of personal use is not permitted under relevant laws. Any vio-
lation of copyright has legal consequences. DON’T MAKE, DISTRIBUTE OR USE ILLEGALCOPIES.
“The Clavinova-Computer Connection,
is a supplementary guidebook that describes, for beginners,
what you can do with your Clavinova and a personal computer and how to set up a Clavinova-Computer
system (the manual is not written for any specific models). The document is available as a PDF file (in
English) at the following Internet address:
Clavinova Web site (English only): http://www.yamahaclavinova.com/
Yamaha Manual Library: http://www2.yamaha.co.jp/manual/english/
6
CLP-170/150
Table of contents
Introduction.......................................................... 2
PRECAUTIONS........................................................................................................................................ 3
About this Owner’s Manual and Reference Booklet..................................................................................................... 5
Table of contents ................................................................................................................................... 6
Application Index................................................................................................................................. 10
Handling the Floppy Disk Drive (FDD) and Floppy Disk (CLP-170).................................................... 12
Maintenance ........................................................................................................................................ 13
Included Accessories ............................................................................................................................ 13
Features ................................................................................................................................................ 14
Before Using the Clavinova.................................................................................................................. 16
About the key cover ...................................................................................................................................................... 16
About the music rest..................................................................................................................................................... 16
About the music braces................................................................................................................................................. 16
Turning the power on................................................................................................................................................... 17
Adjusting the display contrast ...................................................................................................................................... 18
Setting the volume ........................................................................................................................................................ 18
Using headphones......................................................................................................................................................... 18
Performing the iAFC automatic adjustment (CLP-170) ............................................................................................ 18
Basic Operation .................................................. 19
Part Names........................................................................................................................................... 20
Listening to the Demonstration Tunes................................................................................................ 22
Listening to 50 Piano Preset Songs ..................................................................................................... 24
Playing the 50 piano preset songs ................................................................................................................................ 24
Practicing a one-hand part using 50 preset songs ....................................................................................................... 26
Selecting and Playing Voices ............................................................................................................... 28
Selecting Voices............................................................................................................................................................. 28
Using the pedals ............................................................................................................................................................ 29
Adding variation to the sound [BRILLIANCE]/[REVERB]/[CHORUS].................................................................. 30
To enhance the acoustic realism of the sound ...[iAFC (Instrumental Active Field Control)] (CLP-170) ............. 32
Combining two voices (Dual mode)............................................................................................................................ 33
Splitting the keyboard range and playing two different voices (Split mode) ............................................................ 35
Using the metronome................................................................................................................................................... 37
Recording Your Performance............................................................................................................... 38
Recording a New Song.................................................................................................................................................. 38
Recording to [TRACK 1]........................................................................................................................................ 38
Re-recording TRACK 1........................................................................................................................................... 40
Re-recording TRACK 1 partially............................................................................................................................ 41
Recording to [TRACK2]......................................................................................................................................... 42
Recording to the third or more tracks [EXTRA TRACKS] .................................................................................. 43
Other recording techniques.......................................................................................................................................... 43
Table of contents
CLP-170/150
7
Changing a voice or tempo after recording........................................................................................................... 44
Adjusting the volume balance between playback and your performance [SONG BALANCE] ......................... 45
Recording in Dual or Split mode ........................................................................................................................... 45
Saving Recorded Songs and Handling the Files...[FILE]...................................................................... 46
Clavinova memory.................................................................................................................................................. 46
Basic file operation.................................................................................................................................................. 47
Saving recorded or other songs to Clavinova Storage memory...[SaveToMemory]................................................. 48
Saving recorded or other songs to floppy disk...[SaveToDisk] (CLP-170)................................................................ 49
Deletes a song from the Clavinova’s save memory or (CLP-170 only) from a floppy disk...[DeleteSong]............. 50
Renaming a song...[RenameSong]............................................................................................................................... 51
Copying data from one floppy disk to another...[CopyDisk] (CLP-170).................................................................. 52
Formatting a floppy disk...[FormatDisk] (CLP-170).................................................................................................. 53
Automatically open a song when the disk is inserted [FloppyDiskSongAutoOpen] (CLP-170) ............................. 54
Changing the type of characters on screen...[CharacterCode]................................................................................... 54
Playing Back Recorded Songs and Commercially-available Music Data............................................. 55
Playing back a song ....................................................................................................................................................... 55
Turning track playback on and off............................................................................................................................... 57
Supported song data type ............................................................................................................................................. 57
Connections ......................................................................................................................................... 59
Connectors .................................................................................................................................................................... 59
Connecting a personal computer................................................................................................................................. 61
Detailed Settings ................................................ 67
Detailed Settings.................................................................................................................................. 68
Parameter List ............................................................................................................................................................... 68
Making detailed settings ............................................................................................................................................... 71
Detailed settings for recording and playback [SONG SETTING] ........................................................ 73
Correcting note timing [Quantize].............................................................................................................................. 73
Specifying whether playback starts immediately along with the first voicing [QuickPlay]...................................... 74
Auditioning the channels [ChannelListen] ................................................................................................................. 74
Deleting data from each channel [ChannelClear]....................................................................................................... 74
Specifying the range and playing back repeatedly [FromToRepeat] ......................................................................... 74
Playing back the phrase specified by the phrase number [PhraseMark] ................................................................... 75
Playing back a song repeatedly [SongRepeat] ............................................................................................................. 75
Detailed settings for the metronome METRONOME [SETTING]........................................................ 76
Setting the metronome time signature [TimeSignature]............................................................................................ 76
Setting the metronome volume level [MetronomeVolume]...................................................................................... 76
Selecting the metronome voice [MetronomeSound] ................................................................................................. 76
Detailed settings for the voices [VOICE SETTING].............................................................................. 77
Setting the octave [Octave]........................................................................................................................................... 78
Setting the volume level [Volume] .............................................................................................................................. 78
Setting the position of right and left channels [Pan] .................................................................................................. 78
Make fine adjustments to the pitch (only in Dual mode) [Detune].......................................................................... 78
Selecting the reverb type [ReverbType]....................................................................................................................... 79
Table of contents
8
CLP-170/150
Setting the reverb depth [ReverbSend]........................................................................................................................ 79
Selecting the chorus type [Chorus Type]..................................................................................................................... 79
Setting the chorus depth [ChorusSend] ...................................................................................................................... 79
Setting the chorus on/off [ChorusOnOff]................................................................................................................... 80
Selecting the DSP type [DSP Type (DSP)] .................................................................................................................. 80
Setting the speed of the vibraphone vibrato effect [VibeRotorSpeed]....................................................................... 80
Turning the vibraphone vibrato effect on/off [VibeRotorOnOff (RotorOnOff)] .................................................... 81
Setting the rotation speed of the rotary speaker [RotarySpeed (Rot.Speed)]............................................................ 81
Adjusting the depth of the DSP effect [DSPDepth].................................................................................................... 81
Adjusting the brightness of the sound [Brightness].................................................................................................... 81
Adjusting the resonance effect [HarmonicContent (Harmonic)] ............................................................................. 81
Adjusting the low-range frequency of the equalizer [EQ LowFreq. (EQ L.Freq)]....................................................82
Adjusting the low-range gain (amount of boost/cut) of the equalizer [EQ LowGain]............................................. 82
Adjusting the high-range frequency of the equalizer [EQ HighFreq. (EQ H.Freq)] ................................................ 82
Adjusting the high-range gain (amount of boost/cut) of the equalizer [EQ HighGain].......................................... 82
Setting the touch sensitivity [TouchSense].................................................................................................................. 83
Setting the right pedal function [RPedal].................................................................................................................... 83
Setting the center pedal function [MPedal] ................................................................................................................ 83
Setting the left pedal function [LPedal]....................................................................................................................... 84
Setting the auxiliary pedal function [AuxPedal] ......................................................................................................... 84
Detailed settings for iAFC [iAFC SETTING] (CLP-170)......................................................................... 85
Selecting the iAFC type [iAFC Type]........................................................................................................................... 85
Adjusting the iAFC depth [iAFC Depth]..................................................................................................................... 85
Calibration (automatic adjustment) [Calibration]..................................................................................................... 86
Restoring the default iAFC settings [iAFC Default].................................................................................................... 86
MIDI [MIDI SETTING]........................................................................................................................... 87
About MIDI................................................................................................................................................................... 87
Setting the MIDI transmit channel [MidiOutChannel] ............................................................................................. 88
Setting the MIDI receive channel [MidiInChannel]................................................................................................... 88
Setting Local control on/off [LocalControl]................................................................................................................ 89
Selecting performance from the keyboard or song data for MIDI transmission [MidiOutSelect].......................... 89
Selecting a type of data received via MIDI [ReceiveParameter]................................................................................. 89
Selecting a type of data transmitted via MIDI [TransmitParameter] ........................................................................ 89
Transmitting the initial settings on the panel [InitialSetup]...................................................................................... 90
Executing voice data bulk dump [VoiceBulkDump].................................................................................................. 90
Other settings ...................................................................................................................................... 91
Selecting a touch response [TouchResponse] ............................................................................................................. 91
Fine tuning the pitch [Tune]........................................................................................................................................ 91
Selecting a tuning curve for a piano voice [PianoTuningCurve]............................................................................... 91
Selecting a scale [Scale]................................................................................................................................................. 92
Specifying the Split Point [Split Point]........................................................................................................................ 92
Changing the key [Transpose] ..................................................................................................................................... 92
Adjusting the depth of the Soft pedal [SoftPedalDepth] ............................................................................................ 93
Depth of string resonance [StringResonanceDepth] .................................................................................................. 93
Depth of sustain sampling for the damper pedal [SustainSamplingDepth].............................................................. 93
Specify the volume of the key-off sound [KeyOffSamplingDepth] ........................................................................... 93
Selecting a pedal function for vibraphone [VibraphonePedalMode]........................................................................ 93
Assign the SONG [START/STOP] function to the pedal [PedalStart/Stop]............................................................. 94
Selecting a type of auxiliary pedal [AuxPedalType].................................................................................................... 94
Setting the point at which the damper pedal starts to affect the sound [HalfPedalPoint] ....................................... 94
Table of contents
CLP-170/150
9
Pitch bend range [PitchBendRange]............................................................................................................................ 94
Switch the speaker on/off [Speaker] ............................................................................................................................ 95
Selecting items saved at shutdown [MemoryBackUp] ............................................................................................... 95
Restoring the normal (default) settings [FactorySet] ................................................................................................. 95
Other method for restoring the normal settings......................................................................................................... 95
Message List ......................................................................................................................................... 96
Questions about Operations and Functions...................................................................................... 102
Appendix .......................................................... 105
Troubleshooting................................................................................................................................. 106
Data Compatibility............................................................................................................................. 107
Preset Voice List ................................................................................................................................. 109
Voice Combination Examples (Dual and Split) ................................................................................. 111
CLP-150: Keyboard Stand Assembly.................................................................................................. 112
CLP-170: Keyboard Stand Assembly.................................................................................................. 115
Index................................................................................................................................................... 118
10
CLP-170/150
Application Index
Use this index to find reference pages that may be helpful for your application and situation.
Listening
Listening to demo songs...............................................“Listening to the Demonstration Tunes” on page 22
“Playing the 50 piano preset songs on page 24
Listening to demo songs with different voices ............“Listening to the Demonstration Tunes” on page 22
Listening to songs from “50 greats for the Piano” ..............“Playing the 50 piano preset songs” on page 24
Listening to my recorded performance ............................................ “Recording to [TRACK 1]” on page 38
“Playing back a song” on page 55
Listening to songs in a floppy disk (CLP-170) .......................................... “Playing back a song” on page 55
Playing
Using three pedals.............................................................................................“Using the pedals” on page 29
Playing an accompaniment that matches pitch ....................... “Changing the key [Transpose]” on page 92
Changing tonal color
Viewing the list of voices................................................................................ “Preset Voice List” on page 109
Simulating a concert hall...........................................................................................“[REVERB]” on page 31
Combining two voices..................................................... “Combining two voices (Dual mode)” on page 33
Playing different sounds with left and right hands
...........................“Splitting the keyboard range and playing two different voices (Split mode)” on page 35
Making a voice brighter and sharper, or softer and smoother ........................“[BRILLIANCE]” on page 30
Adding spread to the sound .................................................................................... “[CHORUS]” on page 31
Making the sound three-dimensional
........................................................... “[iAFC (Instrumental Active Field Control)] (CLP-170)” on page 32
Practicing
Muting the right- or left-hand part ........... “Practicing a one-hand part using 50 preset songs on page 26
Practicing with an accurate and steady tempo.......................................“Using the metronome on page 37
Practicing using your recorded song ..........................................“Recording Your Performance on page 38
“Turning track playback on and off on page 57
Recording
Recording your performance ......................................................“Recording Your Performance on page 38
Saving recorded songs to floppy disks (CLP-170) or memory
...........................................................“Saving Recorded Songs and Handling the Files...[FILE]” on page 46
Application Index
CLP-170/150
11
Settings
Making detailed settings for recording and playback
............................................“Detailed settings for recording and playback [SONG SETTING]” on page 73
Making detailed settings for the metronome
......................................... “Detailed settings for the metronome METRONOME [SETTING]” on page 76
Making detailed settings for the voices
................................................................. “Detailed settings for the voices [VOICE SETTING]” on page 77
Making detailed settings for MIDI .................................................... “MIDI [MIDI SETTING]” on page 87
Making detailed settings for the Clavinova.........................................................“Other settings on page 91
Connecting the Clavinova to other devices
What is MIDI?......................................................................................................... “About MIDI” on page 87
Recording your performance “AUX OUT [R][L] Pin jacks (LEVEL FIXED), [R][L/L+R] Phone jacks” on
page 60
Raising the volume .. AUX OUT [R][L] Pin jacks (LEVEL FIXED), [R][L/L+R] Phone jacks” on page 60
Outputting other instruments’ sound from the Clavinova.......... AUX IN [R], [L/L+R] jacks” on page 60
Connecting a computer........................................................ “Connecting a personal computer” on page 61
Assembling
Assemble/disassemble the Clavinova............................ “CLP-150: Keyboard Stand Assembly” on page 112
........................................................................................ “CLP-170: Keyboard Stand Assembly” on page 115
Quick solution
What the Clavinova offers............................................................................. “Application Index” on page 10
“Features” on page 14
Returning to the main screen.................................................................................“EXIT button on page 20
Resetting the Clavinova to the default setting
................................................................“Restoring the normal (default) settings [FactorySet]” on page 95
Meaning of the messages........................................................................................ “Message List” on page 96
If you have questions about operations and functions
............................................................................Questions about Operations and Functions on page 102
Troubleshooting............................................................................................. “Troubleshooting on page 106
Use this index to find reference pages that may be helpful for your application and situation.
12
CLP-170/150
Handling the Floppy Disk Drive(FDD)
and Floppy Disk (CLP-170)
Precautions
Be sure to handle floppy disks and treat the disk drive with
care. Follow the important precautions below.
Compatible Disk Type
3.5" 2DD and 2HD type floppy disks can be used.
Inserting/Ejecting Floppy Disks
To insert a floppy disk into the disk drive:
Hold the disk so that the label of the disk is facing upward and
the sliding shutter is facing forward, towards the disk slot.
Carefully insert the disk into the slot, slowly pushing it all the
way in until it clicks into place and the eject button pops out.
To eject a floppy disk:
Before ejecting the disk, be sure to confirm that the floppy
disk drive is stopped. If the disk drive is operating (during
the [SaveToDisk] (P53), [DeleteSong] (P53), [RenameSong]
(P54), [CopyDisk] (P55), or [FormatDisk] (P56) opera-
tion), the Clavinova displays [Executing].
Never attempt to remove the disk or turn the power off
when the disk drive is operating. Doing so can damage the
disk and possibly the disk drive.
Press the eject button slowly as far as it will go; the disk will
automatically pop out. When the disk is fully ejected, care-
fully remove it by hand.
If the eject button is pressed too quickly, or if it is not
pressed in as far as it will go, the disk may not eject properly.
The eject button may become stuck in a half-pressed posi-
tion with the disk extending from the drive slot by only a few
millimeters. If this happens, do not attempt to pull out the
partially ejected disk, since using force in this situation can
damage the disk drive mechanism or the floppy disk. To
remove a partially ejected disk, try pressing the eject button
once again, or push the disk back into the slot and then
repeat the eject procedure.
Be sure to remove the floppy disk from the disk drive before
turning off the power. A floppy disk left in the drive for
extended periods can easily pick up dust and dirt that can
cause data read and write errors.
Cleaning the Disk Drive Read/Write Head
Clean the read/write head regularly. This instrument
employs a precision magnetic read/write head which,
after an extended period of use, will pick up a layer of
magnetic particles from the disks used that will eventually
cause read and write errors.
To maintain the disk drive in optimum working order
Yamaha recommends that you use a commercially-avail-
able dry-type head cleaning disk to clean the head about
once a month. Ask your Yamaha dealer about the avail-
ability of proper head-cleaning disks.
Never insert anything but floppy disks into the disk drive.
Other objects may cause damage to the disk drive or
floppy disks.
About the Floppy Disks
To handle floppy disks with care:
Do not place heavy objects on a disk or bend or apply
pressure to the disk in any way. Always keep floppy disks
in their protective cases when they are not in use.
Do not expose the disk to direct sunlight, extremely high
or low temperatures, or excessive humidity, dust or liq-
uids.
Do not open the sliding shutter and touch the exposed
surface of the floppy disk inside.
Do not expose the disk to magnetic fields, such as those
produced by televisions, speakers, motors, etc., since
magnetic fields can partially or completely erase data on
the disk, rendering it unreadable.
Never use a floppy disk with a deformed shutter or housing.
Do not attach anything other than the provided labels to
a floppy disk. Also make sure that labels are attached in
the proper location.
Drive lamp
Eject button
CLP-170/150
13
Handling the Floppy Disk Drive(FDD) and Floppy Disk
To protect your data (Write-protect Tab):
To prevent accidental erasure of important data, slide the
disk’s write-protect tab to the “protect position (tab open).
Data backup
For maximum data security Yamaha recommends that
you keep two copies of important data on separate floppy
disks. This gives you a backup if one disk is lost or dam-
aged. To make a backup disk use the Copy Disk function
on page 52.
Maintenance
Clean the instrument using a dry or slightly damp soft cloth (wring well).
CAUTION
Do not use benzene, thinner, detergent, or chemically-treated cloth for cleaning. Do not place vinyl, plastic or rubber
products on the instrument.
Otherwise, the panel or keys may become discolored or degraded.
CAUTION
Before using the Clavinova, be sure to read “Precautions” on pages 3-4.
Tuning
Unlike an acoustic piano, the Clavinova does not need to be tuned. It always stays perfectly in tune.
Transporting
If you move to another location, you can transport the Clavinova along with your other belongings. You can move
the unit as it is (assembled) or you can disassemble the unit.
Transport the keyboard horizontally. Do not lean it up against a wall or stand it up on its side. Do not subject the
instrument to excessive vibration or shock.
The CLP-170 features an iAFC (Instrumental Active Field Control) effect. This produces sound from the speaker located on the
rear of the Clavinova, enhancing the reverberation and spaciousness of the sound.
In order to take full advantage of iAFC, we recommend that you do the following.
• Place the Clavinova so that its rear panel is at least 10 cm away from the wall.
• After you move the Clavinova to a different location, perform the automatic adjustment. (page 86)
Included Accessories
“50 greats for the Piano” Score Collection
Owner’s Manual
Reference Booklet
Recording disk (CLP-170)
Save your recorded performance to this disk. (page 49)
Bench
(included or optional depending on locale)
write-protect tab open
(protect position)
TIP
14 CLP-170/150
POWER
TEMPO
VARIATION
BRIGHTMELLOW
BRILLIANCE
GRAND
PIANO 1
CHURCH
ORGAN
E.PIANO
1
STRINGS
E.PIANO
2
CHOIR
SPLIT
CHORUS ON
/
OFFREVERB
GRAND
PIANO 2
JAZZ
ORGAN
HARPSI-
CHORD
SYNTH.
PAD
VIBRA-
PHONE
VOICE
SETTING
MIDI
SETTING
OTHER
SETTING
AFC
SETTING
AFC
SETTINGSTART/STOP
UP
C
A
D
B
NO YES
DOWN
E.BASS XG
GUITAR
E.CLAVI-
CHORD
WOOD
BASS
VOICE
METRONOME
DEMO
SONG BALANCE
MASTER VOLUME
SONG KEYBOARD
SONG
SETTING
FILE
TRACK
1
TOP
EXTRA
TRACKS
TRACK
2
START
/
STOP
SONG SELECT
NEW SONG
SYNCHRO START
REC
SONG
MAXMIN
EXIT
CONTRAST
EFFECT
MIDI
THRU
TO HOST USBHOST SELECT
MIDI
MacPC-2
USB
OUTIN
AUX OUTAUX IN
L
/
L+R R
AUX PEDAL
L
/
L+R R RL
LEVEL FIXED
PHONES
PEDAL
A set of standard
stereo head-
phones can be
plugged in here
for private prac-
tice. (page 18)
These jacks allow you to connect
an external tone generator to
reproduce the sound via the
Clavinova’s internal sound system
and speakers. (page 60)
Connect a MIDI device
here to use various MIDI
functions. (page 59, 64)
(About MIDI—page 87)
Connect an optional pedal
here and assign one of
the various functions to
the pedal. (page 59)
This jack and selector switch al-
low direct connection to a per-
sonal computer for sequencing
and other music applications.
(page 61–66)
Connect the pedal cord here
to use the Clavinova’s
pedals. (page 110–115)
This connector can be connected to your computer, allowing you
to transfer MIDI data between the Clavinova and the computer.
(page 59)
You can output the sound of
the Clavinova from an exter-
nal audio system, or connect
it to a cassette tape recorder
etc. and record your playing.
(page 60)
Features
The Yamaha CLP-170/150 Clavinova features rich sounds produced by Yamahas proprietary “AWM dynamic stereo
sampling” tone generator system, a Graded Hammer” keyboard (CLP-150) that varies the key weight according to
the key range, and a “GH3” keyboard (CLP-170) that enhances the graded hammer keyboard by allowing you to play
a note to be played repeatedly without pressing the pedal, giving these electronic pianos a “playing-feel” that is very
close to the keyboard of a genuine grand piano. The CLP-170/150 GrandPiano1 voice features 3 velocity-switched
samples (Dynamic Sampling), “String Resonance (page 93) that recreates resonance of piano strings, special Sus-
tain Sampling (page 93)that samples the unique resonance of an acoustic grand pianos soundboard and strings
when the damper pedal is pressed, and Key-off Samples that add the subtle sound produced when the keys are
released. The CLP-170/150 comes much closer to the sound of a true acoustic piano.
The illustration shows the CLP-170
CLP-170/150 15
Features
TEMPO
VARIATION BRIGHTMELLOW
BRILLIANCE
GRAND
PIANO 1
CHURCH
ORGAN
E.PIANO
1
STRINGS
E.PIANO
2
CHOIR
SPLIT CHORUS ON
/
OFFREVERB
GRAND
PIANO 2
JAZZ
ORGAN
HARPSI-
CHORD
SYNTH.
PAD
VIBRA-
PHONE
VOICE
SETTING
MIDI
SETTING
OTHER
SETTING
AFC
SETTING
AFC
SETTINGSTART/STOP
UP
C
A
D
B
NO YES
DOWN
E.BASS XG
GUITAR
E.CLAVI-
CHORD
WOOD
BASS
VOICE
METRONOME
DEMO
SONG BALANCEMASTER VOLUME
SONG KEYBOARD
SONG
SETTING
FILE
TRACK
1
TOP
EXTRA
TRACKS
TRACK
2
START
/
STOP
SONG SELECT
NEW SONG
SYNCHRO START
REC
SONG
MAXMIN
EXIT
CONTRAST
EFFECT
TEMPO [DOWN] [UP]
You can change the song tempo (speed).
(page 25, 37, 39, 55)
BRILLIANCE [MELLOW] [BRIGHT]
Adjust the brightness of the tone
using these buttons. (page 30)
[VOICE SETTING] / [VARIATION]
You can make detailed settings for
tone and effects. (page 77)
[EXIT]
The screen returns to its
main display when you
press this button. (page 21)
[SONG SETTING]
Make detailed settings for
song recording and playback.
(page 73)
The display
allows accu-
rate control
and opera-
tion.
(page 21)
[DEMO]
Demonstration
playback is
available for each
voice. (page 22)
[MASTER VOLUME]
Adjust the volume
level using this dial.
(page 18)
[CONTRAST]
Adjust the bright-
ness of the display
using this control.
(page 18)
[REVERB] / [CHORUS]
Add reverb (reverberation) and spread
(chorus) to the sound. (page 31)
[MIDI SETTING]
Make detailed MIDI settings,
such as MIDI receive/transmit
channels. (page 87)
[FILE]
Save recorded songs and
manage song files. (page 46)
[METRONOME]
Use the metronome
functions. (page 37)
The Clavinova includes
50 preset songs.
This section enables you to
listen to these songs, prac-
tice using a convenient
practice function, play back
Clavinova music data (sold
in music stores), and re-
cord and play back your
performance.
(page 24, 38, 55)
[SPLIT]
You can play different
voices on the left- and
right-hand sections of the
keyboard. (page 35)
Voice group buttons
You can choose from sixteen groups of
voices, including grand piano.
You can also combine two sounds and use
them together. (page 28)
[OTHER SETTING]
This lets you make detailed settings, such as adjusting the key-
board touch or making fine adjustments to the pitch. (page 91)
[SONG BALANCE]
This lets you adjust the volume
balance between the song playback
and the sound you are playing on
the keyboard. (page 45)
Position the Clavinova so that its rear panel is
at least 10 cm away from the wall.
Perform the automatic adjustment after you
turn on the power of the Clavinova for the first
time, and after each time you re-locate the
Clavinova.
In order to obtain optimal results from iAFC (CLP-
170), we recommend that you do the following:
TIP
[iAFC ON/OFF] (CLP-170)
This enhances the acoustic realism of the sound produced
from the Clavinova, similar to the sound of an acoustic instru-
ment. (page 32)
[iAFC SETTING] (CLP-170)
You can select the iAFC type and make other detailed
settings for iAFC. (page 85)
16
CLP-170/150
Before Using the Clavinova
About the key cover
To open the key cover:
Lift the cover slightly, then push and slide it open.
To close the key cover:
Slide the cover toward you and gently lower the
cover over the keys.
About the music rest
To raise the music rest:
1. Pull the music rest up and toward yourself as far as it will go.
2. Flip down the two metal supports at the left and right on the
rear of the music rest.
3. Lower the music rest so that it rests on the metal supports.
To lower the music rest:
1. Pull the music rest toward yourself as far as it will go.
2. Raise the two metal supports (at the rear of the music rest).
3. Gently lower the music rest backward until it is all the way
down.
CAUTION
Do not try to use the music rest in a half-raised position. When lowering the music rest, do not release your hands
from the music rest until it is all the way down.
About the music braces
These braces are for holding the pages of music books in place.
Be careful to avoid catching your fingers
when opening or closing the cover.
CAUTION
Hold the cover with both hands when opening or closing it. Do not release it until it is fully opened or closed. Be
careful to avoid catching fingers (yours or others, especially childrens) between the cover and the unit.
Do not place objects such as a piece of metal or paper on top of the key cover. Small objects placed on the key
cover may fall inside the unit when the cover is opened and may be nearly impossible to remove. This could
cause electric shock, short circuit, fire or other serious damage to the instrument.
To open
To close
CLP-170/150 17
Before Using the Clavinova
Turning the power on
1. Connect the power cable.
First insert the plug of the power cable into the AC connector on the Clavinova, then plug the other end of
the cable into the proper AC outlet on the wall.
In some areas a plug adaptor may be provided to match the pin configuration of the AC wall outlets in
your area.
WARNING!
Make sure your CLP-170/150 is rated for the AC voltage supplied in the area in which it is to be used (voltage rating appears on
the name plate on the bottom panel). In some areas, a voltage selector may be provided on the bottom panel of the main key-
board unit near the power cord. Make sure that the voltage selector is set for the voltage in your area. Connecting the unit to the
wrong AC supply can cause serious damage to the internal circuitry and may even pose a shock hazard!
Use only the AC power cord supplied with the CLP-170/150. If the supplied cord is lost or damaged and needs to be replaced,
contact your Yamaha dealer. The use of an inappropriate replacement can pose a fire and shock hazard!
The type of AC power cord provided with the CLP-170/150 may be different depending on the country in which it is purchased.
(In some areas a plug adaptor may be provided to match the pin configuration of the AC wall outlets in your area.) Do NOT mod-
ify the plug provided with the CLP-170/150. If the plug will not fit the outlet, have a proper outlet installed by a qualified electri-
cian.
2. Turn on the power to the Clavinova.
Press the [POWER] switch located on the right of the keyboard to turn the power on.
The screen located in the center of the front panel and the power indica-
tor located below the left end of the keyboard lights up.
Power indicator
If you close the key cover
without turning the power
off, the power indicator
remains lit, indicating that
the power is still on.
Press the [POWER] switch again to turn off the power to the Clavinova.
The screen and the power indicator turn off.
12
(The shape of plug differs
depending on locale.)
(rear panel)
(buttom surface)
CLP-150
CLP-170
TIP
Power indicator
[POWER]
C
A
D
B
NO YES
When you turn on the power to the Clavinova, a voice name
appears on the screen.
18
CLP-170/150
Before Using the Clavinova
Adjusting the display contrast
You can adjust the contrast of the display by turning the [CONTRAST] knob located to the right of the LCD.
Setting the volume
To adjust the volume, use the [MASTER VOLUME] located at the left of the panel. Play the keyboard to actu-
ally produce sound while you adjust the volume.
Using headphones
Connect a pair of headphones to one of the [PHONES] jacks.
When the headphones are plugged into either of the [PHONES]
jacks, the internal speaker system is automatically shut off.
Two [PHONES] jacks are provided. Two sets of standard stereo
headphones can be plugged in. (If you are using only one pair of
headphones, you can plug them into either of these jacks.)
CAUTION
Do not use headphones at a high volume for an extended period of time.
Doing so may cause hearing loss.
Using the Headphone Hanger
A headphone hanger is included in the CLP-170/150
package so that you can hang the headphones on the
Clavinova. Install the headphone hanger using
included two screws (4
×
10mm) as shown in the figure.
CAUTION
Do not hang anything other than the headphones on the hanger. Otherwise, the Clavi-
nova or the hanger may be damaged.
Performing the iAFC automatic adjustment (CLP-170)
The CLP-170 features an iAFC (Instrumental Active Field Control) effect. This produces sound from the
speaker located on the rear of the Clavinova, enhancing the reverberation and spaciousness of the sound.
In order to take full advantage of iAFC, perform the automatic adjustment. (page 86)
C
A
D
B
EXITEXIT
CONTRAST
NO YES
Use this knob.
CONTRAST:
difference between
brightness and dark-
ness
TERMINOLOGY
MASTER VOLUME
MAXMIN
CAUTION
Do not use the Clavi-
nova at a high volume
level for a long period of
time, or your hearing
may be damaged.
The level
increases.
The level
decreases.
MASTER VOLUME:
The volume level of the entire keyboard sound
You can also adjust the [PHONES] output level, the
AUX IN input level and the AUX OUT [L/L+R][R]
output level using the [MASTER VOLUME] dial.
TERMINOLOGY
TIP
buttom surface
standard stereo phone plug
Optional headphones
HPE-160 Yamaha headphones.
TIP
CLP-170/150 19
Basic Operation
20 CLP-170/150
Part Names
POWER
TEMPO
VARIATION
BRIGHTMELLOW
BRILLIANCE
GRAND
PIANO 1
CHURCH
ORGAN
E.PIANO
1
STRINGS
E.PIANO
2
CHOIR
SPLIT
CHORUS ON
/
OFFREVERB
GRAND
PIANO 2
JAZZ
ORGAN
HARPSI-
CHORD
SYNTH.
PAD
VIBRA-
PHONE
VOICE
SETTING
MIDI
SETTING
OTHER
SETTING
AFC
SETTING
AFC
SETTINGSTART/STOP
UP
C
A
D
B
NO YES
DOWN
E.BASS XG
GUITAR
E.CLAVI-
CHORD
WOOD
BASS
VOICE
METRONOME
DEMO
SONG BALANCE
MASTER VOLUME
SONG KEYBOARD
SONG
SETTING
FILE
TRACK
1
TOP
EXTRA
TRACKS
TRACK
2
START
/
STOP
SONG SELECT
NEW SONG
SYNCHRO START
REC
SONG
MAXMIN
EXIT
CONTRAST
EFFECT
PHONES
TEMPO
SETTINGSTART/STOP
UP
C
A
DOWN
METRONOME
DEMO
SONG BALANCEMASTER VOLUME
SONG KEYBOARD
SONG
SETTING
FILE
TRACK
1
TOP
EXTRA
TRACKS
TRACK
2
START
/
STOP
SONG SELECT
NEW SONG
SYNCHRO START
REC
SONG
MAXMIN
VARIATION BRIGHTMELLOW
BRILLIANCE
GRAND
PIANO 1
CHURCH
ORGAN
E.PIANO
1
STRINGS
E.PIANO
2
CHOIR
SPLIT CHORUS ON
/
OFFREVERB
GRAND
PIANO 2
JAZZ
ORGAN
HARPSI-
CHORD
SYNTH.
PA D
VIBRA-
PHONE
VOICE
SETTING
MIDI
SETTING
OTHER
SETTING
iAFC
SETTING
iAFC
D
B
NO YES
E.BASS XG
GUITAR
E.CLAVI-
CHORD
WOOD
BASS
VOICE
EXIT
CONTRAST
EFFECT
6
2
3
4
5
7
8
9
0
A
B
E
F
G
H
I
J K
N P
L M O Q
1
R
S
T
U
C D
CD
(CLP-170)
_
a
Center “C”
C0 D0 E0 F0 G0 A0 B0 C1 D1 E1 F1 G1 A1 B1 C2 D2 E2 F2 G2 A2 B2 C3 D3 E3 F3 G3 A3 B3 C4 D4 E4 F4 G4 A4 B4
C5 D5 E5 F5 G5 A5 B5 C6 D6 E6 F6 G6 A6 B6 C7
B-1A-1
Top panel
1
[POWER]..............................................P17
2 [MASTER VOLUME].............................P18
3 SONG BALANCE..................................P45
4 [DEMO] ...............................................P22
5 SONG SELECT [ ] [ ].........P24, 38, 55
6 [TRACK1] [TRACK2] /
[EXTRA TRACKS] ............... P26, 38–43, 57
7 [FILE] ...................................................P46
8 [TOP] / SONG [START/STOP]
................................................P24, 39, 56
9 [REC]....................................................P37
0 [SONG SETTING] ................................P73
A METRONOME [START/STOP] /
[SETTING]......................................P37, 76
B TEMPO [DOWN] [UP] .......P25, 37, 39, 56
C LCD buttons A [–] [+] / B [– (NO)] [+ (YES)] /
C [–] [+] / D [–] [+]...............................P21
D LCD screen ..........................................P21
E [CONTRAST] knob...............................P18
F [EXIT]...................................................P21
G Voice group buttons ...........................P28
H [VOICE SETTING] ................................P77
I [SPLIT] .................................................P35
J [REVERB]..............................................P31
K [CHORUS]............................................P31
L VARIATION [] [] .............................P28
M BRILLIANCE [MELLOW] [BRIGHT].......P30
N iAFC [ON] / [OFF] (CLP-170)...............P32
O [iAFC SETTING] (CLP-170) ..................P85
P [MIDI SETTING]...................................P87
Q [OTHER SETTING] ...............................P91
R [PHONES] ............................................P18
S Soft pedal............................................P29
T Sostenuto pedal ..................................P29
U Damper pedal .....................................P29
1 / 1

Yamaha CLP-170 Owner's manual

Category
Digital pianos
Type
Owner's manual

Ask a question and I''ll find the answer in the document

Finding information in a document is now easier with AI

Ask the document