Tripp Lite B004-VUA2-K-R User manual

Category
KVM switches
Type
User manual

Tripp Lite B004-VUA2-K-R is a 2-port Compact USB KVM Switch that enables you to control multiple computers with a single keyboard, mouse, and monitor. It features independent audio and microphone switching, allowing uninterrupted audio from either PC even when switching. Connect your USB-enabled PCs to the KVM switch using the included 3-in-1 KVM combo cables and connect your console (keyboard, mouse, monitor, speakers/headphones, and microphone) to the respective ports on the KVM switch.

Tripp Lite B004-VUA2-K-R is a 2-port Compact USB KVM Switch that enables you to control multiple computers with a single keyboard, mouse, and monitor. It features independent audio and microphone switching, allowing uninterrupted audio from either PC even when switching. Connect your USB-enabled PCs to the KVM switch using the included 3-in-1 KVM combo cables and connect your console (keyboard, mouse, monitor, speakers/headphones, and microphone) to the respective ports on the KVM switch.

Owner’s Manual
Warranty
Registration:
register online today for a
chance to win a FREE Tripp Lite
product—www.tripplite.com/warranty
2-Port Compact USB
KVM Switch with Audio
Model: B004-VUA2-K-R
1111 W. 35th St. Chicago, IL 60609
Customer Support: (773) 869-1234 • www.tripplite.com
Introduction
2
Copyright© 2007. All rights reserved. All trademarks are the property of their respective owners.
Installation
2
Operation
3
KVM Switching Operation Reference
4
Warranty and Warranty Registration
6
Español
7
Français
13
200707125 93-2714 B004-VUA2-K-R 1 1200707125 93-2714 B004-VUA2-K-R 1 1 10/2/2007 9:44:40 AM10/2/2007 9:44:40 AM
Introduction
The B004-VUA2-K-R is a 2-port Compact USB KVM Switch with optional audio and
microphone switching function. It allows you to access, control, boot and reboot multiple
USB-enabled PCs. The independent audio/mic switching function allows an uninterrupted
audio signal from either PC even when you switch to the other PC.
For Windows
®
and Macintosh
®
users, it provides innovative, easy-to-use KVM Switcher
Software—a small windows client application to facilitate your KVM switching operations
such as PC selection and hot key sequence programming, auto-scanning, auto-scan delay
time programming, independent/simultaneous audio & PC switching and more.
Take the companion CD-ROM and the KVM Switch out of the box and follow the steps
below for installation.
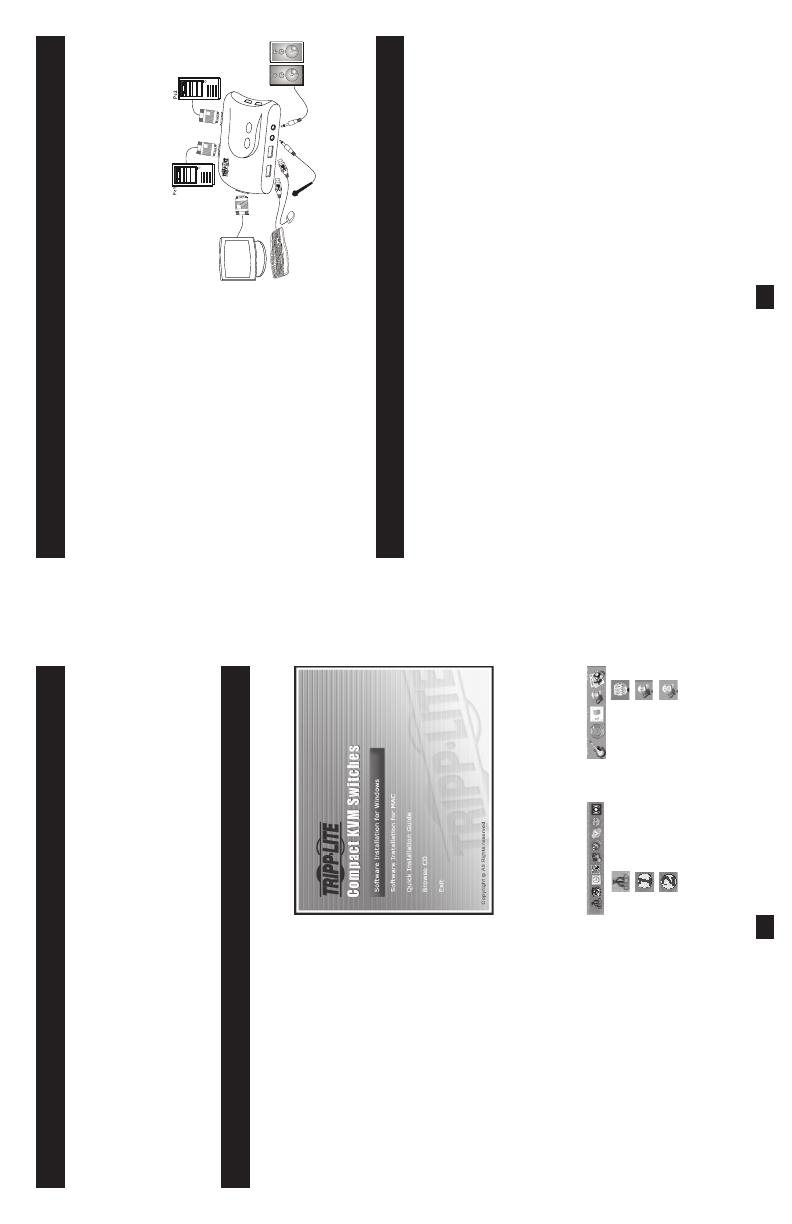
Step 1. Insert the companion CD-ROM into
your CD drive, and the Auto-run screen
will pop up (If the Auto-run feature has not
been enabled on your computer, just fi nd the
Autorun.exe on the CD-ROM and double-
click it to start).
Step 2. For Windows/Mac: Click the
“Software Installation for Window/Mac”
to start the installation. (If the Mac version
software does not start, you will need to copy
it to your local hard drive on your Mac).
Follow the instructions to completion. When
the installation is complete, you will see a
KVM Switcher icon on the system tray of your desktop. Right-click to evoke the operation
menu and double-click to evoke the confi guration box. For operation details of the KVM
Switcher software, please refer to the KVM Switcher Operation Reference.
• The Windows switching software is recommended
for use on Windows 98 SE or later. The Mac
switching software is recommended for use on Mac
OS 10.4 [Tiger].
• The KVM Switcher Software supports both Windows
and Mac OS operating systems. For other OS
platforms such as Linux, you can still use the
keyboard hot key - ScrLk + ScrLK - to switch PCs.
However, this switching hot key is not available on
non-PC platform such as Mac OS.
Installation
No live connection detected
Current active PC channel
is on port 1
Current active PC channel
is on port 2
Window Mac OS
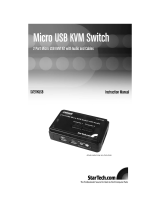
Step 3. Connect the console (USB keyboard, mouse, monitor, speaker/headphone and
microphone) to the respective ports on the KVM Switch.
Step 4. Connect each KVM PC port to a computer, using the slim 3-in-1 KVM combo cable
and the audio/mic cable. After you have connected the KVM and computers properly, you
can operate the KVM Switch immediately.
• Some older computers with USB interface might
need to manually enable the USB option in the
BIOS settings before you can use any USB devices.
If your USB interface does not work, please check
the USB option in the BIOS.
• If you use Windows 95/98/SE or Mac OS and have
not yet installed a USB mouse on your computer,
there may be an error message telling you that
mouse is not detected and prompting you to decide
whether to ignore the same message in the future.
You will also fi nd that there isn’t any mouse
movement to disable this message. You will need
to install your USB mouse on your computer fi rst,
before connecting it to this KVM Switch.
Console
1
2
Installation (continued)
Operation
There are three methods to control your KVM Switch for PC and Audio/Mic channel
selection: using (1) the face-panel push buttons, (2) the hot key sequences, or (3) the KVM
Switching Software.
Manual Push-Buttons
The manual push-buttons on the unit allow you direct control over KVM switching
operation. Simply press the button to switch to the corresponding PC port (and audio/mic
channel, if binding is enabled). By default, PC port switching and audio/mic port switching
are bound together, unless you specify the audio to be fi xed a specifi c port.
You can use the face-panel button to switch to an empty port that is not connected with any computer. If
you use keyboard hotkeys or the KVM Switcher software, you will not be able to switch to an empty port.
Keyboard Hot Keys
User-defi nable hot keys for PC selection:
Hot key sequence = Ctrl - Alt - [command key]*
* Please refer to the next section for keys that are qualifi ed to be used as a command key.
• Note that these 3 keys should be pressed and held together. And it is upon the release of all three keys that
the switching action will be executed.
2 3
200707125 93-2714 B004-VUA2-K-R 2-3 2-3200707125 93-2714 B004-VUA2-K-R 2-3 2-3 10/2/2007 9:44:41 AM10/2/2007 9:44:41 AM
Window
Mac OS
KVM Switching Operation Reference
Switching PCs Using Operation Menu
Right-click the KVM Switcher icon to evoke
the operation menu, then select whichever PC
that is available for switching. Once you select
a PC channel, it will immediately switch to
that PC. Note that the unconnected port(s) or
the active port will be grayed-out and hence
non-selectable.
Switching PCs Using Keyboard Hot keys
Hit the hot key using your current hot key defi nition:
Hot key sequence = Ctrl - Alt - [command key]*
* The factory default hot key setting is Ctrl + Alt + 1/2 for PC 1/2. You can also use ScrLk + ScrLk to
switch PC.
4 5
Universal hot key for switching to next port:
Universal hot key sequence = ScrLk + ScrLk
• For other operating systems on PCs such as Linux, you can still use this special hot key to facilitate PC
switching. This special hot key is not available for Mac.
• Both the universal hot key, ScrLk + ScrLk and the user-defi nable hot key, Ctrl - Alt - [command key] WILL
NOT allow you to switch to an empty port that is not connected with any computer. To force your KVM to
switch to an empty port, just press the manual push-button to switch.
• Each keystroke within a hot key sequence should be pressed within 2 seconds. Otherwise, the hot key
sequence will not be validated.
• After port switching, you have to wait until the KVM Switching icon shows the target port before you can
perform the next switch.
• All the hot keys are functional only after your PCs are booting into the OS. If you want to switch PC in the
BIOS/pre-boot stage, press the face-panel button to switch.
KVM Switcher Software (for Windows and Mac)
In addition to PC switching, the KVM Switcher Software also allows you more advanced
functions such as described in the next section.
Operation (continued)
Start Auto-Scan
Right-click the KVM Switching icon to evoke the operation menu, then select Start Auto-
Scan to activate auto-scanning.
Stop Auto-Scan
While auto-scanning, right-click the KVM Switching icon to evoke the operation menu,
then select Stop Auto-Scan to de-activate auto-scanning. Or you can press any of the manual
buttons to stop Auto-scan.
Auto-Scan Period
Select the Auto-scan period from 10 ~ 60 seconds with an increment of 5 seconds. The Auto-
scan period is the time your KVM Switch will wait before switching to next PC.
KVM Switcher Confi guration
Right-click the KVM Switcher icon and select Settings or double-click the icon to bring up
the confi guration dialog box.
Defi ne Hot key Commands
You can specify the command key you desire by typing it in. For example, you can specify
the hot key for switching to PC 1 as CTRL - ALT - A by typing an A (not case-sensitive) in
the editable fi eld.
Hot key Sequence = CTRL - ALT - [command key]*
* The command key is user-defi nable via the confi guration dialog box
• Please note that if you intend to modify the command key, you have to modify them on each and every of
the connected computers, since the hotkey setting is stored within each connected computer.
• Except those control keys such as Alt, Ctrl, Shift, CAPS, Tab, Esc and those functions keys and edit keys, all
other keys on the keyboard, including number keys on the number pad, are all keys that are qualifi ed to be
used as hot key command keys. In addition to the software, KVM Switching by the operation menu and the
user-defi ned hot keys, you can always use the universal hot key for PC switching – ScrLk + ScrLk
Fix Audio Port to One PC
Check this option and then select the PC to fi x the audio/mic channel to the selected PC.
Once this option is checked, the audio/mic channel will be fi xed and become non-switchable.
KVM Switching Operation Reference (continued)
200707125 93-2714 B004-VUA2-K-R 4-5 4-5200707125 93-2714 B004-VUA2-K-R 4-5 4-5 10/2/2007 9:44:45 AM10/2/2007 9:44:45 AM
FCC Radio/TV Interference Notice
Note: This equipment has been tested and found to comply with the limits for a Class A digital device,
pursuant to Part15 of the FCC Rules. These limits are designed to provide reasonable protection against
harmful interference when theequipment is operated in a commercial environment. This equipment
generates, uses and can radiate radio frequencyenergy and, if not installed and used in accordance
with the instruction manual, may cause harmful interference to radiocommunications. Operation of this
equipment in a residential area is likely to cause harmful interference in which case the user will be
required to correct the interference at his own expense. The user must use shielded cables andconnectors
with this product. Any changes or modifi cations to this product not expressly approved by the
partyresponsible for compliance could void the user’s authority to operate the equipment.
1 Year Limited Warranty
TRIPP LITE warrants its products to be free from defects in materials and workmanship for a period of one
(1) yearfrom the date of initial purchase. TRIPP LITE’s obligation under this warranty is limited to repairing
or replacing (at itssole option) any such defective products. To obtain service under this warranty, you must
obtain a Returned MaterialAuthorization (RMA) number from TRIPP LITE or an authorized TRIPP LITE
service center. Products must bereturned to TRIPP LITE or an authorized TRIPP LITE service center with
transportation charges prepaid and must beaccompanied by a brief description of the problem encountered
and proof of date and place of purchase. This warranty does not apply to equipment, which has been
damaged by accident, negligence or misapplication or has been altered ormodifi ed in any way.
EXCEPT AS PROVIDED HEREIN, TRIPP LITE MAKES NO WARRANTIES, EXPRESS OR IMPLIED,
INCLUDING WARRANTIES OF MERCHANTABILITY AND FITNESS FOR A PARTICULAR PURPOSE.
Somestates do not permit limitation or exclusion of implied warranties; therefore, the aforesaid limitation(s)
or exclusion(s)may not apply to the purchaser.
EXCEPT AS PROVIDED ABOVE, IN NO EVENT WILL TRIPP LITE BE LIABLE FOR DIRECT, INDIRECT,
SPECIAL, INCIDENTAL OR CONSEQUENTIAL DAMAGES ARISING OUT OF THE USE OF THIS
PRODUCT, EVEN IF ADVISED OF THE POSSIBILITY OF SUCH DAMAGE. Specifi cally, TRIPP LITE is
not liable for any costs, such as lost profi ts or revenue, loss of equipment, loss of use of equipment, loss of
software, loss of data, costs ofsubstitutes, claims by third parties, or otherwise.
Warranty Registration
Visit www.tripplite.com/warranty today to register the warranty for your new Tripp Lite product. You’ll be
automatically entered into a drawing for a chance to win a FREE Tripp Lite product!*
* No purchase necessary. Void where prohibited. Some restrictions apply. See website for details.
The policy of Tripp Lite is one of continuous improvement. Specifi cations are subject to change without
notice.
6 7
Manual del Propietario
Multiplexor KVM USB
Compacto de 2 Puertos con Audio
Modelo: B004-VUA2-K-R
1111 W. 35th St. Chicago, IL 60609
Soporte a Clientes: (773) 869-1234 • www.tripplite.com
Introducción
8
Derechos de Autor © 2007 Tripp Lite. Todos los derechos reservados.
Todas la marcas registradas son totalmente propiedad de sus respectivos dueños
Instalación
8
Operación
9
Referencia de Operación de
Conmutación del KVM
10
Garantía
12
English
1
Français
13
200707125 93-2714 B004-VUA2-K-R 6-7 6-7200707125 93-2714 B004-VUA2-K-R 6-7 6-7 10/2/2007 9:44:45 AM10/2/2007 9:44:45 AM
200707125 93-2714
20
1111 W. 35th St. Chicago, IL 60609
Customer Support: (773) 869-1234 • www.tripplite.com
200707125 93-2714 B004-VUA2-K-R 20 20200707125 93-2714 B004-VUA2-K-R 20 20 10/2/2007 9:44:50 AM10/2/2007 9:44:50 AM
1 / 1

Tripp Lite B004-VUA2-K-R User manual

Category
KVM switches
Type
User manual

Tripp Lite B004-VUA2-K-R is a 2-port Compact USB KVM Switch that enables you to control multiple computers with a single keyboard, mouse, and monitor. It features independent audio and microphone switching, allowing uninterrupted audio from either PC even when switching. Connect your USB-enabled PCs to the KVM switch using the included 3-in-1 KVM combo cables and connect your console (keyboard, mouse, monitor, speakers/headphones, and microphone) to the respective ports on the KVM switch.

Ask a question and I''ll find the answer in the document

Finding information in a document is now easier with AI

Ask the document