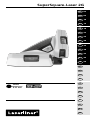
Laserliner SuperSquare-Laser 2G Owner's manual
- Category
- Laser levels
- Type
- Owner's manual
This manual is also suitable for

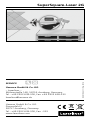
SuperSquare-Laser 2G
Laser
515 nm
02
06
10
14
DE
EN
NL
DA
UK
CS
ET
LV
LT
RO
BG
EL
SL
HU
SK
18
22
26
30
34
38
42
46
50
FR
ES
IT
PL
FI
PT
SV
NO
TR
RU
Page is loading ...
Page is loading ...
Page is loading ...
Page is loading ...

06
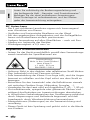
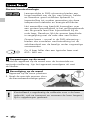
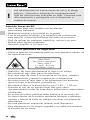
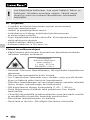
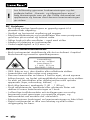
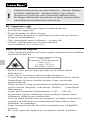
– Attention: Do not look into the direct or reected beam.
– Do not point the laser beam towards persons.
– If a person‘s eyes are exposed to class 2 laser radiation, they
should shut their eyes and immediately move away from the
beam.
– Under no circumstances should optical instruments (magnifying
glass, microscope, binoculars) be used to look at the laser
beam or reections.
– Do not use the laser at eye level (1.40 ... 1.90 m)
– Reective, specular or shiny surfaces must be covered whilst
laser devices are in operation.
– In public areas shield off the laser beam with barriers and
partitions wherever possible and identify the laser area with
warning signs.
– Tampering with (making changes to) the laser device is not
permitted.
– This device is not a toy - keep out of the reach of children.
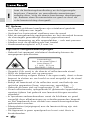
Laser radiation!
Do not stare into the beam!
Class 2 laser
< 1 mW · 515 nm
EN 60825-1:2014
– The device must only be used in accordance with its intended
purpose and within the scope of the specications.
General safety instructions
EN
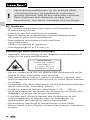
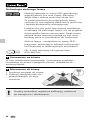
90° line Laser
– The 2 clearly visible laser lines are ideally suited for
aligning tiles.
– Vertical and horizontal levelling on walls
– The applied lay edges and contact surface make it easy
to position oor tiles.
– Clean application on all surfaces – also when using pins
– Vials to adjust the device
– Angle accuracy: ± 0.5 mm / m
Read the operating instructions and the enclosed
brochure „Guarantee and additional notices“
completely. Follow the instructions they contain.
This document must be kept in a safe place and
if the laser device is passed on, this document
must be passed on with it.
!

SuperSquare-Laser 2G
07
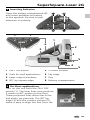
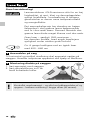
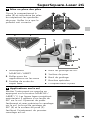
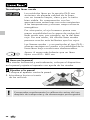
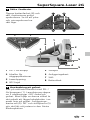
1
1
2
2
3
3
5
5
4
6
–
–
8
7 7
2
EN
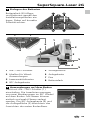
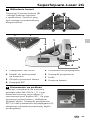
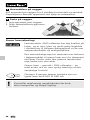
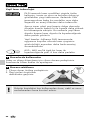
Inserting batteries
Open the battery compartment (8)
and insert batteries according
to the symbols. Be sure to pay
attention to polarity.
1
ON / OFF switch
2
Vials for wall applications
3
Laser output windows
4
90° try-square edge
5
Contact surface
6
Lay edge
7
Pins
8
Battery compartment
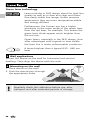
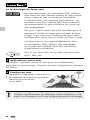
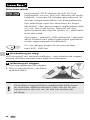
On-oor applications
Turn on the unit with the ON / OFF
switch (1). The laser lines now produce
2 marks at 90° angles on the oor.
These projected lines allow tiles to be
laid easily, yet precisely. The 90° lay
edge (4) and the contact surface (5)
make it easy to align the rst oor tile.

08
EN
3
4
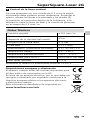
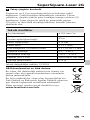
Wall applications
Mount the device on the wall for horizontal and vertical
levelling. Then align the device with the vials.
Mounting on the wall
1. Place device on the wall.
2. Push the special pins through
the appropriate holes.
Regularly check the calibration before use, after
transport and after extended periods of storage.
!
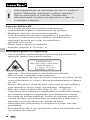
6 times brighter than a typical 630 - 660 nm
laser
Green laser technology
Laser modules in DLD design stand for high line
quality as well as a clean and clear and there-
fore easily visible line image. Unlike previous
generations they are more temperature-stable
and energy efficient.
Furthermore, the human eye has a higher
sensitivity to the wave range of the green laser
than the red laser, for example. This makes the
green laser diode appear much brighter than
the red one.
Green lasers, especially in the DLD design, thus
offer advantages with regards to how visible
the laser line is under unfavourable conditions.

SuperSquare-Laser 2G
09
5
EN
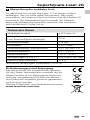
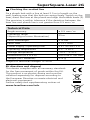
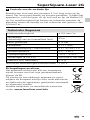
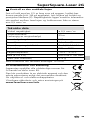
EU directives and disposal
This device complies with all necessary standards
for the free movement of goods within the EU.
This product is an electric device and must be
collected separately for disposal according to
the European Directive on waste electrical and
electronic equipment.
Further safety and supplementary notices at:
www.laserliner.com/info
Subject to technical changes 12.2016
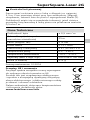
Technical Data
Angle accuracy
± 0.5 mm / m
Operating range
(depending on room illumination)
25 m
Laser wavelength 515 nm
Laser class 2 / < 1 mW
Power supply / Operating time 2 x 1.5V AA / 3 h
Operating temperature
0°C...+ 50°C
Storage temperature -10°C...+ 70°C
Dimensions (W x H x D) 200 x 48 x 100 mm
Weight (incl. batteries) 272 g
Fix a plumb bob with a line at least 2.5 m in length on the
wall, making sure that the bob can swing freely. Switch on the
laser, direct the lines at the plumb and align the bubble levels (2).
The precision is within tolerance if the deviation between the
laser line and plumb line is not greater than 0.5 mm / m.
Checking the vertical line
Page is loading ...
Page is loading ...
Page is loading ...
Page is loading ...
Page is loading ...
Page is loading ...
Page is loading ...
Page is loading ...
Page is loading ...
Page is loading ...
Page is loading ...
Page is loading ...
Page is loading ...
Page is loading ...
Page is loading ...
Page is loading ...
Page is loading ...
Page is loading ...
Page is loading ...
Page is loading ...
Page is loading ...
Page is loading ...
Page is loading ...
Page is loading ...
Page is loading ...
Page is loading ...
Page is loading ...
Page is loading ...
Page is loading ...
Page is loading ...
Page is loading ...
Page is loading ...
Page is loading ...
Page is loading ...
Page is loading ...
Page is loading ...
Page is loading ...
Page is loading ...
Page is loading ...
Page is loading ...
Page is loading ...
Page is loading ...
Page is loading ...
Page is loading ...
Page is loading ...
Page is loading ...
Page is loading ...
-
 1
1
-
 2
2
-
 3
3
-
 4
4
-
 5
5
-
 6
6
-
 7
7
-
 8
8
-
 9
9
-
 10
10
-
 11
11
-
 12
12
-
 13
13
-
 14
14
-
 15
15
-
 16
16
-
 17
17
-
 18
18
-
 19
19
-
 20
20
-
 21
21
-
 22
22
-
 23
23
-
 24
24
-
 25
25
-
 26
26
-
 27
27
-
 28
28
-
 29
29
-
 30
30
-
 31
31
-
 32
32
-
 33
33
-
 34
34
-
 35
35
-
 36
36
-
 37
37
-
 38
38
-
 39
39
-
 40
40
-
 41
41
-
 42
42
-
 43
43
-
 44
44
-
 45
45
-
 46
46
-
 47
47
-
 48
48
-
 49
49
-
 50
50
-
 51
51
-
 52
52
-
 53
53
-
 54
54
-
 55
55
-
 56
56


Laserliner SuperSquare-Laser 2G Owner's manual
- Category
- Laser levels
- Type
- Owner's manual
- This manual is also suitable for
Ask a question and I''ll find the answer in the document
Finding information in a document is now easier with AI
in other languages
- italiano: Laserliner SuperSquare-Laser 2G Manuale del proprietario
- français: Laserliner SuperSquare-Laser 2G Le manuel du propriétaire
- español: Laserliner SuperSquare-Laser 2G El manual del propietario
- Deutsch: Laserliner SuperSquare-Laser 2G Bedienungsanleitung
- Nederlands: Laserliner SuperSquare-Laser 2G de handleiding
- português: Laserliner SuperSquare-Laser 2G Manual do proprietário
- dansk: Laserliner SuperSquare-Laser 2G Brugervejledning
- polski: Laserliner SuperSquare-Laser 2G Instrukcja obsługi
- Türkçe: Laserliner SuperSquare-Laser 2G El kitabı
- svenska: Laserliner SuperSquare-Laser 2G Bruksanvisning
- suomi: Laserliner SuperSquare-Laser 2G Omistajan opas
Related papers
-
Laserliner SuperSquare-Laser 2G Owner's manual
-
-
Laserliner 081 137 User manual
-
Laserliner 081 108 Operating instructions
-
Laserliner 081.100A Datasheet
-
Laserliner SuperLine 2D Owner's manual
-
Laserliner CompactCube-Laser 3 Owner's manual
-
-
Laserliner SmartCross-Laser Owner's manual
-
Laserliner Cubus 110 S Owner's manual
Other documents
-
Cocraft CROSS LASER LC50-SP Original Instructions Manual
-
Anslut 016847 User manual
-
IKEA FIXA User manual
-
EuroLite LED MS-2 User manual
-
Bosch PLT 2 Owner's manual
-
-
-
BLACK DECKER BDL90 T1 Owner's manual
-
CST/Berger LM30 User manual
-
Bosch GIM 60L Specification