Page is loading ...

ENGINEERS OPERATING GUIDE


TEMPOINT ENGINEERS OPERATING GUIDE, ISSUE 1.0 – 02/07/13
3
Table of Contents
Section Page No
1. HOW TO RESET FIRE & FAULT EVENTS............................................................................. 6
2. HOW TO ENTER THE SYSTEM EVENT LOG ......................................................................... 7
3. HOW TO ENTER THE SYSTEM EVENT LOG WITH FAULTS DISPLAYED.................................... 7
4. HOW TO DISABLE DEVICES ............................................................................................ 9
5. HOW TO RE-INSTATE DEVICES FROM DISABLEMENT ....................................................... 11
6. HOW TO DISABLE A DEVICE ACROSS A NETWORK SYSTEM .............................................. 12
7. HOW TO RE-INSTATE A DISABLED DEVICE ACROSS A NETWORK ...................................... 14
8. HOW TO LOG ON A DEVICE .......................................................................................... 16
9. HOW TO REMOVE A DEVICE.......................................................................................... 18
10. HOW TO REPLACE DEVICES ........................................................................................ 20
11. HOW TO PUT DETECTOR ZONES INTO TEST (TESTING DEVICES) .................................... 23
12. HOW TO TAKE DETECTOR ZONES OUT OF TEST ............................................................ 25
13. HOW TO PUT ALL THE ZONES INTO TEST ACROSS A NETWORK....................................... 26
14. HOW TO TAKE ALL THE ZONES OUT OF TEST ACROSS A NETWORK ................................. 28
15. HOW TO TEST INDIVIDUAL SOUNDERS ........................................................................ 30
16. HOW TO CHANGE THE DEVICE ADDRESS TEXT DESCRIPTION ......................................... 32
17. RECOMMENDED ADDITIONAL SOUNDER MONITORING ................................................... 34
18. FAULT LIST ............................................................................................................... 35
19. DO’S AND DON’TS ..................................................................................................... 36

TEMPOINT ENGINEERS OPERATING GUIDE, ISSUE 1.0 – 02/07/13
4
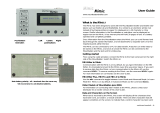
Zoned LED for
Fire Indication
Thermal Printer
Keypad &
Panels Control
Key switch
“
∆”
& “
∇”
Arrows For
scrolling up
and down
the menus
Display
VHF
Helical
Aerial
(R/X)
Yellow
UHF
Helical
Aerial
(T/X)
Green
CONTROL PANELS ARE SUPPLIED WITH ALL DETECTOR
ZONES IN TEST. PLEASE REFER TO SECTIONS 12 OR 14
IN THIS MANUAL TO MAKE ACTIVE.

TEMPOINT ENGINEERS OPERATING GUIDE, ISSUE 1.0 – 02/07/13
5
Options Menu Structure
Pins & Access
User Log On
View Users
Change PIN
Add 6 Digit User
Add 4 Digit User
Edit User
Delete User
Access And Buzzer
User Options Order
Front Screen Text
Site Address Text
Delete All Users!
Time/Date
Set the Time
View the Date
Set the Date
View BST/GMT
Set BST/GMT
Day-Night Ctrl
Options
Passwords
Time and Date
Logging
Fire System Opts
Checksum Info
Radio Lan Opts
Lan Control
Event Logging
View Log At Date
View Entire Log
View Log Group
Print Log By Date
Print Entire Log
Processor Resets
Fire System
Dev. Disable/Test
Net. Disable/Test
Det Zone
Disable/Test
Alarm Zone Disable
ARE Disable
System Mode
Engineers Config
Checksum Ctrl
View Checksums
Monitor Checksums
Radio LAN
Node Table
Re-Start Lan
Re-Online Node
Node Setup
View/Delete Node
Advanced
LAN Fire DB
H/W Local Panels
Mimic
Advanced
Key in “OFF” position
with Password Entered:
-

TEMPOINT ENGINEERS OPERATING GUIDE, ISSUE 1.0 – 02/07/13
6
1. How To Reset Fire & Fault Events.
To reset fires/faults on the TemPoint, insert the Key into the Panel’s Control Key switch,
located at the right of the Panel. Turn the Key to the “ON” Position.
Step Action Screen Display
No
1 This a normal Fire Event
2 Press the “SILENCE ALARMS” button and the
screen will now briefly display: (Press Any
Key). Having silenced the System’s Sounders
and Internal Buzzers, an intermittent beep
every 10 – 15 seconds will occur until reset.
3 Press the “RESET/LED TEST” button and the
screen will now briefly display: (Press Any
Key)
4 The Event is now clear, so the key switch can
be returned to the “OFF” position. The screen
will now display:
01 FIRE ALARM TOT 01
RADIO CALLPOINT
ZONE 01
DEVICE 005
Alarms Silenced
Push Any Key
Device RESET:
RADIO CALLPOINT
Push Any Key
Status Normal
Date Time

TEMPOINT ENGINEERS OPERATING GUIDE, ISSUE 1.0 – 02/07/13
7
2. How To Enter The System Event Log
To enter the Systems Event Log on the TemPoint, insert the key into the Panels Control
Key switch, located at the right of the panel. Turn the key to the”ON” position.
Step Action Screen Display
No
1
With the key in the “ON” position, the screen
will display:
2
Press the “0” key and the screen will now
display:
3
Press the “∇” key until the screen displays:
4
Press the “YES” key and the screen will now
display:
5 Press the “YES” key and the screen will now
display:
6
Enter the required date to view in
dd/mm/yy Format, (e.g.28/05/03) then press
the “YES” key and the screen will now display:
The log for the date selected can be viewed by using the “∆” & “∇” Arrows next to the
display, all fire and fault events are listed in date and time order. Using number 5 on the
keypad will take you to the oldest event, number 8 on the keypad will take you to the
latest event. (Look at the fault list for examples of descriptions that are in the log)
3. How To Enter The System Event Log With Faults Displayed
Panel in Access
Date
Time
|***Options **** |
>Passwords <
|Time and Date |
Yes =Select
Time
|
Time and Date |
>Logging <
|Fire System Opts |
YES = Select Time
|
**Event Logging * |
>View Log At Date<
|View Entire Log |
Yes = Sel
ect Time
Enter the date to
View: / /
Yes = Finish Time
- - - - - - - - - - - - - - - -
On 28/05/03 At 00:00
New Day of 28/05/03
Yes = Select Time

TEMPOINT ENGINEERS OPERATING GUIDE, ISSUE 1.0 – 02/07/13
8
To enter the system event log on the TemPoint with faults displayed there are two ways.
The first way is to disable the devices that are in fault then enter the logging in the first
menu. The second way is to enter the engineer’s menu main. To enter the engineer’s
main menu insert the key into the Panels Control Key switch, located at the right of the
Panel and turn it to the “ON” position.
Step Action Screen Display
No
1
With the key in the “ON” position, the screen will
display:
2 Press the “0” key and the screen will
now display:
3
Press the “∇” key until the screen displays:
4 Press the “YES” key and the screen will now
display:
5 Press 221100 then press the “YES” key and the
screen will display:
6 Press Number 8 on the keypad and the screen
will now display: (number is a quick move key
that takes you to the bottom of the menu)
7
Press the “∆” key until the screen displays:
8
Press the “YES” key followed by the “0” key on
the keypad the screen will now display:
9 Press the “∇” key until the screen displays:
10 Press the “YES” key and the screen will now
display:
11 Press the “YES” key and the screen will now
|** Fire system ** |
>Dev. Disable/Test <
| Net. Disable/Test |
Yes= Select Time
|
System Mode |
> Engineers Config <
| Printer Options |
Yes= Select Time
Enter Your PIN
For Access>
Then Press YES
Time
|** Eng. Config ** |
>Device Database <
| Sounder Options |
Yes= Select Time
|
Reset System |
>Lan Options <
|^^^^^^^^^^^^^^ |
Yes= Select Time
01 FAULT TOT 03
Default Device 001
Zone 01 Devic
e 001
| Reset Security |
>Reset System <
|Lan Options |
Yes= Select Time
|** Main Menu ** |
>Pins & Access <
|System Support |
Yes= Select Time
|Output Setup |
>Logging <
|Remote Rxers |
Yes= Select Time
Enter the date to
View: / /
Yes = Finish
|**Event Logging * |
>View Log At Date <
| View Entire Log |
Yes = Select Time

TEMPOINT ENGINEERS OPERATING GUIDE, ISSUE 1.0 – 02/07/13
9
display:
12 Enter the required date to view in dd/mm/yy
format, (e.g.28/05/03) then press the “YES”
key and the screen will now display:
The log for the date selected can be viewed by using the “∆
∆∆
∆” & “∇
∇∇
∇” Arrows next to the
display, all fire and fault events are listed in date and time order. Using number 5 on the
keypad will take you to the oldest event, number 8 on the keypad will take you to the
latest event. (Look at the fault list for examples of descriptions that are in the log).
4. How To Disable Devices
To disable a device on the TemPoint, insert the key into the Panels Control Key switch,
located at the right of the Panel. Turn the key to the “ON”
Step Action Screen Display
No
1 With the key in the “ON” position, the screen
will display:
2
“0” key and the screen will now display:
3
Press the “∇” key until the screen displays:
4
Press the “YES” key and the screen will now
display:
5 Press the “YES” key and the screen will now
display:
6 Press the “0” key and the screen will now
display:
7
Enter the device number that you want to
Disable (e.g. 125) then press the “YES” key
and the Screen will now display:
8
Press the “∇” key until the screen displays:
- - - - - - - - - - - - - - - -
On 28/05/03 At 00:00
New Day of 28/05/03
Yes = Select
Panel in Access
Date
Time
|***Options **** |
>Passwords <
|Time and Date |
Yes =Select
Time
| Logging |
>Fire System Opts<
| Remote Access |
Yes = select Time
|** Fire system ** |
>Dev. Disable/Test<
| Net. Disable/Test |
Yes= Select Time
|** Device Status * |
>Number is: 001 <
|Status is: ACTIVE|
Yes= Select Time
Enter Device
(Number 1-256)
Number > _
Yes = Finish Time
Time
|** Device Status * |
>Number is: 125 <
|Status is: ACTIVE|
Yes= Select Time
|Number is: 125 |
> Status is: ACTIVE<
| Zone is : 01 |
Yes= Select Time

TEMPOINT ENGINEERS OPERATING GUIDE, ISSUE 1.0 – 02/07/13
10
9 Press the “YES” key and the screen will now
display:
10
Press the “NO” key three times and the screen
will now display:
11
Turn the Control key to the “OFF” position and
the screen will now display:
Note: The “DETECTOR/ZONE DISABLED” LED on the TemPoint Panel will
illuminate with an intermittent beep to show there’s a Disabled device on
the system.
|Number is: 125 |
>Status is :DISABLE<
| Zone is : 01 |
Yes= Select Time
Panel in Access
Date Time
Status Normal
Date Time

TEMPOINT ENGINEERS OPERATING GUIDE, ISSUE 1.0 – 02/07/13
11
5. How To Re-instate Devices From Disablement
To reactivate a device on the TemPoint, insert the key into the Panels Control Key
switch, located at the right of the panel. Turn the key to the “ON” position.
Step Action Screen Display
No
1 With the key in the “ON” position, the screen
will display:
2 Press the “0” key and the screen will now
display:
3 Press the “∇” key until the Screen displays:
4 Press the “YES” key and the screen will now
display:
5 Press the “YES” key and the screen will now
display:
6 Press the “0” key and the screen will now
display:
7 Enter the device number that you want to Re-
enable (e.g. 125) then press the “YES” key and
the Screen will now display:
8 Press the “∇” key once and the screen will
display:
9 Press the “YES” key twice and the screen will
now display:
10 Press the “NO” key three times and the screen
will now display:
11 Return the Control key to the “OFF” position
and the screen will now display:
Note: The “DETECTOR/ZONE DISABLED” LED on the TemPoint Panel will
clear and the Disable beep will stop.
Panel in Access
Date
Time
|***Options **** |
>Passwords <
|Time and Date |
Yes =Select
Time
|
Logging |
>Fire System Opts <
|Remote Access |
Yes = select Time
|** Fire system ** |
>Dev. Disable/Test <
| Net. Disable/Test |
Yes= Select Time
| ** Device Status * |
>Number is: 001 <
|Status is: ACTIVE |
Yes= Select Time
Enter Device
(Number 1-256)
Number > _
Yes = Finish Time
| ** Device Status * |
>Number is: 125 <
|Status is: DISABLE|
Yes= Select Time
|Number is: 125 |
>Status is: DISABLE<
| Zone is : 01 |
Yes= Select Time
|Number is: 125 |
>Status is : ACTIVE <
| Zone is : 01 |
Yes= Select Time
Panel in Access
Date Time
Status Normal
Date Time

TEMPOINT ENGINEERS OPERATING GUIDE, ISSUE 1.0 – 02/07/13
12
6. How To Disable A Device Across A Network System
To disable a device across the network on the TemPoint, insert the key into the Panels
Control Key switch, located at the right of the panel.
Step Action Screen Display
No
1 With the key in the “ON” position, the screen
will display:
2 Press the “0” key and the screen will now
display:
3 Press the “∇” key until the screen displays:
4 Press the “YES” key and the screen will now
display:
5 Press the “∇” key once and the screen will
display:
6 Press the “YES” key and the screen will now
display: (move on to step 8 if H/W)
7 Press the “YES” key once the Screen will now
display:
NOTE: PAN is for a Hardwired based System.
NET is for a Radio LAN based system.
8 Press the “∇” key once and the screen will
display:
9 Press the “YES” key to change the panel
number until the required panel number is
shown: (e.g. 04)
10
Press the “∇” key once and the screen will
display:
Panel in Access
Date
Time
| ***Options **** |
>Passwords <
| Time and Date |
Yes =Select
Time
| Logging |
>Fire System Opts <
| Remote Access |
Yes = select Time
|** Fire system ** |
> Dev. Disable /Test<
| Net. Disable /Test |
Yes= Select Time
| Dev. Disable/Test |
>Net. Disable/Test <
| Det Zone Dis/Test |
Yes= Select Time
|
* Network Status * |
> Panel Type : PAN <
| Panel : 00 |
Yes= Select Time
|* Network Status * |
> Panel Type : NET <
| Panel : 00 |
Yes= Select Time
|
Panel Type : PAN |
> Panel : 00 <
| Device : 00 |
Yes= Select Time
| Panel Type : NET |
> Panel : 04 <
| Device : 00 |
Yes= Select Time
|
Panel : 04 |
> Device : 00 <
| Status : Active|
Yes= Select Time

TEMPOINT ENGINEERS OPERATING GUIDE, ISSUE 1.0 – 02/07/13
13
11 Press the “0” key and the screen will
now display:
12 Enter the device number that you want to
Disable (e.g. 125) then press the “YES” key and
screen will now display:
13 Press the “∇” key once and the screen will
display:
14 Press the “YES” key once the screen will now
display:
15
Press the “∇” key once and the screen will
display:
16
Press the “YES” key once the Screen will now
display:
17
Press the “NO” key three times and the screen
will display:
18
Turn the Control key to the “OFF”
Position. The screen will now display:
Note: The “DETECTOR/ZONE DISABLED” LED on the TemPoint Master
Panel and the TemPoint Slave Panel 04 will illuminate with intermittent
beep to show there’s a disablement on the system.
Enter Device
(Number 1-256)
Number > _
Yes = Finish Time
| Panel : 04 |
>Device : 125 <
| Status : Active |
Yes= Select Time
| Device : 125 |
> Status : Active <
| Transmit Event |
Yes= Select Time
| Device : 125 |
>Status : Disable<
| Transmit Event |
Yes= Select Time
|Status : Disable |
>Transmit Event <
|^^^^^^^^^^^^^^ |
Yes= Select Time
Device 125 on NET 04
Set to DISABLED
Push Any Key Time
Panel in Access
Date Time
Status Normal
Date
Time

TEMPOINT ENGINEERS OPERATING GUIDE, ISSUE 1.0 – 02/07/13
14
7. How To Re-instate a Disabled Device Across a Network
To re-instate a Disabled a device across the network on the TemPoint, insert the key into
the Panels Control Key switch, located at the right of the panel.
Step Action Screen Display
No
1
With the key in the “ON” position, the screen
will display:
2
Press the “0” key and the screen will now
display:
3
Press the “∇” key until the screen displays:
4 Press the “YES” key and the screen will now
display:
5
Press the “∇” key until the screen displays:
6
Press the “YES” key and the screen will now
display:
NOTE: PAN is for a Hardwired based System. (Go to step 7).
NET is for a Radio LAN based system. (Go to step 8).
7
Press the “YES” key to select the required panel
type and the Screen will now display:
8
Press the “∇” key until the screen will display:
(Where Panel type = NET/PAN)
9
Press the “YES” key to change the panel
number until the required panel number is
shown: (e.g. 04)
10
Press the “∇” key until the screen displays:
Panel in Access
Date
Time
|***Options **** |
>Passwords <
| Time and Date |
Yes =Select
Time
| Logging |
>Fire System Opts <
| Remote Access |
Yes = select Time
|
** Fire system ** |
>Dev. Disable/Test <
| Net. Disable/Test |
Yes= Select Time
| Dev. Disable/Test |
>Net. Disable /Test <
| Det Zone Dis/Test |
Yes= Select Time
|* Network Status * |
>Panel Type : PAN <
| Panel : 00 |
Yes= Select Time
|* Network Status * |
> Panel Type:
NET<
| Panel : 00 |
Yes= Select Time
| Panel Type : NET |
>Panel : 00 <
| Device : 00 |
Yes= Select Time
| Panel Type : NET |
>Panel : 04 <
| Device : 00 |
Yes= Select Time
|Panel : 04 |
>Device : 00 <
|Status :Disable |
Yes= Select Time

TEMPOINT ENGINEERS OPERATING GUIDE, ISSUE 1.0 – 02/07/13
15
11
Press the “0” key and the screen will now
display:
12
Enter the device number that you want to re-
instate (e.g. 125) then press the “YES” key and
screen will now display:
13
Press the “∇” key until the screen displays:
14 Press the “YES” key once the Screen will now
display:
15
Press the “∇” key until the screen displays:
16
Press the “YES” key once the Screen will now
display:
17
Press the “NO” key until the screen displays:
18
Turn the Control key to the “OFF” Position. The
screen will now display:
Note: The “DETECTOR/ZONE DISABLED” LED on the TemPoint Master
Panel and TemPoint Slave Panel will clear and the Disable beep will stop.
Enter Device
(Number 1-256)
Number > _
Yes = Finish Time
Time
| Panel : 04 |
> Device : 125 <
| Status :Disable |
Yes= Select Time
| Device : 125 |
> Status :Disable <
| Transmit Event |
Yes= Select Time
| Device : 125 |
> Status : Active <
| Transmit Event |
Yes= Select Time
|
Status : Active |
>Transmit Event <
| ^^^^^^^^^^^^^^ |
Yes= Select Time
Device 125 on NET 04
Set to ACTIVE
Push Any Key Time
Panel in Access
Date
Time
Status Normal
Date
Time

TEMPOINT ENGINEERS OPERATING GUIDE, ISSUE 1.0 – 02/07/13
16
8. How To Log On A Device
To log on a device onto the TemPoint, take the device in front of the panel. Insert the
key into the Panels Control Key switch, located at the right of the Panel.
Step Action Screen Display
No
1
With the key in the “ON” position, the screen
will display:
2 Press the “0” key and the screen will now
display:
3 Press the “∇” key until the screen displays:
4 Press the “YES” key and the screen will now
display:
5 Press the “∇” key until the screen displays:
6 Press the “YES” key and the screen will now
display:
7 Press 221100 then press the “YES” key and the
screen will display:
8 Press the “∇” key until the screen displays:
9 Press the “YES” key and the screen will now
display:
10 Press the “YES” key to change and the screen
will now display:
11 Press the “0” key and the screen will now
display:
Panel in Access
Date
Time
|***Options *** * |
> Passwords <
| Time and Date |
Yes =Select
Time
| Logging |
> Fire System Opts <
| Remote Access |
Yes = select Time
|** Fire system ** |
> Dev. Disable /Test<
| Net. Disable /Test |
Yes= Select Time
| System Mode |
>Engineers Config <
| Printer Options |
Yes= Select Time
Enter Your PIN
For Access>
Then Press YES
Time
|** Eng.; Config ** |
> Device Database <
| Sounder Options |
Yes= Select Time
| Sounder Options |
> Log On Devices <
| Site Survey |
Yes= Select Time
Logon DISABLED(000)
Push YES to change
Push NO to escape
Push YES/NO Time
|**Logon Options** |
> Logon Slot :AUTO<
| Slot is :FREE |
Yes= Select Time
Enter Device
(Numbers 1-256)
Number>
Yes= Finish Time

TEMPOINT ENGINEERS OPERATING GUIDE, ISSUE 1.0 – 02/07/13
17
12 Enter the slot number that you want to add a
device to (e.g. 125) then press the “YES” key
and the Screen will now display:
13 Press the “∇” key until the screen displays:
14 Press the “YES” key and the screen will now
display:
15 Take the device you want to log on.
Press and hold the logon button for 2-3 seconds
(e.g. Figure 1) and the screen will now display:
Figure 1
| **Logon Options** |
> Logon Slot :125 <
| Slot is :FREE |
Yes= Select Time
| Slot is :IN USE |
>Logon is DISABLED<
| /\/\/\/\/\/\/\/\/\/\ |
| Slot is :IN USE |
>Logon is ENABLED <
| /\/\/\/\/\/\/\/\/\/\ |
Logon Default Device
125
Yes= Select Time
Added Default Device
125
Yes= Select Time

TEMPOINT ENGINEERS OPERATING GUIDE, ISSUE 1.0 – 02/07/13
18
16 Press the “YES” key twice and the screen will
now display:
17 Press the “NO” key three times and the screen
will now display:
Note: After logging the device on to the system there will be two faults:-
1
st
fault is processor reset. (Silence and reset E.G. Page 5)
2
nd
fault is the Tamper. (Make sure the device tamper is clear then silence
and reset E.G. page 5)
18 After the faults have been cleared, turn the
control key to the “OFF” position and the screen
will display:
9. How To Remove A Device
To remove a device from the TemPoint, insert the key into the Panels Control Key
switch, located at the right of the panel.
Step Action Screen Display
No
1 With the key in the “ON” position, the screen
will display:
2
Press the “0” key and the screen will now
display:
3
Press the “∇” key until the screen displays:
4
Press the “YES” key and the screen will now
display:
5
Press the “∇” key until the screen displays:
6
Press the “YES” key and the screen will now
display:
| Slot is :IN USE |
>Logon is DISABLED<
| /\/\/\/\/\/\/\/\/\/\ |
01 FAULT TOT 02
Default Device 125
ZONE 01 DEVICE 125
Status Normal
Date
Time
Panel in Access
Date
Time
|***Options **** |
>Passwords <
| Time and Date |
Yes =Select
Time
| Logging |
> Fire System Opts <
| Remote Access |
Yes = select Time
|** Fire system ** |
> Dev. Disable /Test <
| Net. Disable /Test |
Yes= Select Time
| System Mode |
> Engineers Config <
| Printer Options |
Yes= Select Time
Enter Your PIN
For Access>
Then Press YES
Time

TEMPOINT ENGINEERS OPERATING GUIDE, ISSUE 1.0 – 02/07/13
19
7
Press 221100 then press the “YES”
key and the screen will display:
8
Press the “∇” key until the screen displays:
9
Press the “YES” key and the screen will now
display:
10
Enter the device number you want to delete
(e.g. 005) and press the “YES” the screen will
now display:
11
Press ANY key and the screen will display:
12
Press the “NO” key three times and the screen
will now display:
13
Turn the control key to the “OFF” Position. The
screen will now display:
|** Eng.; Config ** |
>Device Database <
| Sounder Options |
Yes= Select Time
| Site Survey |
> Remove Devices <
| Panel Hardware |
Yes= Select Time
Enter Device
(Numbers 1-256)
Number > _
YES = Finish Time
Device 5 Deleted
Press Any Key Time
| Site Survey |
>Remove Devices <
| Panel Hardware |
Yes= Select Time
Panel in Access
Date Time
Status Normal
Date
Time

TEMPOINT ENGINEERS OPERATING GUIDE, ISSUE 1.0 – 02/07/13
20
10. How To Replace Devices
To replace a device onto the TemPoint, take the new device in front of the panel. Insert
the key into the Panels Control Key switch, located at the right of the panel.
Step Action Screen Display
No
1 With the key in the “ON” position, the screen
will display:
2
Press the “0” key and the screen will now
display:
3
Press the “∇” key until the screen displays:
4
Press the “YES” key and the screen will now
display:
5
Press the “∇” key until the screen displays:
6
Press the “YES” key and the screen will now
display:
7
Press 221100 then press the “YES” key and the
screen will display:
8
Press the “∇” key until the screen displays:
9
Press the “YES” key and the screen will now
display:
10
Press the “YES” key to change and the screen
will now display:
Panel in Access
Date
Time
|***Options **** |
> Passwords <
| Time and Date |
Yes =Select
Time
|Logging |
>Fire System Opts <
|Remote Access |
Yes = select Time
|** Fire system * * |
> Dev. Disable/Test <
| Net. Disable/Test |
Yes= Select Time
| System Mode |
> Engineers Config <
| Printer Options |
Yes= Select Time
Enter Your PIN
For Access>
Then Press YES
Time
| ** Eng.; Config ** |
> Device Database <
| Sounder Options |
Yes= Select Time
| Sounder Options |
> Log On Devices <
| Site Survey |
Yes= Select Time
Logon DISABLED(000)
Push YES to change
Push NO to escape
Push YES/NO Time
|**Logon Options** |
> Logon Slot :AUTO<
| Slot is :FREE |
Yes= Select Time
/