Page is loading ...

SoftLite Led T

2
User Manual version 1.0
Edition October 2019
Serial Number:
.......................................................................................................................................................................................
Purchase date:
.......................................................................................................................................................................................
Dealer:
.......................................................................................................................................................................................
Address:
.......................................................................................................................................................................................
Suburb:
.......................................................................................................................................................................................
Country:
.......................................................................................................................................................................................
Phone / Fax:
.......................................................................................................................................................................................
Please note in the space provided above the relative service information of the model and the
retailer from whom you purchased your SoftLite Led T: this information will assist us in providing
spare parts, repairs or in answering any technical enquiries with the utmost speed and accuracy.
WARNING: the security of the xture is granted only if these instructions are strictly followed;
therefore it is absolutely necessary to keep this manual.
SoftLite Led T

3
Index
1. Packaging and transportation ........................................................................................................Pag. 5
1.1 Packaging ............................................................................................................................................Pag. 5
1.2 Transportation ...................................................................................................................................Pag. 5
2. General Information .......................................................................................................................... Pag. 5
2.1 Important safety information......................................................................................................... Pag. 5
2.2 Warranty conditions ....................................................................................................................... Pag. 6
2.3 EC Norms .......................................................................................................................................... Pag. 6
3. Product specications .....................................................................................................................Pag. 7
3.1 Technical characteristics .................................................................................................................Pag. 7
3.2 Dimensions ........................................................................................................................................Pag. 7
3.3 Unit’s main components ................................................................................................................Pag. 8
3.4 Back panel description ...................................................................................................................Pag. 8
4. Installation ............................................................................................................................................ Pag. 9
4.1 Mechanical installation ................................................................................................................... Pag. 9
4.2 Safety chain ..................................................................................................................................... Pag. 9
4.3 Adjusting unit’s tilt ........................................................................................................................ Pag. 10
4.4 Mounting the accessories ............................................................................................................ Pag. 11
5. Powering up ......................................................................................................................................... Pag. 12
5.1 Operating voltage and frequency .............................................................................................. Pag. 12
5.2 Connection to mains power ........................................................................................................ Pag. 12
5.3 Supply cable characteristics ....................................................................................................... Pag. 12
6. Control signal connections ........................................................................................................... Pag. 14
6.1 Control signal connection by XLR5 plugs ................................................................................ Pag. 14
7. Turning the projector on ................................................................................................................. Pag. 15
7.1 DMX address of the unit ................................................................................................................ Pag. 15
8. DMX Chart ............................................................................................................................................. Pag. 16
8.1 DMX Chart 5 or 1 channels ........................................................................................................... Pag. 16
9. Display panel functions .................................................................................................................. Pag. 19
9.1 Quick guide to menu ...................................................................................................................... Pag. 19
9.2 Rapid count .................................................................................................................................... Pag. 19
9.3 Main functions menu ................................................................................................................... Pag. 20
9.4 Measure (MEAS) ............................................................................................................................ Pag. 22
9.5 Electronic alignment of the leds ............................................................................................... Pag. 24
9.6 Special functions of the xture .................................................................................................. Pag. 25
9.7 Error messages ............................................................................................................................... Pag. 25
10. Accessories and spare parts ..................................................................................................... Pag. 26

4
11. Maintenance ...................................................................................................................................... Pag. 27
11.1 Firmware update ........................................................................................................................... Pag. 27
11.2 Periodic cleaning ......................................................................................................................... Pag. 27
11.3 Periodic controls .......................................................................................................................... Pag. 27
11.4 Fuses .............................................................................................................................................. Pag. 27
12. F.A.Q. and answers ......................................................................................................................... Pag. 28

5
Congratulations on having purchased a Coemar product. You have assured yourself of a xture
of the highest quality, both in componentry and in the technology used. We renew our invitation
to you to complete the service information on the previous page, to expedite any request for
service information or spares (in case of problems encountered either during, or subsequent
to, installation). This information will assist in providing prompt and accurate advice from your
Coemar service centre. Following the instructions and procedures outlined in this manual will
ensure the maximum eciency of this product for years to come.
1. Packaging and transportation
1.1 Packaging
Open the packaging and make sure that no part of the equipment has suered any damage
during the transportation. In case of damage to the xture, contact your currier and your supplier
immediately by telephone, fax or e-mail, and inform them you will formally notify them in writing
through registered letter.
Packing list
Make sure the packaging contains:
1 SoftLite Led T
1 Instruction manual
1 Main power plugs
2. General information
2.1 Important Safety information
Fire prevention:
1. Never locate the xture on any ammable surface.
2. Minimum distance from ammable materials: 0,5 m.
3. Minimum distance from the closet illuminable surface: 0,5 m.
4. Replace any blown or damaged fuse only with those of identical values. Refer
to the schematic diagram if there is any doubt.
5. Connect the projector to mains power protected by a thermal magnetic circuit
breaker.
Prevention from electric shock:
1. Presence of high voltage inside of the xture. Insulate the projector from mains
supply before opening or performing any function which involves touching
the inside of the xture, including lamp replacement.
2. For the connection to the mains, adhere strictly to the guidelines outlined in
this manual.
1.2 Transportation
The SoftLite Led T must be transported exclusively in its original packaging or in an appropriate
ight case.

6
3. The level of technology of SoftLite Led T requires the use of specialised per-
sonnel for all service applications; refer all work to your authorised Coemar
service centre.
4. A good earth connection is essential for the proper functioning of the projec-
tor. Never connect the xture if there is no earth connection.
5. Mains cables must not come into contact with other cables.
6. Do not operate the projector with wet hands or in an area where water is pres-
ent.
7. The xture must never be located in an exposed position, or in areas of ex-
treme humidity.
Safety:
1. The projector must always be installed with bolts, clamps, or other xing de-
vices which are suitably rated to support the weight of the projector.
2. Always use a secondary safety xing device with chain or steel wire of a suit-
able rating to sustain the weight of the unit in case of failure of the principal
xing point.
3. The external surfaces of the unit, at various points, may reach 60°C. Nev-
er handle the unit until at least 10 minutes have elapsed since the LED was
turned o.
4. Never install the xture in an enclosed area lacking sucient air ow; the room
temperature must not exceed 35°C.
5. The projector contains electronic and electrical components which must un-
der no circumstances be in contact with water, oil or any other liquid. Failure
to do so will compromise the proper functioning of the projector.
2.2 Warranty conditions
1. The xture is under warranty for 36 months from the purchase date against factory defec-
tions.
2. Damage ought to unskillfulness, inappropriate use, or lack of suggested maintenance are
excluded from the warranty.
3. Warranty expires when the projector is opened by unauthorized personnel.
4. Warranty doesn’t include the replacement of the xture.
5. Serial number and model of the xture are necessary to retrieve informations and assistance
from the dealer.
2.3 EC norms
The projector meets all fundamental applicable EC requirements.

7
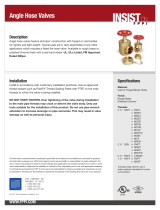
3.2 Dimensions
3.1 Technical characteristics
Power supply 90-264 V, auto-sensing, 50/60 Hz
Maximum current 1.2 A a 230 V - 2.43 A a 115 V
Power factor Cosϕ = 0.9
Power consumption 250 W
Color temperature Fixed white color temperature at 3.200 K
CRI (Color Rendering Index) 90
Weight 9.6 kg - 21.1 lbs
Minimum ambient temperature -20°C / -4°F
Maximum ambient temperature +35°C / +95°F
IP rating 20
3. Product specications
691.2 mm
27.21 in
620 mm
24.41 in
584 mm
23.00 in
248 mm
9.76 in
200 mm
7.87 in
210.5 mm
8.28 in
264.5 mm
10.41 in
90 mm
3.54 in
14 mm
0.55 in
30 mm
1.18 in
90 mm
3.54 in
90 mm
3.54 in
90 mm
3.54 in

8
3.3 Unit’s main components
Components description
A Locking knobs
B Yoke
C Cooling slots
D Front panel
E Back panel
F Accessories hooking
3.4 Back panel description
A
A
B
C
D
E
F
Display and
keyboard
DMX In and Out
5 poles connector
Power supply
Neutrik PowerCon
connector

9
4.1 Mechanical installation
SoftLite Led T may be hung from an appropriate structure in any position or on tripod. If hang-
ing the xture from a lighting truss or similar, we recommend the use of an appropriate clamp
“A”, as shown in the following diagram.
Warning!!
Always ensure that your support
structure and xing (bolts, clamps,
etc…) are rated to support the weight
of the xture.
4.2 Safety chain
When hanging SoftLite Led T it is recommended to use a safety chain, as required by current
legislation. The safety chain must pass through the handles of the unit and then attached to
the structure.
If using steel cables and chains not Coemar’s production, make sure they are suitable to sup-
port the weight of the unit according to normative UL/ETL (required: the weight of 6 complete
devices for at least one hour).
4. Installation
A
9

10
4.3 Adjusting unit’s tilt
In order to adjust the tilt of the unit simply loose the side handle, adjust the tilt and lock the yoke
by tightening the handle again.

11
4.4 Mounting the accessories
To mount an accessory you have to loose the small knob “A”, insert the accessory that you need
and close the knob.
A
A

12
5. Powering up
5.3 Supply cable characteristics
The supply cable complies to the most recent safety norms.
5.2 Connection to mains power
Mains cable characteristics
The mains cable provided is thermally resistant, complying to the most recent International
standards.
Note: in case of cable replacement, similar cable with comparable thermal resistant qualities
must be used exclusively (cable 3 X 1,5 ø external 10 mm, rated 300/500V, tested to 2 KV, op-
erating temperature -40°C + 180°C, Coemar cod. CV5311).
Connection to mains power
SoftLite LED T is equipped with two power connectors, one as input and one as output, which
can be used to feed up to 10 (at 230 V) or 5 (at 90 V) xtures.
The max absorption of SoftLite Led T is reported in the following table:
- 230 V, 1,2 A constant during normal exercise.
- 115 V, 2,43 A constant during normal exercise.
5.1 Operating voltage and frequency
The unit may operates at voltages ranges from 90 to 264 V at a frequency of 50 or 60 Hz. It is
not needed to eect any setup procedures: SoftLite Led T will automatically adjust its opera-
tion to suit any frequency or voltage within this range.

13
Warning!!
The use of a thermal/magnetic circuit breaker is recommended. Strict adherence to
regulatory norms is strongly recommended.
SoftLite Led T should not be powered through a dimmer as this may damage the
internal switching power supply.
Prior to connecting the device to mains power, ensure that the mains characteristics are
within the recommended range for the use of SoftLite Led T.
All cabling and connections should be carried out by a suitably qualied personnel.

14
Warning!
Make sure that screening and conductors are not in contact one another or with the
metal housing of the connector.
Pin#1 and housing must never be connected to the power supply unit.
6.1 Control signal connection by XLR5 plugs
The digital control signal is transmitted to the projector via two pole cable screened according
to the International standards for the transmission of DMX 512 data. The connection must be
serial, using connectors XLR5 male and female located on the back of SoftLite Led T labeled
DMX512 IN e OUT (see diagram).
Connectors equipped on SoftLite Led T are IP rated, which ensures protection against water
and dust. In order to keep this rating they must be connected exclusively to other IP rated con-
nectors.
Pin 1 = Ground (GND)
Pin 2 = Data -
Pin 3 = Data +
Pin 4 = Not connected
Pin 5 = Not connected
6. Control signal connections

15
Warning!!
If you alter the DMX address with no DMX signal connected, the digits on the display panel
will continue to ash even after you have pressed ENTER button to conrm the address.
A00 1
7. Turning the projector on
After having followed the preceding steps described, proceed with the power supply and turn
on the projector connecting it to the mains power.
The software version installed on the internal microprocessors will be shown on the display,
suddenly it will show the current DMX addressing. If the address blinks, it means that the DMX
signal has not been received. Check the connection cable and the mixer functioning.
7.1 DMX address of the unit
Each projector can use 5 or 1 address channels for its complete operation and is controlled by
a DMX 512 signal.
DMX addressing
When powered up initially, each projector will show A001, which indicates DMX address 001;
for example, when set at 5 channels a projector thus addressed will respond to commands of
channel 1 to 5 from your DMX 512 controller . A second unit must be addressed as A006, a third
one as A011 and so on. The operation must be carried out on every SoftLite Led T which has
an address dierent from A001.
Altering the DMX address:
1. Press the + or – button until the display shows the required DMX address. The digits on the
display will blink to indicate that the variation has not been registered.
2. Press the enter key to conrm your selection. The digits on the display panel will cease to
blink and the projector will now respond to the new address.
Note: by holding the + or – button down the scrolling will be faster; thus allowing a faster se-
lection

16
8. DMX chart
8.1 DMX Chart 5, 1 channels
channel function
type of
control
eect decimal percentage
1 1 master dimmer proportional adjust luminous output intensity from 0% to 100% 0 - 255 0% - 100%
2 - spare channel step no eect 0 - 255 0% - 100%
3 - dimmer ne proportional ne dimmer control 16 bit 0 - 255 0% - 100%
4 - strobe eect
step no eect 0 - 9 0% - 100%
proportional
variable speed strobing eect, from slow to fast
10 - 57 4% - 22%
step stop strobe 58 - 59 23% - 23%
proportional
sequenced pulsed strobing eect,
slow closing, fast opening
(variable speed pulsing, from slow to fast)
60 - 108 24% - 42%
step
stop strobe
109 - 110 43% - 43%
proportional
sequenced pulsed strobe, fast closing, slow
opening (variable speed pulsing, from slow to fast)
111 - 159 44% - 62%
step stop strobe 160 - 161 63% - 63%
proportional
strobe eect with random
ashes and synchronous colors
(variable speed from slow to fast)
162 - 207 64% - 81%
step stop strobe 208 - 209 82% - 82%
proportional
strobe eect with random
ashes and synchronous colors
(variable speed from slow to fast)
210 - 255 82% - 100%
5 -
special
function
step
park 0 - 9 0% - 4%
no eect 10 - 71 4% - 28%
600 Hz 72 - 84 28% - 33%
fan at low-noise speed 85 - 96 33% - 38%
fan at auto speed 97 - 108 38% - 42%
proportional fan speed control from minimum to maximum 109 - 120 43% - 47%
step
no eect 121 - 133 47% - 52%
enables the automatic display blackout 134 - 185 53% - 73%
disables the automatic display blackout 186 - 199 73% - 78%
LED control frequency tuning 1.000 Hz 200 - 205 78% - 80%
LED control frequency tuning 3.000 Hz 206 - 211 81% - 83%
LED control frequency tuning 6.000 Hz 212 - 217 83% - 85%
LED control frequency tuning 8.000 Hz 218 - 223 85% - 87%
LED control frequency tuning 10.000 Hz 224 - 229 88% - 90%
LED control frequency tuning 12.000 Hz 230 - 235 90% - 92%
LED control frequency tuning 14.000 Hz 236 - 241 93% - 95%
LED control frequency tuning 16.000 Hz 242 - 247 95% - 97%
LED control frequency tuning 19.000 Hz 248 - 255 97% - 100%

17
9. Display panel functions
9.1 Quick guide to menu
To access the menu’s functions, just press the MENU button. Then press + or – buttons to scroll
the pages and press the ENTER button to access to any other function.
By suitably using all the functions of SoftLite Led T, which can be activated through its display
panel, it is possible to change some of the parameters and to add some functions.
Changing the preset settings made by Coemar can vary the functions of the projector so that it
will respond dierently to the controller; therefore carefully read about the functions described
here before carrying out any possible selection.
9.2 Rapid count
Through the display panel of SoftLite Led T it is possible to quickly change the various num-
bers displayed for the dierent functions in the following 3 manners:
1. Pressing the + or – buttons will cause the count to be quicker.
2. Pressing rst + and then – and then holding them down simultaneously will cause the num-
bers to jump to the highest value.
3. Pressing rst – and then + and then holding them down simultaneously will cause the num-
ber to jump to the lowest value.

18
9.3 Main functions menu
On
OFF
ESP [Exponential]
LOG [Logarithmic]
LIn [Linear]
diMM [Dimmer]
Strb [Strobe]
Tungsten:
Mimics the slow dimming curve of tung-
sten lamps.
It allows the selection of dierent dimmer
curves: exponential (default), logarithmic
and linear;
Allows to manually set the DMX channels
controlled by a DMX console:
• Dimmer: sets the luminous intensity;
• Strobe: manually sets the strobe
DMX channel;
• Store: stores the modications that
will be set at the next times the xture
will be turned on.
• Auto: under this setting the fan speed
varies based on the overall tempera-
ture of the xture to guarantee the
maximum output possible;
• Low noise: this setting will keep the
speed of the fan at the minimum level
while the light output will decrease in
case of overheat.
tUnG
[Tungsten]
dIMM
[Dimmer]
tESt
[Test]
StOr [Store]
FAn
[Fan Speed]
AUtO [Auto]
LO [Low noise]

19
dISP
[Display]
611 - 19000
DMX channels:
Shows the DMX mode and number of
channels selectable;
Display functions:
Changes the display settings:
• Reverse: rotates the display of 180°;
• Auto: Sets or disables the automatic
display turn o function, which would
occur after 10 seconds of inactivity;
• Hold Sets or disables the automatic
display lock function that occurs after
10 seconds of inactivity;
Note: The AUTO and HOLD function be-
come active only when the DMX address
selection is displayed (A001). The eect
of AUTO and HOLD trigger after 10 sec-
onds of keyboard inactivity. To turn on
the display it is enough to push a button,
to unlock the keyboard it is necessary to
hold any button down for a few seconds.
LED Frequency:
Allows to choose the operating frequen-
cy of the LEDs in order to avoid ickering
issues with video recording devices. The
excursion varies from 611 Hz (default) to
19000 Hz.
Reset:
It allows to restore the default factory
settings of the unit. Keeping pressed
both ENTER and MENU allows to enter
the ALIG menu.
Default Settings:
It restores all the settings to default val-
ue except for led settings, hour and DMX
address.
Measures:
Allows to read all the parameters: LED
and board temperatures, fan level, DMX
ratio, DMX, allarms, channels value and
software version.
dMX
[DMX channels]
FrE
[LED Frequency]
5 CH [5 Channels]
1 CH [1 Channel]
rurS [Reverse]
HOLd [On - O]
AUtO [On - O]
dF.SE.
[Default Settings]
MEAS.
[Measures]
pag. 20

20
9.4 Measures menu (MEAS)
CH 1 [Channel 1]
CH 2 [Channel 2]
CH 3 [Channel 3]
CH 4 [Channel 4]
CH 5 [Channel 5]
Temperature:
Shows the current temperature values:
• LED: shows the LED module temper-
ature;
• Board: shows the electronic board
temperature.
Volt:
Shows the power supply voltage.
DMX Input:
Shows the value of the DMX channels
received by the xture on every channel
that the xture occupies on the line.
Rate:
Shows the refresh rate of the DMX signal
sent by the console
Alarm:
This menu shows the alarm statuses if
there is any.
tEMP
[Temperature]
vOLt
[Supply Voltage]
dM.In.
[DMX Input]
rAtE
[DMX Rate]
ALrM
[Alarms]
brd
[Board Temperature]
t.LEd
[LED Temperature]
/