Page is loading ...

ZIRKOL O-D
78,7X39.4’’/2X1M
ETL
Mounting Instructions
Instrucions de montage
UZRO16A20G15_ _ _

1Disconnect the electrical
power before to install the
lamp and draw the
suspension points
Débranchez l'alimentation
électrique avant d'installer
la lampe et dessinez les
points de suspension
1
MAX 118’’/3000
1,96’’/50
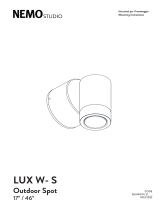
Installation/Installation
Box contents / Contenu de l’emballage
(inches/mm)
Split
Electrical cable
Iron cable
Downlight
39,4”X1000
0,98”/25
31,4”/800
78,7”/2000
78,7”/2000

3
2
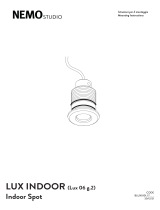
Example of connection/Example de branchement
Make the holes for the dowels in the
correct position
Faire les trous pour les chevilles dans
bonne position
Fix the lamp with wall
dowels (not included) and the little roses.
Fixer la lampe avec les
chevilles (non incluses) et les petites
roses.
iron wire
2
110V-240V/50-60Hz
L
N
L
N
+
IN
OUT
DRIVER LED
N.O. PUSH BUTTON
0-10V / 1-10V
(DEFAULT SETTING)
Parallel connection
Branchement Dali

4Fix the lamp with the wire gripper
Fixez la lampe avec les autobloquants
3

4
Drill the holes for the dowels in the correct position.
Percez les trous pour les chevilles dans la bonne
position.
!
!
!
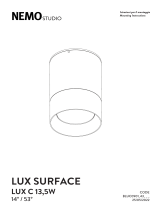
Installation / Installation
Connection to residential wire ( wires that come out from the canopy)
Branchement au fil résidentiel (fils sortant de la patère )
Isolate D1 and D2 if not connected
to any dimmer/
Isoler D1 et D2 si non connecté
à un gradateur
HIGH VOLTAGE (120V):
White is neutral, Black is hot.
HAUTE TENSION (120V):
Le blanc est le Noir,
le brun est la Phase.
LOW VOLTAGE-FOR DIMMING USE ONLY:
D1 isDIM+, D2 is DIM-
BASSE TENSION - POUR UTILISATION
DE GRADATION UNIQUEMENT:
D1 est DIM+, D2 DIM-
Make sure the cables
go out for at least 6
inches / Assurez-vous
que les câbles sortent
sur au moins 6 pouces
Screws not included
Vis non incluses
5
6
D1+
D1+
D2-
D2-
AB
C

7
~0,2’’/7mm
~0,7’’/7mm
Branchement de la lampe (24V)
Lamp connection (24V)
Peel the wires
Peler les fils
Basse tension
Low voltage
Insert the power cable in the turret 1 of the canopy
Insérez le câble d'alimentation dans la tourelle 1
de la verrière
N
L
7
!
!
Connexion 110-240V
Connection 110-240V
Min. 0.07 x 0,02’’/2x0,75mm
Max.0.07 x 0,09’’/2x2,50mm
5
Connection 0-10V/1-10V/PUSH/DALI
0-10V/1-10V/PUSH/DALI

8
9
Match the position of the numbers (1,2
and 3) inside the canopy and the
ones on the cover
Faites correspondre la position des
chiffres (1, 2 et 3) à l'intérieur de la
patère et ceux sur la couvercle
!
Canopy closure
Fermeture du couvercle de la patère
6
For an inspection, open the canopy
Pour une inspection, ouvrez la patère

Connection 0-10V/1-10V/PUSH/DALI
0-10V/1-10V/PUSH/DALI
!
Screws not included
Vis non incluses
Unscrew the canopy
Dévisser la patère
Remove electrical cables
Retirer les câbles électriques
~0,2’’/7mm
Branchement la lampe (24V)
Lamp connection (24V)
Basse tension
Low voltage
!
7
C
1
2

ENGLISH
CAUTION
INDOOR LUMINAIRE
Installation should be
carried out by a suitable
qualified installer. / Discon-
nect main voltage before
maintenace operation / All
wiring and maintenance
must be performed with the
main switch in the OFF
position / Don’t open the
luminaire.
Connect the fitting to the
power supply only after
connecting all LED to the
driver (when expected) / In
case of failure, upon a
return authorization of
NEMO Studio, the product
will be not neither open or
dismounted / Make the
wiring using a system that
guarantees at least the IP
grade of the spot. /
Se previsto, use only bulbs
of suitable type and power
specified in the label / Do
not install fixture in
environment with presence
of chlorine, salt air or
aggressive agents, if not
expressly mentioned. / The
color temperature (CCT) of
LED sources can be dier-
ent from the declared nom-
inal value within a range of
±5%. / NEMO reserves the
right to make any technical
or formal alterations to its
products without giving
prior notice, especially for
LED sources. / We recom-
mend you to keep instruc-
tions for further consulta-
tions.
FRANÇAIS
AVVERTISSMENTS
LUMINAIRES INDOOR
L’installation doit être eec-
tué par un personnel qualifié.
/ Couper le courant avant
toute intervention sur l’appa-
reil. / Toutes les opérations de
câblage et d’entretien
doivent être eectuées avec
l’interrupteur général sur la
position OFF / Ne pas ouvrir
le spot/luminaire.
Mettre le système sous
tension seulement après
avoir branché tous les LED
sur le transformateur (dans le
cas échéant) / En cas de
panne, sous réserve de
l’autorisation du retour de
NEMO Studio le produit ne
devra pas être ouvert, ni
démonté / Eectuer le
câblage en utilisant un
système garantissant au
moins l’indice IP du spot.
Dans le cas échéant, utiliser
exclusivement les ampoules
de type et de puissance
indiqués sur l’étiquette
informative. / Lorsque cela
n’est pas expressément
indiqué, éviter d’exposer le
produit dans des environne-
ments avec présence de
chlore, air marin ou autres
substances agressives. /
La température de couleur
(CCT) des sources LED peut
varier de la valeur nominale
déclarée de ±5% . / NEMO
se réserve le droit de modifier
ses produits sans préavis, en
particulier en ce qui concerne
les sources de LED. / Cette
notice de montage doit être
bien conservée pour toute
ultérieure consultation.
8

FRANÇAIS
DECHETS DE
L’APPAREIL
Cet appareil d’éclairage est
produit en conformité avec
la Directive Européenne
2012/19/EU. Selon la
directive communautaire
DEEE (Déchets des
Equipements Electriques et
Electroniques) exige que
l’appareil ne soit pas jeté
dans le flux normal des
déchets municipaux.
Contacter les autorités
locales pour la récupération
et le recyclage des appareils
électroniques.
ENGLISH
EQUIPMENT DISPOSAL
This lamp has been manu-
factured according to
Directive EU 2012/19/EU.
In accordance with EU
Directive WEEE (Waste
Electrical and Electronic
Equipment), luminaires
must not be disposed of with
other household waste. At
the end of their life, lumi-
naires must be taken to the
appropriate local facility
available for the disposal or
recycling of electronic
products.
FRANÇAIS
INSTRUCTIONS DE SECU-
RITE POUR LA MAINTE-
NANCE DU LUMINAIRE
Nettoyer périodiquement la
superficie du spot/luminaire.
Avant de commencer la main-
tenance, éteindre l’appareil.
Pour les parties en
plastique-verre-composants
vernis :
• à l’aide des gants en latex,
enlever la couche superficielle
de poussière avec un chion
électrostatique doux et non
pelucheux.
• Nettoyer avec un chion
doux et humidifié en mouve-
ments circulaires.
•Eviter l’usage de détergents
agressifs. Utiliser exclusive-
ment des produits neutres
(PH 7).
Note : pour les parties en
plastique, utiliser exclusive-
ment détergents antistatiques
sans alcool. Pour les parties en
aluminium, nettoyer avec un
chion doux.
ENGLISH
LIGHTING CLEANING
SAFETY INSTRUCTIOS
-Periodically clean the
surface of the spot. Before
starting, switch the light o.
For Plastic parts - Glass -
Painted parts:
•Remove the dust surface
layer with latex gloves and
soft electrostatic lint-free
cloth.
•Clean with a soft and
moist cloth with circular
movements.
•Avoid using aggressive
detergents. Use only
neutral products (PH 7).
Note: for plastic parts use
only antistatic alcohol-free
soap. For aluminum parts,
clean with a soft cloth.
9

Ilti Luce Srl - Strada Borgata Paradiso 20 - 10036 Settimo Torinese (TO) ITALY
Tel +39 011 7657301
[email protected] - nemolighting.com
NEMO Studio
Copyright © 2020 NEMO Srl Milano, Italia.
The text and images are protected by copyright.
Unauthorized reproduction.
Lamping
max
35˚C
24V max
74W
Versione 1.1
Data ultimo aggiornamento 13/04/2022
2700K
3000K
4000K
The LED, the cables and the driver cannot be changed in the luminaire from the end-user.Please contact
NEMO STUDIO (only authorized center).
La LED, les câbles et le pilote ne peuvent pas être modifiés dans le luminaire par l'utilisateur final.
This luminaire contains built-in LED lamps.
Ce luminaire contient des lampes LED intégrées.
This product contains a light source of energy eciency class <E> (EEC=D for 4000K version)
Ce produit contient une source lumineuse de classe d'ecacité énergétique <E> (EEC = D pour la version
4000K)
/