
CODE
BLUC2101_21_ _ _
LUX CEILING
Lux C 4,2W Trimless
17° / 46°
Istruzioni per il montaggio
Mounting Instructions

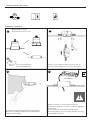
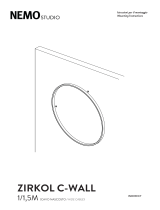
Contenuto imballo / Box contents
Installazione / Installation
4
3
2
1Dividere lo Spot in 3 parti
To separate the spot into 3 parts.
Inserire la cornice all'interno del foro e fissarlo con le viti
Insert the frame inside the hole and secure it with screws
Stuccare l’area circostante in modo che la cornice sparisca.
Cover the surronding area with plaster to make the frame
disappear into the ceiling
Ø 77 Foro di incasso Ø 77mm
Recessed hole Ø 77mm
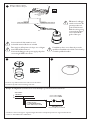
Collegare il driver (non incluso) alla tensione di rete
Dare tensione all’impianto solo dopo aver collegato il LED Spot
all’alimentatore.
To connect driver (not included) to the main voltage.
Connect the fitting to the power supply only after connecting
the Spot LED to the driver.
!
50~60Hz
110-240V*
LED Driver
INPUT
OUTPUT
L
N
LED DRIVER@350mA
(SELV)

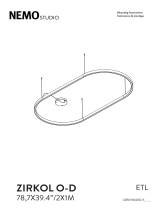
Esempio di collegamento (connessione in serie) / Example of connection (serial connection)
76
5
Inserire il corpo allineando le fessure sulla cornice alle 4 sfere.
Insert the body with four beads aiming at the slits
Collegare il driver al faretto.
To connect driver to the spot.
50~60Hz
110-240V*
LED Driver
INPUT
OUTPUT
L
N
LED DRIVER@350mA
(SELV)
Black
Red
-
+
Eettuare il cablaggio
usando un sistema che
garantisca almeno il
grado IP del faretto/
Make the wiring using
a system that guaran-
tees at least the IP
grade of the spot.
La morsettiera di alimentazione non è
inclusa/the terminal block not included
L'installazione deve essere fatta da personale
qualificato./Installation should be carried out by
a suitable qualified installer.
Dare tensione all’impianto solo dopo aver collegato
tutti i LED all’alimentatore/
Connect the fitting to the power supply only after
connecting all LED to the driver
* Verificare la tensione di ingresso supportata dagli alimentatori / Verify the input tension supported from drivers.
max n°3 Spot 4,2W
17W -350mA (max 47V)
+
N
L
2
1
-
50/60 Hz
110V-240V*
connessione in SERIE
** Usare un driver SELV / Use a SELV driver.
(SELV driver)**
PSU Constant Current
+
--
+
20m (40m tot.)
sez.cavo/cable section 1mm2
es. WALIMLED12350

Lamping
- Il LED non può essere sostituito dall’utente finale Rivolgersi a NEMO STUDIO (unico centro autorizzato).
The LED cannot be changed in the luminaire from the end-user.Please contact NEMO STUDIO (only authorized center).
- Questo apparecchio contiene lampade a LED integrate.
This luminaire contains built-in LED lamps.
- Questo prodotto contiene una sorgente luminosa di classe di ecienza energetica <F>
This product contains a light source of energy eciency class <F>
Ilti Luce Srl - Strada Borgata Paradiso 20 - 10036 Settimo Torinese (TO) ITALY
Tel +39 011 7657301
[email protected] - nemolighting.com
NEMO Studio
Copyright © 2020 NEMO Srl Milano, Italia.
The text and images are protected by copyright.
Unauthorized reproduction.
ENGLISH
CAUTION
OUTDOOR LUMINAIRE
Installation should be carried out by a
suitable qualified installer. /
Disconnect main voltage before
maintenace operation / All wiring and
maintenance must be performed with
the main switch in the OFF position /
Don’t open the luminaire.
Connect the fitting to the power
supply only after connecting all LED
to the driver (when expected) / In
case of failure, upon a return
authorization of NEMO Studio, the
product will be not neither open or
dismounted and the cable must be cut
leaving at least 10/15cm / Make the
wiring using a system that guarantees
at least the IP grade of the spot. /
Se previsto, use only bulbs of suitable
type and power specified in the label /
Do not install fixture in environment
with presence of chlorine, salt air or
aggressive agents, if not expressly
mentioned. / The color temperature
(CCT) of LED sources can be
dierent from the declared nominal
value within a range of ±5%. / NEMO
reserves the right to make any
technical or formal alterations to its
products without giving prior notice,
especially for LED sources. / We
recommend you to keep instructions
for further consultations.
ITALIANO
AVVERTENZE
LAMPADE OUTDOOR
L'installazione deve essere fatta da
personale qualificato. / Togliere tensione
prima di eseguire operazioni di manuten-
zione / Tutte le operazioni di cablaggio e
manutenzione vanno eseguite con
l’interruttore generale in posizione OFF
/ Non aprire il faretto/lampada.
Dare tensione all’impianto solo dopo aver
collegato tutti i LED all’alimentatore
(quando previsto) / In caso di guasti,
previa autorizzazione al reso di NEMO
Studio il prodotto non dovrà essere nè
aperto nè smontato e il cavo deve essere
tagliato lasciandone almeno 10/15cm/
Eettuare il cablaggio usando un sistema
che garantisca almeno il grado IP del
faretto /
Se previsto, usare esclusivamente le
lampadine del tipo e della potenza
indicate nei dati dell’etichetta. /
Quando non è espressamente indicato
evitare di esporre il prodotto in ambienti
con presenza di cloro, salsedine o altri
agenti aggressivi. / La temperature di
colore (CCT) delle sorgenti LED può
dierire dal valore nominale diichiarato
in un range di ±5% / NEMO si riserva di
apportare qualsiasi modifica tecnica o
formale senza preavviso, soprattutto per
quanto concerne le sorgenti LED. /
Queste istruzioni devono essere
conservate con cura per ogni ulteriore
consultazione.
-Per un corretto funzionamento,
l’apparecchio necessita di relativo vetro
di protezione integro.
-For a proper operation, the fitting
requires its protective undamaged
glass.
ITALIANO
SMALTIMENTO
DELL’APPARECCHIO
Questo apparecchio di illuminazione è
prodotto in conformità alla Direttiva EU
2012/19/EU.
Secondo la direttiva comunitaria WEEE
(Waste Electrical and Electronic
Equipment) l’apparecchio non può essere
smaltito con i rifiuti indierenziati. Deve
essere portato nelle strutture locali per lo
smaltimento ed il riciclaggio dei prodotti
elettronici.
ENGLISH
EQUIPMENT DISPOSAL
This lamp has been manufactured
according to Directive EU 2012/19/EU.
In accordance with EU Directive WEEE
(Waste Electrical and Electronic
Equipment), luminaires must not be
disposed of with other household waste.
At the end of their life, luminaires must
be taken to the appropriate local facility
available for the disposal or recycling of
electronic products.
ITALIANO
ISTRUZIONI DI SICUREZZA
PER LA PULIZIA DELLE LAMPADE
Pulire periodicamente gli apparecchi per
rimuovere gli accumuli di sporco e
sostanze che si depositano sulle superfici
a contatto con aria/acqua. Prima della
pulizia, spegnere l’apparecchio e lasciarlo
rareddare. Gli intervalli ed i metodi
richiesti a tale riguardo dipendono dal
luogo e dalla situazione di montaggio
nonché dalle condizioni ambientali.
Eettuare le pulizia utilizzando un panno
morbido inumidito in acqua tiepida. Non
usare prodotti per la pulizia a base acida
per pulire i faretti. Non utilizzare
idropulitrici. Nessuna parte degli
apparecchi installati in esterno deve
entrare in contatto con sostanze
chimiche aggressive (es. fertilizzanti,
diserbanti, calce, acidi e sostanze
potenzialmente corrosive, etc…).
Non trattare con detersivi granulosi e/o
con spugne ruvide o abrasive.
Rivolgersi alla Nemo in caso di dubbio
sulla modalità di pulizia della lampada.
ENGLISH
LIGHTING CLEANING SAFETY
INSTRUCTIOS
It is essential to clean the luminaire
periodically at regular intervals to
remove the dust, dirt, limestone or other
contaminations.
Before cleaning the luminaire, switch o
the power supply and let it cool down.
Not maintaining the luminaires may
result in malfunctioning.
Clean the luminaires using a soft cloth
damped in lukewarm water. Do not use
cleaning products which contain acidic
substances. Do not use cleaner
machines. Luminaires must not be used
in corrosive environments, exposure to
corrosive substances must always be
avoided. Do not use grainy detergent
and/or rough or abrasive sponges.
Contact NEMO in case of doubts
regarding lamp cleaning.
IP65
max
35˚C
-20˚C
0,40
4,2W
350mA
-
 1
1
-
 2
2
-
 3
3
-
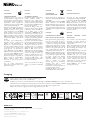 4
4


Ask a question and I''ll find the answer in the document
Finding information in a document is now easier with AI
in other languages
- italiano: Nemo BLUC2101_21 Manuale utente
Related papers
Other documents
-
Saxby Lighting 46896 Operating instructions
-
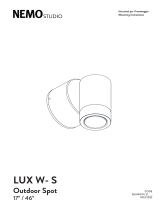 NEMO STUDIO LUX W- S User manual
-
NEMO STUDIO LUX WALKWAY User manual
-
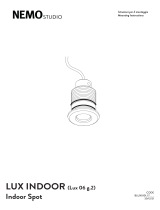 NEMO STUDIO LUX INDOOR User manual
-
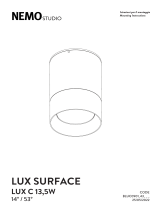 NEMO STUDIO LUX SURFACE User manual
-
NEMO STUDIO 1005 User manual
-
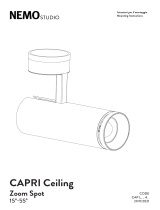 NEMO LIGHTING CAPRI Ceiling User manual
-
NEMO STUDIO B-HF User manual
-
 NEMO STUDIO ZIRKOL C-WALL User manual
-
 NEMO STUDIO UZRO16A20G15 User manual


