2. You can also press button to check for activity on the
current channel before you talk.
3. Release the button to exit monitor mode.
User can use this function to switch between two-way and
weather mode by press and hold for 3 seconds.
335100418 _RevA
OPERATING INSTRUCTION
Walkie-Talkie
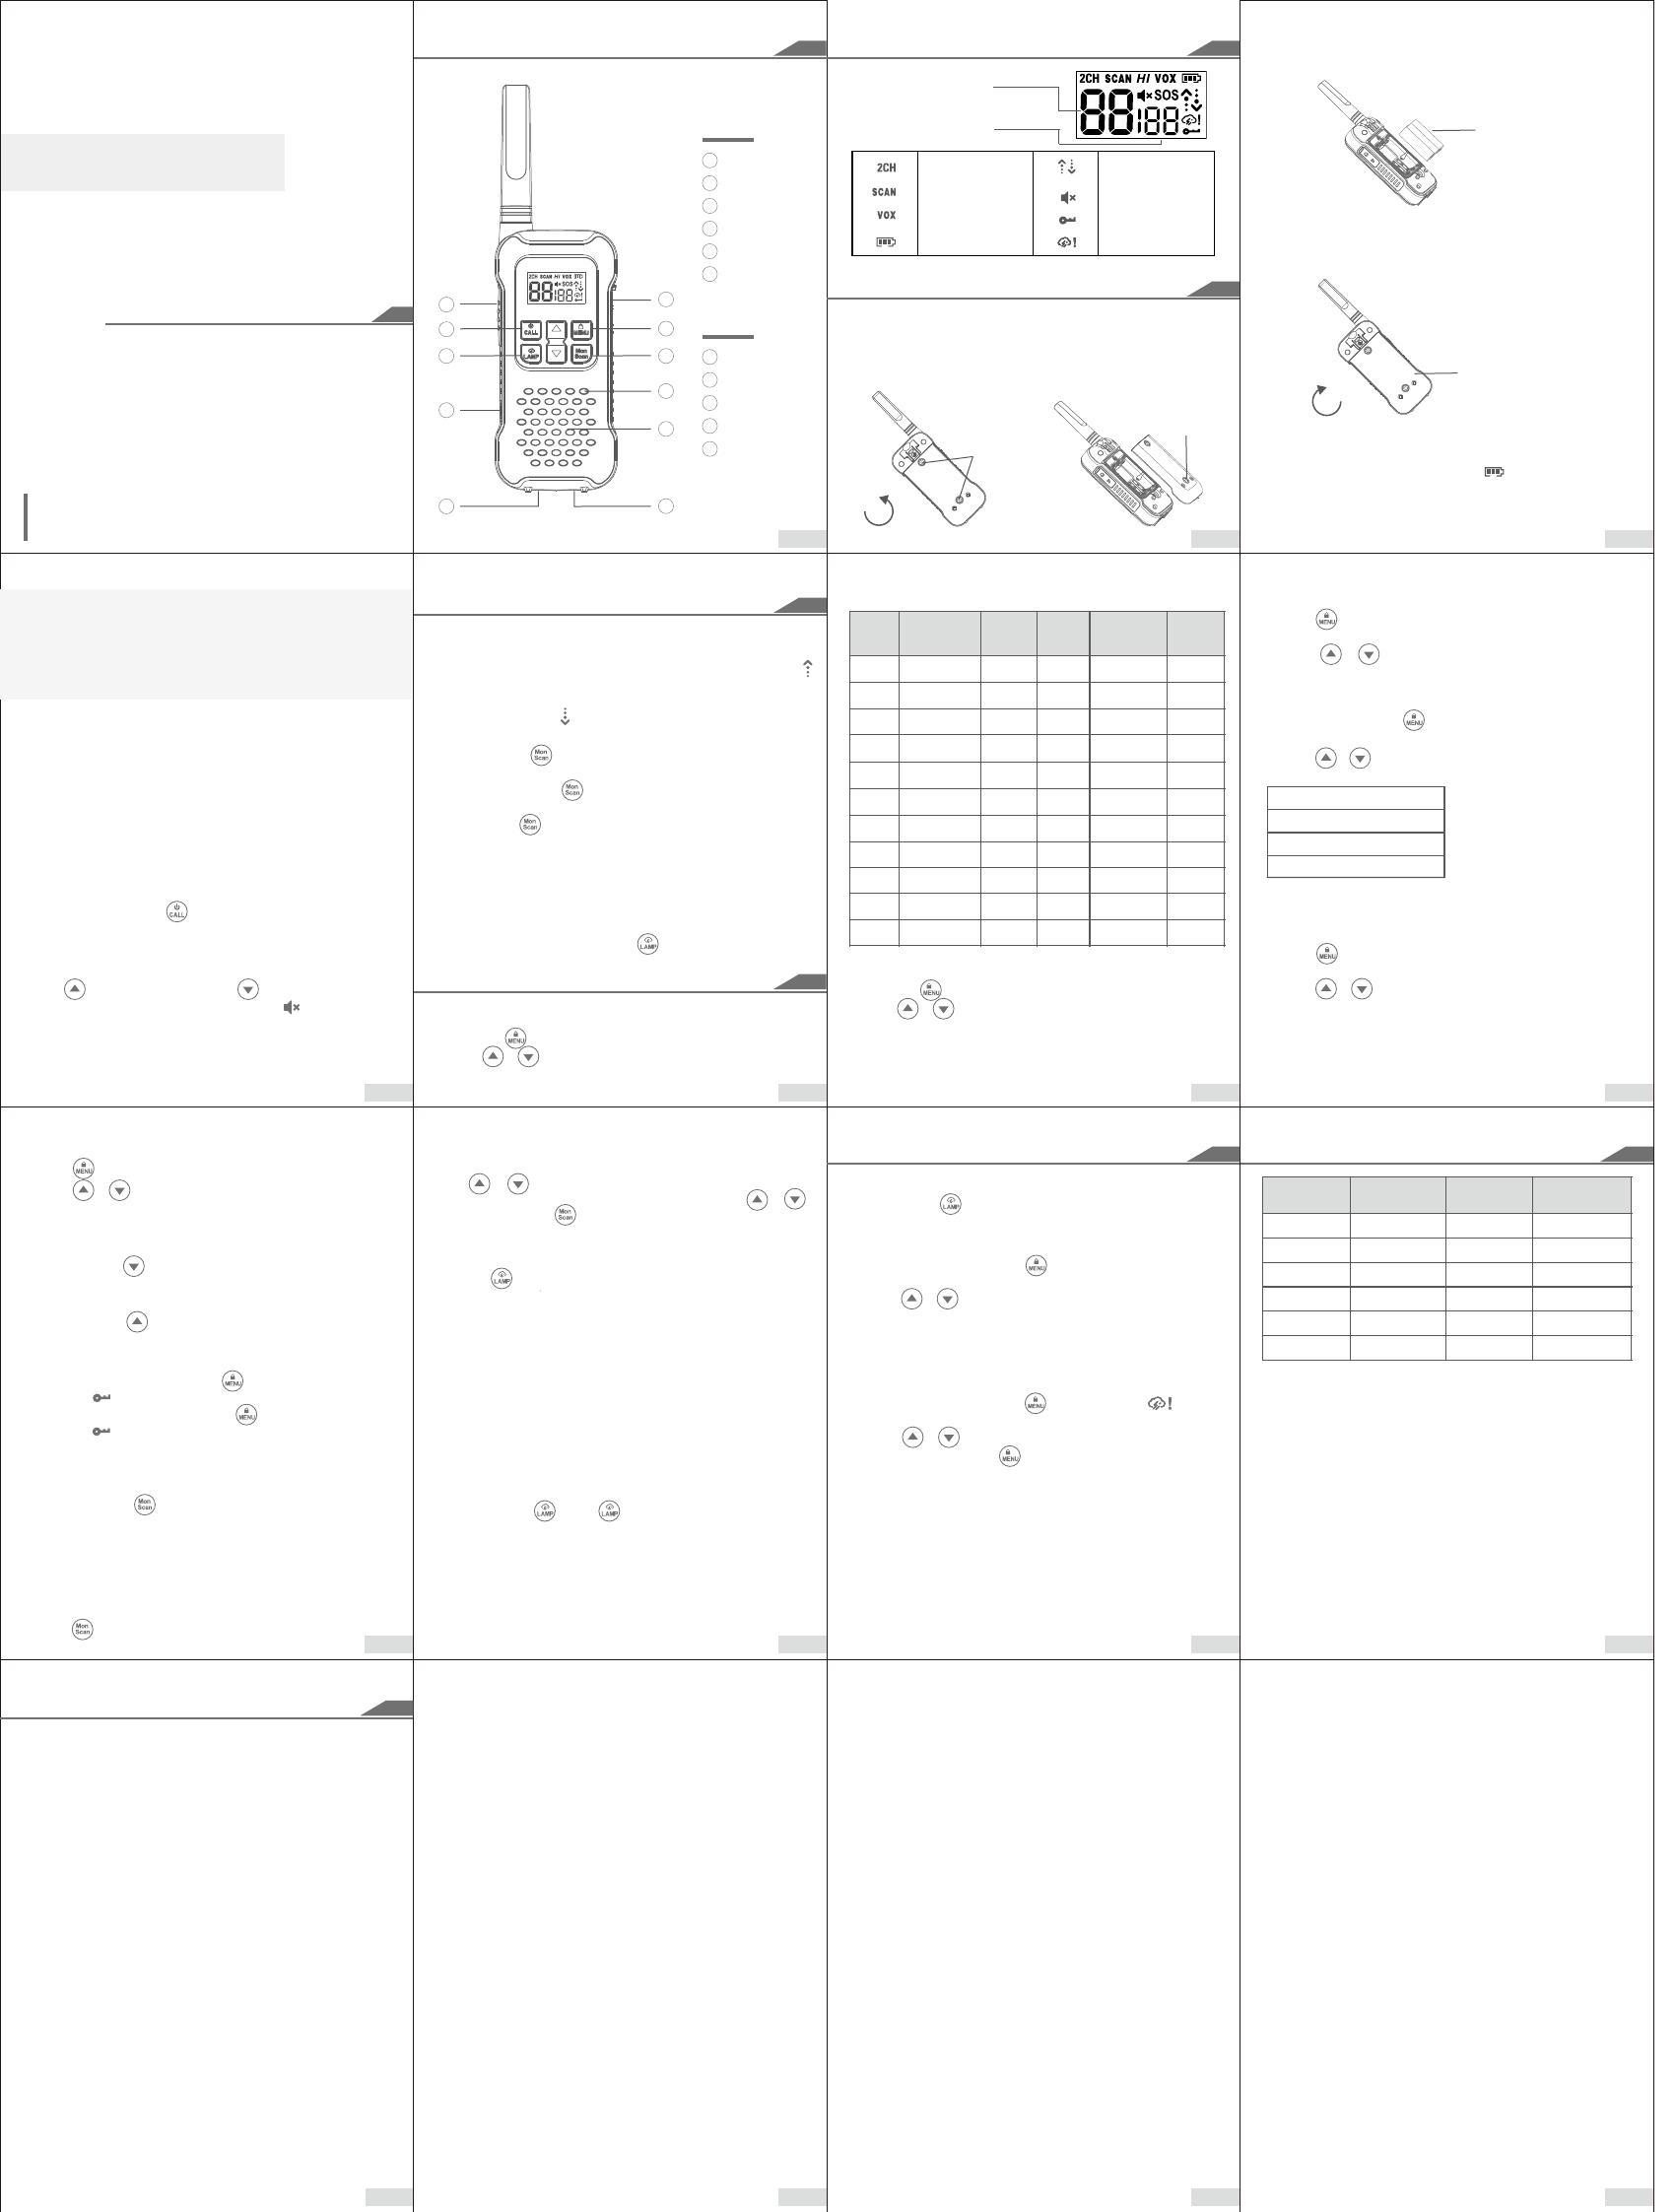
1 2 3
654 7
1098 11
13 14 1512
Note:
Please read the operating instructions carefully
before using the device.
GETTING STARTED
Insert 3 AA NiMH
batteries.
Close the battery
cover.
Radio Battery Meter
KEY FUNCTIONS
Installing the Three AA NiMH Rechargeable Battery
1. Take the belt clip off.
2. Unlock two screws counterclockwise and open the cover ot
install the three AA NiMH battery according to orientation shown
in battery compartment.
3. Close the battery and tighten the two screws clockwise.
4. Tighten the screws clockwise to close the battery cover firmly.
Battery full bars indicates battery high .When battery meter
shows 1 bar, device is on low battery mode and will indicate low
battery alert in the forms of alert tone and blinking bar display.
Using the Micro-USB Charger
The micro-USB charger is a handy port that allows you to
conveniently charge your NiMH battery. Use certified adaptor(5V,
≥1A). Do not attempt to charge alkaline batteries.
1. Make sure your radio is turned OFF.
2. Plug the micro-USB cable into the micro-USB charging port on
DISPLAY SCREEN GUIDE
Numbers of Channel
Call Tone
Numbers for Codes
Dual Watch
Scan
VOX
Batt ery Meter
Status
(Transmit/Receive)
Volume Mut e
Lock
Weather Alert
Remove the
battery cover.
screws
When you press PTT buttons for more than 60 seconds, radio will stop
transmitting. This is to prevent accidental transmission.
To communicate, all radios in your group must be set to the same
channel and sub code.
1. To talk, press and hold the PTT button. When transmitting, the
icon is shown. Release the PTT button when you are finished
talking. Do not use the radios closer than five feet apart.
2. When receiving, the icon is shown.
Monitor Button
PTT Timeout Timer
1. Press and hold button for 3 seconds to enter monitor mode and
listen for weak signals on the current channel.
Mode But ton
RECEIVING AND TRANSMITTING
FEATURES
2. Press or button to change t he channel number.
.
Setting the Channel 2. Press or button to select code number. Press the
PTT button to exit menu .
.
Setting and Transmitting Call Tones
1. Press button until call tone 'CA' appears. The current call
tone setting flash.
1. Press the button until the code number starts to flash.
Press the PTT button to exit menu
Press the
PTT button to exit menu
Setting the Sub Codes
1. Press the button until the channel number starts to flash.
2. Press or button to change and listen to the call tone.
Voice Operated Transmission (VOX)
L3=High Sensitivity
L2=Medium Sensitivity
L1=Low Sensitivity
L0=Turn Off VOX function
exit menu. The screen will alternate between Home Channel
and Dual Watch Channel.To end Dual Watch mode, re-enter
Dual Watch menu to select the OFF setting. If you set the
same channel and code as current channel, Dual Watch does
not work.
2. Press or to select channels.
Dual Channel Monitor
Press the PTT button to
With this feature enabled, you can scan current channel and
another channel alternately.
1. Press button until '2CH' appears on the display. The current
setting (OF, 1-22) will flash.
Press the
PTT button to exit menu.
1. To activate VOX, press button until 'VOX' appears on the
display. The current setting (0, 1-3) will flash.
2. Press or button to select the sensitivity level.
Press and hold the button while turning the radio ON to switch the
keypad tone ON/OFF.
Press and hold the button while turning the radio ON to turn the
Roger Beep ON. Repeat the step to turn Roger Beep OFF.
2. To unlock t he radio, press and hold but t on unt il key lock
indicator icon on display disappear.
Keypad Tones
Scanning Channels
To Start Scanning:
1. Briefly press the button to start scanning. SCAN icon will
appear in the display. The device will stop scrolling and
receiving when matched channel and sub codes detected.
2. After the end of transmission, press the PTT button within 5
seconds to respond. The device will resume scanning after end
of any received activity.
3. If you press PTT button when the device is scrolling, the
transmission will be on the 'home channel'.
4. Press button to exit scanning feature.
Roger Tone
Keypad Lock
1. To lock t he radio, press and hold but t on unt il t he key lock
indicator icon on display appear.
Your radio receives weather frequencies:
Entering Weather Mode
press and hold button for 3 seconds to enter weather mode.
Setting the Weather Channel
3. Press the PTT button to set and exit menu.
2. Press or button to select the appropriate channel.
1. In weather mode, press the button until weather channel
number flashes.
WEATHER RECEIVE
Setting the Weather Alert
Your radio can be set to respond to NOAA Weather Radio
emergency messages.
2. Press or button to select On/Off.
1. In weather mode press the button twice until icon
displays.
3. Press the PTT button or button to exit the weather menu set up.
WEATHER CHANNELS & FREQUENCIES
Weather
Channel (MHz)
Frequency Weather
Channel
Frequency
(MHz)
WX1 162.550 WX7 162.525
WX2 162.400 WX8 161.650
WX3 162.475 WX9 161.775
WX4 162.425 WX10 161.750
WX5 162.450 WX11 162.000
WX6 162.500
SAFETY & GENERAL INFORMATION
FCC Warning
Any Changes or modifications not expressly approved by
the party responsible for compliance could void the user's
authority to operate the equipment.
This device complies with part 15 of the FCC Rules.
Operation is subject to the following two conditions: (1) This
device may not cause harmful interference, and (2) this
device must accept any interference received, including
interference that may cause undesired operation.
Note: This equipment has been tested and found to comply with
the limits for a Class B digital device, pursuant to part 15 of the
FCC Rules. These limits are designed to provide reasonable
protection against harmful interference in a residential
installation. This equipment generates, uses and can radiate
radio frequency energy and, if not installed and used in
accordance with the instructions, may cause harmful
interference to radio communications. However, there is no
guarantee that interference will not occur in a particular
installation. If this equipment does cause harmful interference to
radio or television reception, which can be determined by turning
the equipment off and on, the user is encouraged to try to correct
the interference by one or more of the following measures:
— Reorient or relocate the receiving antenna.
— Increase the separation between the equipment and receiver.
— Connect the equipment into an outlet on a circuit different
from that to which the receiver is connected.
— Consult the dealer or an experienced radio/TV technician for help.
Safety Information for Radios
Your wireless handheld portable transceiver contains a low
power transmitter. When the talk button is pushed, it sends out
radio frequency (RF) signals. The device is authorized to
operate at a duty factor not to exceed 50%. In August 1996,
the Federal Communications Commissions (FCC) adopted RF
exposure guidelines with safety levels for handheld wireless
devices.
Important
FCC RF Exposure Requirements: For body-worn operation,
this radio has been tested and meets the FCC RF exposure
guidelines when used with accessories supplied or designated
for this product. Use of other accessories may not ensure
compliance with FCC RF exposure guidelines. Use only the
supplied antenna. Unauthorized antennas, modifications or
attachments could damage the transmitter and may violate
FCC regulations.
Normal Position
Hold the transmitter approximately 25 mm from your face and
speak in a normal voice, with the antenna pointed up and
away.
ISEDC Warning
This product meets the applicable Industry Canada technical
specifications. / Le présent matériel est conforme aux
specifications techniques applicables d’Industrie Canada.
This device complies with ISEDC license-exempt RSS
standard (s). Operation is subject to the following two
conditions:(1) this device may not cause interference, and (2)
this device must accept any interference, including interference
that may cause undesired operation of the device.
Le présent appareil est conforme aux CNR d'ISEDC
applicables aux appareils radio exempts de licence.
L'exploitation est autorisée aux deux conditions suivantes:
(1) l'appareil ne doit pas produire de brouillage, et
(2) l'utilisateur de l'appareil doit accepter tout brouillage
radioélectrique subi, même si le brouillage est susceptible d'en
compromettre le fonctionnement.
ISEDC Radiation Exposure Statement
For body worn operation, this model device has been tested and
meets the FCC/ISED RF exposure guidelines when used with
an accessory designated for this product or when used with an
accessory that Contains no metal and that positions of the face
up minimum distance is 25 mm.
Any Changes or modifications not expressly approved by the
party responsible for compliance could void the user’s authority
to operate the equipment.
Pour le corps, ce modèle d’appareil a été testé et adapté à la RF
renforcée Lignes directrices relatives à l’exposition lorsqu’elles
sont utilisées avec un accessoire pour ce produit ou lorsqu’elles
sont utilisées avec celui-ci Un acces-soire ne contenant pas de
métal et dont la distance minimale de la face est de 25 mm.
Tout changement ou modiÿcation non expressément approuvé
par la partie responsable de la conformité l'équipement.
Your wireless handheld portable transceiver contains a low
power transmitter. When the talk button is pushed, it sends out
radio frequency (RF) signals. The device is authorized to
operate at a duty factor not to exceed 50%.
Votre émetteur-récepteur portable sans fil contient un émetteur
de faible puissance. Lorsque le bouton de conversation est
enfoncé, il envoie des signaux de radiofréquence (RF).
L'appareil est autorisé à fonctionner avec un facteur d'utilisation
ne dépassant pas 50%.
7
8
9
10
Lock / Menu
Monitor / Scan
Microphone
Speaker
Micro-USB
Charging Port /
Accessory Port
7
8
9
10
11
11
1
2
3
4
5
Push-to-Talk
Power On / Off
Call Tone
Lamp On / Off
Weather Switch
Lamp
SOS
SOS Lamp
1
2
3
4
5
6
6
Note:
- Remove the battery from radio for storage purposes. Batteries
may corrode over time and cause permanent damage to your
devices.
- Do not mix and use old/new/alkaline/NiMH batteries.
- Charge the supplied NiMH batteries once every 3 months when
not in use.
Turning your Radio On and Off
2. The display screen then shows the current channel, code and
all features that are enabled.
1. Press to increase the volume. Press to decrease the volume.
2. When the volume reached level 0 the mute icon appears
permanently on screen.
1. Press and hold on the button to turn your radio ON/OFF.
Setting the Volume
your radio. Connect the other end of the micro- USB charger
to wall power outlet.
3. The battery meter on LCD will move to indicate the battery is
charging.
3. Repeat the step to unlock the device.
Repeat the step to disable the weather alert.
Notes:
Automatic Power Saving
Press the button to turn ON/OFF the lamp.
LED Lamp
This feature is enabled by default to enhance battery life.
Emergency SOS Mode
User can use this feature to emit SOS signal. To enter emergency
SOS mode:
1. Press and hold the SOS button for 3 seconds. The RED LED
light will be activated.
2. Press the button again to deactivate.
Water Activated LED
Once the devices are dropped into water, white LED will be
activated automatically to ease user to locate the devices in dark
environment. After retrieve the devices, press any button to
deactivate except button. button will overwrite and
activate LAMP feature.
CH Frequency
(MHz)
Max
Power
Out put (MHz)
Frequency Max
Power
Out put
1 462.5625 2W 12 467.6625 0.5W
2 462.5875 2W 13 467.6875 0.5W
3 462.6125 2W 14 467.7125 0.5W
4 462.6375 2W 15 462.5500 2W
5 462.6625 2W 16 462.5750 2W
6 462.6875 2W 17 462.6000 2W
7 462.7125 2W 18 462.6250 2W
8 467.5625 0.5W 19 462.6500 2W
9 467.5875 0.5W 20 462.6750 2W
10 467.6125 0.5W 21 462.7000 2W
11 467.6375 0.5W 22 462.7250 2W
CH
Set t ing High Low Power
1. Press button unt il 'Pr' appears on the display.
2. Press or button to select HI or LO. (HI- High Power, LO-
Low Power)
3. Press t he PTT button to exit menu.
Channels and Frequences
If the device stops on an unintended/undesired transmission,
press or button to resume scan OR temporarily remove
that channel from the scan list by pressing and holding or
for 3 seconds. Press to exit and re-enter scan mode
to restore removed channels to the scan list.


