Page is loading ...

Manufacturer reserves the right to discontinue, or change at any time, specifications or designs without notice and without incurring obligations.
Catalog No. 536-220 Printed in U.S.A. Form 62M-1SI Pg 1 1-06 Replaces: New
Book 1 4
Tab 10a 12a
Installation, Start-Up and
Service Instructions
CONTENTS
Page
SAFETY CONSIDERATIONS
.......................1
INTRODUCTION...................................1
INSTALLATION ................................ 1-58
Step 1 — Inspection...............................1
Step 2 — Install Roof Curb ........................1
• STAND-ALONE APPLICATIONS
• COUPLED APPLICATIONS
Step 3 — Rigging and Handling .................45
• MOUNTING THE UNIT INDOORS
Step 4 — Installing ERV Transitions...............47
• ERV UNIT COUPLED WITH A 3 TO 12
1
/
2
TON
HVAC UNIT
Step 5 — Make Electrical Connections ............47
• POWER SUPPLY
• ELECTRICAL CONNECTIONS
START-UP .................................... 59-75
Unit Preparation .................................59
Internal Wiring ..................................59
Rain Hoods .....................................59
Energy Recovery Wheel .........................59
•DRIVEBELT
•AIRSEALS
Blower Rotation .................................59
Airflow Settings and Adjustments...............59
• FACTORY SETTING
• CURVE SELECTION
• ADJUST THE ERV BLOWER SPEED
• MEASURE MOTOR VOLTAGE, AMPERAGE
AND FAN RPM
• BELT MAINTENANCE
Variable Air Volume Option......................74
Operating Sequence ............................74
• OCCUPIED MODE
• UNOCCUPIED MODE
SERVICE ..................................... 75-78
Removing Wheel Segments for Cleaning
(62M170-950 Units)............................75
Removing and Installing Non-Segmented
Wheel for Cleaning (62M040 Units)............75
Removing and Installing Non-Segmented
Wheel for Cleaning (62M075,120 Units) .......76
Installing Wheel Segments (62M170-950 Units)...76
Wheel Drive Motor and Pulley Replacement .....77
Belt Replacement ...............................77
MAINTENANCE ...............................78,79
START UP CHECKLIST ........................CL-1
SAFETY CONSIDERATIONS
Installation and servicing of air-conditioning equipment can
be hazardous due to system pressure and electrical compo-
nents. Only trained and qualified service personnel should
install, repair, or service air-conditioning equipment.
Untrained personnel can perform the basic maintenance
functions of cleaning coils and filters and replacing filters. All
other operations should be performed by trained service
personnel. When working on air-conditioning equipment,
observe precautions in the literature, tags and labels attached to
the unit, and other safety precautions that may apply.
Follow all safety codes. Wear safety glasses and work
gloves. These instructions describe how to install, start up, and
service 62M energy recovery ventilator units.
INTRODUCTION
The 62M energy recovery ventilator (ERV) units recover
energy from building exhaust air and pre-condition ventilation
air. All ERV units are available in either vertical discharge
(through the bottom) or horizontal discharge configuration.
The 62MB and MC vertical discharge units are used when a
stand-alone ERV unit is required.
The 62MD and ME horizontal discharge unit can be used as
a stand-alone unit, or can also be coupled with a Carrier rooftop
unit.
INSTALLATION
Step 1 — Inspection —
Inspect the unit; file a claim
with the shipping company if the unit is damaged. Check the
packing list to ensure that the correct items have been received
and notify your Carrier representative of any discrepancy.
Step 2 — Install Roof Curb
STAND-ALONE APPLICATIONS — The ERV unit can be
installed without being coupled with a Carrier rooftop unit. The
ERV units can be installed in one of three stand-alone applica-
tions: down discharge, horizontal discharge, or a combination
of both down discharge and horizontal discharge.
When installing a stand-alone ERV unit refer to Fig. 1-45
and, complete the following:
Locate the Roof Curb
— Prior to locating the roof curb con-
sider the structural support required for the rooftop system and,
the duct drop location in relation to the joists. Allow sufficient
space for service, clearance, and locations of vents or other
sources of air.
Electrical shock can cause personal injury and death. Shut
off all power to this equipment during installation. There
may be more than one disconnect switch. Tag all discon-
nect locations to alert others not to restore power until work
is completed.
62MB,MC,MD,ME040-950
Energy Recovery
Ventilators

2
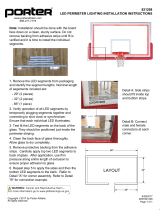
Assemble the Roof Curb
— Connect the curb side and the
curb end. See Fig. 1. Insert the tabs on the curb end into the
slots on the curb sides. Press firmly until the pieces lock into
place. It may be necessary to exert additional force to the top of
the curb to lock the pieces in place. Ensure the curb pieces are
locked together prior to proceeding.
Repeat for all corners of the roof curb.
Prepare Roof Curb Location
— Cut a hole in the roof for duct
openings. See Fig. 2-5 for duct opening dimensions. Frame the
opening to provide adequate structural support.
Install Deck Pans and Duct Supports
— The roof curb may
have a duct support and deck pans, depending on the model
and application. Determine which end of the roof curb will be
the duct end.
Install the deck pans on the roof curb with the insulation
side facing up toward the ERV base. Install the duct support
between the supply and return openings.
Set the Roof Curb
— Fit the roof curb assembly by measuring
across the corners of the curb to ensure a square fit. Set the roof
curb over the roof opening. Level the curb by placing shims
under the bottom flange of the curb. Secure the curb in place by
welding or fastening the curb to the roof.
Install Ductwork
— Ductwork will be installed in the roof
curb for vertical discharge and stand-alone applications. The
duct will hang from the top of the curb. See Fig. 45 for stand-
alone application airflow.
NOTE: Ductwork must be installed before the ERV unit is set
in place.
Refer to Fig. 2-5 to determine the duct size required.
Provide field manufactured duct and place into the supply and
return openings in the curb.
Install Gaskets
— The ERV roof curbs come with a gasketing
package to provide a seal between the ERV unit and the top
perimeter of the roof curb. Install the gasket around the top
perimeter of the curb and around the supply and return opening.
NOTE: Some stand-alone curbs will not have duct openings).
Gasket strips must fit tightly together, leaving no gaps for
leakage.
Install Roofing Materials
— Insulate and add a cant strip to
the roof curb. Follow suggested and acceptable roofing practices
for applying roofing materials. The roofing material should
extend up to the wood nailer and be secured under the counter-
flashing. Follow all local, national, and industry roofing
standards. Refer to Fig. 6 for roofing recommendations.
COUPLED APPLICATIONS — The ERV unit can be in-
stalled directly coupled to a Carrier rooftop unit. The connec-
tion between the ERV and HVAC (Heating, Ventilation, and
Air Conditioning) unit is made with the use of a transition. In a
coupled rooftop application there is a separate roof curb for the
HVAC curb and a separate roof curb for the ERV unit. See
Fig. 4 and 5 for roof curb dimensions.
Locate the Roof Curb
— Prior to locating the roof curb con-
sider the structural support required for the rooftop system and,
the duct drop location in relation to the joists. Allow sufficient
space for service, clearance, and locations of vents or other
sources of air. Refer to the rooftop installation instructions for
more information regarding location considerations.
Assemble the Roof Curb
— Connect the curb side and the
curb end. Insert the tabs on the curb end into the slots on the
curb sides. Press firmly until the pieces lock in to place. It may
be necessary to exert additional force to the top of the curb to
lock the pieces in place. Ensure the curb pieces are locked to-
gether prior to proceeding.
Repeat for other corners of the roof curb.
NOTE: If lifting or moving the roof curb assembly hammer
the tabs over 90 degrees.
Install Deck Pans and Duct Supports
— The roof curb may
have a duct support and deck pans, depending on the model
and application. Refer to Fig. 2-5. Determine which end of the
roof curb will be the duct end.
Install the deck pans on the roof curb with the insulation
side facing up toward the ERV base. Install the duct support
between the supply and return openings.
Install Locator Pieces
— Some ERV roof curbs (62MA-CRB-
14MC and 62MB-CRB-14MC) will include locator pieces,
which are to be attached to the ERV roof curb section. The
locator pieces will help the installer ensure that the ERV and
HVAC unit roof curbs are positioned properly. Attach the
2 side locator pieces to the ERV roof curb. Install the cover
panel over the 2 sides and fasten in place.
Cover roof opening if installation of the ERV unit will not
be immediate. Failure to cover roof opening could result in
water damage and/or serious personal injury.
Cover the roof curb if installation of the ERV unit will not
be immediate. Failure to cover the roof curb could result in
water damage and/or serious personal injury.
IMPORTANT: Gasket installation is critical for water
integrity. Improperly installed gaskets can result in air
or water leaks, leading to poor unit performance.
END
SIDE
Fig. 1 — Assembling the Roof Curb

3
Set the Roof Curb
— Fit the roof curb assembly by measuring
across the corners of the curb to ensure a square fit. Set the roof
curb over the roof opening. Level the curb by placing shims
under the bottom flange of the curb. Secure the curb in place by
welding or fastening the curb to the roof.
Install Ductwork
— Ductwork will be installed in the roof
curb for vertical, coupled applications. The duct will hang from
the top of the curb.
NOTE: Ductwork must be installed before the rooftop unit is
set in place.
NOTE: Ductwork must be installed before the ERV unit is set
in place.
Refer to Fig. 2 and 3 to determine the duct size required.
Provide field manufactured duct and place into the supply and
return openings in the curb.
Install Gaskets
— The ERV roof curbs come with a gasketing
package to provide a seal between the ERV unit and the top
perimeter of the roof curb. Install the gasket around the top
perimeter of the curb and around the supply and return
opening. (Some stand-alone curbs will not have duct open-
ings.) Gasket strips must fit tightly together, leaving no gaps for
leakage.
Install Roofing Materials
— Insulate and add a cant strip to
the roof curb. Follow suggested and acceptable roofing proce-
dures for applying roofing materials. The roofing material
should extend up to the wood nailer and be secured under the
counter flashing. Follow all local, national, and industry roof-
ing standards. Refer to Fig. 5 for roofing recommendations.
IMPORTANT: The ERV roof curb must be set in
precisely the correct location relative to the rooftop
roof curb for the transitions to connect properly. See
Fig. 7-44 for location dimensions.
IMPORTANT: Gasket installation is critical for water
integrity. Improperly installed gaskets can result in air
or water leaks, leading to poor unit performance.
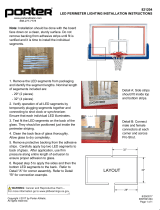
10.81
11.00
11.50
RETURN
SUPPLY
14.00
1.00
TYP. 4X
3.00
TYP. 4X
24.09
22.94
NOTES:
1. All dimensions are in inches.
2. Roof curb shipped unassembled.
Fig. 2 — Roof Curb — 62M040 for Stand-Alone Applications

4
C
D
G
E
F
B
A
R/A
S/A
Typical Insulated deck pans.
(Insulation face up) *
H
62M UNIT SIZE
CURB
PART N O.
DIMENSIONS (in.)
ABCDEFGH
Duct Sizes
Return Supply
075,120 62M-A-CRB-14S 27 30.5 14 14 11.3 1 14.7 1.5 13.75 x 14.38 13.75 x 11
170-285 62M-B-CRB-14S 45.5 49.63 14 17.5 19.5 2 24 1.75 17 x 23.5 17 x 19
330-640 62M-C-CRB-14S 55.41 60.34 14 24.84 23.41 2 30 — 24.5 x 29.5 24.5 x 23
750,950 62M-D-CRB-14S 86.25 95.7 14 32.5 42.13 2 42.13 — 32 x 41.75 32 x 41.75
LEGEND
NOTE: Roof curb shipped unassembled.
R/A — Return Air
S/A — Supply Air
*IMPORTANT: Insulation on deck pans must face up.
Fig. 3 — Roof Curb — 62M075-950 for Vertical Stand-Alone Applications
ERV Curb
C
B
A
D
*62M075,120 curb is shipped with deckpans insulation and duct supports which may
be discarded.
†62M170-285 curb is shipped with deck pans and insulation.
62M UNIT SIZE
CURB
PART N O.
DIMENSIONS (in.)
A BCD
075,120* 62M-A-CRB-14S 27 30.5 14 1.5
170-285† 62M-B-CRB-14S 49.63 14 45.5 1.75
330-640 62M-C-CRB-14M 60.34 14 55.41 1.75
750,950 62M-D-CRB-14M 95.7 14 86.25 1.75
LEGEND
NOTE: Roof curb shipped unassembled.
ERV — Energy Recovery Ventilator
Fig. 4 — Roof Curb — 62M075-950 for Horizontal Stand-Alone Applications
or Units Coupled with Rooftop Units 15 Tons and Above

5
ERV Curb
Locator pieces to connect
ERV curb to rooftop unit curb
C
B
A
D
E
Must be Watertight
NAIL*
FLASHING*
ROOF FELT*
ROOF*
ROOF DECK*
CANT STRIP*
RIGID
INSULATION*
GASKETING
ROOF CURB
62M UNIT SIZE
CURB
PART N O.
DIMENSIONS (in.)
ABC D E
075,120 62M-A-CRB-14MC 30.5 14 27 1.5 19.81
170-285 62M-B-CRB-14MC 49.63 14 45.5 1.75 37.81
LEGEND
NOTE: Roof curb shipped unassembled.
ERV — Energy Recovery Ventilator
Fig. 5 — Roof Curb — 62M075-285 Units 3 to 12
1
/
2
Ton Rooftop Units
*Field provided.
Fig. 6 — Roofing Materials — Recommendation

6
Fig. 7 — 62MB,MC040 Indoor Unit Dimensions
3.95
11.09
8.43
13.26
16.02
2.67
12.45
3.48
7.69
29.88
27.19
25.12
29.75
31.24
29.75
EXHAUST
AIR
OUTSIDE
AIR
OPTIONAL
(INDOOR) PREHEATER
LEFT SIDE FRONT SIDE
POWER
ENTRY
10.75
12.75
12.45
19.75
2.33
.75
3.52
7.53
29.98
SUPPLY
AIR
RETURN
AIR*
HORIZONTAL
UNITS ONLY*
REAR SIDE
45.75
SUPPLY AIR
(OPTIONAL)
4.83
7.13
3.91
11.15
10.50
3.95
5.34
TOP SIDE
RETURN AIR
(OPTIONAL)
16.00
OPTIONAL
INDOOR PREHEATER
ERV
WHEEL
19.25
22.90
1
0
27.19
25.12
RIGHT SIDE
1
3.
2
5
16
A
A
VIEW A-A
REQUIRED SERVICE
CLEARANCES
*30 in. service clearance required
on either Left or Right side for
ERV wheel removal.
NOTE: All dimensions are in
inches.
Front 16 in.
Rear 0in.
Left* 18 in.
Right* 18 in.

7
OUTSIDE AIR HOOD
12.29
5.35
EXHAUST AIR HOOD
3.55
TOP OF CURB
13.72
RIGHT SIDE
OUTSIDE AIR HOOD
EXHAUST AIR HOOD
5.31
13.5
16.00
LEFT SIDE
10.75
12.75
12.45
19.75
2.33
.75
3.52
7.53
29.98
SUPPLY
AIR
RETURN
AIR*
HORIZONTAL
UNITS ONLY*
3.95
11.09
8.43
13.26
16.02
2.67
12.45
3.48
7.69
29.88
EXHAUST
AIR
OUTSIDE
AIR
POWER
ENTRY
45.75
13.38
11.00
8.97
12.96
SUPPLY AIR
(OPTIONAL)
4.83
7.13
3.91
11.15
10.50
3.95
5.34
OUTSIDE AIR HOOD AND
OPTIONAL PREHEATER
RETURN AIR
(OPTIONAL)
A
A
VIEW A-A
ERV
WHEEL
16.00
10
REAR SIDE
FRONT SIDE
TOP SIDE
29.75
29.75
EXHAUST AIR HOOD
Fig. 8 — 62MD,ME040 Outdoor Unit Dimensions
REQUIRED SERVICE
CLEARANCES
*30 in. service clearance required
on either Left or Right side for
ERV wheel removal.
NOTE: All dimensions are in
inches.
Front 27.5 in.
Rear 10 in.
Left* 20 in.
Right* 20 in.

8
11.00
18.63
14.50
18.63
5.58
5.58
5.53
3.34
SUPPLY
RETURN
REAR SIDE
6.13
12.90
21.10
RIGHT SIDE
10.50
11.00
10.66
2.10
21.10
3.63
15.40
EXHAUST AIR
LEFT SIDE
15.25
23.00
8.63
3.88
OUTSIDE AIR
FRONT SIDE
6.97
POWER ENTRY / OPTIONAL
DISCONNECT LOCATION
10.32
(OPTIONAL)
AIRFLOW TEST
PORTS
OPTIONAL
PREHEATER
(INDOOR)
ACCESS DOOR
18.88
VIEW A-A
OPTIONAL RETURN AIR
(BOTTOM RETURN ONLY)
SUPPLY AIR
(BOTTOM SUPPLY ONLY)
OPTIONAL PREHEATER
10.93
6.18
12.98
3.46
9.25
6.65
6.60
10.39
19.04
A
A
TOP SIDE
EXHAUST AIR OUTLET
37.14
42.6
39.03
PREHEATER CABINET
Fig. 9 — 62MB,MC075,120 Indoor Unit Dimensions
REQUIRED SERVICE
CLEARANCES
*39 in. service clearance required
for ERV wheel removal.
Front 31 in.
Rear 0in.
Left 24 in.
Right* 39 in.
NOTE: All dimensions are in inches.

9
Fig. 10 — 62MD,ME075,120 Outdoor Unit Dimensions
39.8
37.14
43.10
18.74
6.39
35.711
39.03
9.60
9.19
10.25
11.06
6.43
14.45
18.55
5.62
3.10
2.86
10.32
6.97
SUPPLY
RETURN
REAR SIDE
POWER ENTRY/
OPTIONAL DISCONNECT
*NOTE*
DISCONNECT
LOCATION IS APPROXIMATE
FRONT SIDE
13.24
9.59
42.60
A
4.11
AIRFLOW
TEST PORTS
(OPTIONAL)
TOP OF CURB
ACCESS DOOR
DETAIL A
SEE DETAIL
A
LEFT SIDE
ACCESS DOOR
RIGHT SIDE
OPTIONAL RETURN AIR
(BOTTOM RETURN ONLY)
SUPPLY AIR
(BOTTOM SUPPLY ONLY)
OPTIONAL PREHEATER
OUTDOOR AIR HOOD
10.93
6.18
12.98
3.46
9.25
6.65
6.60
10.39
18.69
.87
19.04
ERV WHEEL
AA
TOP SIDE
9.60
2.87
10.35
EXHAUST AIR HOOD
VIEW A-A
REQUIRED SERVICE
CLEARANCES
*39 in. service clearance required
for ERV wheel removal.
Front 31 in.
Rear 0in.
Left 24 in.
Right* 39 in.
NOTE: All dimensions are in inches.

10
15.50
20.00
9.62
6.92
6.48
23.00
25.00
8.20
3.16
REAR SIDE
26.60
10.76
26.60
21.84
49.55
RIGHT SIDE
36.00
22.00
11.18
26.60
57.91
FRONT SIDE
14.57
12.50
43.38
14.86
62.03
LEFT SIDE
SUPPLY
AIR
AIRFLOW TEST
PORTS (OPTIONAL)
ACCESS DOOR
OUTSIDE AIR
EXHAUST AIR
ACCESS DOOR
POWER ENTRY
(OPTIONAL DISCONNECT)
EXHAUST AIR OUTLET
RETURN AIR OPENING
SUPPLY AIR OPENING
TOP SIDE
8.21
15.28
6.10
22.33
15.63
8.20
8.68
13.75
RETURN
AIR
AA
ERV WHEEL
VIEW A-A
OPTIONAL PREHEATER
PREHEATER CABINET
Fig. 11 — 62MB,MC170-285 Indoor Unit Dimensions
REQUIRED SERVICE
CLEARANCES
*55 in. service clearance required for
ERV wheel removal.
Front 39 in.
Rear 0in.
Left 32 in.
Right* 55 in.
NOTE: All dimensions are in inches.

11
20.78
9.16
OUTSIDE AIR HOOD
RIGHT SIDE
6.94
EXHAUST AIR HOOD
FRONT SIDE
A
4.61
TOP OF CURB
15.50
20.00
9.62
6.92
6.48
23.00
25.00
8.20
3.16
REAR SIDE
SUPPLY
AIR
RETURN
AIR
EXHAUST AIR HOOD
RETURN AIR OPENING
SUPPLY AIR OPENING
OUTSIDE AIR HOOD
TOP SIDE
8.21
16.19
15.28
6.10
22.33
15.63
8.20
8.68
13.75
26.45
.64
OPTIONAL PREHEATER
AA
ERV WHEEL
14.57
12.50
43.38
14.86
62.03
LEFT SIDE
EXHAUST AIR
POWER ENTRY
(OPTIONAL DISCONNECT)
14.84
15.96
OUTSIDE AIR HOOD
VIEW A-A
49.55
57.91
Fig. 12 — 62MD,ME170-285 Outdoor Unit Dimensions
REQUIRED SERVICE
CLEARANCES
*55 in. service clearance required for
ERV wheel removal.
Front 39 in.
Rear 0in.
Left 32 in.
Right* 55 in.
NOTE: All dimensions are in inches.

12
29.00
2.78
9.03
54.00
27.00
5.11
67.39
FRONT SIDE
20.00
17.00
49.1
72.63
LEFT SIDE
OUTSIDE
AIR
ACCESS
DOOR
POWER ENTRY
(OPTIONAL DISCONNECT)
EXHAUST
AIR
OPTIONAL AIRFLOW
TEST PORTS
29.00
14.63
65.21
RIGHT SIDE
ACCESS DOOR
37.50
19.00
2.87
28.50
37.50
6.11
7.66
6.11
6.61
REAR SIDE
SUPPLY
AIR
RETURN
AIR
TOP SIDE
EXHAUST AIR OUTLET
21.11
RETURN AIR OPENING
(BOTTOM RETURN ONLY)
6.93
25.76
18.62
8.01
15.94
6.88
SUPPLY AIR OPENING
(BOTTOM SUPPLY ONLY)
AA
VIEW A-A
OPTIONAL PREHEATER
PREHEATER CABINET
Fig. 13 — 62MB,MC330-640 Indoor Unit Dimensions
REQUIRED SERVICE
CLEARANCES
*62 in. service clearance required
for ERV wheel removal.
Front 50 in.
Rear 0in.
Left 40 in.
Right* 62 in.
NOTE: All dimensions are in inches.

13
26.41
8.68
OUTSIDE AIR HOOD
RIGHT SIDE
18.81
17.96
9.22
EXHAUST AIR HOOD
FRONT SIDE
A
4.21
TOP SIDE
OUTSIDE AIR HOOD
OPTIONAL PREHEATER
29.44
7.63
19.69
EXHAUST AIR HOOD
21.11
RETURN AIR OPENING
(BOTTOM RETURN ONLY)
6.93
25.76
18.62
8.01
15.94
6.88
SUPPLY AIR OPENING
(BOTTOM SUPPLY ONLY)
A A
20.00
17.00
49.1
72.63
LEFT SIDE
POWER ENTRY
(OPTIONAL DISCONNECT)
EXHAUST
AIR
OPTIONAL AIRFLOW
TEST PORTS
VIEW A-A
TOP OF
CURB
OUTSIDE AIR HOOD
12.52
37.50
19.00
2.87
28.50
37.50
6.11
7.66
6.11
6.61
REAR SIDE
SUPPLY
AIR
RETURN
AIR
65.21
67.39
Fig. 14 — 62MD,ME330-640 Outdoor Unit Dimensions
REQUIRED SERVICE
CLEARANCES
*62 in. service clearance required
for ERV wheel removal.
Front 50 in.
Rear 0in.
Left 40 in.
Right* 62 in.
NOTE: All dimensions are in inches.

14
34.10
2.37
35.08
64.25
9.52
11.31
12.77
98.37
FRONT SIDE
23.25
20.25
9.01
48.98
107.75
LEFT SIDE
34.10
21.86
77.41
RIGHT SIDE
49.01
35.75
28.00
16.19
7.69
7.69
13.11
REAR SIDE
RETURN AIR
SUPPLY
AIR
POWER ENTRY/
OPTIONAL DISCONNECT
LOCATION
AIRFLOW TEST
PORTS (OPTIONAL)
ACCESS DOOR
ACCESS DOOR
EXHAUST AIR OUTLET
RETURN AIR OPENING
SUPPLY AIR OPENING
31.67
6.43
34.73
21.88
17.07
6.42
18.75
TOP SIDE
11.02
VIEW A-A
AA
OUTSIDE AIR
EXHAUST AIR
40.12
34 7/8
40
OPTIONAL PREHEATER
PREHEATER CABINET
Fig. 15 — 62MB,MC750,950 Indoor Unit Dimensions
REQUIRED SERVICE
CLEARANCES
*72 in. service clearance required
for ERV wheel removal.
Front 65 in.
Rear 0in.
Left 50 in.
Right* 72 in.
NOTE: All dimensions are in inches.

15
33.71
8.83
OUTSIDE AIR HOOD
B
21.58
2.89
23.81
EXHUAST AIR HOOD
4.40
17.16
23.22
EXHAUST AIR HOOD
RETURN AIR OPENING
SUPPLY AIR OPENING
31.67
6.43
34.73
21.88
17.07
6.42
18.75
OUTSIDE AIR HOOD
TOP SIDE
OPTIONAL PREHEATER
40.12
11.02
A A
34 7/8
23.25
20.25
9.01
48.98
107.75
LEFT SIDE
POWER ENTRY/
OPTIONAL DISCONNECT
LOCATION
AIRFLOW TEST
PORTS (OPTIONAL)
EXHAUST AIR
OUTSIDE AIR HOOD
RIGHT SIDE
FRONT SIDE
49.01
35.75
28.00
16.19
7.69
7.69
13.11
REAR SIDE
RETURN AIR
SUPPLY
AIR
VIEW A-A
77.41
98.37
40
Fig. 16 — 62MD,ME750,950 Outdoor Unit Dimensions
REQUIRED SERVICE
CLEARANCES
*72 in. service clearance required
for ERV wheel removal.
Front 65 in.
Rear 0in.
Left 50 in.
Right* 72 in.
NOTE: All dimensions are in inches.

16
Outside air hood
with aluminum
water entrain-
ment filter.
Includes baro-
metric intake
damper.
Rooftop Unit
Filter access door
shipped with Rooftop
Unit
62M040 Unit
Accessory ERV
Equipment support
Standard Rooftop
Unit roof curb
3 to 6 Ton Rooftop Unit
Evaporation
Coil
Filters
Filter
ERV
wheel
Filter
Exhaust
hood
Outside
air hood
Supply
Blower
EXH
Rooftop Curb
Accessory ERV
Equipment support
35"
Side View A-A
AA
Rooftop
Unit
Curb
ERV
Unit
Support
67 3/8”
37”
3”
35”
Supply
Return
Accessory Transition
Panel covering
return chamber
Access door to
adjust balancing
damper
To 62M040 Unit
Balancing damper
Top View
ROOFTOP UNIT MODEL ROOFTOP SIZE TRANSITION P/N ROOFTOP ECONOMIZER ERV EQUIPMENT SUPPORT P/N
48/50HJ,TJ,TM 004-007 62M-AATR-HJ36-D 62MA-900---004 62MA-900---001
TRANSITION DETAIL
ROOF CURB LOCATION DETAIL
Fig. 17 — 62MD,ME040 Coupled with Carrier 48/50HJ,TJ,TM004-007 Vertical Discharge Rooftop Unit
LEGEND
ERV — Energy Recovery Ventilator

17
Accessory ERV
Equipment support
Outside air hood
with aluminum
water entrain-
ment filter.
Includes baro-
metric intake
damper.
Rooftop Unit
Filter access door
shipped with Rooftop
Unit
62M040 Unit
Standard Rooftop
Unit roof curb
3 to 6 Ton Rooftop Unit
Filter
ERV
wheel
Filter
Exhaust
hood
Outside
air hood
Supply
Blower
EXH
Rooftop Curb
Accessory ERV
Equipment support
AA
67 3/8”
37”
3”
35”
Supply
Return
To 62M040 Unit
Access door to
adjust balancing
damper
Accessory Transition
Panel covering
return chamber
Balancing damper
35"
Side View A-A
Rooftop
Unit
Curb
ERV
Unit
Support
Field-Supplied
Duct
ROOFTOP UNIT MODEL ROOFTOP SIZE TRANSITION P/N ROOFTOP ECONOMIZER ERV EQUIPMENT SUPPORT P/N
48/50HJ,TJ,TM 004-007 62M-AATR-HJ36-D 62MA-900---008 62MA-900---001
TRANSITION DETAIL
ROOF CURB LOCATION DETAIL
Fig. 18 — 62MD,ME040 Coupled with Carrier 48/50HJ,TJ,TM004-007 Horizontal Discharge Rooftop Unit
LEGEND
ERV — Energy Recovery Ventilator

18
Rooftop Unit
62M040 Unit
Accessory ERV
Equipment support
Accessory Transition
(Includes front panel)
Filter
ERV
wheel
Filter
Exhaust
hood
Outside air hood
Supply
Rooftop Curb
Accessory ERV
Equipment support
AA
Supply
2 Piece front
panel covers
return chamber
Access door to
adjust balancing
damper
Accessory Transition
Return
Rooftop Unit
80 5/16”
35”
44 11/16”
Return
Top Vi ew
To 62M040 Unit
35"
Side View A-A
Rooftop
Unit
Curb
ERV
Unit
Support
4 3/8”
ROOFTOP UNIT MODEL ROOFTOP SIZE TRANSITION P/N ERV EQUIPMENT SUPPORT P/N
48/50PG 03-07 62M-AATR-HJ36-D 62MA-900---001
TRANSITION DETAIL
ROOF CURB LOCATION DETAIL
Fig. 19 — 62MD,ME040 Coupled with Carrier 48/50PG03-07 Vertical Discharge Rooftop Unit
LEGEND
ERV — Energy Recovery Ventilator

19
Rooftop Unit
62M040 Unit
Accessory ERV
Equipment support
Accessory Transition
(Includes front panel)
Filter
ERV
wheel
Filter
Exhaust
hood
Outside air hood
Rooftop Curb
Accessory ERV
Equipment support
AA
2 Piece front
panel covers
return chamber
Access door to
adjust balancing
damper
To 62M040 Unit
Accessory Transition
Rooftop Unit
80 5/16”
35”
44 11/16”
Top View
35"
Side View A-A
Rooftop
Unit
Curb
ERV
Unit
Support
4 3/8”
ROOFTOP UNIT MODEL ROOFTOP SIZE TRANSITION P/N ERV EQUIPMENT SUPPORT P/N
48/50PG 03-07 62M-AATR-HJ36-D 62MA-900---001
TRANSITION DETAIL
ROOF CURB LOCATION DETAIL
LEGEND
ERV — Energy Recovery Ventilator
Fig. 20 — 62MD,ME040 Coupled with Carrier 48/50PG03-07 Horizontal Discharge Rooftop Unit

20
67 3/8"
37 3/16"
36"
3"
35
"
34 3/8"
Return
Air
Standard roof curb fo
r
3 to 6 ton rooftop unit
62MA-900---001
Equipment Support
10.4"
Equipment Support
Roof
14"
Standard Roof curb
for 3 to 6 ton roof top unit
"A-A" SIDE VIEW
TOP VIEW
A
A
62MA-900---001
Supply
Air
35
"
ROOF CURB LAYOUT
Fig. 21 — 62MD,ME040 Coupled with Carrier 48/50HJ,TJ,TM004-007 Rooftop Unit
/