Kenwood KDC-448U User manual
- Category
- Car media receivers
- Type
- User manual
This manual is also suitable for

Before reading this manual, click the button below to check the latest edition and the
modified pages.
IM327_Ref_K_en_00© 2010 Kenwood Corporation All Rights Reserved.
KDC-X895
KDC-BT848U
KDC-X595
KDC-448U
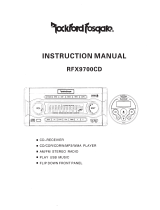
CD-RECEIVER
INSTRUCTION MANUAL
Take the time to read through this instruction manual.
Familiarity with installation and operation procedures will help you obtain the best performance from your new
CD-receiver.
For your records
Record the serial number, found on the back of the unit, in the spaces designated on the warranty card, and in the space
provided below. Refer to the model and serial numbers whenever you call upon your Kenwood dealer for information or
service on the product.
Model KDC-X895/ KDC-BT848U/ KDC-X595/ KDC-448U Serial number
US Residence Only
Register Online
Register your Kenwood product at www.Kenwoodusa.com
Check the latest edition

2
|
KDC-X895/ KDC-BT848U/ KDC-X595/ KDC-448U
Contents
Before use 4
Component names 6
Function setting 6
Function setting operation
Audio adjustments 7
Audio control
Audio preset Memory
Audio preset recall
iPod control operation 9
Music search
Alphabet search
Related search
Direct search
Skip search
Skip search ratio setting
Play mode
Registering a song in the playlist
Playing the playlist
Deleting a song from the playlist
Music disc/Audio file (CD or USB)
Operation 14
Music search
Skip search
Play mode
Direct music search
Basic operation of Disc changer (Optional)
Direct search in Disc changer (Optional)
Tuner Operation 18
Auto memory
Seek mode setting
Tuner setting
Direct access tuning
PTY (Program Type)
Program Type preset
Log memory 22
Log memory recall
Log memory item lock
Deleting a Log memory item
Log memory category setting
Tuner Log memory time setting
Display settings 26
Selecting display type
Selecting text display
Information display setting
Illumination color selection
Display & Illumination setting
General operation 30
Adjusting the Clock
Adjusting the Date
Dual clock display
Clock & Date display type setting
Auxiliary input display setting
Muting the audio upon reception of phone call
Initial setting
Demonstration mode Setting
Operation of hands-free phoning 36
Before use
Registering cell-phone
Receiving a call
Calling a number in the Phone book
Dialing a number
Calling a number in the call log
Speed dialing (Preset dial)
Registering to the Preset dial number list
During a call
Call waiting
Clearing the Disconnection message
Making a voice dialing call
Displays of phone number type (category)
Bluetooth audio operation 44
Before Use
Basic operation
Bluetooth setup 46
Registering Bluetooth device
Registering Special bluetooth device
Registering PIN Code
Downloading the Phone book
Selecting the Bluetooth device you wish to
connect
Deleting a registered Bluetooth device
Displaying the firmware version
Adding a voice dialing command
Setting a voice command for category
Bluetooth detail setting
SMS (Short Message Service) 53
Displaying the SMS
Downloading the SMS

English
|
3
HD Radio™ tuner control 54
Basic Operation
Station preset memory
Preset tuning
Auto memory
Seek mode setting
iTunes tagging
Direct access tuning
HD Radio setting
Satellite radio tuner (Optional accessory)
control 58
Basic operation
Category and Channel search
Channel preset memory
Preset tuning
Channel scan
Direct access tuning
Seek mode setting
Electronic serial number display
Basic operations of remote control 62
General control
In Tuner source
HD Radio source
In CD/Audio file source
In iPod source
In Satellite radio tuner source
Hands-free phone control
Appendix 64
Troubleshooting guide 66
Specifications 68

4
|
KDC-X895/ KDC-BT848U/ KDC-X595/ KDC-448U
Before use
Before using this unit for the first time
This unit is initially set on the Demonstration mode.
When using this unit for the first time, cancel the
Demonstration mode. Refer to <Exit Demonstration
Mode> (page 4) of Quick start guide.
2 WARNING
To prevent injury or fire, take the following
precautions:
• Stop the car before operating the unit.
• To prevent a short circuit, never put or leave any
metallic objects (such as coins or metal tools) inside
the unit.
¤
CAUTION
• Adjust the volume so that you can hear sounds
outside the car. Driving with the volume too high
may cause an accident.
• Wipe off the dirt on the panel with a dry silicon or
soft cloth.
Failure to observe this precaution may result in
damage to the monitor or unit.”
Cleaning the connector
Wipe off dirt on the connector of the unit and panel.
Use a cotton swab or cloth
Condensation
When the car is air-conditioned, moisture may collect
on the laser lens. This may cause disc read errors. In
this case, remove the disc and wait for the moisture
to evaporate.
Notes
• If you experience problems during installation,
consult your Kenwood dealer.
• When you purchase optional accessories, check with
your Kenwood dealer to make sure that they work
with your model and in your area.
• Characters that conform to ISO 8859-1 can be
displayed.
• The illustrations of the display and the panel
appearing in this manual are examples used to
explain more clearly how the controls are used.
Therefore, what appears on the display in the
illustrations may differ from what appears on the
display on the actual equipment, and some of the
illustrations on the display may be inapplicable.
About discs used with this unit
• This unit can only play the CDs with .
• The following discs cannot be used:
- Discs that are not round
- Discs with coloring on the recording surface or
discs that are dirty
- Recordable/Rewritable disc that has not been
finalized (For the finalization process, refer to
your disc writing software, and your disc recorder
instruction manual.)
- 8 cm (3 inch) disc (Attempt to insert using an
adapter can cause malfunction.)
Handling discs
• Do not touch the recording surface of the disc.
• Do not stick tape etc. on the disc, or use a disc with
tape stuck on it.
• Do not use any accessories for the disc.
• Do not use any solvents to clean discs. Use a dry
silicon or soft cloth.
• Clean from the center of the disc and move
outward.
• When removing discs from this unit, pull them out
horizontally.
• Remove the rims from the center hole and disc
edge before inserting a disc.
How to reset your unit
If the unit fails to operate properly, press the Reset
button. The unit returns to factory settings when the
Reset button is pressed.
Reset button

English
|
5

6
|
KDC-X895/ KDC-BT848U/ KDC-X595/ KDC-448U
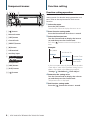
Function setting
Function setting operation
Preferences of this unit can be set in the Function
setting mode. For detailed setting procedure and
items, refer to the explanation for each source
function.
Select the source
Press the [SRC] button.
Switch to the source to display the items to set.
Enter Function setting mode
Press the Control knob for at least 1 second.
Select the Function item
Turn the Control knob to display the item to
set, and then press the Control knob.
Press the [ ] button to return to the previous
item.
Example:
Settings
Initial Settings
Clock&Date
DISP&ILLUMI
Play Mode
AUX Name Set
Clock Adjust
Date Mode
Summer Time
In this Instruction manual, the procedure to select
“Clock Adjust” item in the Function setting layer as
above is described as the following example:
“Settings” > “Clock&Date” > “Clock Adjust”.
Determine the setting value
Turn the Control knob to display the value to
set, and then press the Control knob.
The previous item is displayed.
Exit Function setting mode
Press the [ ] button for at least 1 second.
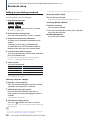
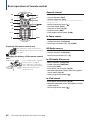
Component names
1 [ ] button
2 Release button
3 [SRC] button
4 Control knob
5 [PRESET] button
6 [0] button
7 USB terminal
8 Auxiliary input
9
KDC-X895 KDC-BT848U
[ ] [ ] button
KDC-X595 KDC-448U
[iPod] button
o [LOG] button
q [DISP] button
w [
] button
1 32 4 5 6
789pqw

English
|
7
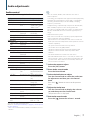
Audio adjustments
⁄
• You can set Bass, Middle, and Treble for each source.
About Supreme
Technology to extrapolate and supplement with proprietary
algorithm, the high-frequency range that is cut off when
encoding at low bit rate (less than 128Kbps, Sampling
frequency is 44.1kHz).
Supplementing is optimized by compression format (AAC,
MP3 or WMA) and processed according to bit rate.
The effect is negligible with music that is encoded at high
bit rate, variable bit rate or has minimal high frequency
range.
• About Dual Zone System
Main source and sub source (Auxiliary input) output Front
channel and Rear channel separately.
- When “2Zone” is set to “ON”, the main source sound and
AUX input sound are output to the front speakers and rear
speakers separately.
- Set up the channel of sub source by “2Zone”.
- Select Main source by [SRC] button.
- Adjust the volume of Front channel by Control knob.
- Adjust the volume of Rear channel by “2Zone Rear
Volume”.
- The Audio Control has no effect on sub source.
- When Bluetooth audio source is selected, set “2Zone F/R
Select” to “Rear”. “2Zone” cannot be turned “ON” when this
is set to “Front”. While “2Zone” is turned “ON”, “2Zone F/R
Select” function is disabled.
Select the source to adjust
Press the [SRC] button.
Enter Audio control mode
Press the Control knob.
Select the Audio item to adjust
Turn the Control knob to select the audio item
for adjustment and then press the Control
knob.
Press the [ ] button to return to the previous
item.
Adjust the Audio item
Turn the Control knob to display the value to
set, and then press the Control knob.
The previous item is displayed.
Exit Audio control mode
Press the [ ] button for at least 1 second.
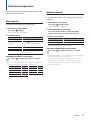
Audio control
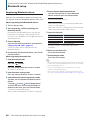
You can adjust following Audio Control items;
Display Audio item Range
“SubWoofer Level” Subwoofer level –15 — +15 (dB)
“Bass Boost” Bass Boost Level1/Level2/OFF
“System Q” Preset Equalizer
curve
“Rock”/ “Pops”/ “Easy”/
“Top40”/ “Jazz”/ ”Game”/
“Natural”/ “User”
‡
“Bass Adjust”
“Bass Center FRQ” Bass Center
Frequency*
40/50/60/70/80/100/
120/150 (Hz)
“Bass Level” Bass level –8 — +8 (dB)
“Bass Q Factor” Bass Q Factor* 1.00/1.25/1.50/2.00
“Bass EXT” Bass Extend* OFF/ON
“Middle Adjust”
“Middle Center
FRQ”
Middle Center
Frequency*
0.5/1.0/1.5/2.0 (kHz)
“Middle Level” Middle level –8 — +8 (dB)
“Middle Q Factor” Middle Q Factor* 1.0/2.0
“Treble Adjust”
“Treble Center FRQ” Treble Center
Frequency*
10.0/12.5/15.0/17.5 kHz
“Treble Level” Treble level –8 — +8 (dB)
“Balance” Balance Left 15 — Right 15
“Fader” Fader Rear 15 — Front 15
“2Zone Rear Volume” Rear volume during
Dual zone
0 — 35
“SubWoofer” Subwoofer output OFF/ON
“Detailed Settings”
“HPF Front” Front High Pass
Filter
Through/40*/60*/80/
100/120/150/180/220*
(Hz)
“HPF Rear” Rear High Pass Filter Through/40*/60*/80/
100/120/150/180/220*
(Hz)
“LPF SubWoofer” Low Pass Filter 50*/60/80/100*/120/
Through (Hz)
“SubWoofer Phase” Subwoofer Phase Reverse (180°)/
Normal (0°)
“2Zone” Dual Zone System ON/OFF
“2Zone F/R Select” Dual Zone output
channel
Rear/Front
“Supreme” Supreme setting ON/OFF
“Audio Preset” Audio Preset
memoy
†
Recall/Memory
“Volume Offset
ADJ”
Volume offset –8 — ±0 (dB)
(AUX: -8 — +8)
*Function of KDC-X895/ KDC-X595.
†
Refer to <Audio preset Memory> (page 8), <Audio preset
recall> (page 8).
‡
“User”: The customized Bass, Middle, and Treble levels are
effective.

8
|
KDC-X895/ KDC-BT848U/ KDC-X595/ KDC-448U
Audio adjustments
Audio preset recall
Recalling the sound setup registered by <Audio
preset Memory> (page 8).
Select the source
Press the [SRC] button.
Enter Audio control mode
Press the Control knob.
Select Audio preset memory mode
The item can be selected and determined as
follows.
“Detailed Settings” > “Audio Preset”
To select the item, turn the Control knob. To
determine the item, press the Control knob.
Select the Audio preset recall
Turn the Control knob to select “Recall”, and
then press the Control knob.
Turn the Control knob to select “YES”, and
then press the Control knob.
“Recall Completed” is displayed.
Exit Audio Control mode
Press the [ ] button for at least 1 second.
Audio preset Memory
Registering the value setup by Audio Control.
Setup Audio control
Setup the <Audio control> (page 7).
Enter Audio control mode
Press the Control knob.
Select Audio preset memory mode
The item can be selected and determined as
follows.
“Detailed Settings” > “Audio Preset”
To select the item, turn the Control knob. To
determine the item, press the Control knob.
Select the Audio preset memory
Turn the Control knob to select “Memory”, and
then press the Control knob.
Turn the Control knob to select “YES”, and
then press the Control knob.
“Memory Completed” is displayed.
Exit Audio Control mode
Press the [ ] button for at least 1 second.
⁄
• Register 1 pair of Audio Preset Memory. You cannot register
by the source.
• When you press the Reset, all the sources will be the setting
value which is registered.
• The following items can be registered.
“Bass Center FRQ”, “Bass Level”, “Bass Q Factor”, “Bass EXT”,
“Middle Center FRQ”, “Middle Level”, “Middle Q Factor”,
“Treble Center FRQ”, “Treble Level”, “SubWoofer Level”, “HPF
Front”, “HPF Rear”, “LPF SubWoofer”, “SubWoofer Phase”

English
|
9
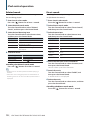
Music search
Searching for the song you want to play.
Enter Music search mode
Press the [ ] button.
“MUSICSEARCH” is displayed.
Search for music
Operation type Operation
Movement between items Turn the Control knob.
Move to the Alphabet
search mode
Press the [
] button for at least 1
second. Refer to <Alphabet search>
(page 9).
Selection of item Press the Control knob.
Return to previous item Press the [
] button.
Return to Top menu Push the Control knob towards left for at
least 1 second.
Cancelling the Music search mode
Press the [ ] button for at least 1 second.
⁄
• If no characters included in a song name can be displayed,
the browse item name and digits are displayed.
Items Display Items Display
Playlists “PLIST***” Podcasts “PDCT***”
Artists “ART***” Genres “GEN***”
Albums “ALB***” Composers “COM***”
Songs “PRGM***”
iPod control operation
Alphabet search
You can select an alphabetic character from the
list in the browse item (artist, album, etc.) currently
selected.
Enter Music search mode
Press the [ ] button twice.
“MUSICSEARCH” is displayed.
Select Alphabet search mode
Turn the Control knob to select “Alphabet
Search”, and then press the Control knob.
Search for character
Operation type Operation
Select the characters Turn the Control knob.
Determine the characters. Press the Control knob.
Return to the Music search mode.
Cancelling the Alphabet search mode
Press the [ ] button for at least 1 second.
⁄
• The time of Alphabet search may become long depending
on the number of items (songs) in iPod.
• To search for a character other than A to Z and 1, enter “*”.
• If the first character string begins with an article “a”, “an”,
or “the” in the alphabet search mode, it is searched for in
defiance of the article.
For basic operation to playback iPod contents, refer
to the Quick Start Guide.

10
|
KDC-X895/ KDC-BT848U/ KDC-X595/ KDC-448U
iPod control operation
Related search
Browsing for music of the same artist or genre as
the one being played.
Enter Search select mode
Press the [ ] button for at least 1 second.
Select Related search mode
Turn the Control knob to select “Related
Search”, and then press the Control knob.
Select desired browsing item
Turn the Control knob to select browse item,
and then press the Control knob.
Display Browses music
“Search Artist” Displays the album of the same artist.
“Search Album” Displays music in the album in which the one
being played is included.
“Search Genre” Displays the artist of the same genre.
“Search Composer” Displays the album including music created by the
same composer.
Search for music
Operation type Operation
Movement between items Turn the Control knob.
Selection of item Press the Control knob.
Return to previous item Press the [
] button.
Cancelling the Related search mode
Press the [ ] button for at least 1 second.
⁄
• Related search cannot be performed while playing a
Podcast.
• When the music being played has no information on
browsing items or no music was found, “Not Found” is
displayed.
Direct search
Searching for music by selecting a browse item and
an alphabetic character(s).
Enter Search select mode
Press the [ ] button for at least 1 second.
Select Direct search mode
Turn the Control knob to select “Direct Search”,
and then press the Control knob.
Select browse item
Turn the Control knob to select browse item,
and then press the Control knob.
Display Browses item
“PLAYLISTS” Playlists
“ARTISTS” Artists
“ALBUMS” Albums
“SONGS” Songs
“PODCASTS” Podcasts
“GENRES” Genres
“COMPOSERS” Composers
Select the character to be searched for
Turn the Control knob to select character, and
then press the Control knob.
You can select up to three characters.
Search for music
Turn the Control knob to select “DONE”, and
then press the Control knob.
A search result list is displayed.
Select the music
Turn the Control knob to select music, and then
press the Control knob.
Cancelling the Direct search mode
Press the [ ] button for at least 1 second.

English
|
11
Skip search
The number of songs to be skipped is determined
by the ratio of the total number of songs in the list
which is selected.
Enter Music search mode
Press the [ ] button.
“MUSICSEARCH” is displayed.
Enter Search select mode
Press the [ ] button.
Select Skip search mode
Turn the Control knob to select “Skip Search”,
and then press the Control knob.
Search for music
Operation type Operation
Movement between items Turn the Control knob.
Skip Search Push the Control knob towards up or down.
Selection of item Press the Control knob.
Sets the ratio of skip
performed
Push the Control knob towards right or left.
Cancelling the Music search mode
Press the [ ] button for at least 1 second.
⁄
• The ratio of the Skip Search is set to 0.5% as default. Refer to
<Skip search ratio setting> (page 11).
• Keep pushing Control knob for 3 seconds or longer skips
songs at 10% regardless of the setting.
Skip search ratio setting
Sets the ratio of skip performed with <Skip search>
(page 11).
Select iPod source
Press the [SRC] button.
Select the “iPod” display.
Enter Function setting mode
Press the Control knob for at least 1 second.
Select the Skip search
The item can be selected and determined as
follows.
“Settings” > “Skip Search”
To select the item, turn the Control knob. To
determine the item, press the Control knob.
Set the Skip search ratio
Turn the Control knob to select ratio (“0.5%”,
“1%”, “5%”, or “10%”), and then press the
Control knob.
Exit Function setting mode
Press the [ ] button for at least 1 second.

12
|
KDC-X895/ KDC-BT848U/ KDC-X595/ KDC-448U
iPod control operation
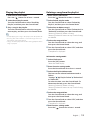
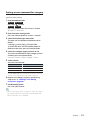
Registering a song in the playlist
You can register your favorite songs to make a
playlist. You can register up to ten songs in the
playlist.
Play the song you want to register
Push the Control knob towards up, down, right,
and left.
Enter Search select mode
Press the [ ] button for at least 1 second.
Register the song
Turn the Control knob to select “Register My
Playlist”, and then press the Control knob.
“## (registration number) Stored” is displayed. You
can register up to ten songs.
In Music search mode
Enter Music search mode
Press the [ ] button.
“MUSICSEARCH” is displayed.
Play the song you want to register
Refer to <Music search> (page 9).
Enter Register playlist mode
Press the [ ] button.
Register the song
Turn the Control knob to select “Register My
Playlist”, and then press the Control knob.
“## (registration number) Stored” is displayed. You
can register up to ten songs.
⁄
• When creating a playlist, you can register the songs stored
in one iPod. If you attempt to register a song by connecting
an unregistered iPod, “My Playlist Delete” is displayed.
Selecting “YES” deletes the playlist.
• If you attempt to register the eleventh song, “Memory Full”
is displayed and you cannot register the song. To register it,
delete an unnecessary song.
• Do not register Podcasts. Songs may be registered or played
improperly. For example, unintended songs are registered.
Play mode
You can select a Play Mode, such as Random play
and Repeat play.
Select iPod source
Press the [SRC] button.
Select the “iPod” display.
Enter Function setting mode
Press the Control knob for at least 1 second.
Select the Play mode
Turn the Control knob to select “Play Mode”,
and then press the Control knob.
Select the desired Play function
Turn the Control knob to select Play function,
and then press the Control knob.
Display Overview
“Play Mode”
“iPod by Hand”
When set to “ON”, allows you to operate iPod
with the control on the iPod.
“ON” / “OFF”
“Folder Random”
When set to “ON”, plays the music in the folder
randomly. (Music only)
“ON” / “OFF”
“All Random”
When set to “ON”, plays all songs in iPod
randomly. (Music only)
“ON” / “OFF”
“File Repeat”
When set to “ON”, plays the music repeatedly.
“ON” / “OFF”
( : Factory setting)
Set the Play function
Press the Control knob.
The previous item is displayed.
Exit Function setting mode
Press the [ ] button for at least 1 second.

English
|
13
Playing the playlist
Enter Search select mode
Press the [ ] button for at least 1 second.
Select Recall playlist mode
Turn the Control knob to select “Recall My
Playlist”, and then press the Control knob.
Play a song in the playlist
Turn the Control knob to select the song you
want to play, and then press the Control knob.
⁄
• To stop playing the song in the playlist, turn the power off.
• If a song does not end with 1 second or longer silence, its
last portion may not be played.
• Songs cannot be played at random during playback of the
songs in playlist.
Deleting a song from the playlist
Enter Search select mode
Press the [ ] button for at least 1 second.
Select Delete playlist mode
Turn the Control knob to select “Delete My
Playlist”, and then press the Control knob.
Select how to delete song(s)
Turn the Control knob to select “Delete One” or
“Delete All”, and then press the Control knob.
Selecting “Delete All” deletes all songs.
Selecting “Delete All” moves to step 5 and all songs
are deleted.
Select the song to delete
Turn the Control knob to select the song, and
then press the Control knob.
Turn the Control knob to select “YES”, and then
press the Control knob.
“Completed” is displayed.
In Function setting mode
Select iPod source
Press the [SRC] button.
Select the “iPod” display.
Enter Function setting mode
Press the Control knob for at least 1 second.
Select the Playlist delete mode
The item can be selected and determined as
follows.
“Settings” > “My Playlist Delete” > “Delete One”
or “Delete All”
To select the item, turn the Control knob. To
determine the item, press the Control knob.
Selecting “Delete All” deletes all songs.
Selecting “Delete All” moves to step 5 and all songs
are deleted.
Select the song to delete
Turn the Control knob to select the song, and
then press the Control knob.
Turn the Control knob to select “YES”, and then
press the Control knob.
“Completed” is displayed.
Exit Function setting mode
Press the [ ] button for at least 1 second.

14
|
KDC-X895/ KDC-BT848U/ KDC-X595/ KDC-448U
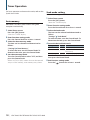
Music disc/Audio file (CD or USB) Operation
Music search
Selecting the music you want to listen to from the
device or media being played now.
Enter Music search mode
Press the [ ] button.
“MUSICSEARCH” is displayed.
Search for music
Audio file
Operation type Operation
Movement between
folders/files
Turn the Control knob.
Selection of folder/flie Press the Control knob.
Return to previous folder Press the [
] button.
Return to root folder Push the Control knob towards left for at
least 1 second.
Cancel the Music Search
mode
Press the [
] button for at least 1 second.
¡ indicator: Audio file
] indicator: Folder
CD source
Operation type Operation
Movement between track Turn the Control knob.
Selection of track Press the Control knob.
Return to first track Push the Control knob towards left for at
least 1 second.
Cancel the Music Search
mode
Press the [
] button.
For basic operation to playback Music disc/Audio
file contents, refer to the Quick Start Guide.
Music Editor media
Skip search
The number of songs to be skipped is determined
by the ratio of the total number of songs in the list
which is selected.
Enter Music search mode
Press the [ ] button.
“MUSICSEARCH” is displayed.
Enter Search select mode
Press the [ ] button.
Select Skip search mode
Turn the Control knob to select “Skip Search”,
and then press the Control knob.
Search for music
Operation type Operation
Movement between items Turn the Control knob.
Skip Search Push the Control knob towards up or down.
Selection of item Press the Control knob.
Sets the ratio of skip
performed
Push the Control knob towards right or left.
Cancelling the Music search mode
Press the [ ] button for at least 1 second.
⁄
• The ratio of the Skip Search is set to 0.5% as default. Refer to
<Skip search ratio setting> (page 11).
• Keep pushing Control knob for 3 seconds or longer skips
songs at 10% regardless of the setting.

English
|
15
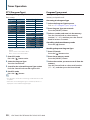
Play mode
You can select a Play Mode, such as Random play
and Repeat play.
Select CD/ USB source
Press the [SRC] button.
Select the “CD” or “USB” display.
Enter Function setting mode
Press the Control knob for at least 1 second.
Select the Play function mode
Turn the Control knob to select “Play Mode”,
and then press the Control knob.
Select the desired Play function
Turn the Control knob to select Play function,
and then press the Control knob.
Display Overview
“Play Mode”
“Track Scan” (CD)/
“File Scan” (Audio
file)
When set to “ON”, plays the intro of the music
in the disc/folder successively.
“ON” / “OFF”
“Disc Random” (CD)/
“Folder Random”
(Audio file)
When set to “ON”, plays the music in the folder
randomly.
“ON” / “OFF”
“All Random”
When set to “ON”, plays all songs in CD/USB
randomly. (Audio file only)
“ON” / “OFF”
“Track Repeat” (CD)/
“File Repeat” (Audio
file)
When set to “ON”, plays the music repeatedly.
“ON” / “OFF”
“Disc Repeat” (CD
changer)/ “Folder
Repeat” (Audio file)
When set to “ON”, plays the music in the disc/
folder repeatedly.
“ON” / “OFF”
“MGZN Random”
When set to “ON”, plays the music in the disc
changer randomly. (Disc changer only)
“ON” / “OFF”
( : Factory setting)
Set the Play function
Press the Control knob.
The previous item is displayed.
Exit Function setting mode
Press the [ ] button for at least 1 second.
Function of remote control
Direct music search
Searching the music by entering the track number.
Enter Direct Music search mode
Press the [DIRECT] button on the remote
control.
“– –” is displayed.
Enter the music number
Press the number buttons on the remote
control.
Search the music
Press the [4] or [¢] button on the remote
control.
Cancelling Direct music search
Press the [ ] button on the remote control.

16
|
KDC-X895/ KDC-BT848U/ KDC-X595/ KDC-448U
Music disc/Audio file Operation
Function of disc changers
Basic operation of Disc changer
(Optional)
Selecting CD changer source
Press the [SRC] button.
Select the “CD CH” display.
Music search
Push the Control knob towards right or left.
Disc search
Push the Control knob towards up or down.
Function of disc changers with remote control
Direct search in Disc changer
(Optional)
Searching the disc or music by entering the disc or
music number.
Enter Direct search mode
Press the [DIRECT] button on the remote
control.
“– –” is displayed.
Enter the disc or music number
Press the number buttons on the remote
control.
Search the disc
Press the [FM] or [AM] button on the remote
control.
Search the music
Press the [4] or [¢] button on the remote
control.
Cancelling Direct search
Press the [ ] button on the remote control.
⁄
• Input “0” to select disc 10.

English
|
17

18
|
KDC-X895/ KDC-BT848U/ KDC-X595/ KDC-448U
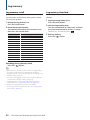
Tuner Operation
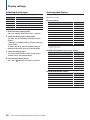
Auto memory
Memorizes 18 (FM)/ 6 (AM) stations with good
reception automatically.
Select Tuner source
Press the [SRC] button.
Select the “TUNER” display.
Enter Function setting mode
Press the Control knob for at least 1 second.
Select the Auto memory mode
The item can be selected and determined as
follows.
“Settings” > “Auto Memory”
To select the item, turn the Control knob. To
determine the item, press the Control knob.
Start Auto memory mode
Turn the Control knob to select “YES”, and then
press the Control knob.
When 18 (FM)/ 6 (AM) stations that can be received
are put in the memory, auto memory entry closes.
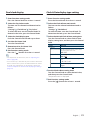
Seek mode setting
Selects the tuning mode of the radio.
Select Tuner source
Press the [SRC] button.
Select the “TUNER” display.
Enter Function setting mode
Press the Control knob for at least 1 second.
Select the Seek mode
The item can be selected and determined as
follows.
“Settings” > “Seek Mode”
To select the item, turn the Control knob. To
determine the item, press the Control knob.
Set to the desired Seek mode
Tuning mode Display Operation
Auto seek “Auto1” Automatic search for a station.
Preset station seek “Auto2” Search in order of the stations in the
Preset memory.
Manual “Manual” Normal manual tuning control.
Turn the Control knob to select Seek mode, and
then press the Control knob.
Exit Function setting mode
Press the [
] button for at least 1 second.
For basic operation to listen to the radio, refer to the
Quick Start Guide.

English
|
19
Function of remote control
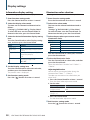
Direct access tuning
Entering the frequency and tuning.
Enter Direct access tuning mode
Press the [DIRECT] button on the remote
control.
“– – – –” is displayed.
Enter the frequency
Press the number buttons on the remote
control.
Example:
Desired frequency Press button
92.1 MHz (FM) [9], [2], [1]
810 kHz (AM) [8], [1], [0]
Search the frequency
Press the [4] or [¢] button on the remote
control.
Cancelling Direct access tuning
Press the [ ] button on the remote control.
Tuner setting
Sets the tuner items.
Select Tuner source
Press the [SRC] button.
Select the “TUNER” display.
Enter Function setting mode
Press the Control knob for at least 1 second.
Select the Setting mode
Turn the Control knob to select “Settings”, and
then press the Control knob.
Select the desired Tuner setting item
Turn the Control knob to select Tuner setting
item, and then press the Control knob.
Display Overview
“Settings”
“MONO”
You can reduce the noise when stereo
broadcasts are received as monaural.
“ON” / “OFF”
“TI”
Switches to the traffic information
automatically when the traffic bulletin starts
“ON” / “OFF”
( : Factory setting)
Set the Tuner setting item
Turn the Control knob to select desired value,
and then press the Control knob.
The previous item is displayed.
Exit Function setting mode
Press the [ ] button for at least 1 second.

20
|
KDC-X895/ KDC-BT848U/ KDC-X595/ KDC-448U
Tuner Operation
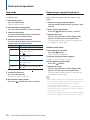
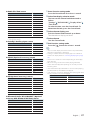
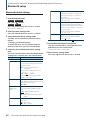
PTY (Program Type)
Selecting the Program Type below and searching
for a station;
Program Type Display
Speech “Speech”
Music “Music”
News “News”
Information “Inform”
Sports “Sports”
Talk “Talk”
Rock “Rock”
Classic Rock “Cls Rock”
Adult Hits “Adlt Hit”
Soft Rock “Soft Rck”
Top 40 “Top 40”
Country “Country”
Oldies “Oldies”
Program Type Display
Soft “Soft”
Nostalgia “Nostalga”
Jazz “Jazz”
Classical “Classicl”
R & B “R & B”
Soft R & B “Soft R&B ”
Language “Language”
Religious Music “Rel Musc”
Religious Talk “Rel Talk”
Personality “Persnlty”
Public “Public”
College “College”
Weather “Weather”
• Speech and Music include the Program type shown
below.
Speech: Items in the white letters.
Music: Items in the black letters.
Enter PTY mode
Press the [ ] button twice.
Select the Program Type
Turn the Control knob.
Search for the selected Program Type station
Push the Control knob towards right or left.
Exit PTY mode
Press the [ ] button.
⁄
• This function cannot be used during a traffic bulletin or AM
reception.
• When the selected Program Type is not found, “No PTY” is
displayed. Select another Program Type.
Program Type preset
Putting the Program Type in the Preset button
memory and quick recall.
Presetting the Program Type
Select the Program Type to preset
Refer to <PTY (Program Type)> (page 20).
Enter Program Type preset mode
Press the [PRESET] button.
Select a number and store it in the memory
Turn the Control knob to select memory
number (“1” – “6”), and then press the Control
knob for at least 2 seconds.
Cancelling the Preset Memory mode
Press the [ ] button.
Recalling the preset Program Type
Enter PTY mode
Press the [ ] button twice.
Enter Preset memory mode
Press the [PRESET] button.
Select the number you want to recall from the
memory
Turn the Control knob to select recall number
(“1” – “6”), and then press the Control knob.
Page is loading ...
Page is loading ...
Page is loading ...
Page is loading ...
Page is loading ...
Page is loading ...
Page is loading ...
Page is loading ...
Page is loading ...
Page is loading ...
Page is loading ...
Page is loading ...
Page is loading ...
Page is loading ...
Page is loading ...
Page is loading ...
Page is loading ...
Page is loading ...
Page is loading ...
Page is loading ...
Page is loading ...
Page is loading ...
Page is loading ...
Page is loading ...
Page is loading ...
Page is loading ...
Page is loading ...
Page is loading ...
Page is loading ...
Page is loading ...
Page is loading ...
Page is loading ...
Page is loading ...
Page is loading ...
Page is loading ...
Page is loading ...
Page is loading ...
Page is loading ...
Page is loading ...
Page is loading ...
Page is loading ...
Page is loading ...
Page is loading ...
Page is loading ...
Page is loading ...
Page is loading ...
Page is loading ...
Page is loading ...
Page is loading ...
Page is loading ...
Page is loading ...
-
 1
1
-
 2
2
-
 3
3
-
 4
4
-
 5
5
-
 6
6
-
 7
7
-
 8
8
-
 9
9
-
 10
10
-
 11
11
-
 12
12
-
 13
13
-
 14
14
-
 15
15
-
 16
16
-
 17
17
-
 18
18
-
 19
19
-
 20
20
-
 21
21
-
 22
22
-
 23
23
-
 24
24
-
 25
25
-
 26
26
-
 27
27
-
 28
28
-
 29
29
-
 30
30
-
 31
31
-
 32
32
-
 33
33
-
 34
34
-
 35
35
-
 36
36
-
 37
37
-
 38
38
-
 39
39
-
 40
40
-
 41
41
-
 42
42
-
 43
43
-
 44
44
-
 45
45
-
 46
46
-
 47
47
-
 48
48
-
 49
49
-
 50
50
-
 51
51
-
 52
52
-
 53
53
-
 54
54
-
 55
55
-
 56
56
-
 57
57
-
 58
58
-
 59
59
-
 60
60
-
 61
61
-
 62
62
-
 63
63
-
 64
64
-
 65
65
-
 66
66
-
 67
67
-
 68
68
-
 69
69
-
 70
70
-
 71
71


Kenwood KDC-448U User manual
- Category
- Car media receivers
- Type
- User manual
- This manual is also suitable for
Ask a question and I''ll find the answer in the document
Finding information in a document is now easier with AI
Related papers
-
Kenwood KDC-448U User manual
-
-
Kenwood DPX304 User manual
-
Kenwood DPX308U User manual
-
-
-
-
-
JVC Kenwood KCA-BT100 User manual
-
Other documents
-
Dual XHD7714 User manual
-
-
 Rockford Fosgate RFX9700CD• User manual
-
Fusion MS-BT200 User manual
-
Pandigital PANTV1512 User manual
-
Sirius Satellite Radio KCA-R70FM User manual
-
Sentry Industries 2ACP4-BT300 User manual
-
-
Laser KB-BT300 User manual
-
Poly Planar MRD80/MRD80i Owner's manual
