Page is loading ...

550-767
Gestalteter Arbeitsplatz für
Seitenairbag - Sollreißnaht
Engineered work station for
side airbag tearing seam
Bedienanleitung / Operating instructions
Aufstellanleitung / Installation instructions
Postfach 17 03 51, D-33703 Bielefeld Potsdamer Straße 190, D-33719 Bielefeld Sprache: D/ GB
Telefon +49 (0) 5 21/ 9 25-00 Telefax+49(0)521/9252435 www.duerkopp-adler.com
1
2
Ausgabe / Edition: Änderungsindex Teile-Nr./Part.-No.:
10/2007 Rev. index: 01.0 Printed in Federal Republic of Germany 0791 550034

Alle Rechte vorbehalten.
Eigentum der Dürkopp Adler AG und urheberrechtlich geschützt. Jede, auch auszugsweise
Wiederverwendung dieser Inhalte ist ohne vorheriges schriftliches Einverständnis der Dürkopp Adler AG
verboten.
All rights reserved.
Property of Dürkopp Adler AG and copyrighted. Reproduction or publication of the content in any manner,
even in extracts, without prior written permission of Dürkopp Adler AG, is prohibited.
Copyright ©
Dürkopp Adler AG - 2007
Übersicht Summary
Bedienanleitung
Aufstellanleitung
Serviceanleitung (0791 767651)
Bauschaltplan
9890 550004 B
Operating Instructions
Installation Instructions
Service Instructions (0791 767651)
Interconnection-diagram
9890 550004 B

Foreword
This instruction manual is intended to help the user to become familiar
with the machine and take advantage of its application possibilities in
accordance with the recommendations.
The instruction manual contains important information on how to
operate the machine securely, properly and economically. Observation
of the instructions eliminates danger, reduces costs for repair and
down-times, and increases the reliability and life of the machine.
The instruction manual is intended to complement existing national
accident prevention and environment protection regulations.
The instruction manual must always be available at the machine/sewing
unit.
The instruction manual must be read and applied by any person that is
authorized to work on the machine/sewing unit. This means:
– Operation, including equipping, troubleshooting during the work
cycle, removing of fabric waste,
– Service (maintenance, inspection, repair) and/or
– Transport.
The user also has to assure that only authorized personnel work on the
machine.
The user is obliged to check the machine at least once per shift for
apparent damages and to immediatly report any changes (including the
performance in service), which impair the safety.
The user company must ensure that the machine is only operated in
perfect working order.
Never remove or disable any safety devices.
If safety devices need to be removed for equipping, repairing or
maintaining, the safety devices must be remounted directly after
completion of the maintenance and repair work.
Unauthorized modification of the machine rules out liability of the
manufacturer for damage resulting from this.
Observe all safety and danger recommendations on the machine/unit!
The yellow-and-black striped surfaces designate permanend danger
areas, eg danger of squashing, cutting, shearing or collision.
Besides the recommendations in this instruction manual also observe
the general safety and accident prevention regulations!

General safety instructions
The non-observance of the following safety instructions can cause
bodily injuries or damages to the machine.
1. The machine must only be commissioned in full knowledge of the
instruction book and operated by persons with appropriate training.
2. Before putting into service also read the safety rules and
instructions of the motor supplier.
3. The machine must be used only for the purpose intended. Use of
the machine without the safety devices is not permitted. Observe all
the relevant safety regulations.
4. When gauge parts are exchanged (e.g. needle, presser foot, needle
plate, feed dog and bobbin) when threading, when the workplace is
left, and during service work, the machine must be disconnected
from the mains by switching off the master switch or disconnecting
the mains plug.
5. Daily servicing work must be carried out only by appropriately
trained persons.
6. Repairs, conversion and special maintenance work must only be
carried out by technicians or persons with appropriate training.
7. For service or repair work on pneumatic systems, disconnect the
machine from the compressed air supply system (max. 7-10 bar).
Before disconnecting, reduce the pressure of the maintenance unit.
Exceptions to this are only adjustments and functions checks made
by appropriately trained technicians.
8. Work on the electrical equipment must be carried out only by
electricians or appropriately trained persons.
9. Work on parts and systems under electric current is not permitted,
except as specified in regulations DIN VDE 0105.
10. Conversion or changes to the machine must be authorized by us
and made only in adherence to all safety regulations.
11. For repairs, only replacement parts approved by us must be used.
12. Commissioning of the sewing head is prohibited until such time as
the entire sewing unit is found to comply with EC directives.
13. The line cord should be equipped with a country-specific mains
plug. This work must be carried out by appropriately trained
technicians (see paragraph 8).
It is absolutely necessary to respect the safety
instructions marked by these signs.
Danger of bodily injuries !
Please note also the general safety instructions.

Contents Page:
Preface and general safety instructions
Part 1: Operating Instructions, Class 550-767
(Edition: 10.2007)
1. Items delivered .............................................. 5
2- Designated use .............................................. 5
3. Equipment
3.1 Basic equipment .............................................. 6
3.2 Additional equipment ........................................... 6
4. Technical data ............................................... 7
5. Operation
5.1 Threading the needle thread ....................................... 8
5.2 Adjusting the needle thread tension .................................. 10
5.3 Opening the needle-thread tension ................................... 11
5.4 Winding on the hook thread ....................................... 12
5.5 Threading the bobbin thread ....................................... 13
5.6 Adjusting the bobbin thread tension .................................. 13
5.7 Replacing the needle ........................................... 14
5.8 Liftingandlockingthesewingfeet ................................... 15
5.9 Adjustingthesewing-footstroke..................................... 16
5.10 Sewing-footpressure........................................... 16
5.11 Adjusting the stitch length ........................................ 17
5.12 Buttonsonsewingarm .......................................... 17
5.13 RFW 13–3 bobbin thread monitor .................................... 18
5.14 HP 13–10 electro-pneumatic rapid stroke adjustment ........................ 20
6. Operating the rupture-seam visualisation facility
6.1 Accesstothesystem ........................................... 21
6.1.1 Advice for the production begin ..................................... 24
6.2 Seam-typefunction ............................................ 25
6.2.1 Createanewseamtype ......................................... 25
6.2.2 Editseamtype ............................................... 30
6.2.3 Copyseamtype .............................................. 31
6.2.4 Deleteseamtype.............................................. 32
6.3 Database function ............................................. 33
6.4 Checkfunction............................................... 35
6.5 Needle-thread tension tolerance range ................................. 48
6.6 Error codes ................................................. 50
6.7 Setting the end-label barcodes ..................................... 51
6.8 Setting the end-label layouts ....................................... 54
6.9 Adjustingbarcodedefinitions ...................................... 55
7. Sew ing
7.1 Label scanner (optional) ......................................... 62
8. Maintenance
8.1 Cleaning ................................................... 63
8.2 Oiling..................................................... 64
1


1. Product description
The DÜRKOPP ADLER class 550-767 is an engineered sewing station
with the following features:
·
flat-bed double-lockstitch sewing machine with underfeed, needle
feed and alternating-foot overfeed.
·
single-needle machine with thread cutter under the throat plate.
·
apparatus slide in the base plate for the rapid change of different
apparatus.
·
maximum clearance of 16 mm under the sewing feet when raised.
·
stroke of alternating sewing feet adjustable to a
maximum of 7mm by programming function.
·
automatic, unpressurised oil-recirculating lubrication with sight
glasses for oil level and circulation inspection,
hook lubrication integral to the circulation.
·
large two-piece vertical hook with bobbin-housing lift.
·
safety coupling to avoid displacing or damaging the hook if the
thread gets jammed in the hook track.
2. Designated use
The class 550—767 machine is an engineered sewing station designed
for sewing light to medium-heavy material. Such material is generally
made of textile fibres, but it may also be leather. It is used in the
clothing industry and for domestic and motor-vehicle upholstery.
This sewing machine can also be used to produce so-called technical
seams. In this case, however, the operator must assess the possible
dangers which may arise (with which DÜRKOPP ADLER AG would be
happy to assist), since such applications are on the one hand relatively
unusual and, on the other, they are so varied that no single set of
criteria can cover them all. The outcome of this assessment may
require appropriate safety measures to be taken.
Generally only dry material may be sewn with this sewing unit. The
material may be no thicker than 10 mm when compressed by the
lowered sewing feet. The material may not contain any hard objects,
since if it does the machine may not be operated without an
eye-protection device. No such device is currently available.
The seam is generally produced with textile-fibre sewing thread of up
to gauge 11/3 NeB (cotton), 11/3 Nm (synthetic) or 11/4 N m (covered
yarn). Before using any other thread the possible dangers arising must
be assessed and appropriate safety measures taken if necessary.
This sewing unit may be set up and operated only in dry,
well-maintained premises. If the sewing machine is used in other
premises which are not dry and well-maintained it may be necessary to
take further precautions (which should be agreed in advance
– see EN 60204-31: 1999).
As manufacturers of industrial sewing machines we proceed on the
assumption that personnel who work on our products will have
received training at least sufficient to acquaint them with all normal
operations and with any hazards which these may involve.
1
5

3. Equipment
3.1 Basic equipment
The class 550—767 sewing unit is supplied w ith the following basic
equipment:
RAP 13-2 Electro-pneumatic bar tack and sewing-foot lift,
foot-operated.
HP 13-10 Electro-pneumatic rapid stroke adjustment by
knee switch (switch and touch operation) to maximum
stroke height with simultaneous stitch-rate limit.
Automatic infinitely-variable stitch-rate limit as a
function of the stroke height set.
RFW 13-3 residual-thread monitor
798 500088 Sewing light transformer
907 487519 Mounting kit for sewing light
9822 510001 Sewing lamp (halogen)
3.2 Additional equipment
The following additional equipment can be supplied for the ?class
550-767 sewing unit:
0467 367959 pneumatic needle-cooling unit NK 13-1
0767 590129 Uninterruptible power supply 230 V/1000 A
0767 100134 DS 2200-1100 5 V barcode scanner for end-label
recognition
0767 490214 DS 2200-1100 5 V barcode scanner for
hook thread recognition
0767 490224 DS 2200-1100 5 V barcode scanner for
needle thread recognition
9800 330010 Operating panel EFKA V820
6

4. Technical data
Stitch type: 301 / double lockstitch
Number of needles: 1
Needle system: 134-35
Needle size
1
: 110-170 Nm
Thread thicknesses
1
- Cotton: 12/3 NeB
- Synthetic sewing thread: 11/3 Nm?
- Covering thread: 11/3 Nm
Bobbin capacity
with synthetic sewing thread
- 30/3 max. 35 m
- 11/3 max. 12 m
Stitch rate
2
- equipment with HP: max. 3500 min-1
- on delivery: 3200 min-1
Stitch length
1
:0-9mm
Stroke height of sewing feet: max. 7 mm
(on delivery): 6 mm
Clearance under sewing feet
- Sewing: 7 mm
- Raised: 16 mm
Handwheel groove (average diameter): 80 mm
Operating pressure: 6 bar
Air consumption: approx. 0.7 Nl per
working cycle
Nominal voltage: 1~ 190-240 V, 50/60 Hz
Input power: 1 kVA
Dimensions (including PC table): 2100 x 1150 x 1500 mm
Working height : 685-1085 mm
(to upper edge of table plate)
Weight (head only): approx. 60 kg
Workplace-related emission value to D IN 45635-48-A-1-KL2:
Lc = 83 dB (A)
Stitch length: 5.0 mm, sewing-foot stroke: 1.6 mm, stitch rate: 2 500 min
-1
material G1 DIN 23328 4-ply
Lc = 80 dB (A)
Stitch length: 7.2 mm, sewing-foot stroke: 5.6 mm, stitch rate: 1.500 min
-1
material 2-ply Skai 1.6 mm 900 g/m2 DIN 53352
1
accordingtoENo.
2
depends on stitch length and stroke height of the sewing feet
1
7

5. Operation
5.1 Threading the needle thread
CAUTION: DANGER OF INJURY!
Turn off the main switch!
The needle thread may only be threaded with the machine turned off.
Versions with switch 2:
Before placing the needle-thread cones on the s tand they must be
scanned by the manual scanner. If a needle-thread bobbin is removed,
this is recognised by the control via switch 2 and the scanning process
is to be repeated.
Version w ith optional thread-barcode scanner:
–
Place the thread bobbin on the stand while ensuring that the
barcode of the thread bobbin can be read by the optional
thread-barcode scanner.
If the barcode is not recognised by the scanner, an error message
will be displayed on the monitor.
–
Open and fold back cover 1.
8
1
2

–
Pass the thread through guide 7 and anti-clockwise around
prethread-tensioning spring-tensioner 8. Pass the thread through
guide 7 again.
–
Pass the thread around guide 10 and then anti-clockwise around
the main tensioner 9. Pass the thread clockwise around main
tensioner 11.
–
Pass the thread clockwise around the thread tensioning unit 4, past
the check spring 3 and through the guide 2.
–
Pass the thread through take up lever 1 and through guides 2, 5
and 6.
–
Pass the thread through the needle; pull out several c entimetres of
thread and cut.
–
Pass the needle thread through the needle from the right, pull out a
few centimetres of thread and cut.
HINT
The needle thread can be threaded without opening cover 1 by tying
the new needle thread to the residual needle thread and pulling it
through the thread tensioner.
1
9
7
8
9
10
11
1
2
3
4
5
6

5.2 Adjusting the needle thread tension
The tension must be set according to the requirements of the
manufacturer of seat-covers. The cross-over point should be in the
centre of the material.
–
Adjust the pre-tension 1. The pre-tensioning should be set lower
than at the main tensioners 2 and 3.
–
Adjust the main tension 2 and 3.
–
Adjust the tolerance range 4 (window) for seam monitoring via the
Touch Screen Monitor.
–
0 = monitoring deactivated.
Hint
The required thread tension is set via the “ELTEX” menu. See section
6.5: Needle-thread tension tolerance range.
10
4
1
2
3

5.3 Opening the needle-thread tension
The needle-thread tension is automatically opened when the thread is
cut.
–
Press button 2 manually or press down the upper right-hand corner
of cover 1. The needle-thread tension remains opened for as long
as the button or c over is held down.
1
11
1
2

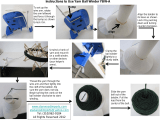
5.4 Winding on the hoo thread
CAUTION:
Only special bobbins suitable for this type of machine may be used!
The matt side of the bobbin
–
Place the needle-thread cone onto the thread stand.
–
Pass the needle thread through the thread guide on the take-up
arm and through pre-tensions 1 and 2 as shown in the illustration.
–
Carefully wind a few turns of thread anti-clockwise onto the reserve
groove 6 of the bobbin by hand and place the bobbin on the thread
stand with the ring 3 and the matt surface towards the operator.
–
Swivel the bobbin-winder lever 5 against the empty bobbin.
–
Enter the bobbin number via the Touch Screen Monitor.
When the bobbin is full, winding is automatically stopped by the
bobbin-winder lever 5.
Caution!
Before you press the ENTER key, please ensure that the number
entered does in fact correspond to the number engraved on the
bobbin.
–
Adjust pre-tensions 1 and 2.?
The thread should be wound on at as low a tension as possible.
12
6
2
1
5
3
4

5.5 Threading the bobbin thread
CAUTION: danger of injury!
Turn off the main switch!
The bobbin thread may only be threaded when the sewing machine is
switched off.
–
Raise flap 1 and remove the e mpty bobbin using a magnet.
–
Insert bobbin 2 so that it turns anti-clockwise when the thread is
drawn off.
–
Pass the thread through slit 4 and pull beneath spring 5.
–
Pass the thread through slit 6 and pull out approx. 3 cm of thread.
–
Close flap 1 and pull the thread through the guide 6 of flap 1.
–
Enter the bobbin number engraved on the bobbin 7.
CAUTION!
Before you press the ENTER key, please ensure that the number
entered does in fact correspond to the number engraved on the
bobbin.
5.6 Adjusting the bobbin thread tension
The bobbin thread tension must be adjusted in accordance with the
required seam type.
–
Adjust the tension with screw 3.
1
13
1
7
6543
2

5.7 Replacing the needle
CAUTION: danger of injury!
Turn off the main switch!
The needle may only be threaded and replaced when the sewing
machine is switched off.
–
Turn the handwheel until the needle bar has reached its top dead
centre.
–
Undo screw 1.
–
Remove needle.
–
Insert the new needle with its channel towards the hook and push it
up as far as it w ill go.
–
Tighten screw 1.
CAUTION:
If a needle of a different thickness is fitted the settings must ?be
altered as specified in the servicing instructions.
A thinner needle may cause faulty stitches or damage to the thread.
A thicker needle may damage the hook point itself.
14
1

5.8 Lifting and locking the sewing feet
The sewing feet can be raised mechanically or pneumatically.
Mechanical operation
–
Swivel lever 2 downwards.
Pneumatic operation
–
Push pedal 3 half-way back (first position back).
Once raised mechanically or pneumatically, the sewing feet can be
secured in raised position using lever 2.
–
Swivel lever 2 downwards.
The sewing feet are secured in the r aised position.
–
Swivel lever 2 downwards.
The sewing feet are released.
1
15
2
3

5.9 Adjusting the sewing-foot stroke
The stroke height 1 of the sewing-foot can be adjusted via the Touch
Screen Monitor in the “seam types” menu in four steps (0, 1, 2, 3).
The maximum stroke can be activated during s ewing in free seam
sections with the knee switch 2.
This function is not available in documented seam sections.
HINT!
The sewing-foot stroke and stitch rate are interdependent. The control
unit detects what foot-stroke has been set by means of a potentiometer
and restricts the stitch rate accordingly. The values are pre-set in the
control unit.
5.10 Sewing-foot pressure
The required sewing-foot pressure is set using rotary knob 3.
–
To increase the sewing-foot pressure
:turnknob3clockwise
–
To reduce the sewing-foot pressure
:turnknob3clockwise
16
2
1
3

HINT!
The sewing-foot pressure can only be altered when knob 3
(clamping block) is released: see the Servicing instructions.
5.11 Adjusting the stitch length
The stitch length is adjusted in the ”Seam types” menu on the Touch
Screen Monitor.
5.12 Buttons on sewing arm
Button 5 = intermediate lock-stitches during sewing
Button 6 = needle in high or low position
Button 7 = suppresses starting or finishing lock-stitches
Button 8 = authorises thread-cutting in the monitored region
–
Press and hold down button 5.
An intermediate lock-stitch is sewn. The machine sews backwards
for as long as the button is held down.
–
Press button 6.
The needle is raised or lowered.
–
Press button 7.
The next starting or finishing lock-stitch will not be sewn.
–
Press button 8.
The thread can now be severed in the monitored region using the
pedal. This enables the material to be removed in the event of a
fault. The program issues an error message.
1
17
56 7 8

5.13 RFW 13–3 bobbin thread monitor
The bobbin thread monitor monitors the quantity of thread on the
bobbin. A signal is issued on the PC when only a small quantity of
thread remains.
The operator can finish the seam and fit a new bobbin, thus avoiding
damage to the material and the need for repairs.
Function and operation of the bobbin thread monitor
If the light beam from the light barrier is reflected b y surface 1 on the
bobbin core during sewing, a signal is displayed on the PC and sewing
is interrupted.
–
Acknowledge the message on the PC screen.
–
Release the pedal, then push it forwards again. The seam will be
continued. The quantity of thread in reserve groove 2 of the bobbin
is normally sufficient to finish it.
–
At the end of the seam push the pedal back. The thread is cut.
–
Terminate sewing mode on the PC with “Back”.
CAUTION: danger of injury!
Turn off the main switch!
The bobbin may only be replaced with the machine turned off!
–
Replace the bobbin.
–
Reactivate sewing mode on the PC with “Sew”.
A new seam can be sewn.
CAUTION:
The bobbin must be placed in position with ring 3 downwards. The area
around the bobbin housing and light barrier must be cleaned of any
fluff!
18
/