Page is loading ...

Digital Thermostat Installation in RV HVAC Systems
Page 1 of 5
Coleman Mach to Hunter Digital Thermostat Instructions
Credit given where credit is due: This page written by Ken Lenger and derived from the text
from Alan Paskey and Les Adams. Credit for the original concept and details of the Coleman
modification is given to Alan Paskey. Les Adams further developed this concept to work with
the Dometic A/C and Atwood furnace. Their comments follow page 2.
The Coleman Mach analog RV thermostat can be replaced with a Digital Hunter thermostat part
number 42999(B) or 42995 to provide tighter temperature control in both heating and cooling
modes. The hysterisis program for the Hunter thermostat is +/-1 degree of set temperature, and
also provides a digital readout of ambient temperature. The Hunter unit can be purchased from
Wal*Mart for about $20. I have also verified that this mod will work with the Lux TX500
thermostat, which is available at many hardware stores.
Although the Hunter thermostat is designed to work with mili-volt and 24 vac residential HVAC
systems, it can be used in an RV DC system because the thermostat uses battery power to run
all of the thermostat electronics, which in turn controls internal relays to run the heating and air-
conditioning equipment.
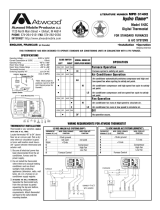
Function
Coleman Mach
Wire Color
Hunter P/N 42999 or 42995
Terminal Designation
+12 VDC Power Red RH and RC (Note 1)
DC Ground Blue Not Connected (Note 2)
Furnace (+12 VDC switched) White W
Fan High (+12 VDC switched) Green G (see Note 3)
Fan Low (+12 VDC switched) Gray G (see Note 3)
A/C Comp (+12 VDC switched) Yellow Y
Note 1: The +12 VDC wire is required because the Hunter thermostat switches this power
through switches and relays to operate the HVAC equipment. The RH terminal supplies power
to the heating equipment and the RC terminal supplies power to the air conditioning equipment.
Note 2: The DC ground wire is not used. On the Coleman Mach thermostat, power to operate
the electronics is derived from RV +12 VDC power. The +12 VDC power and DC ground were
required for this. Since the Hunter thermostat uses battery power to operate it’s electronics, the
DC ground wire is not required.
Note 3: There are three options for the fan control terminal wiring:
Option 1: The G terminal can be connected to the green wire removed from the Coleman
thermostat for manual high speed fan operation, or to the gray wire for low speed fan operation.
Option 2: The G terminal can be connected through a SPDT switch to select either high or low
speed.
Option 3: The G terminal can be connected through a relay so that the fan runs on low speed
whenever the fan is turned on with the FAN switch on the T-stat (G terminal), and runs at high
speed whenever the A/C compressor is running (Y terminal). This option allows you to run the
fan at low speed to circulate air, but still have the A/C run at maximum capacity when on.
Note 4: The HG / HE switch in the T-stat should be left in the HG position. In the HG (heat-gas)
position, the furnace fan is controlled by the furnace electronics. In the HE (heat-electric)
position, the Hunter thermostat controls the furnace fan independently of the furnace burner.
This document can be found at http://www.klenger.net/arctic-fox/hunter-tstat/


Digital Thermostat Installation in RV HVAC Systems
Page 3 of 5
TEXT OF ALAN PASKEY'S ARTICLE as FOLLOWS (FOR COLEMAN UNITS)
The wires coming out of the a/c are as follows:
Red = +12 VDC
Blue = -12 VDC
Green = Fan High
Gray = Fan Low
White = Furnace
Yellow = Compressor
The wire terminals on the new stat are as follows:
RC = cooling relay
RH = heating relay
G = Fan
W = Heat
Y = A/C compressor
I hooked up everything as follows:
RC = Red wire
RH = Red wire
G = see notes below
W = White wire
Y = Yellow wire
Notes:
1. I did not use the Blue wire (-12 VDC)... The book says it goes to all relay coils but as far
as I can tell in the stat, it is used for a delay circuit for the compressor... I MAY BE
COMPLETELY WRONG!!! I have the circuit drawn out if there is an EE or someone
smarter than I am that can figure it out... It looks like a simple circuit with 2 caps and a
transistor... If someone knows what it is really for, please let me know...
2. I took a wire from "G" on the stat to the common on a single pole double throw (SPDT)
switch... I wired the fan high and fan low to the switch... This allows me to still control
the high and low of the fan just like the old stat...
3. This has worked for me but I can't make any promises for anyone else... A little research
should be able to determine if it will work for you or not...
4. Total cost: $19.99 +tax for the stat from Wal Mart and $2.99 +tax for the switch from
Radio Shack...
Hope this helps someone else out. - Alan Paskey

Digital Thermostat Installation in RV HVAC Systems
Page 4 of 5
LES ADAMS ARTICLE FOR WIRING HUNTER DIGITAL THERMOSTAT
INTO DOMETIC A/C AND ATWOOD FURNACE
There was a thread on another BBS by Alan Paskey about his installation of a Hunter Digital
Thermostat for his A/C and heat... I have been wanting to do this for some time now and finally
got around to going over to "Wally World" (Wal Mart) and buying the thermostat and "getting off
my duff" and installing it!!!
I installed it yesterday... Unfortunately, I have a Dometic (Duo Therm) ducted A/C unit and
Atwood Furnace and Alan Paskey's unit was a Coleman... His wiring documentation DID NOT
work for me... I spent the better part of the day figuring out how the Dometic contact closures
worked and then another few hours doing the same for the digital thermostat and marrying the
two together...
The digital thermostat is a Hunter - Part #42995 and is $19.95 at "Wally World" (Wal Mart)...
The advantage to the digital thermostat is tighter hysterisis (+/- 1 degree of temperature change
yields "turn on" or "turn off"), a digital temperature readout, and no guesswork about where
temperature is set for your particular "comfort zone"...
The Hunter Thermostat runs on 2 AA pen cells which are NOT supplied... I would suggest you
carry spares as well, for if the batteries go dead, so does your thermostat (AND A/C and Heat)!!!
The following documentation will apply ONLY to my particular Dometic type A/C unit and
Atwood furnace although it should work on other similar Dometic systems and possibly other
manufacturers as well... As previously mentioned,
Alan's wiring documentation (his was a Coleman) DID NOT work on my unit, so bare in mind
that some wiring changes may be necessary to make the Hunter Digital thermostat function
properly with your particular system if they are different than the two referenced within this
article...
Duo Therm
(original)
OEM Wire Color
used in trailer
Hunter stat terminal
Ground Black or green "RC"
Fan Orange or Tan "G"
Cool Yellow "Y"
Ground Black or Green "RH"
Furnace White "W"
High Fan Blue Thru SPST switch
to "G" (Tan)
Red +7.5 volts DC not used

Digital Thermostat Installation in RV HVAC Systems
Page 5 of 5
Hunter thermostat Heating System Selector switch set to "HG"... "F/C" selector switch to "F" ...
Note that both the Hunter "RC" and "RH" terminals have the ground lead connected to them... I
fashioned a jumper wire from one terminal to another... BOTH these terminals are grounded
from the same point in my installation...
This setup worked very well for me last night... I will continue to test but I believe this wiring
documentation is correct for Dometic/Atwood...
The Hunter Thermostat has two fan positions - "Auto" and "ON" which enables you to run the
fan only, if desired, in the A/C mode only...
I used a Radio Shack subminiature DPDT slide switch for the "High Fan" function... I cut out a
little notch in the upper right hand corner of the back of the Hunter thermostat and mounted the
switch there with the supplied "very tiny" screws... The Radio Shack part number for this switch
is 275-407 ... I had this switch in my "junque box" of electronic components for quite a few years
so I don't know if they still make it, but any switch will work... Actually you only need a SPST but
this is what I had so I used it...
Additionally, I kept all of the standard thermostat leads (OEM red wire is not used with Hunter)
just in case the Hunter fails and I have to switch back to the Duo Therm... The Duo Therm
thermostat is in the TT and can be reinstalled in just minutes if necessary...
For those with a Coleman setup, I also have the original article for the Coleman written by Alan
Paskey and the wiring directions associated with it... The text of Alan's article is shown below
and was used for Alan's Coleman setup...
Good Luck and Best Regards,
Les
HUNTER DIGITAL THERMOSTAT FOLLOW UP REPORT AS OF 10/26/01
WRITTEN BY LES ADAMS
The Hunter Digital Thermostat was installed in my 27' Nomad travel trailer in the Spring of this
year(2001)... We used the TT all year long utilizing both the heating mode and cooling mode...
The Hunter performed quite well coming "on" at 1 degree above set point and going "off" at 1
degree below set point...
Although this is actually a 3 degree range as opposed to the advertised +/- 1 degree,
theoretically, it is within the spec of +/- 1 degree (of set point) and the Hunter operates much
better than the standard Duo Therm analog thermostat...
This is a great modification to make if your dissatisfied with the hysterisis (on/off ratio) of your
current thermostat... I find the digital much easier to use because you simply set the desired
temperature... With the OEM Duo Therm analog thermostat that came with the TT, you had to
play with the "temp set arm" until you found the most comfortable setting while trying to
"interpolate" the temperature marks on the thermostat... The hysterisis of the Duo Therm
thermostat seemed to be larger than the Hunter... It was not uncommon to be either too hot or
too cold while waiting for the old thermostat to kick on or off... The temperature range within the
trailer is much more comfortable using the Hunter digital thermostat...
/