Page is loading ...

ISSUED: 07-17-96 SHEET #: 170-9001-7 10-26-04
1 of 12
Visit the Peerless Web Site at www.peerlessindustries.com For customer service call 1-800-729-0307 or 708-865-8870.
Installation and Assembly - TV Wall Mount
Models: PM 13, PM 13S, PM 13W, PM 20,
PM 20C, PM 20S, PM 20W, PM 27, PM 27C,
PM 27S, PM 27W
Before you start make sure all of the parts
shown are included with your product. See page
5 for a complete parts list.
R
PM 13, PM 13S,
PM 13W
PM 20, PM 20C,
PM 20S, PM 20W
PM 27, PM 27C,
PM 27S, PM 27W
The Maximum UL Load Capacity for this
product is rated up to 13" TV, 125 lb
WALL CONSTRUCTION ADDITIONAL HARDWARE REQUIRED
Wood Stud, Wood Beam none
Solid Concrete, Cinder Contact Customer Service for accessory kit
Block unless you have a PM 20C or PM 27C which
includes concrete fasteners
Metal Stud (Attachment to Do not attach except with Peerless accessory kit
metal studs has not been for metal studs; Contact Customer Service for
evaluated by UL and the Peerless accessory kit for metal studs.
product is not UL listed if
attached to metal studs.)
Other or unsure? Contact Customer Service
IMPORTANT! Certain types of walls require additional mounting hardware...
• Do not begin to install your Peerless product until you have read and understood the instructions and warnings
contained in this Installation Sheet. If you have any questions regarding any of the instructions or warnings, call
Peerless customer service at 1-800-729-0307.
• This product should only be installed by someone of good mechanical aptitude, has experience with basic
building construction, and fully understands these instructions.
• Make sure that the supporting surface will safely support the combined load of the equipment and all attached
hardware and components.
• Never mount this product to a metal stud wall construction unless the stud can be verified to be constructed of
25 gauge steel minimum, the drywall is 1/2" thick minimum and you obtain and use the Peerless accessory kit
for metal studs.
• Never exceed the Maximum UL Load Capacity.
• If mounting to wood wall stud wall construction, make sure that mounting screws are anchored into the center of
the studs. Use of an "edge to edge" stud finder is highly recommended.
• Always use an assistant or mechanical lifting equipment to safely lift and position equipment.
• Tighten screws and nuts firmly, but do not overtighten. Overtightening can damage the items, greatly reducing
their holding power. See suggested torque values where applicable within these instructions.
WARNING
L
M
F
D
C
K
J
B
E
G
H
A
N
E
I
The Maximum UL Load Capacity for this
product is rated up to 20" TV, 125 lb
The Maximum UL Load Capacity for this
product is rated up to 27" TV, 125 lb

ISSUED: 07-17-96 SHEET #: 170-9001-7 10-26-04
2 of 12
Visit the Peerless Web Site at www.peerlessindustries.com For customer service call 1-800-729-0307 or 708-865-8870.
BE SURE
TO DRILL
INTO STUD
CENTERS!
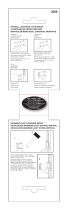
For Wood Stud Walls (for concrete skip to step 4) drill three 5/32" (4 mm) dia. holes 2 1/2" (65 mm)
deep. Attach wall bracket (F) using #14 x 2.5 (6 mm x 65 mm) wood screws (A) and plastic bushings (B).
∅ 5/32" (4 mm)
3/8" (10 mm)
B
F
A
3" (76 mm)
13" (330 mm) *
16.5" (419 mm)**
X
* PM 13, PM 13S, PM 13W, PM 20, PM 20S, PM 20W, PM 20C
** PM 27, PM 27S, PM 27W, PM 27C, PM 27WC
PLAN AHEAD! If you wish to
mount TV as close to ceiling
as possible measure TV height
and use dimensions provided to
calculate dimension X.
• Tighten wood screws so that wall plate is firmly attached, but do not overtighten. Overtightening can damage the
screws, greatly reducing their holding power.
• Never tighten in excess of 80 in. • lb (9 N.M.).
• Make sure that mounting screws are anchored into the center of the studs. The use of an "edge to edge" stud
finder is highly recommended.
WARNING

ISSUED: 07-17-96 SHEET #: 170-9001-7 10-26-04
3 of 12
Visit the Peerless Web Site at www.peerlessindustries.com For customer service call 1-800-729-0307 or 708-865-8870.
∅ 5/16" (8 mm)
FF
F
∅ 5/16" (8 mm)
For attachment to solid concrete
or cinder block wall drill, 5/16" (8
mm) dia. holes 1.75" (45 mm) deep
using a standard drill and masonry bit
(DO NOT use a hammer drill). Attach
wall bracket (F) using Concrete
Anchor Kit as pictured below.
Tighten to 80 in. lbs. (9 N.M.) maxi-
mum torque.
Insert and
hammer in
anchor.
Tighten to 80 in.
lbs. (9 N.M.)
maximum
torque. The
anchor will
expand and grip
inside the hole.
• Always attach concrete expansion anchors directly to
load-bearing concrete.
• Never attach concrete expansion anchors to concrete
covered with plaster, drywall, or other finishing mate-
rial. If mounting to concrete surfaces covered with a
finishing surface is unavoidable, the finishing surface
must be counterbored.
WARNING
• Tighten concrete anchor bolt firmly, but do not over-
tighten. Overtightening can damage the bolt, greatly
reducing its holding power.
• Never tighten in excess of 80 in • lb (9 N.M.).
WARNING
WARNING
• If your model does not include concrete fasteners, contact customer service for the appropriate accessory kit to
install the product on concrete or cinder block.
• When installing Peerless wall mounts on cinder block, verify that you have a minimum of 1-3/8" of actual concrete
surface in the 5/16" diameter hole to be used for the concrete anchors. Do not drill into mortar joints! Be sure to
mount in a solid part of the block, generally 1" minimum from the side of the block. Cinder block must meet ASTM
C-90 specifications. It is suggested that a standard electric drill on slow setting is used to drill the hole instead of
a hammer drill to avoid breaking out the back of the hole when entering a void or cavity.
• Concrete must be 2000 psi density minimum. Lighter density concrete may not hold concrete anchor.
• Make sure that the wall will safely support the combined load of the equipment and all attached hardware and
components.
• Never exceed the Maximum UL Load Capacity.
F
O
FINISHING
SURFACE
CONCRETE

ISSUED: 07-17-96 SHEET #: 170-9001-7 10-26-04
4 of 12
Visit the Peerless Web Site at www.peerlessindustries.com For customer service call 1-800-729-0307 or 708-865-8870.
0
0
10
0
5
0
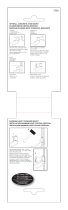
Join support arm
(K) and support
arm retainer (C)
with retainer pin
(D). Note: A gentle
tap with a hammer
may be necessary
to insert retainer
pin (D).
Snap bushings
(E) into wall
bracket (F).
Insert support arm
(K) into wall bracket
(F), then insert
support arm
retainer (C).
E
E
F
C
D
F
F
K
K
K
C
C
Support arm
retainer (C) will
hold support arm
(K) in place on
wall bracket (F).
11/16"
(17 mm)
G
H
I
L
M
N
K
N
J
K
Complete the wall
mount assembly as
shown. Note: If install-
ing a VCR mount refer
to that instruction
before completing
this step.
Choose from one of three tilt positions.

ISSUED: 07-17-96 SHEET #: 170-9001-7 10-26-04
5 of 12
Visit the Peerless Web Site at www.peerlessindustries.com For customer service call 1-800-729-0307 or 708-865-8870.
PM 20C
PM 27C
Description Qty. Part Number
A Washer Head Screw (black) 3 5S1-015-C03
#14 x 2.5 (6 mm x 65 mm)
Washer Head Screw (cadmium) 3 5S1-015-C04
#14 x 2.5 (6 mm x 65 mm)
B Plastic Ring 3 590-1018
C Support Arm Retainer (black) 1 590-1051
Support Arm Retainer (white) 1 590-1052
Support Arm Retainer (silver) 1 590-4051
D Retainer Pin 1 560-9643
E Bushing (black) 2 590-1005
Bushing (white) 2 9PT-66SW02P
Bushing (silver) 2 590-4005
F Wall Bracket (black) 1 170-1001
Wall Bracket (white) 1 170-2001
Wall Bracket (silver) 1 170-4001
Wall Bracket (black) 1 170-1039
Wall Bracket (white) 1 170-2039
Wall Bracket (silver) 1 170-4039
G Lock Nut (black) 1 530-9402
Lock Nut (white) 1 530-9404
H Brass Washer 1 540-9441
I Spring Plate 1 580-0003
J Support Tray (black) 1 170-1017
Support Tray (white) 1 170-2017
Support Tray (silver) 1 170-4017
Support Tray (black) 1 170-1018
Support Tray (white) 1 170-2018
Support Tray (silver) 1 170-4018
Support Tray (black) 1 170-1020
Support Tray (white) 1 170-2020
Support Tray (silver) 1 170-4020
K Support Arm (black) 1 170-1021
Support Arm (white) 1 170-2021
Support Arm (silver) 1 170-4021
Support Arm (black) 1 170-1022
Support Arm (white) 1 170-2022
Support Arm (silver) 1 170-4022
Support Arm (black) 1 170-1023
Support Arm (white) 1 170-2023
Support Arm (silver) 1 170-4023
L Swivel Cup (black) 1 590-1019
Swivel Cup (white) 1 590-1020
Swivel Cup (silver) 1 590-4019
M End Cap (black) 1 590-1014
End Cap (white) 1 590-1001
End Cap (silver) 1 590-4014
N Carriage Bolt (black) 1 520-1158
Carriage Bolt (cadmium) 1 520-2158
Carriage Bolt (sliver) 1 520-2158
O Concrete Anchor 3 560-9707
PM 13
PM 13S
PM 13W
PM 20
PM 20S
PM 20W
PM 27
PM 27S
PM 27W
!
!
!
!
!
!
!
!
!
!
!
!
!
!
!
!
!
!
!
!
!
!
!
!
!
!
!
!
!
!
!
!
!
!
!
!
!
!
!
!
!
!
!
!
!
!
!
!
!
!
!
!
!
!
!
!
!
!
!
!
!
!
!
!
!
!
!
!
!
!
!
!
!
!
!
!
!
!
!
!
!
!
!
!
Parts List
!
!
!
!
!
!
!
!
!
!
!
!
!
!
!
!
!
!
!
!
!
!
!
!
!
!
!
!
!
!
!
!
!
!
!
!
!
!
!
!
!
!
!
!
!
!
!
!
!
!
!
!
!
!
!
!
!
!
!
!
!
!
!
!
!
!
!
!
!
!
/