Page is loading ...

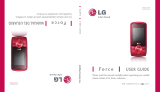
LG221C User Guide
- English
Some of the contents in this manual may differ from your
phone depending on the software of the phone or your service
provider.

2
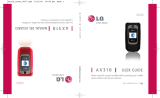
Phone Overview
1. Earpiece Lets you hear the caller.
2. LCD Screen Displays messages and status
icons. When the phone is turned on, Power
Save mode automatically dims the screen and
then darkens it if no keys are pressed.
3. Left Soft Key Use to access the Main menu
from the Home screen or the function
immediately above it.
4. Speakerphone Key Use to turn the Speaker On or
Off.
5. SEND Key Use to place or answer calls.
6. Alphanumeric Keypad Use to enter numbers
and characters and select menu items.
7.
Vibrate Mode Key
Use to set the vibration
mode from standby mode. To set it, press and
hold for about 2 seconds.
8. Navigation Key Use to navigate through
menus and options. When on the Home
screen, use for quick access to Messages,
Contact List, Games and Sound.
9. Right Soft Key Use to access the Browser
menu from the Home screen or the function
immediately above it.
10.
Menu/OK
Key Use to access the Prepaid
menu.
11. CLR Key Deletes single spaces or characters
with a quick press, but press and hold to
delete the text entered in a text field. This key
will also back you out of menus, one level at a
time.
12. PWR/END Key Use to turn the power on/off
and to end a call. Also use to exit from any
function and return to the standby menu.
13.
Lock Mode Key
Use to lock the phone from
standby mode. To lock the phone, press and
hold for about 2 seconds.

3
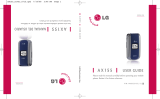
1. Earphone Jack Allows the use of a headset
to hear caller's voice.
2. Volume Keys Use to adjust the ringer
volume in standby mode and the earpiece
volume during a call.
3. Charger/Accessory Port Connects the
phone to the battery charger or other
available accessories.
4. Voice Command Key Use for quick access
to Voice Command function.
Charging with the PC USB Port
You can use your computer to charge your
phone. Connect one end of a USB cable to
the Charger/Accessory Port on your phone
and the other end to a high-power USB
port on your PC (commonly located on the
front panel of the computer).

4
Prepaid
1. Add Airtime
2. Buy Airtime
3. My Phone
Number
4. Airtime Info
5. Airtime Display
6. Serial Number
7. Code Entry Mode
Contacts
1. New Contact
2. Contact List
3. Groups
4. My vCard
5. Speed Dials
Messages
1. New Message
2. Inbox
3. Outbox
4. Drafts
5. Voicemail
6. Templates
7. Settings
1. Entry Mode
2. Signature
8. Delete All
1. Delete Inbox
2. Delete Outbox
3. Delete Drafts
4. Delete All
Messages
Recent Calls
1. Missed Calls
2. Received Calls
3. Dialed Calls
4. All Calls
5. Call Timer
6. Data Counter
Games
1. Buy Games
Bubble Bash 2
Platinum Solitaire
2
UNO
Menus Overview
Menu Access
While in standby mode, press the Left Soft Key Menu to
access your phone's menus. There are two methods of accessing
menus and submenus:
●
Use the Navigation Key to highlight a menu/option and press to
select it.
●
Press the number key on the keypad to activate the
corresponding menu/option.

5
Browser
Multimedia
1. Record Voice
2. Images
1. My Images
2. Default
3. Buy Graphics
3. Sounds
1. My Sounds
2. Default
3. Buy Ringtones
Voice Command
1. Start Command
1. Call <Name> or
<Number>
2. Voicemail
3. Missed Calls
4. Messages
5. Time & Date
6. Help
2. Command Mode
1. Normal
2. Speed
3. Announce Alert
1. Disable
2. Announce
3. Announce +
Ring
4. Train Word
1. Voice
Command
2. Answer
3. Digit Dial
5. Best Match
1. 1Match
2. 4 Matches
My Schedule
1. Alarm Clock
2. Calendar
3. Notepad
Bluetooth
1. Paired Devices
2. Power
3. My Visibility
4. My Bluetooth
Info
Tools
1. Calculator
2. Ez Tip Calculator
3. World Clock
4. Stopwatch
5. Unit Converter
1. Currency
2. Area
3. Length
4. Mass
5. Temperature
6. Volume
7. Velocity

6
Menus Overview
Settings
1. Sound
1. Ringtones
1. All Calls
2. Caller ID
3. No Caller
ID
4. Buy
Ringtones
2. Volume
1. Master
Volume
2. Keypad
3. Earpiece
4. Speaker
3. Message
Alerts
1. Message
2. Voicemail
3. Message
Reminder
4. Alert Type
5. Service Alerts
1. Minute
Beep
2. Call
Connect
3. Back to Top
4. Low Battery
5. Roam Alert
6. Power On/Off
Tone
7. Flip Tone
8. Emergency
Tone
2. Display
1. Wallpaper
1. My Images
2. Default
3. Buy
Graphics
2. Backlight
1. Display
2. Keypad
3. Brightness
3. Menu Style
4. Languages
(Idiomas )
5. Clocks &
Calendar
1. Main
Screen
2. Front
Screen
6. Font Settings
1. Font Type
2. Dial Font
Style
3. Dial Font
Size
7. Wo r d
Prediction
8. Name Match
for Dialing
3. Security
1. Lock Phone
2. Change
Lock Code
3. Reset
Default
4. Call Settings
1. Answer
Options
2. Auto Retry
3. One Touch
Dial
4. Airplane Mode

5. TTY Mode
5. System
1. Network
1. System
Select
2. Serving
System
2. Location
6. Memory
1. Reserved
Memory
2. Multimedia
7. Phone Info
1. My Number
2. ESN/MEID
3. Icon Glossary
4. Version
7

8
The Battery
The phone comes with a
rechargeable battery. The
battery charge level is shown at
the top right corner of the LCD
screen.
Installing the Battery
Remove the battery cover by
pressing down on the LG logo
and sliding the cover up. Align
the battery with the terminals
near the top of the phone,
then snap the rest of the
battery into place. Align the
battery cover and slide it
downward until it clicks into
place.
Removing the Battery
Turn the phone off. Slide the
battery cover upward to
remove it. Use the opening
near the bottom of the battery
to lift the battery out.
Charging the Battery
Warning! Use only the charger
provided with the phone. Using
any charger other than the one
included with the LG221C may
damage your phone or battery.
Getting Started with Your Phone
Note
It is important to fully charge the
battery before initial use of the
phone.

9
Plug one end of the charger
into the phone’s Charger/
Accessory Port and the other
end into an electrical outlet.
The charge time varies depending
upon the battery level.
Battery Charge Level
The battery charge level is
shown at the top right corner
of the LCD screen. When the
battery charge level becomes
low, the low battery sensor
alerts you in up to three ways:
sounding an audible tone,
blinking the battery icon, and
displaying a warning message.
If the battery charge level
becomes exceedingly low, the
phone automatically switches
off and any function in
progress is not saved.
Turning the Phone On
and Off
Turning the Phone On
1. Install a charged battery or
connect the phone to an
external power source if the
battery level is low.
2. Press for about 3
seconds until the LCD
screen turns on.
Turning the Phone Off
Press and hold until the
screen turns off.
Notice
Please make sure that the 'B' side
faces up before inserting a
charger or USB cable into the
Charger/Accessory Port of your
phone.

10
Getting Started with Your Phone
Signal Strength
Call quality depends on the
signal strength in your area.
The signal strength is indicated
on the screen as the number of
bars next to the signal strength
icon ; the more bars, the
better the signal strength. If
the signal quality is poor, move
to an open area. If you are in a
building, the reception may be
better near a window.
Screen Icons
To see the icon glossary, go to
Menu
-
>
Settings
-
>
Phone Info
-
>
Icon
Glossary
on your phone.
Making Calls
1. Make sure the phone is
turned on. If not, press
for about 3 seconds to turn
it on.
2. Enter the phone number
(include the area code if
needed).
3. Press to dial the
number.
4. Press to end the call.
Correcting Dialing
If you make a mistake while
dialing a number, press
once to erase the last digit
entered, or hold down for
at least 2 seconds to erase all
the digits entered.
Note
The call quality may also be affected
by your location and weather/
ambient conditions.

11
Redialing Calls
Press twice to redial the
last number you dialed. The
last 150 numbers (50 missed,
50 received and 50 dialed) are
stored in the call history list
and you can also select any of
these to redial.
Receiving Calls
1. When the phone rings
and/or vibrates, press
to answer.
2. Press to end the call.
Tip
To select your method for answering
calls, you can change your Answer
Options.
Menu
->
Settings
->
Call Settings
->
Answer Options
. Choose
from the following options:
Flip Open/ SEND Key Only/
Any Key/ Auto with Handsfree
Note
If you press or (the
Volume Keys), while the phone is
ringing, the ringing or vibration is
muted for that call.

Mute Function
The Mute Function is used
during a phone call. To quickly
activate Mute, press the Left Soft
Key
Mute
. To cancel, press
the Left Soft Key
Unmute
.
Quick Volume Adjustment
Quickly adjust the ringer and
earpiece volumes by pressing
the upper Volume Key to
increase the volume and the
lower Volume Key to decrease
it.
Call Waiting
Your cellular service may offer
call waiting. While a call is in
progress one beep indicates an
incoming call. When call
waiting is enabled, you may put
the active call on hold while
you answer the other incoming
call. Check with your cellular
service provider for information
about this function.
1. Press to receive a
waiting call.
2. Press again to switch
between calls.
Caller ID
Caller ID displays the phone
number or name of the
incoming call. If the caller’s
identity is stored in Contacts,
the name will appear along
with the phone number. Check
12
Quick Access to Convenient Features
Note
Keypad Volume is adjusted
through the Sound Volume
menu:
Menu
-
>
Settings
-
>
Sound
-
>
Volume
-
>
Keypad

with your service provider to
ensure they offer this feature.
Speed Dialing
Speed dialing is a convenient
feature that allows you to make
phone calls quickly. A number
key can be assigned to a
specific phone number. By
pressing and holding down a
number key, your phone will
recall the phone number
associated from the Contact
List and display it briefly while
simultaneously dialing that
phone number for you. Speed
Dial Number 1 is set to your
Voice Mailbox by default and is
unchangeable.
Dialing Single Digit Speed
Dials (from 2 to 9)
Press and hold the Speed
Dial number.
OR
Enter the Speed Dial
number and press .
Dialing Double Digit Speed
Dials (from 10 to 99)
Press the first digit and then
press and hold the key of
the second digit.
OR
Enter the first and second
digits and press .
13

Text Input
You can input and edit your
Banner, Calendar, Contacts,
Alarm Clock, Notepad, and
Messages.
Key Functions
Left Soft Key:
Press to scroll through
the following text input
modes:
T9Word
(T9WORD/T9Word/
T9word) -> Abc
(ABC/Abc/abc) -> 123
-> Symbols
Shift
: Press to change
capitalization.
T9 text : T9Word ->
T9WORD -> T9word
Abc text : Abc -> ABC -
> abc
Next
: In T9 mode, press
to display other
matching words.
Space: Press to
complete a word if in T9
mode; otherwise, press
to insert a space.
Clear: Press to delete a
single space or
character. Hold to delete
the whole message.
Punctuation: Press to
insert punctuation in a
word and complete a
sentence.
14
Entering and Editing Information

15
The Basics of Storing
Contacts Entries
1. From standby mode, enter
the phone number you want
to save (up to 48 digits).
2. Press
Save
.
3. Select either
Add New
Contact
or
Update
Existing.
4. Use to highlight a Label
and press .
Mobile 1/ Home 1/
Office 1/ Mobile 2/
Home 2/ Office 2/Fax
5. Enter a name for the phone
number (up to 32 characters)
and press
Save
. A
confirmation message is
displayed briefly.
Phone Numbers With
Pauses
When you call automated
systems, such as voicemail or
credit billing numbers, you
often have to enter a series of
numbers to navigate through
the system. Instead of entering
these numbers by hand, you
can store the numbers in your
Contacts separated by special
pause characters (W, P). There
are two different types of
pauses you can use when
storing a number:
Wait (W)
The phone stops dialing until
you press the Left Soft Key
Release
to advance to
the next number.
Contacts in Your Phone’s Memory
Note
Use
Update Existing
to add
another phone number to a
contact already stored in memory.

Pause (P)
The phone waits 2 seconds
before sending the next string
of digits.
Storing a Number with Pauses
1. Press
Menu
.
2. Press
Contacts
.
3. Press
New Contact
.
4. Enter a name (up to 32
characters).
5. Enter the phone number in
any of the number labels.
6. While entering the number,
press the Right Soft Key
Options
.
7. Press
Wait
or
Pause
.
8. Enter the additional
number(s) and press
Save
.
Adding a Pause to an Existing
Number
1. While in standby mode,
press the Down Navigation
Key to display your
Contacts alphabetically.
2. Use to highlight the
Contact entry to edit, then
press
View
.
3. Press the Left Soft Key
Edit
.
4. Use to highlight the
number.
5. Press the Right Soft Key
Options
.
6. Press
Wait
or
Pause
.
7. Enter the additional
number(s), and press
Save
.
16
Contacts in Your Phone’s Memory

Searching Your Phone’s
Memory
The LG221C phone is able to
perform a dynamic search of the
contents in your phone’s
memory. A dynamic search
compares entered letters or
numbers against the entries in
your Contacts. A matching list is
displayed in descending order.
You can then select a number
from the list to call or edit.
Searching by Letter
1. While in standby mode,
press the Down Navigation
Key to display your
Contacts alphabetically.
2. Press (or press repeatedly)
the key on the keypad that
corresponds with the search
letter.
Scrolling Through Your Contacts
1. Press the Down Navigation
Key to display your
Contacts alphabetically.
2. Use to scroll through
the list.
Contact List Options
1. While in standby mode,
press the Down Navigation
Key and highlight a
Contact entry.
2. Press the Right Soft Key
Options
.
3. Select from the following
options:
Send Message
: Send a
text message to the
selected contact.
17

18
Contacts in Your Phone’s Memory
Delete
: Delete the
selected entry in your
Contacts.
Edit
: Edit the selected
contact information.
Delete Multiple
: Choose
from
Selective
or
All
to
delete multiple entries at
one time.
Send via Bluetooth
:
Send a contact (vCard)
via Bluetooth. In case
Bluetooth power is not
on, a notice pops up to
turn Bluetooth on.
Set Speed Dial
: Set a
speed dial.
Making a Call From Your
Phone’s Memory
Once you have stored phone
numbers in your Contacts, you
can place calls to those
numbers quickly and easily.
●
By pressing the SEND Key
after searching for a
phone number in Contacts
or Call History and
highlighting it.
●
By using Speed Dialing.
From Contacts
1. While in standby mode,
press the Down Navigation
Key to display your
Contacts.
2. Use to highlight the
Contact entry, then press
View
.

3. Use to highlight the
phone number.
4. Press to place the call.
From Call History
1. Press
Menu
.
2. Press
Recent Calls
.
3. Use to highlight the
type of recent call, then
press .
Missed Calls/ Received
Calls/ Dialed Calls/ All
Calls
4. Use to highlight the
phone number.
5. Press to place the call.
Speed Dialing
For a single-digit Speed Dial,
press and hold the digit or
press the digit, then press .
For a double-digit Speed Dial,
press the first digit and hold
the second digit or press the
first and second digits, then
press .
19

Prepaid
The Prepaid menu provides
shortcuts to access useful
account information.
1. Add Airtime
Add Airtime allows you to start
an over-the-air request for
additional airtime.
1. Press
Menu
, ,
.
2. Enter your Airtime PIN
Number and press .
2. Buy Airtime
Buy Airtime allows you to start
an over-the-air request for
purchase additional airtime.
1. Press
Menu
, ,
.
2. Use to highlight an
option and press .
60 mins./ 120 mins./ 200
mins./ 450 mins.
3. My Phone Number
My Phone Number displays
your device's phone number.
1. Press
Menu
, ,
.
4. Airtime Info
Airtime Info displays your
airtime balance and due date.
1. Press
Menu
, ,
.
5. Airtime Display
Airtime Display allows you to
disable/enable the display of
prepaid-related information on
the Home screen.
1. Press
Menu
, ,
.
20
Using Phone Menus
/