VocoPro DVG-777K III Operating instructions
- Category
- Karaoke systems
- Type
- Operating instructions

DVG-777K III
Multi-Format USB/DVD/CD+G Karaoke Player

2
Table of Contents
Safety Instructions
..........................................
3
FCC Information
.............................................
4
Welcome
......................................................
5
Features and Specifi cations
.............................
6
Getting Started
..............................................
7
•
Warranty Information
...................................
7
•
Package Contents
........................................
7
Getting Connected
..........................................
8
•
A
udio Connections
.......................................
8
•
Video Connections
.......................................
10
•
USB Device Connection
................................
12
•
SD ca
rd Connection
.....................................
12
General
Operations
.........................................
13
•
DVD Operations
...........................................
17
•
Mp3, AVI and Media File Operations
...............
18
Descriptions and Functions
..............................
19
•
Front Panel
.................................................
19
•
Rear Panel
.................................................
20
•
Remote Control
...........................................
21
Setup Menu
..................................................
23
•
System Setup Menu
.....................................
23
•
Audio Setup Menu
.......................................
24
•
Video Setup Menu
........................................
24
•
Speaker Setup Menu
....................................
2
4
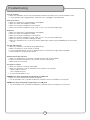
Troubleshooting
.............................................
2
6

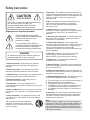
Safety Instructions
CAUTION: To reduce the risk of electric shock,
do not remove cover (or back). No
user-serviceable parts inside. Only refer
servicing to qualified service personnel.
To reduce the risk of fire or electric shock, do
not expose this unit to rain or moisture.
The lightning flash & arrowhead
symbol, within an equilateral triangle,
is intended to alert you to the
presence of danger.
The exclamation point within an
equilateral triangle is intended to alert
you to the presence of important
operating and servicing instructions.
- All the safety and operating
instructions should be read before the appliance is
operated.
- The safety and operating
instructions should be retained for future reference.
- All warnings on the appliance and in
the operating instructions should be adhered to.
- All operating and use
instructions should be followed.
- Do not use attachments not
recommended by the product manufacturer as they may
cause hazards.
- Do not use this unit near water.
For example, near a bathtub or in a wet basement and
the like.
- The appliance should be used
only with a cart or stand that is recommended by the
manufacturer.
An appliance and cart combination
should be moved with care. Quick stops,
excessive force, and uneven surfaces may
cause an overturn.
- The appliance should be situated so its
location does not interfere with its proper ventilation. For
example, the appliance should not be situated on a bed,
sofa, rug, or similar surface that may block the
ventilation slots.
- The appliance should be situated away from
heat sources such as radiators, heat registers,
stoves, or other appliances (including amplifiers)
that produce heat.
- The appliance should be
connected to a power supply only of the type described
in the operating instructions or as marked on the
appliance.
- Precautions should be
taken so that the grounding or polarization means of
an appliance is not defeated.
- Power-supply cords
should be routed so that they are not likely to be walked
on or pinched by items placed upon or against them,
paying particular attention to cords at plugs,
convenience receptacles, and the point where they exit
from the appliance.
- Unplug this unit from the wall outlet
before cleaning. Do not use liquid cleaners or
aerosol cleaners. Use a damp cloth for cleaning.
- An outdoor antenna should be
located away from power lines.
- The power cord of the appliance
should be unplugged from the outlet when left unused
for a long period of time.
- Care should be taken so
that objects do not fall and liquids are not spilled into the
enclosure through openings.
- The appliance should
be serviced by qualified service personnel when:
A. The power supply cord or plug has been damaged; or
B. Objects have fallen into the appliance; or
C. The appliance has been exposed to rain; or
D. The appliance does not appear to operate normally
or exhibits a marked change in performance; or
E. The appliance has been dropped, or the enclosure
damaged.
- The user should not attempt to service
the appliance beyond that described in the operating
instructions. All other servicing should be referred to
qualified service personnel.
To CATV system installer's (U.S.A.): This reminder is
provided to call the CATV system installer's attention to
Article 820-40 of the NEC that provides guidelines for
proper grounding and, in particular, specifies that the
cable ground shall be connected as close to the point of
cable entry as practical.

FCC information (U.S.A.)
1. IMPORTANT NOTICE: DO NOT MODIFY THIS
UNIT!: This product, when installed as indicated in the
instructions contained in this manual, meets FCC
requirements. Modifications not expressly approved by
Vocopro may void your authority, granted by the FCC, to
use this product.
2. IMPORTANT: When connecting this product to
accessories and/or another product use only high
quality shielded cables. Cable(s) supplied with this
product MUST be used. Follow all installation
instructions. Failure to follow instructions could void your
FCC authorization to use this product in the U.S.A.
3. NOTE: This product has been tested and found to
comply with the requirements listed in FCC Regulations,
Part 15 for Class "B" digital devices. Compliance with
these requirements provides a reasonable level of
assurances that your use of this product in a residential
environment will not result in harmful interference with
other electronic devices. This equipment
generates/uses radio frequencies and, if not installed
and used according to the instructions found in the
owner's manual, may cause interference harmful to the
operation of other electronic devices. Compliance with
FCC regulations does not guarantee that interference
will not occur in all installations. If this product is found
to be the source of interference, which can be
determined by turning the unit "Off" and "On", please try
to eliminate the problem by using one of the following
measures:
Relocate either this product or the device that is being
affected by the interference.
Use power outlets that are on different branch (circuit
breaker or fuse) circuits or install AC line filter(s).
In the case of radio or TV interference, relocate/reorient
the antenna. If the antenna lead-in is 300-ohm ribbon
lead, change the lead-in to coaxial type cable.
If these corrective measures do not produce satisfactory
results, please contact your local retailer authorized to
distribute Vocopro products. If you can not locate the
appropriate retailer, please contact Vocopro, 1728
Curtiss Court, La Verne, CA 91750.
1. To ensure the finest performance, please read this
manual carefully. Keep it in a safe place for future
reference.
2. Install your unit in a cool, dry, clean place - away from
windows, heat sources, and too much vibration, dust,
moisture or cold. Avoid sources of hum (transformers, v
motors). To prevent fire or electrical shock, do not expose
to rain and water.
3. Do not operate the unit upside-down.
4. Never open the cabinet. If a foreign object drops into
the set, contact your dealer.
5. Place the unit in a location with adequate air
circulation. Do not interfere with its proper ventilation; this
will cause the internal temperature to rise and may result
in a failure.
6. Do not use force on switches, knobs or cords. When
moving the unit, first turn the unit off. Then gently
disconnect the power plug and the cords connecting to
other equipment. Never pull the cord itself.
7. Do not attempt to clean the unit with chemical solvents:
this might damage the finish. Use a clean, dry cloth.
8. Be sure to read the "Troubleshooting" section on
common operating errors before concluding that your unit
is faulty.
9. This unit consumes a fair amount of power even when
the power switch is turned off. We recommend that you
unplug the power cord from the wall outlet if the unit is not
going to be used for a long time. This will save electricity
and help prevent fire hazards. To disconnect the cord, pull
it out by grasping the plug. Never pull the cord itself.
10. To prevent lightning damage, pull out the power cord
and remove the antenna cable during an electrical storm.
11. The general digital signals may interfere with other
equipment such as tuners or receivers. Move the system
farther away from such equipment if interference is
observed.
NOTE:
Please
check the copyright laws in your country
before recording from records, compact discs,
radio, etc. Recording of copyrighted material may
infringe copyright laws.
CAUTION
The apparatus is not disconnected from the AC power
source so long as it is connected to the wall outlet,
even if the apparatus itself is turned off. To fully insure
that the apparatus is indeed fully void if residual power,
leave unit disconnected from the AC outlet for at least
fifteen seconds.
CAUTION:
READ THIS BEFORE OPERATING YOUR UNIT
Voltage Selector (General Model Only)
Be sure to position the voltage selector to match the
voltage of your local power lines before installing the
unit.
110V

And thank you for purchasing the DVG-777K III from VocoPro, your ultimate choice in
Karaoke entertainment! With years of experience in the music entertainment business,
VocoPro is a leading manufacturer of Karaoke equipment, and has been providing
patrons of bars, churches, schools, clubs and individual consumers the opportunity to
sound like a star with full-scale club models, in-home systems and mobile units. All our
products offer solid performance and sound reliability, and to reinforce our commitment
to customer satisfaction, we have customer service and technical support professionals
ready to assist you with your needs. We have provided some contact information for
you below.
VocoPro
1728 Curtiss Court
La Verne, CA 91750
Toll Free: 800-678-5348
TEL: 909-593-8893
FAX: 909-593-8890
VocoPro Company Email Directory
Customer Service & General Inf
ormation
info@vocopro.com
Tech Suppor
t
techsupport@vocopro.com
Remember Our Website
Be sure to visit the VocoPro website www.vocopro.com for the latest information on
new products, packages and promos. And while you're there don't forget to check out
our Club VocoPro for Karaoke news and events, chat rooms, club directories and even
a KJ Service directory!
We look forward to hearing you sound like a PRO, with VocoPro, the singer’s ultimate
choice.
FOR YOUR RECORDS
Please record the model number and serial number below, for easy reference, in case of loss or theft. These
numbers are located on the rear panel of the unit. Space is also provided for other relevant information
Model Number
Serial Number
Date of Purchase
Place of Purchase
Welcome

6
Features
•
Multi-format disc player reads DVD, CD, CD+G, Mp3, Mp3+G, Mp4, HDCD and VCD
•
USB and SD card
playback
•
Now supports
Mp3+G format
•
Two
¼
”
m
icrop
hone
input channels with individual volume controls
•
Cue mode stops playback at the begginging of each track
•
5.1
channel surround sound
•
Di
rect Trac
k Access
•
Digital Echo gives vocals that hard-to-fi nd professional sound
•
Full-function remote control
•
P
AL/NTSC compatible for worldwide use
PAL/NTSC compatible for worldwide use P
•
LED
Display wi
ndow
•
Audio Outputs
:
5.1 Channel
RCA
surround sound
,
Digital Coa
xial (music only)
, Digital
O
ptical (music only)
•
Video Ouputs
:
RCA video
, (
Y,U/Pb,V/Pr), S-VIDEO
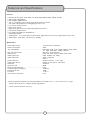
Specifi cations
Power re
quirements
................................................
100V/240V AC, 50/60
Hz
Power consumption
................................................
25W
Disc compatibility
....................................................
Disc compatibility ....................................................Disc compatibility
DVD, M
p4
, VCD 1.0-3.0, Mp3,
Mp3+G,
SVCD, CD+G,
CD, J
PEG,
CD-R/RW*,
DVD+R/-R/RW*
Disc size requirements
............................................
Diameter: 120mm/80mm
Video format
..........................................................
NTSC, PAL, Multi System, 480P, 576P, 720P
Video output type
....................................................
Video, S-Video, YUV, YPbPr
Video output level
....................................................
CVBS: 1Vp-p 75
Ω
USB jack
...............................................................
USB jack ...............................................................USB jack
USB1.1
Remote distance
....................................................
22 fe
et maximum**, 30
º
angle
Audio output format
................................................
Stereo, 5.1CH, optical, and coaxial
DVD frequ
ency response
..........................................
20-20kHz
DVD S/N ratio
.......................................................
80dB
DVD harmonic distortion
..........................................
0.3%
Karaoke frequ
ency response
....................................
20-20kHz
Karaoke S/N ratio
..................................................
70dB
Echo level
..............................................................
10 lev
e
ls
Total harmon
ic distortion
.........................................
0.5%
*Some burned CDs and DVDs may not
play properly on the D
VG-777K III. I
f this is the case, tr
y using a
different brand of disc or a di
ff
ernt
disc-burning program.
**
Actual maximum distance may
vary
Features and Specifi cations

7
When unpacking your DVG-777K III we recommend that you keep the original receipt or invoice, box and
packing materials in case the product ever needs to be shipped for warranty repair or any other purpose.
Warranty Information
The DVG-777K III is covered under a 1-Year Limited Warranty. For detailed warranty information please
visit
www.vocopro.com/warranty_standard.html
Extended Limited Warranty
Extended Warranties are also available and can be purchased directly from VocoPro. Visit
www.vocopro.com/warranty_extended.html
for information and purchasing of our Silver and Gold Extended Limited Warranties.
Service Centers
For a list of U.S. and International Authorized VocoPro Service Centers visit
www.vocopro.com/frm_service.html
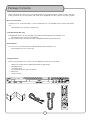
Package Contents
Before using the DVG-777K III make sure the following accessories are included:
•
1 DVG
-777K III Multi-Format USB/DVD/CD+G Karaoke Player
•
1 Remote Control
•
1
AC Power Cord
•
1
A/V R
CA cable (red, white and
yellow)
• 2 Rack
e
ars
• 1 Warranty Card
Package Contents

8
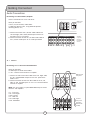
Audio Connections
Connecting to a Stereo Mixer/Amplifi er
Use this connection for music and vocals.
What you will need:
•
RCA L
/R (red & white) audio cables
•
Audio input device
(mixer, amp, powered speakers,
recording device, etc.)
1. Connect one end of the L/R RCA audio cable to the
Left and Right (red & white) RCA Output channels on
the DVG-777K III’s rear panel
2. Connect the other end of the L/R RCA audio cable to
the L/R RCA audio inputs on an audio input device
5.1 Audio
Connecting to a 5.1 Surround Sound Receiver
What you will need:
•
6
RCA
-style surround sound cables
•
A 5.1
surround
sound receiver or amplifi er
1. Connect an end of each RCA cable to the Left, Right, CEN,
SL, SR, and Subwoofer outputs on the rear panel of the
DVG-777K III
2. Connect the other end of each RCA cable to the FL, FR,
CEN, SL, SR, and SW inputs on a 5.1 CH. Surround Sound
receiver or amplifi er.
NOTE:
The actual inputs may be labeled differently on certain
receivers and amplifi ers.
• FL - Front Left
• FR - Front Right
• CEN - Center
• SL - Side Left
• SR - Side Right
• SW - Subwoofer
Getting Connected
REC OUT
remote
AV OUT
AV INPUT STEREO INPUT
PHONO
RECORD AUDIO AV3 AV2 AV1 PHONO 3 CD 3 CD 2 CD 1
PHONO 2
LINE
PHONO 1
LINE

9
Getting Con
nected
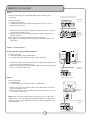
Connecting
Directly to a Powered Subwoofer
The DVG-777K III can be connected directly to a powered subwoofer
with an RCA input.
What you will need:
•
1
RCA
cable
•
A powered su
bwoofer with an RCA audio input
1. Connect one
end of the RCA cable
to the SW output on the rear
panel of th
e DVG-777K III
2
. Co
nnect the other end of
the RCA cable to th
e RCA input on the
power
ed subwoofer
Optical
Use the Optical output for connecting digital audio to a device with
an optical input.
What you will need:
• 1 Digital Optical cable
• An audio input device with a Digital Optical audio input jack such
as a digital receiver or mixer
1. Connect one end of the Optical cable to the OPTICAL output jack
on the rear panel of the DVG-777K III
2. Connect the other end of the Optical cable to an Optical input
jack on a receiver, mixer, etc.
NOTE: There is no microphone output in digital audio signal.
NOTE: Digital audio must be set up. Refer to the audio setup page
in the setup menu.
R
L
+ +- -
+

10
Getting Connected
Coaxial
Use the Coaxial output for connecting digital audio to a device with a
coaxial input.
What you will need:
• 1 Digital Coaxial cable**
• An audio input device with a Digital Coaxial audio input jack such as a
digital receiver or mixer
1. Connect one end of the Coaxial cable to the COAXIAL output jack on the
rear panel of the DVG-777K III
2. Connect the other end of the Coaxial cable to a Coaxial input jack on a
receiver, mixer, etc.
NOTE: There is no microphone output in digital audio signal.
NOTE: Digital audio must be set up. Refer to the audio setup page in the
setup menu.
Video Connections
Connecting Video Using the RCA Video Output
What you will need:
• 1 RCA video cable (usually labeled yellow)
• A TV, video monitor or video mixer with an RCA video input
1. Connect one end of the RCA video cable to the yellow RCA VIDEO output
on the rear panel of the DVG-777K III
2. Connect the other end of the RCA video cable to an RCA video input jack
on a TV, monitor or video mixer
S-Video
What you will need:
• 1 S-Video Cable
• A TV, video monitor or video mixer with an S-Video input
1. Connect on
e end
of the S-Video
cable to the S-Video output on the rear
panel of the DVG-777K III
2. Connect the other end of the
S-Video cable to
an S
-Video input jack on a
TV,
monitor or video mixer
NOTE:
When using the S-Video output, the DVG-777K III must be set to
S-VIDEO output. See “Changing the Video Output Mode” in the Operations
section of this manual for detailed instructions on setting the DVG-777K III
to S-VIDEO
Mode.

11
Getting Connected
Component Video HD
Out
puts
What you will need:
• 1 Component video cable
• A High-Defi nition TV with Component (Y, U/Pb, V/Pr) video inputs
1. Connect one end of the
Y, U/Pb, V/Pr
cable to the
Y, U/Pb, V/Pr
jacks
on the DVG-777K III’s rear panel
2. Connect the other end of the
Y, U/Pb, V/Pr
cable to t
he
Y, U/Pb, V/Pr
inputs on
a
High Defi nition TV
NOTE:
When using the Component output, the DVG-777K III must be set
to YPBPR output. See “Changing the Video Output Mode” in the Operations
section of this manual for detailed instructions on setting the DVG-777K III
to
YPBPR
Mode.

12
Getting Connected
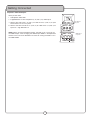
Connecting a USB Device
The DVG-777K III allows you to connect a USB device and play A/V
fi les using the remote control.
1. Connect the USB device to the USB port on the front panel
2. Use the USB button on the front panel or remote to access the
USB device. The fi le menu will appear.
3.
Use the
remote control to navigate through
the A/V fi les for
playback
See the general operations section of this manual for more
information on using USB.
Connectin
g an SD CARD
The DVG-777K III allows you to connect an SD CARD to play Audio/Video fi les using the remote control.
1. Insert the SD C
ARD
into the slot
on the f
ront panel
. To view the fi les, press the SD
button on the remote or the
USB/SD/DISC button on the front panel to cycle t
hrough to the card.
2. Use the
remote control to navigate through
the A/V fi les for playback
See the general operations section of this manual for more information on using SD.

13
General Operations
Turning on the Power
Main Power
The main power button for the DVG-777K III is located on the front panel.
1. Press the POWER button on the front panel to turn the DVG-777K III on and off
Standby
Once the main power is turned on, the DVG-777K III can be set to standby mode using the POWER button on
the remote control.
1. Press the POWER button on the remote control while the player is on to set the player to standby mode
2. Press the POWER button again to turn the player back on
Inserting a Disc
1. Press the
Open/close button on the front panel or remote control to open the disc tray
2. Insert the disc label-side-up
3.
Press the
Open/close
button on the front panel or remote control a second time to close the disc tray
Playing a Disc
1. Insert a disc into the disc tray
2.
P
ress the PLAY
/PAU
SE button on the front panel or th
e PLAY/PAUSE button on t
he remote control to be
gin
playing
Stopping a Disc
1. Press the STOP button on the front panel or the
STOP button on the remote control to stop a disc while it
is playing
Pausing a Disc
1. While a disc is playing press t
he
PLAY
/PAU
SE
button on t
he front panel or the
PLAY/PAUSE
button on
the remote control to pause the disc
2. Press
the
PLAY/PAUSE
button again to resume playback
Muting a Disc
1. Press the MUTE button on the remote control to silence the disc
2. Press the MUTE button again to un-mute the disc
S
ki
pping Tracks
1. Use the PR
EV
/NEXT button
s on the fro
nt panel or the PREV
NEXT to skip from one track to another
2. T
he
NEXT
button skips fo
rward to t
he next track and the PREV
button skips back to the pre
vious
track
G
eneral Operations

14
Scanning through Tracks (CD, VCD, DVD, USB, and SD only)
1. Use the FWD/REW
buttons on the remote control to scan through tracks
2. T
he
FWD
button
scans fo
rward through the current
track and the REW
backward through the
current
t
rack
Adjusting the Disc Music V
olume
Adjusting the Disc Music VolumeAdjusting the Disc Music V
1. Use the VOL + and VOL - buttons on the remote control to adjust the volume
2. The V
OL + button raises the volume and t
he VOL
-- button lowers it
Using Direct Track A
ccess
The
Direct Track Access buttons are the number buttons on t
he fro
nt panel and remote control. These allow
you to jump
directly to a track or chapter (DVD) b
y entering its number. When using Direct Track Access on the
front panel, type the two digit equivalent of the number.
example
T
o jump directly to track 9:
To jump directly to track 9:T
1. P
ress the 0 and 9 buttons
2. T
rack 9 will be
2. Track 9 will be2. T
gin playing
Jumping
to a Specifi c
Time on a track (
CD, VCD and DVD only)
1
. Press t
he
GOTO
button on the remote control
2. Use the ARROW buttons to move to the 00:00:00
3. Enter t
he time on
the track that you want to ju
m
p to
4. P
ress ENTER
5.
The
disc will play at that time
example
To jump directly to 1:45
1. Press
GOTO
on t
he remote control
2. Press right ARROW button to get to the 00:00:00
2. Press 0, 1, 4,
then 5
3. Press ENTER on the remote control
4. The disc will begin playing at 1:45 minutes in t
he disc
Prog
ramming a Custom Track
Order
The DVG-777K III allows you to create a custom
playlist of up to 16 tracks using the PROGRAM button on the
remote control.
1.
If there is a disc in the DVG-777K III, make sure it is stopped
2. Press the PROGRAM button on the remote control to access the Program menu. The Program menu will
appear on the TV screen
3. Enter a track number using the number buttons on the remote control
4. Jump to the next playlist slot using the arrow buttons on the remote control
5. Continue this until your playlist is complete
6. Navigate to “PLAY” icon on screen or PLAY button on remote control to begin program.
example (on next page)
G
eneral Operations

15
To create a playlist in the following order:
1. Track 14
2. Track 7
3. Track 3
4. Track 1
1. Press
the PROGRAM button to enter Program mode
2. Press 14 and then EN
TER
3. Press 7 and then ENTER
4. Press 3 and then ENTER
5. Press 1 and then ENTER
6. Pres
s
PLAY to begin playing in th
is order
7. Press STOP twice to exit the programmed
playlist
Clearing a track in Program Mode
Press the CLEAR button on the screen control to erase the last programmed track.
Using Digital Key Control
Digital Key Control allows you to change the musical key of disc music to fi t any singer’s vocal range. The Digital
Key Control buttons are located on the remote control and front panel
b - Lowers the musical key
# - Raises the musical key
Setting Repeat Options
Press the REPEAT button on the remote control to cycle through the available Repeat options
•
REP-ONE: Repeats the same song continuously
•
REP-ALL: Repeats the entire disc after it has played through
•
REPEAT OFF:
All Repeat
o
ptions are off
•
CHAPTER REPEAT (DVD only): Repeats the current chapter on a DVD disc
•
TITLE REPEAT (DVD only): Repeats t
he current title on a DVD disc
Swit
chi
ng Between PAL and NTSC Video Mode
s
The DVG-777K III is defaulted to NTSC
. Use the P/N button on the remote control to switch between PAL and
NTSC.
1. If there is a disc in the DVG-777K III make, sure it is stopped
2. Press the P/N button on the remote control
3. Press ENTER on the remote control. The video mode will change
PAL: Europe and A
sia
NTSC: North America
G
eneral Operations

16
Changing the Video Output Mode
The DVG-777K III has different video output channels: S-Video, Component, Etc. The DVG-777K III must be set
to the correct video output mode when using these output channels.
To select a video output modes:
1.
If there is a disc in the DVG-777K III, make sure it is stopped
2. Press the SETUP button on the remote control
3. Scroll down to “video”.
4. Select the video mode that matches your connection.
NOTE: For component video connections: select INTERLACE-YUV if using an older TV with component jacks;
select P-SCAN YPBPR is using an HDTV.
Loop
ing a
Section of Disc using the A
--B Button (CD, VCD, DVD, USB and SD only)
Section of Disc using the A--B Button (CD, VCD, DVD, USB and SD only)Section of Disc using the A
1. Press
the A--B button o
n the remote cont
r
ol
to set the starti
ng point of the loop
2. Pres
s t
he A--B button again to set the ending point of the loop
and to b
egin the loop
3. Press the A
--B button a third time to cancel the loop and resume normal playback
Setting the CUE MODE function
The CUE MODE will pause a disc at the two second mark. This is for use on CD+G karaoke discs with a song-
title screen at the beginning of each song as it allows you to display the song-title for the audience before playing
the song.
1. Press the CUE button on the remote control or front panel of the DVG-777K III to turn CUE on. A message
on the screen will indicate if CUE has been turned on or off. Each song will pause at the one second mark
3. Press PLAY to begin playing each song
NOTE: CUE MODE is not supported for DVD format
Using the Digital Equalizer (EQ)
The DVG-777K III has fi ve preset equalizer settings plus one user-programmable one.
1. Press the EQ button on the remote control to cycle through the settings: CLASSIC, ROCK, JAZZ, POP,
STANDARD
Using surround music effects
The DVG-777K III has fi ve surround music presets that can be used to enhance the music sound.
1. Press the MUSIC EFFECTS button to cycle through the surround music settings: Concert, Church, Passive,
Wide, & Live.
NOTE: These music effects do not effect microphone output.
Playing One Frame at a Time with the Step Function
The Step function allows you to view one frame at a time on DVDs and VCDs.
NOTE:
The Step function does not work on CD+Gs
1. Press the STEP button to enter Step mode and pause the current frame
2. Press it again to jump to the next frame
3. Press PLAY to resume normal playback
G
eneral Operations

17
Playing Forward and
Reverse
in
Slow
M
otion
You can play a disc forward or
reverse
at 1/2
, 1/3, 1/4, 1/5, 1/6 and 1/7
the normal speed
1. Press t
he SLOW button on the remote control to cycle through t
he Slow Motion options
2. Press the PLAY button to return to n
ormal playback
Slow Motion options:
•
SF 1/2X - Forward at 1/2 the normal speed
•
SF 1/3X - Forward at 1/3 the normal speed
•
SF 1
/4X
- Forward at 1/4 the normal speed
/4X - Forward at 1/4 the normal speed/4X
•
SF 1
/5X
- Forward at 1/5 the normal speed
/5X - Forward at 1/5 the normal speed/5X
•
SF 1
/6X
- Forward at 1/6 the normal speed
/6X - Forward at 1/6 the normal speed/6X
•
SF 1
/7X
- Forward at 1/7 the normal speed
/7X - Forward at 1/7 the normal speed/7X
DVD Operations
Accessing the DVD Menu
Use the MENU button on the remote control to access t
he main
menu on a DVD. Use t
he arrow button
s on
t
he remote control to na
vi
gate through
the main menu and the ENTER button to make selections.
A
ccessing the T
itle Screen
Each section on
a DVD
such as the movie, special f
eatures, etc. has its own title screen. Use t
he TITLE button
on the remote control to access t
he title screen for the current
section.
Bypassing the menu screen
Press the DIRECT PLAY button to bypass the previews and title screen of a DVD, and go directly to the feature
title.
Turning on Subtitles
Use the SUBTITLE button on the remote control to cycle through the available subtitle languages on a DVD.
NOTE:
The available subtitles vary from each DVD and some may not have any at all.
Changing the Angle View
Use the ANGLE button on the remote control to view multiple angles on a DVD with multiple angles available.
NOTE:
Not all discs have multiple angles available.
Accessing Additional Dubbed Languages
Some DVDs have multiple languages dubbed over the original language for speakers of other languages. Use
the AUDIO button on the remote control to cycle through these languages on DVDs with multiple languages
available.
G
eneral Operations

18
M
p
3, AVI and Media fi le Operations
When playing a disc, USB device or SD CARD with Mp3 or AVI fi les in it, the fi le menu will be enabled. Use the
arrow buttons to navigate through this menu and the ENTER or PLAY button on the remote control to make
selections.
Navigating
on the File Menus:
The DVG-777K III has two menu modes available for selecting and playing media fi les: FOLDER VIEW and FILE
VIEW. ‘Folder view’ is used for selecting folders and fi les types, while ‘fi le view’ is used for only selecting fi les for
playback. Toggle between the menu modes with the MENU MODE button on the remote control.
When accessing a disc/SD card/USB drive with multiple folders and/or fi le types, you fi rst must use folder
view to select the folder to be accessed, and/or the fi le type to be displayed. Once these have been selected,
press the MENU MODE to enter FILE VIEW. Once in fi le view, you enter the track number to begin playback.
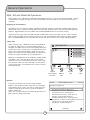
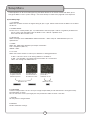
Folder View
When inserting a disc, USB drive or SD card with MP3+G,
AVI, MP3 or JPEG fi les on it, after the loading process is
complete, the folder view menu will automatically display the
contents on screen. The fi le menu is composed of two main
panes: the left pane displays folders, while the right pane
displays the contents of the selected folder. Use the arrow
buttons to navigate the folder, fi le, and fi le type items.
Media fi les are divided into three categories: AUDIO, PHOTO,
and VIDEO. If your card/disc/drive only has one type of
media fi le, the menu will view them by default. If your card/
disc/drive has more than one media type, you will need to
use the media icons at the bottom of the screen to select a
media type to view.
File View
In fi le view, you simply enter the fi le number to begin
playback. Use the left and right arrow keys to scroll pages.
At the bottom of the screen. This view is useful when your
media has long fi le names which may not be completely
visible in folder view.
NOTE: This view will show only the media fi le type which has
been selected in folder view mode.
G
eneral Operations

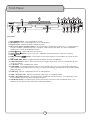
19
Front Panel
1.
Main POWER button
- Turns the power on and off.
2.
SD CARD slot
- Insert an SD CARD here for A/V fi le playback.
3.
Display screen
- Displays the player’s operating status.
4. Direct Track Access (number) buttons
- For use whenever number input is necessary. i.e. Jumping directly
to tracks/chapters, programming tracks in program mode, parental password, etc. See the Operations
section in this manual for detailed instructions.
5. EJECT
button
- Opens and closes the disc tray
6. PLAY/PAUSE
button
- Plays a disc that is stopped or paused and pauses a disc that is playing.
7. Stop
button
- Stops a disc that is playing.
8. PREV and NEXT
buttons
- Press PREV to jump to the previous track and NEXT to jump to the next
track.
9. USB/CARD/DISC button
- Toggles between disc player, SD Card and USB input.
10. Digital Key Control
- Adjusts the musical key to fi t a singer’s vocal range. Press “b” to lower the key and
“#” to raise the key.
11. L/R button
- Turns multiplexing on and off
,
allowing you to remove vocals from a multiplex
-enabled CD+G.
allowing you to remove vocals from a multiplex-enabled CD+G.allowing you to remove vocals from a multiplex
12. CUE MODE
-
This function will pause a disc at the 1 second mark. This is for use on CD+G karaoke discs
with a song-title at the beginning of each song as it allows you to display the song-title for the audience before
playing the song.
13. USB input
- Connect a USB device here for A/V fi le playback.
14. Disc Tray
- Insert discs here.
14. Disc Tray - Insert discs here.14. Disc Tray
15. MIC 1 & 2 Input jacks
- Connect microphones here using
¼
” microphone
cables.
16. MIC 1 & 2 Volume con
t
rols
- For adjusting each microph
one’s individual volume
. Turn clockwise to raise
the microphone volume and counter-clockwise to lower it.
17. ECHO level control
- For adjusting the amount of Echo that is
presen
t in the
microphone voc
als. Turn
clockwise to raise the Echo level and counter-clockwise to lower it.
Front Panel

20
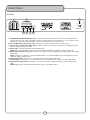
Rear Panel
1
.
MIC-MUSIC/SURROUND OUTPUT jacks –
Use the LEFT/RIGHT jacks to connect to a standard 2-channel
audio system with mic and music output. Use the surround output jacks to connect to a 5.1 surround sound
receiver or mixer. NOTE: See Setup Menu section for setting up 5.1 surround sound.
2
. ML and MR Output jacks (music only)
- Connect to a mixer or sound system to output music.
3
. (Y,U/Pb,V/Pr)/Component Video output
- Connect video to a TV with
(
Y,U/Pb,V/Pr
)
or Component video
inputs using
(
Y,U/Pb,V/Pr
)
cables.
4
.
Power Input
- Connect the power cord (included) here.
NOTE:
Make sure the power cord is fi rmly connected to the Power Input before turning the player on.
5
. Digital Coaxial Output (music only)
- Connect to a sound system with digital Coaxial audio input using a digital
audio cable.
NOTE:
Although it is alright to use standard RCA cables, it is recommended that you use Digital RCA audio
cables for optimum digital signal.
6
. Video Output (RCA)
- Connect to a TV/Video monitor using an RCA video cable.
7. S-Video Output
- Connect to a TV/video monitor with an S-Video input jack using an S-Video video cable.
8
. Digital Optical Audio Output
- Connect to a sound system with an Optical audio input using a digital audio
cable.
NOTE:
Digital coaxial and optical outputs do not output a microphone signal.
Rear Panel
Page is loading ...
Page is loading ...
Page is loading ...
Page is loading ...
Page is loading ...
Page is loading ...
Page is loading ...
Page is loading ...
-
 1
1
-
 2
2
-
 3
3
-
 4
4
-
 5
5
-
 6
6
-
 7
7
-
 8
8
-
 9
9
-
 10
10
-
 11
11
-
 12
12
-
 13
13
-
 14
14
-
 15
15
-
 16
16
-
 17
17
-
 18
18
-
 19
19
-
 20
20
-
 21
21
-
 22
22
-
 23
23
-
 24
24
-
 25
25
-
 26
26
-
 27
27
-
 28
28


VocoPro DVG-777K III Operating instructions
- Category
- Karaoke systems
- Type
- Operating instructions
Ask a question and I''ll find the answer in the document
Finding information in a document is now easier with AI
Related papers
-
VocoPro DVG-777K User manual
-
-
-
-
-
-
-
-
-
VocoPro Carry-Oke Microphone Owner's manual

