Dascom DP-530 User guide

Type
User guide
DASCOM Europe GmbH
Heuweg 3
89168 Ulm
Germany
www.dascom.com
379925b
DP
-
530
Series
Operator’s Manual
DP-530
Thermal Printer
i www.dascom.com
This device fulfills the European standards requirements by complying with the Directive relating to electromagnetic
compatibility and relating to low-voltage electrical equipment. Furthermore it fulfills the requirements for RoHS and R&TTE
if applicable.
Conformity with the above mentioned Directives is indicated by the CE symbol attached to the device.
Note: Conformity may be affected by:
- using interface cables not complying with the specifications
- non-observance of important instructions in the operator´s manual
- installing components not approved for this device by the manufacturer
- unauthorized manipulation
Dieses Gerät erfüllt die Anforderungen der Europäischen Normen durch Einhaltung der Richtlinien bezüglich der
Elektromagnetischen Verträglichkeit sowie bezüglich Elektrischer Betriebsmittel mit Niederspannung. Des Weiteren
werden die Anforderungen bezüglich RoHS und falls anwendbar R&TTE erfüllt.
Die Konformität zu den oben angeführten Richtlinien ist durch das am Gerät angebrachte CE-Zeichen gekennzeichnet.
Hinweis: Die Konformität kann beeinflusst werden durch:
- Benutzung von nicht spezifizierten Schnittstellen
- Nichtbeachtung wichtiger Hinweise der Bedienungsanleitung
- Ersetzen von Bauteilen, die nicht vom Hersteller für dieses Gerät freigegeben wurden
- Eingriffe durch Unbefugte
FCC Part 15 Class B
This device complies with Part 15 of the FCC Rules. Operation is subject to the following two conditions: (1) this device
may not cause harmful interference, and (2) this device must accept any interference received, including interference that
may cause undesired operation.
This equipment has been tested and found to comply with the limits for a Class B digital device, pursuant to Part 15 of the
FCC rules. These limits are designed to provide reasonable protection against harmful interference in a residential
installation. This equipment generates, uses, and can radiate radio frequency energy and, if not installed and used in
accordance with the instructions, may cause harmful interference to radio communications. However, there is no guarantee
that interference will not occur in a particular installation. If this equipment does cause harmful interference to radio or
television reception, which can be determined by turning the equipment off and on, the user is encouraged to try to correct
the interference by one or more of the following measures:
Reorient or relocate the receiving antenna.
Increase the separation between the equipment and the receiver.
Connect the equipment into an outlet on a circuit different from that to which the receiver is connected.
Consult the dealer or an experienced radio/TV technician for help.
This equipment complies with Canadian and FCC radiation exposure limits set forth for an uncontrolled environment. This
equipment is in direct contact with the body of the user under normal operating conditions. This transmitter must not be co-
located or operating in conjunction with any other antenna or transmitter.
Part 15.21 Caution: Changes or modifications not expressly approved by Dascom could void the user’s authority to operate
the equipment.
Canadian Department of Communications Radio Interference Statement
ii www.dascom.com
This device complies with Industry Canada license-exempt RSS standard(s). Operation is subject to the following two
conditions: 1) this device may not cause interference; 2) this device must accept any interference, including
interference that may cause undesired operation of the device. Under Industry Canada regulations, this radio
transmitter may only operate using an antenna of a type and maximum (or lesser) gain approved for the transmitter
by Industry Canada. To reduce potential radio interference to other users, the antenna type and its gain should be
so chosen that the equivalent isotropically radiated power (e.i.r.p.) is not more than that necessary for successful
communication. Maximum power output plus maximum antenna gain of the EUT is: 4.5W/m
2
, Limit is 10Wm
2
.
Le présent appareil est conforme aux CNR d'Industrie Canada applicables aux appareils radio exempts de licence.
L'exploitation est autorisée aux deux conditions suivantes : (1) l'appareil ne doit pas produire de brouillage, et (2)
l'utilisateur de l'appareil doit accepter tout brouillage radioélectrique subi, même si le brouillage est susceptible d'en
compromettre le fonctionnement. Conformément à la réglementation d'Industrie Canada, le présent émetteur radio
peut fonctionner avec une antenne d'un type et d'un gain maximal (ou inférieur) approuvé pour l'émetteur par
Industrie Canada.
Dans le but de réduire les risques de brouillage radioélectrique à l'intention des autres utilisateurs, il faut choisir le
type d'antenne et son gain de sorte que la puissance isotrope rayonnée équivalente (p.i.r.e.) ne dépasse pas
l'intensité nécessaire à l'établissement d'une communication satisfaisante.
La puissance de sortie maximale plus
gain d'antenne maximal du EUT est : 4.5W/m
2
Limite est 10W/m
2
Battery Disposal
Only disposes of used batteries according instructions and/or your local regulations.
Acknowledgments:
DASCOM is a registered trademark of DASCOM Europe GmbH
Bluetooth is a registered trademark of Bluetooth SIG, Inc.
Zebra, CPCL and ZPL are registered trademarks of Zebra Technologies
Wi-Fi is a registered trademark of the Wi-Fi Alliance
Windows is a registered trademark of Microsoft Corporation
All other trademarks are the property of their respective owners.
© 2015 by DASCOM Europe GmbH, Ulm, Germany. All rights reserved.
iii www.dascom.com
Read all set up and operating instructions before proceeding with operation. Do not operate in an enclosure unless properly
ventilated. Do not operate near a heat source.
Lesen Sie vor der Inbetriebnahme die Aufbau- und Bedienungsanleitung Betreiben Sie den Drucker nicht in einem kleinen,
geschlossenen Raum, es sei denn dieser wird ordnungsgemäß belüftet. Nehmen Sie den Drucker nicht in der Nähe einer Wärmequelle in
Betrieb
No user-serviceable parts inside. Refer service or repairs to a qualified service professional. Use of genuine DASCOM
replacement parts is required to warrant proper, safe operation. Any alteration or modification of this device voids the user warranty and
may make the product unsafe to operate. The print head and motors get hot during use. Wait until they cool before touching them. Make
certain the printer is disconnected from AC power before removing any covers or performing any required cleaning or maintenance.
Connecting this printer to an ungrounded receptacle can result in electrical shock. Never place the printer near inflammable or explosive
substances. Do not operate near liquid or spill liquid into the printer at any time.
Enthält keine Teile, die vom Bediener instandgesetzt werden können. Bitte wenden Sie sich bei Instandsetzung oder Reparatur an
qualifiziertes Kundendienstpersonal. Die Verwendung von echten DASCOM Ersatzteilen ist notwendig, um ordnungsgemäßen, sicheren
Betrieb zu gewährleisten. Änderungen oder Modifikationen dieses Geräts machen die Garantie ungültig und können den sicheren Betrieb
des Produkts gefährden. Während des Druckens werden Druckerkopf und Motoren heiß. Warten Sie, bis sich die Teile abgekühlt haben,
bevor Sie sie berühren. Vergewissern Sie sich, dass der Drucker nicht mehr an die Stromquelle angeschlossen ist, bevor Sie Abdeckungen
abnehmen oder das Gerät reinigen bzw. warten. Schließen Sie diesen Drucker nicht an eine ungeerdete Steckdose an; dies kann zum
Elektroschock führen. Setzen Sie den Drucker niemals in die Nähe von feuer- oder explosionsgefährlichen Stoffen. Betreiben Sie den
Drucker nicht in der Nähe von Flüssigkeiten und lassen Sie keine Flüssigkeiten in den Drucker gelangen.
Specifications are subject to change without notice.
DASCOM Representatives:
Germany : DASCOM Europe GmbH, Heuweg 3, D-89079 Ulm, Phone: +49 (0) 731 2075 0
UK: DASCOM GB Ltd, Hart House, Priestley Road, Basingstoke, Hampshire, RG24 9PU, Phone: +44 (0) 1256 481481
France: DASCOM Europe GmbH, 117 Avenue Victor Hugo 92100 Boulogne-Billancourt, Phone: +33 (1)73 02 51 98
Singapore (AP): DASCOM AP Pte Ltd, 21 Bukit Batok Crescent, #29-81, WCEGA Tower, 658065, Phone: +65 6760 8833
Americas: Dascom Americas Corp, 34 Lakeview Court, Verona, VA 24482, USA, Phone: +1 (877) 434 1377
China: Jiangmen Dascom Computer Periphals Co., Ltd, No.399, jinxing Road, Jianghai District Jiangmen
1
www.dascom.com
TABLE OF CONTENTS
Introduction ........................................................................................................................................... 2
Printer Features ..................................................................................................................................... 3
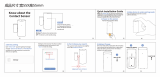
Quick Start Instructions ........................................................................................................................ 4
A.
Paper Load ................................................................................................................................... 4
B.
Battery Installation ........................................................................................................................ 5
C.
Charge Battery ............................................................................................................................. 5
D.
Power On ..................................................................................................................................... 5
E.
Control Panel................................................................................................................................ 6
F.
Performing a Printer Self-Test ....................................................................................................... 6
Configuration ......................................................................................................................................... 7
A.
Connectivity Parameters ............................................................................................................... 8
B.
Image Parameters ...................................................................................................................... 10
C.
Device Config ............................................................................................................................. 11
D.
Graphics ..................................................................................................................................... 13
E.
Update Printer Firmware, Upload Files to Printer Memory ........................................................... 14
F.
Reset Printer Configuration to Factory Defaults (Safe Mode)....................................................... 14
Printing Modes .................................................................................................................................... 15
A.
ASCII Based Print Jobs .............................................................................................................. 15
B.
Graphic Based Print Jobs ........................................................................................................... 15
Integrating the Printer into your Business Applications ................................................................... 16
A.
Windows Desktop Computers ..................................................................................................... 16
Print Drivers ....................................................................................................................................... 16
I.
USB ....................................................................................................................................... 16
II.
Bluetooth – General ............................................................................................................... 16
III.
Bluetooth Windows 7 and above ......................................................................................... 16
IV.
Wi-Fi ...................................................................................................................................... 17
B.
Windows Tablets and Smartphones ............................................................................................ 17
C.
Android Tablets & Smart phones ................................................................................................ 17
I.
Bluetooth ............................................................................................................................... 17
II.
Wi- Fi ..................................................................................................................................... 18
D.
Apple™ Tablets & Smartphones ................................................................................................. 18
Bluetooth ............................................................................................................................... 18
I.
Wi-Fi ...................................................................................................................................... 18
II.
Media .................................................................................................................................................... 19
A.
Standard Media .......................................................................................................................... 19
B.
Black Mark Media Position .......................................................................................................... 19
Maintenance and Troubleshooting ..................................................................................................... 20
A.
Cleaning ..................................................................................................................................... 20
B.
Battery Care ............................................................................................................................... 20
I.
Getting the Maximum Battery Life .......................................................................................... 20
II.
Charging the Battery .............................................................................................................. 20
III.
Additional Battery and Safety Information ............................................................................... 21
IV.
Testing the Power Adapter and Battery .................................................................................. 21
C.
Troubleshooting .......................................................................................................................... 22
General Error Conditions ....................................................................................................... 22
I.
Fault Description and Resolution ............................................................................................ 22
II.
D.
Obtaining Service ....................................................................................................................... 24
APPENDIX ............................................................................................................................................ 25
A.
Appendix A – DP-530 Printer Specifications ................................................................................ 25
B.
Appendix B – DP-530L Printer Specifications .............................................................................. 26
Glossary of Terms ............................................................................................................................... 27
Index .................................................................................................................................................... 29
2
www.dascom.com
Introduction
Thank you for purchasing the Tally Dascom DP-530 Series mobile thermal printer also referred to in
this manual as the “DP-530” (for Receipt) or “DP-530L” (for Label). The DP-530 series prints on
special thermal media supplied in roll form up to 80 mm wide. All models are equipped with a USB
port which supports cabled communications. All models support an optional internal Bluetooth or Wi-
Fi interface. Complete specifications may be found in Appendix A – DP-530 Printer Specifications
and Appendix B – DP-530L Printer Specifications.
The remainder of this manual focuses on preparing the printer for initial use and performing tasks that
will be encountered during daily use.
Maintenance and Troubleshooting describes how to maintain the printer for optimal performance and
has information on how to diagnose any problems that may occur.
3
www.dascom.com
Printer Features
Your DP-530 features:
Easy-to-read control face and simple drop-in paper loading
Quickly prints a wide variety of tickets, receipts, and labels (530L)
IP54 rated for water and dust resistance... plus rated for repeated 6-foot drops to concrete
Print speeds up to 5 ips
Extensive fonts, character sets, bar codes and graphic capabilities
Printer configuration is quick and easy with a web based interface
The latest in battery technology provides for full-shift printing in all modes
Compatible with Windows, Windows Mobile, Apple iOS, and Android
Emulations that allow the printer to be a drop-in replacement for nearly any mobile printer
For detailed specifications reference Appendix A – DP-530 Printer Specifications and Appendix B –
DP-530L Specifications.
4
www.dascom.com
Quick Start Instructions
A. Paper Load
5
www.dascom.com
B. Battery Installation
C. Charge Battery
Uncover the printer ports and plug in your AC power adapter to the Power port (must be a DASCOM-
supplied accessory). The yellow LED will show solid ON while the printer battery is charging.
D. Power On
Depress the Power button on the control panel. The green LED and the red LED will both be lit while
the printer is going through its startup sequence (about 10 seconds). The red LED will go off, leaving
the green LED on to indicate the printer is ready to print.
6
www.dascom.com
E. Control Panel
Control P
anel
Power Button
Power Up
Power Down
Toggle IP over USB
on/off
Press & Release
Press & Hold
Press twice
Paper Feed Button
Advance paper
Print Setup Report
Press once
Press twice
Power & Status
(Green/Red)
Battery
(Yellow)
Alert
(Red)
Indication
On On
On Booting up
On Off Off Ready
On Off Flashing Paper Error/Lid Open
Flashing Off Off Job is arriving
Flashing Off Off Job is printing
Flashing Off
Flashing IP over USB active
Solid
Charging Battery
Flashing
Battery Low
F. Performing a Printer Self-Test
With power on, press the paper feed button twice quickly.
7
www.dascom.com
Configuration
Configuration of the DP-530 printer is done through a built-in web page. This allows you to configure
the printer from any device that has a browser and is compatible with your DP-530 communication
capabilities.
1. Turn the printer ON.
2. To access the DP-530 web page, push the Power button twice rapidly. This will put the printer
into Configuration mode.
3. When the printer is in Configuration mode the POWER and FAULT LEDs will flash together.
4. Connect a USB cable between the printer and a PC.
a. Open browser on your host and type 169.254.200.1 into the address bar of the browser (Note:
Firefox or Chrome will work best) and hit Enter.
b. A login box should appear.
c. Type “0000” and hit Enter- you should now be at the home page for DP-530 Configuration.
5. The main configuration screen of the DP-530:
This is an
overview of the
printer
configuration.
The battery
icon shows the
relative charge
in the battery.
The more bars,
the higher the
charge. An AC
plug will appear
in the battery
icon when the
printer is
plugged into an
external power
source.
8
www.dascom.com
To return the printer to normal operating mode, double-click the Power button. The POWER LED will
be returned to a solid light.
At the top of the Main Page are selections to access the sub-menus.
A. Connectivity Parameters
This page allows you to setup the connection to your printer. Depending on the optional interface
installed, you will see either Bluetooth Config or WI-FI Config. In the detailed descriptions, an asterisk
(*) indicates the factory default value.
Bluetooth Config:
Security:
Possible values: Off*, On
Setting Security to ON forces the printer and the remote device to use Paring. Setting Security ON
requires that Pairing is set to Paired and that a PIN has been entered that matches the PIN in the
remote device.
Paired Mode:
Possible values: UnPaired, Paired*
This feature allows Bluetooth pairing to occur between the printer and the connecting device whenever
Security is required by either device. Pairing requires that the PIN on the printer and the connecting
device exactly match each other.
Role Policy:
Possible Values: Defer*, Master
This feature selects the role of the printer’s interface in the Bluetooth network.
9
www.dascom.com
If the device attempting to communicate with the printer is having trouble discovering the printer, setting
the value to Master may correct the problem.
Discoverability:
Possible Values: Off, On*
This feature is used to set whether the printer may be discovered by other Bluetooth devices. It should
only be set to “Off” after the printer has been discovered and paired with a host computer.
PIN
:
Possible Values: 0000*, Up to 16 Numeric Characters
.
Note that this feature is only available if Pairing Mode is set to “Paired”. The PIN value must exactly
match the PIN value set in the Bluetooth manager on the host computer.
WI-FI Config:
Current Printer Config
This will display the current Wi-Fi configuration:
IP Address – user defined. If Static Address Method is selected, type in the address the printer will use
on the network.
SubNetMask user defined. If Static Address Method is selected, type in the subnet mark of the
network.
GateWay – user defined. If Static Address Method is selected, type in the gateway address of the
network.
Address Method – user selectable
Static – printer will always connect to the network using the IP address defined.
DHCP – printer will acquire an IP address from your network DHCP server
Access Point –The printer will broadcast itself as a network connection. The SSID will be the
serial number of the printer.
WiFi Port – user defined. Type in the IP port to be used by the printer. (default value = 8023)
Available Networks
– access points detected by the printer will be displayed. Select Add/Connect to use one
of these access points.
Add Personal Network
Add the SSID of an ad-hoc network connection. If authentication is used select the authentication type and the
password for the network connection.
Add Enterprise Network
Add the SSID of the enterprise network connection. If authentication is used select the authentication type and
the password for the network connection.
Upload Digital Certificate
If your enterprise network uses digital certificates as another form of authentication, you can upload the
certificates here.
10
www.dascom.com
B. Image Parameters
This page allows you to make selections about the image to be printed.
Current Emulation:
Possible Values: PRINTEK*, MT3, CPCL, IMAGE, PDF, POSTSCRIPT
The DP-530 printer is capable of using several different emulation modes. This feature sets the family of printer
commands that may be used by a host application program to control the various capabilities of the printer. The
printer will only respond to commands valid for the currently selected emulation. For more information, please
refer to the Integrator’s Guide.
Besides the popular printer languages to choose from, the following selections allow the DP-530 to print many
other file formats directly, without the need for a driver.
IMAGE – selected if just image files are being sent to the printer. When in this mode the printer will directly print
the following file types: .png, .jpg, .bmp, .pbm, .svg, .tiff
PDF – When in this mode the printer will directly print Portable Document Files (PDF).
POSTSCRIPT – When in this mode the printer will directly print Postscript formatted files (.ps). You can also
use a generic Postscript driver to print when in this mode.
Default Font:
The DP-530 has the ability to use True Type Fonts. All True Type Fonts loaded into printer memory are listed
here. Select the font you would like to use as the default font. All print jobs will use the default font unless a
command is sent to the printer to use another font.
Default Text Line Spacing:
NOTE: This setting only functions in Printek Emulation
11
www.dascom.com
This setting determines how many characters will print in a one inch space. The higher the number, the greater
the number of lines per vertical inch of print.
C. Device Config
This page allows you to set certain hardware parameters on the printer.
Units
Select between inches or millimeters. Default setting is inches.
Max Paper Speed
Possible values: 1.0 to 5.5 ips, Default = 5.0
When using labels or heavy paper stock, you may need to decrease the paper speed to prevent paper jam
errors.
Mark Seeking
Possible values: Off, Front, Rear, Gap. Default= Off (Note: Rear and Gap apply to 530L models only)
Set the value when using regular or label media with appropriate characteristics. To align the printed image to
the media, the printer will use the indicator according to the user choice here.
Front Paper Sensor Threshold
Possible values 0-100%. Default value is 75%
When using paper with a black on the front adjust this setting to insure the paper stops at the black mark.
• If the printer is not detecting black marks reliably, set the Mark Sensitivity to a lower value.
• If the printer is detecting false check paper conditions, set the Mark Sensitivity to a higher value.
• If the printer is detecting black marks where none exist, set the Mark Sensitivity to a higher value.
12
www.dascom.com
Rear Paper Sensor Threshold (DP-530L models only)
Possible values 0-100%. Default value is 75%
When using paper with a Black on the back adjust this setting to ensure the paper stops at the Black Mark.
• If the printer is not detecting Black Marks reliably, set the Mark Sensitivity to a lower value.
• If the printer is detecting false Check Paper conditions, set the Mark Sensitivity to a higher value.
• If the printer is detecting Black Marks where none exist, set the Mark Sensitivity to a higher value.
Gap Paper Sensor Threshold (DP-530L models only)
Possible values 0-100%. Default value is 75%
When using labels without a Black Mark, adjust this setting to insure the label stops at the gap in between
labels.
• If the printer is not detecting gaps between labels reliably, set the Gap Sensitivity to a higher value.
• If the printer is detecting gaps where none exist, set the Gap Sensitivity to a lower value.
Backup Distance Before Printing
Used with Mark Seek. User defined. This is the distance the printer will pull in the paper before starting to print.
Max Mark Search Distance
Used with Mark Seek. User defined. This is the distance the printer will advance paper to seek the mark before
displaying a Paper Out condition.
Stop Distance after Mark
Use with Mark Seeking. User defined. This is the distance the printer will advance the paper after the mark is
detected.
Left Margin
Setting this value will tell the printer how far from the left edge of the paper to start the print job.
Contrast
Possible values 0 – 10. Default value is 5
The lower the value the lighter the print. The higher the value the darker the print.
Paper Energy Values
This is a locked value. These settings are supplied by the paper manufacturer. The default settings cover most
grades of paper. If you are using non-standard paper consult the paper manufacturer for recommended
settings.
13
www.dascom.com
D. Graphics
This menu will allow you to load a graphics file into printer memory for use in creating your output. For instance,
logos can be stored for recall and use by your host program (see Integrator’s Guide for more details).
Upload File
Select the graphics file to load into printer memory.
Set Width
Select the width you want to use to display your logo: full width, half width, or quarter width.
Set index
Depending on the Index value used, you can automatically print the graphics file as a header (prints at the
beginning of the print job), footer (prints at the end of a print job) or use the graphics print command to print
anywhere on your receipt or label. See Integrator’s Guide for more information on graphics commands.
When selecting header, the graphics file will automatically print the logo at the beginning of each print job.
When selecting footer, the graphics file will automatically print the logo at the end of each print job.
You must set each of these values before selecting Upload Logo or the default values will be associated with
your image.
Current Logo Mapping
Once uploaded into the printer memory, your image and settings will be displayed here.
14
www.dascom.com
E. Update Printer Firmware, Upload Files to Printer Memory
F. Reset Printer Configuration to Factory Defaults (Safe Mode)
15
www.dascom.com
Printing Modes
There are two fundamental printing modes with mobile printers.
A. ASCII Based Print Jobs
The host sends the print job as a series of lines of characters, some of which represent the
text to be printed, while other portions are command codes which tell the printer which font
to use, where to locate the text, what barcodes to use, etc. These text-based files are
encoded in a print language specific to the target printer.
The DP-530 understands ASCII based jobs in several different print languages. Refer to
the Appendix or the
Integrator’s Guide
for the list of print languages supported.
B. Graphic Based Print Jobs
The host assembles the printed image as a series of lines of dots, and transmits this image
as a sequence of data bytes that represent the dot patterns assembled. Often these jobs or
files have some control characters on the front end and / or rear end of the dot pattern bytes
to define their format, help control pagination, etc.
Windows drivers in particular encode the image as a graphic based print job before it is
passed along to the printer.
In addition to accepting graphic jobs from its Windows driver, the DP-530 can accept and
print directly many other graphic image file types. This opens up the option to print job
images from a variety of devices for which drivers or print utilities don’t exist, such as some
tablets and smartphones.
Please see the Integrator’s Guide or your system integrator for more details.
16
www.dascom.com
Integrating the Printer into your Business Applications
Step by Step – Creating a Link from Host to Printer
A. Windows Desktop Computers
Print Drivers
You may download the appropriate Windows driver from our website. Install the printer driver by the
standard method for your version of Windows.
I. USB
a) Install the printer driver onto your host before connecting the printer. Follow prompts
displayed during installation.
b) Plug the printer into a USB port on your host system using a mini-USB cable.
c) The printer will appear in the “Unspecified” devices section. Right click on the icon.
d) In the popup window, select the Hardware tab. Note the USB port number displayed.
e) Using the “Add Printerwizard, install the printer using the driver file obtained from
DASCOM and the USB port number noted above.
f) After the printer driver installs, the printer will appear as “Dascom 3-inch printerunder the
“Printers and Faxes” heading of your Windows “Devices and Printers” screen.
II. Bluetooth – General
a) Turn on printer. Make sure Bluetooth on your host device is turned ON.
b) Your host Bluetooth manager may automatically scan for new devices, or you may need to
tell it to scan. The discover name of the DP-530 printer will be “DP-530-XXXxxxxx”, where
XXXxxxxx = the Printer Serial Number.
c) For Pairing, the default passkey is “0000”.
Note: Bluetooth host devices pair after discovery, but only connect to Bluetooth printers
when the host application has asked it to print.
III. Bluetooth – Windows 7 and above
a) Turn on printer. Make sure Bluetooth on your host device is turned ON.
b) Open the “Devices and Printers” folder.
c) Select “Add a Device”. The printer will display using the discover name listed above.
d) Select the printer from the list of devices.
e) Select “Enter the Device’s Pairing Code”. The default pairing code is 0000”.
f) A window will display informing you the device was successfully added, and the printer
name will appear in the devices list. Close this.
g) Printer now appears under “Printer and Faxes” heading of the “Devices and Printers”
screen, as “DP-530-serial #”. The icon may show that it is still configuring.
h) Right click on the printer name or icon and select Properties. Select “Services” tab and
deselect all items except for “SPP”.
i) Now select “Hardware” tab. A virtual com port number will be listed here – make note of
this COM Port number. Use this Com Port number when setting up the printer driver,
under the “port settings.
  • Page 1 1
  • Page 2 2
  • Page 3 3
  • Page 4 4
  • Page 5 5
  • Page 6 6
  • Page 7 7
  • Page 8 8
  • Page 9 9
  • Page 10 10
  • Page 11 11
  • Page 12 12
  • Page 13 13
  • Page 14 14
  • Page 15 15
  • Page 16 16
  • Page 17 17
  • Page 18 18
  • Page 19 19
  • Page 20 20
  • Page 21 21
  • Page 22 22
  • Page 23 23
  • Page 24 24
  • Page 25 25
  • Page 26 26
  • Page 27 27
  • Page 28 28
  • Page 29 29
  • Page 30 30
  • Page 31 31
  • Page 32 32
  • Page 33 33

Dascom DP-530 User guide

Type
User guide

Ask a question and I''ll find the answer in the document

Finding information in a document is now easier with AI