Sheet# 971147
Rev B (7/09)
Stylmark, Incorporated 6536 Main Street NE, PO Box 32008 Minneapolis, MN 55432
1-800-328-2495 www.stylmark.com
Fi
g
ure 1
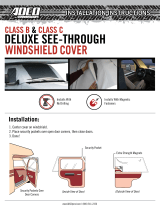
Installation Instructions
Wardrobe Doors
Models: 630017, 630019,
630021 & 630022
INSTALLATION INSTRUCTIONS
Before you begin
These instructions illustrate the Stylmark® Wardrobe
Doors for ¼” panels. The maximum weight capacity of
one door for this unit is 125 pounds. If you have
questions during assembly, call 800-328-2495 to request
technical assistance. This package does not include
panels and mounting screws, which are necessary for
complete assembly.
Please read these instructions carefully before be
g
innin
g
installation.
Tools you’ll need
Rubber mallet
Phillips screwdriver
Drill with #29 bit
Utility Knife
Plumb bob

Sheet# 971147
Rev B (7/09)
Stylmark, Incorporated 6536 Main Street NE, PO Box 32008 Minneapolis, MN 55432
1-800-328-2495 www.stylmark.com
Getting Started:
These instructions are for pre-fabricated wardrobe door
assemblies. Assembly typically requires two people. Follow
the instructions for the assembly ordered.
Step-by-Step Instructions:
1. Press glazing channel onto the edges of the door
panel. Slit the channel at the corners with an utility
knife to eliminate bulge. See Figure 2.
2. Center the top and bottom rails onto the panel and
tap into place using a rubber mallet. Rails should fit
snugly against the glazing vinyl. See Figure 2.
3. Position the stiles onto the sides of the panel so that
the notched ends are at the bottom. Tap the stiles
into place using a rubber mallet. Stiles should fit
snugly against the glazing vinyl. See Figure 3.
Note: Security doors must have the stiles orientated
properly. See Figure 6A & 6B.
4. Insert wheel assemblies into the slots at the bottom
of the stiles. Wheel assembly part # 530011 is for
non-security stile part # 130026 & wheel assembly
part # 530025 is for security stile part # 130027.
Line up the adjustment screw with the bottom hole in
the stile. See Figure 4.
Stylmark Installation Instructions: Wardrobe Doors
Models: 630017, 630019, 630021 & 630022

Sheet# 971147
Rev B (7/09)
Stylmark, Incorporated 6536 Main Street NE, PO Box 32008 Minneapolis, MN 55432
1-800-328-2495 www.stylmark.com
Stylmark Installation Instructions: Wardrobe Doors
Models: 630017, 630019, 630021 & 630022
Getting Started:
These instructions are for pre-fabricated wardrobe door
assemblies. Assembly typically requires two people. Follow
the instructions for the assembly ordered.
Step-by-Step Instructions Continued:
5. Insert the plastic top guide into the slots at the top of
the stile. See Figure 5.
6. Secure the assembled frame at each corner using
#8 - 32 x 2 1/4” screws (part # 213017) for models
630019 & 630022 or #8 – 32 x 1 9/16” (part #
213036) for models 630017 & 630021. Note:
Screws at the bottom must pass through the
clearance hole in the wheel assembly. Screws at the
top must pass through the clearance hole in the
plastic top guide. See Figure 5.
7. Press the adhesive bumpers onto the top and bottom
of each stile, covering the exposed screw heads. See
Figure 5.
8. Repeat steps 1-7 to assemble additional door panels.
9. If ordered, install lock & strike plate to stiles. See
Figure 6A and 6B. Typical installation: Lock installs
on the front right hand door and strike plate installs
on the rear left hand door. The strike plate is part of
the lock assembly (part# 530024).

Sheet# 971147
Rev B (7/09)
Stylmark, Incorporated 6536 Main Street NE, PO Box 32008 Minneapolis, MN 55432
1-800-328-2495 www.stylmark.com
Stylmark Installation Instructions: Wardrobe Doors
Models: 630017, 630019, 630021 & 630022
Step-by-Step Instructions – Installation:
1. Mount the header (part# 130022) to the top of the
door opening using #8 x 1 ¼” screws (part#
212037). See Figure 7. Note: Install the header so
that the attached sticker is not visible.
2. Using a plumb bob to position the track with the
center of the header. Mount the track (part #
130023) to the bottom of the door opening using #8
x 1” flat head screws (part # 212030). See Figure
7. Note: It is not recommended that the track be
installed over carpeting.
3. Insert the rear door panel up into the header and
lower bottom onto the track. Adjust the door to align
vertically with the side jambs by turning the adjusting
screw in the wheel assembly at the bottom of each
door stile. See Figure 8. Note: For best
appearance, door panel should be adjusted to the
lowest possible position to avoid scraping against the
track or losing guidance in the header.
4. Insert and adjust the front door panel following steps
1-3.
/