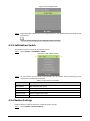
Dahua LS460UCM-EF is a high-quality LCD video wall that is perfect for a variety of commercial and industrial applications. With its slim bezel design, the LS460UCM-EF can be used to create a seamless video wall display that will captivate your audience.
The LS460UCM-EF features a high brightness of 700 cd/m2 and a contrast ratio of 4000:1, which ensures that your images will be clear and vibrant, even in brightly lit environments. The video wall also has a wide viewing angle of 178 degrees, so everyone in the room can enjoy the same great view.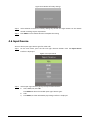


-
 1
1
-
 2
2
-
 3
3
-
 4
4
-
 5
5
-
 6
6
-
 7
7
-
 8
8
-
 9
9
-
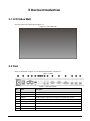 10
10
-
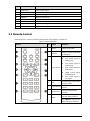 11
11
-
 12
12
-
 13
13
-
 14
14
-
 15
15
-
 16
16
-
 17
17
-
 18
18
-
 19
19
-
 20
20
-
 21
21
-
 22
22
-
 23
23
-
 24
24
-
 25
25
-
 26
26
-
 27
27
-
 28
28
-
 29
29
-
 30
30
-
 31
31
-
 32
32


Dahua LS460UCM-EF User manual
- Type
- User manual
- This manual is also suitable for
Dahua LS460UCM-EF is a high-quality LCD video wall that is perfect for a variety of commercial and industrial applications. With its slim bezel design, the LS460UCM-EF can be used to create a seamless video wall display that will captivate your audience.
The LS460UCM-EF features a high brightness of 700 cd/m2 and a contrast ratio of 4000:1, which ensures that your images will be clear and vibrant, even in brightly lit environments. The video wall also has a wide viewing angle of 178 degrees, so everyone in the room can enjoy the same great view.
Ask a question and I''ll find the answer in the document
Finding information in a document is now easier with AI
Related papers
-
Dahua LS550UDM-EG User manual
-
-
-
-
Dahua PFS3008-8ET Quick start guide
-
-
-
-
-
Other documents
-
ProScan NC691B Operating instructions
-
Christie Christie Roadster S+22K-J User manual
-
Christie WU12K-M User manual
-
-
Christie DS+6K-M User manual
-
Sharp LC-46XD1E Datasheet
-
-
-
TEAC LES6572F3D User manual
-