G-Shock GA110MW-7A Owner's manual

Category
Watches
Type
Owner's manual
Operation Guide 5146 5425
MO1407-EA
© 2014 CASIO COMPUTER CO., LTD.
E-1
About This Manual
Depending on the model of your watch, display text appears either as dark fi gures
on a light background or light fi gures on a dark background. All sample displays in
this manual are shown using dark fi gures on a light background.
Button operations are indicated using the letters shown in the illustration.
Note that the product illustrations in this manual are intended for reference only,
and so the actual product may appear somewhat different than depicted by an
illustration.
Graphic (moves with seconds count)
Module 5146 only
Module 5425Module 5146
E-2
Each section of this manual provides you with the information you need to perform
operations in each mode. Further details and technical information can be found in
the “Reference” section.
E-3
Contents
General Guide ………………………………………………………………………… E-6
Timekeeping …………………………………………………………………………… E-8
To set the digital time and date ……………………………………………… E-9
To change the Daylight Saving Time (summer time) setting ………………E-12
Stopwatch ………………………………………………………………………………E-14
To specify a distance value ……………………………………………………E-16
To specify lap time or split time readings ……………………………………E-18
To perform elapsed time measurement ………………………………………E-19
To set up the stopwatch to take lap time readings …………………………E-20
To perform a lap time measurement …………………………………………E-21
To set up the stopwatch to take split time readings …………………………E-22
To perform a split time measurement …………………………………………E-23
To measure times with the stopwatch ………………………………………E-24
E-4
Countdown Timer………………………………………………………………………E-25
To use the countdown timer ……………………………………………………E-26
To confi gure countdown start time and auto-repeat settings ………………E-27
World Time ………………………………………………………………………………E-29
To view the current time in another time zone ………………………………E-30
To toggle a city code time between Standard Time and Daylight
Saving Time …………………………………………………………………E-31
To swap your Home City and World Time City ………………………………E-32
Alarms ……………………………………………………………………………………E-33
To set an alarm time ……………………………………………………………E-34
To turn an alarm on and off ……………………………………………………E-36
To turn the Hourly Time Signal on and off ……………………………………E-37
E-5
Illumination ……………………………………………………………………………E-38
To illuminate the display manually ……………………………………………E-38
To specify the illumination duration……………………………………………E-39
To turn the auto light switch on and off ………………………………………E-41
Hand Home Position Correction ……………………………………………………E-42
To adjust home positions ………………………………………………………E-42
Reference ………………………………………………………………………………E-44
Specifi cations …………………………………………………………………………E-48
E-6
Timekeeping Mode
Press &.
General Guide
Press
&
to change from mode to mode.
In any mode (except a setting mode), press
%
to illuminate the display.
E-7
Alarm Mode (page E-33)
Countdown Timer Mode (page E-25)
World Time Mode (page E-29)
Stopwatch Mode (page E-14)
E-8
Timekeeping
You can adjust the Home Time city date and time in the Timekeeping Mode.
The analog time of this watch is synchronized with the digital time. The analog time
setting is adjusted automatically whenever you change the digital time.
If the analog time does not match the digital time for any reason, use the procedure
described under “To adjust home positions” (page E-42) to match the analog
setting to the digital setting.
Pressing
'
in the Timekeeping Mode toggles digital display between the Home
City Date and Home City Time.
'
Home City Date Home City Time
Month Day
Seconds
Day of wee
k
Hour : Minutes
Seconds
PM indicator
Day of week
E-9
To set the digital time and date
1. In the Timekeeping Mode, hold down
$
for about three
seconds until the currently selected city code fl ashes in
the upper digital display. This is the setting mode.
2. Use
'
(east) and
%
(west) to select the city code you
want.
Make sure you select your Home City code before
changing any other setting.
For full information on city codes, see the “City
Code Table” at the back of this manual.
l
l
l
l
l
l
l
l
l
l
l
l
l
l
Hour : Minutes
City code
PM indicator
Second
s
Operation Guide 5146 5425
E-10
3. Press
&
to change the fl ashing screen content in the sequence shown below to
select the other settings.
Seconds
12/24-Hour
Format
Hour
Minutes
DST
Month
Yea r
City Code
Day
Illumination
Duration
4. When the setting you want to change is fl ashing, use
'
or
%
to change it as
described below.
Screen: To do this: Do this:
Change the city code Use
'
(east) and
%
(west).
Toggle the DST setting between
Daylight Saving Time (
on
) and
Standard Time (
OFF
).
Press
'
.
Toggle between 12-hour (
12H
) and
24-hour (
24H
) timekeeping
Press
'
.
E-11
Screen: To do this: Do this:
Reset the seconds to
00
Press
'
.
Change the hour and minutes
Use
'
(+) and
%
(–).
Change the year, month, or day
Toggle the display illumination
duration between 1.5 seconds (
LT1
)
and three seconds (
LT3
)
Press
'
.
5. Press
$
to exit the setting mode.
The day of the week is displayed automatically in accordance with the date (year,
month, and day) settings.
E-12
Daylight Saving Time (DST)
Daylight Saving Time (summer time) advances the time setting by one hour from
Standard Time. Remember that not all countries or even local areas use Daylight
Saving Time.
To change the Daylight Saving Time (summer time) setting
1. In the Timekeeping Mode, hold down
$
for about three
seconds until the currently selected city code fl ashes in
the upper digital display. This is the setting mode.
2. Press
&
. This will display the DST setting screen.
3. Use
'
to toggle the DST setting on (
on
) and off (
OFF
).
The default DST setting is off (OFF).
4. When the setting you want is selected, press
$
to exit
the setting mode.
The DST indicator appears to indicate that Daylight
Saving Time is turned on.
l
l
l
l
l
l
l
l
l
l
l
l
l
l
l
l
l
l
l
l
l
l
l
l
l
l
l
DST indicator
E-13
12-hour and 24-hour timekeeping
With the 12-hour format, the PM indicator (
P
) appears for times in the range of noon
to 11:59 p.m. and no indicator appears for times in the range of midnight to 11:59
a.m.
With the 24-hour format, times are displayed in the range of 0:00 to 23:59, without
the PM indicator (
P
).
The 12-hour/24-hour timekeeping format you select in the Timekeeping Mode is
applied in all other modes.
E-14
Stopwatch
You can use the stopwatch to measure elapsed time, lap
times and split times. If you specify a distance value, the
stopwatch also will calculate and display speeds.
The digital display range of the stopwatch is 99 hours,
59 minutes, 59.999 seconds. The stopwatch continues
to run until you stop it. If it reaches the above limit, it will
restart the time measurement from zero.
The stopwatch operation continues even if you exit the
Stopwatch Mode. If you exit the Stopwatch Mode while
a stopwatch operation is in progress, the segments
along the top of the upper digital display (upper display
segments) will indicate the seconds of the current time.
Each segment represents one second. This is to let you
know that a stopwatch operation is in progress.
All of the operations in this section are performed in the
Stopwatch Mode, which you enter by pressing
&
(page
E-7).
Speed hand
Upper display
segments
E-15
Important!
Check to make sure that the speed hand is not moving before you perform any
Stopwatch Mode button operation.
Specifying a Distance Value
You can use the procedure below to specify a distance value, if you want. If you
specify a distance value, the watch will calculate and indicate speed for certain
stopwatch operations.
The distance value represents kilometers, miles, or any other distance unit you
want. Specifying a distance value of 10.0, for example, can mean 10.0 kilometers
or 10.0 miles.
No speed calculation is performed when 0.0 is specifi ed as the current distance
value.
For lap time readings, you can specify either the lap distance (when all the laps are
the same distance) or the total race distance.
For split time readings, you can specify the total race distance only. Though the
watch will indicate a speed each time you take a split reading, they will be based
on the total race distance, and so they will not indicate actual intermediate split
speeds.
E-16
To specify a distance value
1. In the Stopwatch Mode, make sure the stopwatch is
stopped and reset to all zeros.
If you need to reset the stopwatch to all zeros, press $.
2.
Hold down
$
for about three seconds until the current
distance value setting fl ashes in the lower digital display.
This is the distance value setting mode.
3. Press
&
to move the fl ashing between the values on
the left side and right side of the distance value decimal
point.
4. While a distance value is fl ashing, use
'
(+) and
%
(–)
to change it.
You can specify a distance value in the range of 0.1
to 99.9.
5. After specifying the distance value you want, press
$
to exit the setting mode.
l
l
l
l
l
l
l
l
l
l
l
E-17
How speed is indicated
While an elapsed time measurement operation is being
performed in the Stopwatch Mode, the watch will
indicate a speed value, which is calculated based on
the distance you specifi ed and the elapsed time.
The speed value is indicated as described below.
Speed hand: Up to 100
Upper display segments: 100 unit
A
1000
indicator points to 1000 (located to the right of
the upper display segments) when the speed value
exceeds 1000.
The speed hand indicates speed values less than 100.
Only even-numbered values are indicated.
Speed can be indicated from 0 to 1998.
OVER
is indicated
by the speed hand when the speed exceeds 1998.
Example:
When the speed value is 1,740.
Speed hand: Indicates
40
.
Upper display segments: Indicate
700
.
1000
indicator: Displayed
Speed hand
(Up to 100)
Segments
(100 unit)
OVER
1000 indicator
E-18
Time Measurement
You need to specify either lap time (page E-20) or split time (page E-22) measurement
before you start a stopwatch operation.
If you want to measure total elapsed time, select split time measurement.
To specify lap time or split time readings
1. In the Stopwatch Mode, make sure the stopwatch is stopped and reset to all zeros.
Make sure that LAP (lap times) or SPL (split times) is shown in the lower digital
display.
If you need to reset the stopwatch to all zeros, press $.
2. You can toggle between LAP (lap times) and SPL (split times) by pressing
$
.
$
E-19
Elapsed Time Measurement
Use the following procedure to measure elapsed time, without taking lap time or split
time readings.
To perform elapsed time measurement
Select split time (SPL) measurement and then perform the following button operations.
'
Start
'
Stop
$
Reset
If you have a distance value (page E-15) specifi ed for the current elapsed time
measurement, the upper display segments and speed hand will indicate the speed
when you press
'
to stop the elapsed time operation.
After pressing
'
to stop an elapsed time operation, you could press
'
again to
restart from the point where you left off.
Operation Guide 5146 5425
E-20
Lap Time
A lap time reading shows the time elapsed since the last
lap time reading was taken.
If you want the watch to calculate the speed of each lap
(when all of the laps are the same distance), specify the
lap distance for the distance setting (page E-15).
If you want the watch to calculate the speed of the
entire race, specify the race distance for the distance
setting (page E-15). A speed will be indicated each
time you take a lap reading, but these lap speeds will
not indicate actual speed of the entire race.
To set up the stopwatch to take lap time readings
1. In the Stopwatch Mode, make sure the stopwatch is stopped and reset to all zeros.
If you need to reset the stopwatch to all zeros, press $.
2. Make sure that LAP (lap times) is shown in the lower digital display.
If SPL (split times) is displayed, press
$
to toggle it to LAP.
Lap time
E-21
To perform a lap time measurement
Select lap time (LAP) measurement and then perform the
following button operations.
'
Start
$
Lap*
$
Lap*
'
Stop
$
Reset
* Normal elapsed time measurement reappears after
about 12 seconds.
You can press
$
to take lap readings as many times
as you like.
While a lap time is displayed, the upper digital display
will alternate between the lap number (
#01
to
#99
) and
the lap hour value. If you take more than 99 lap
readings, the lap number will restart from
#00
following
lap
#99
.
Pressing
'
to stop elapsed time measurement
displays the time (and speed if a distance is specifi ed)
of the fi nal lap.
Lap number
Speed hand
(calculated)
Minutes
Seconds
1/1000
second
s
Hours
E-22
Split Time
A split time reading shows the time elapsed since the
beginning of the current time measurement.
If you want the watch to calculate the speed of the race,
specify the race distance for the distance setting (page
E-15).
For split time readings, you can specify the total race
distance only. Though the watch will indicate a speed
each time you take a split reading, they will be based
on the total race distance, and so they will not indicate
actual intermediate split speeds.
To set up the stopwatch to take split time readings
1. In the Stopwatch Mode, make sure the stopwatch is stopped and reset to all zeros.
If you need to reset the stopwatch to all zeros, press $.
2. Make sure that SPL (split times) is shown in the lower digital display.
If LAP (lap times) is displayed, press
$
to toggle it to SPL.
Split time
E-23
To perform a split time measurement
Select split time (SPL) measurement and then perform the
following button operations.
'
Start
$
Split
$
Split Release*
'
Stop
$
Reset
* The split time is released automatically if you do not
press
$
within about 12 seconds.
You can press
$
to take split readings as many times
as you like.
The stopwatch continues elapsed time measurement
internally while a split time reading is displayed.
Pressing
$
while a split time is displayed will switch
back to normal elapsed time measurement. The
elapsed time will appear in the lower digital display.
You also could press
'
to stop elapsed time
measurement instead.
Pressing
'
to stop elapsed time measurement
displays the time (and speed if a distance is specifi ed)
of the fi nal split (which is the overall elapsed time).
Hours
1/1000
second
s
Minutes
Seconds
Speed hand (calculated)
E-24
To measure times with the stopwatch
Elapsed Time
D
D A
Start Stop Reset
Lap Time
D
A A D A
Start
(
LAP
displayed)
Lap
(Lap01)
Lap
(Lap02)
Stop Reset
Split Time
D
A A D A
Start
(
SPL
displayed)
Split Split release Stop Reset
E-25
Countdown Timer
You can set the countdown start time within a range of
one minute to 24 hours. An alarm sounds when the
countdown reaches zero.
You also can select auto-repeat, which automatically
restarts the countdown from the original value you set
whenever zero is reached.
All of the operations in this section are performed in the
Countdown Timer Mode, which you enter by pressing
&
(page E-7).
Second
s
Auto-repeat off
Start time
(Hours : Minutes)
E-26
To use the countdown timer
Press
'
while in the Countdown Timer Mode to start the countdown timer.
When the end of the countdown is reached, the alarm will sound for 10 seconds or
until you stop it by pressing any button.
The countdown time is reset to its starting value automatically after the alarm stops
if auto-repeat is turned off.
When auto-repeat is turned on, the countdown will restart automatically without
pausing when it reaches zero.
The countdown timer measurement operation continues even if you exit the
Countdown Timer Mode.
Press
'
while a countdown operation is in progress to pause it.
Press
'
again to resume the countdown.
To stop a countdown timer operation completely, fi rst pause it (by pressing
'
),
and then press
$
. This returns the countdown time to its starting value.
E-27
To confi gure countdown start time and auto-repeat settings
1. While the countdown start time is on the display in the
Countdown Timer Mode, hold down
$
for about three
seconds until the hour setting of the countdown start
time starts to fl ash. This is the setting mode.
If the countdown start time is not displayed, use
the procedure under “To use the countdown timer
(page E-26) to display it.
2. Press
&
to move the fl ashing in the sequence shown
below, and select the setting you want to change.
Start Time
(Minutes)
Auto-Repeat
On/Off
Start Time
(Hours)
3. Perform the following operations, depending on which setting currently is selected
on the display.
While the start time setting is fl ashing, use ' (+) and % (–) to change it.
While the auto-repeat on/off setting is fl ashing on the display, press ' to
toggle auto-repeat on (
) and off ( ).
l
l
l
l
l
l
l
l
l
l
l
Start time
(Hours : Minutes)
Auto-repeat on
E-28
4. Press
$
to exit the setting mode.
The auto-repeat on ( ) is displayed on the Countdown Timer Mode screen while
this function is turned on.
E-29
World Time
World Time digitally displays the current time in one of
48 cities (29 time zones) around the world. A simple
operation swaps your Home City with the currently
selected World Time City.
The times kept in the World Time Mode are
synchronized with the time being kept in the
Timekeeping Mode. If you feel that there is an error in
any World Time Mode time, check to make sure you
have the correct city selected as your Home City. Also
check to make sure that the current time as shown in
the Timekeeping Mode is correct.
Times in the World Time Mode are based on UTC
offsets. See the “City Code Table” at the back of this
manual for information about the UTC offsets that are
supported.
All of the operations in this section are performed in the World Time Mode, which
you enter by pressing
&
(page E-7).
Currently selected
World Time City
World Time
Operation Guide 5146 5425
E-30
To view the current time in another time zone
In the World Time Mode, use
'
to scroll through available city codes (time zones).
The lower digital display will show the time in the currently selected World Time
City.
A PM indicator (
P
) will be displayed in the lower digital display between the hours
of noon and midnight.
When the city code (time zone) you want is selected, you can press
$
to display
the date. After about one second, the watch will resume regular timekeeping for the
currently selected city.
Press $.
One second
Hour : Minutes
Seconds
Date
PM indicator
E-31
To toggle a city code time between Standard Time and Daylight Saving Time
1. In the World Time Mode, press
'
to display the city
code (time zone) whose Standard Time/Daylight Saving
Time setting you want to change.
2. Hold down
$
for about three seconds to toggle
between Daylight Saving Time (
DST
indicator
displayed) and Standard Time (
DST
indicator not
displayed).
A
DST
indicator will be displayed in the lower digital
display if Daylight Saving Time is turned on.
You can turn on DST individually for each city code,
except UTC.
Turning on DST for the city code that is currently
selected as your Home City will turn on DST for normal
timekeeping.
DST indicator
E-32
Swapping your Home City and World Time City
You can use the procedure below to swap your Home City and World Time City. This
changes your Home City to your World Time City, and your World Time City to your
Home City. This capability can come in handy when you frequently travel between two
cities in different time zones.
To swap your Home City and World Time City
1. In the World Time Mode, use
'
to select the World Time City you want.
2. Hold down
$
and
%
until the watch beeps.
This will make the World Time City you selected in step 1 your Home City, and
cause the hour and minute hands to move to the current time in that city. At the
same time, it will change the Home City you had selected prior to step 2 your World
Time City, and cause the content of lower digital display to change accordingly.
After swapping the Home City and World Time City, the watch stays in the World
Time Mode with the city that was selected as the Home City prior to step 2 now
displayed as the World Time City.
E-33
Alarms
When an alarm is turned on, the alarm tone will sound
when its alarm time is reached. One of the alarms is a
snooze alarm, while the other four are daily alarms.
You also can turn on an Hourly Time Signal that causes
the watch to beep twice every hour on the hour.
There are fi ve alarm screens numbered
AL1
,
AL2
,
AL3
and
AL4
for the daily alarm, and a snooze alarm screen
indicated by
SNZ
. The Hourly Time Signal screen is
indicated by
SIG
.
All of the operations in this section are performed in the
Alarm Mode, which you enter by pressing
&
(page
E-7).
Alarm number
Alarm time
(Hour : Minutes)
E-34
To set an alarm time
1. In the Alarm Mode, use
'
to scroll through the alarm
screens until the one whose time you want to set is
displayed.
SIG
AL1 AL2 AL3 AL4 SNZ
To set a daily alarm, display alarm screen AL1, AL2,
AL3 or AL4. To set the snooze alarm, display the
SNZ screen.
SIG is the Hourly Time Signal setting (page E-37).
The snooze alarm repeats every fi ve minutes.
2. After you select an alarm, hold down
$
for about three seconds until the hour
setting of the alarm time starts to fl ash. This is the setting mode.
This operation turns on the alarm automatically.
3. Press
&
to move the fl ashing between the hour and minute settings.
4. While a setting is fl ashing, use
'
(+) and
%
(–) to change it.
5. Press
$
to exit the setting mode.
On/Off status
E-35
Alarm Operation
The alarm tone sounds at the preset time for 10 seconds, regardless of the mode the
watch is in. In the case of the snooze alarm, the alarm operation is performed a total
of seven times, every fi ve minutes, or until you turn the alarm off (page E-36).
Alarm and Hourly Time Signal operations are performed in accordance with the
current time in your Home City, as kept in the Timekeeping Mode.
To stop the alarm tone after it starts to sound, press any button.
Performing any one of the following operations during a 5-minute interval between
snooze alarms cancels the current snooze alarm operation.
Displaying the Timekeeping Mode setting screen (page E-9)
Displaying the
SNZ
setting screen (page E-34)
E-36
To turn an alarm on and off
1. In the Alarm Mode, use
'
to select an alarm.
2. Press
$
to toggle it on (
on
) and off (
OFF
).
Turning on a alarm (
AL1
,
AL2
,
AL3
,
AL4
or
SNZ
)
displays the alarm on indicator on its Alarm Mode
screen.
In all modes, the alarm on indicator is shown for any
alarm that currently is turned on.
The alarm on indicator fl ashes while the alarm is
sounding.
The snooze alarm indicator fl ashes while the snooze
alarm is sounding and during the 5-minute intervals
between alarms.
Alarm on
indicator
Snooze
alarm
indicator
On/Off
status
E-37
To turn the Hourly Time Signal on and off
1. In the Alarm Mode, use
'
to select the Hourly Time
Signal (
SIG
) (page E-34).
2. Press
$
to toggle it on (
on
) and off (
OFF
).
The Hourly Time Signal on indicator is shown on the
display in all modes while this function is turned on.
Hourly time signal
on indicator
On/Off
status
E-38
Illumination
An LED (light-emitting diode) illuminates the face of the
watch for easy reading in the dark. The watch’s auto light
switch turns on illumination automatically when you angle
the watch towards your face.
The auto light switch must be turned on (indicated by
the auto light switch on indicator) for it to operate.
See “Illumination Precautions” (page E-46) for other
important information about using illumination.
To illuminate the display manually
In any mode, press
%
to turn on illumination.
The above operation turns on illumination regardless of
the current auto light switch setting.
You can use the procedure below to select either 1.5
seconds or 3 seconds as the illumination duration.
When you press
%
, illumination will remain on for about
1.5 seconds or 3 seconds, depending on the current
illumination duration setting.
Auto light switch on
indicator
E-39
To specify the illumination duration
1. In the Timekeeping Mode, hold down
$
until the
display contents start to fl ash. This is the setting mode.
2. Press
&
nine times to display the current illumination
duration
LT1
or
LT3
.
3. Press
'
to toggle the setting between
LT1
(1.5
seconds) and
LT3
(three seconds).
4. Press
$
to exit the setting mode.
Operation Guide 5146 5425
E-40
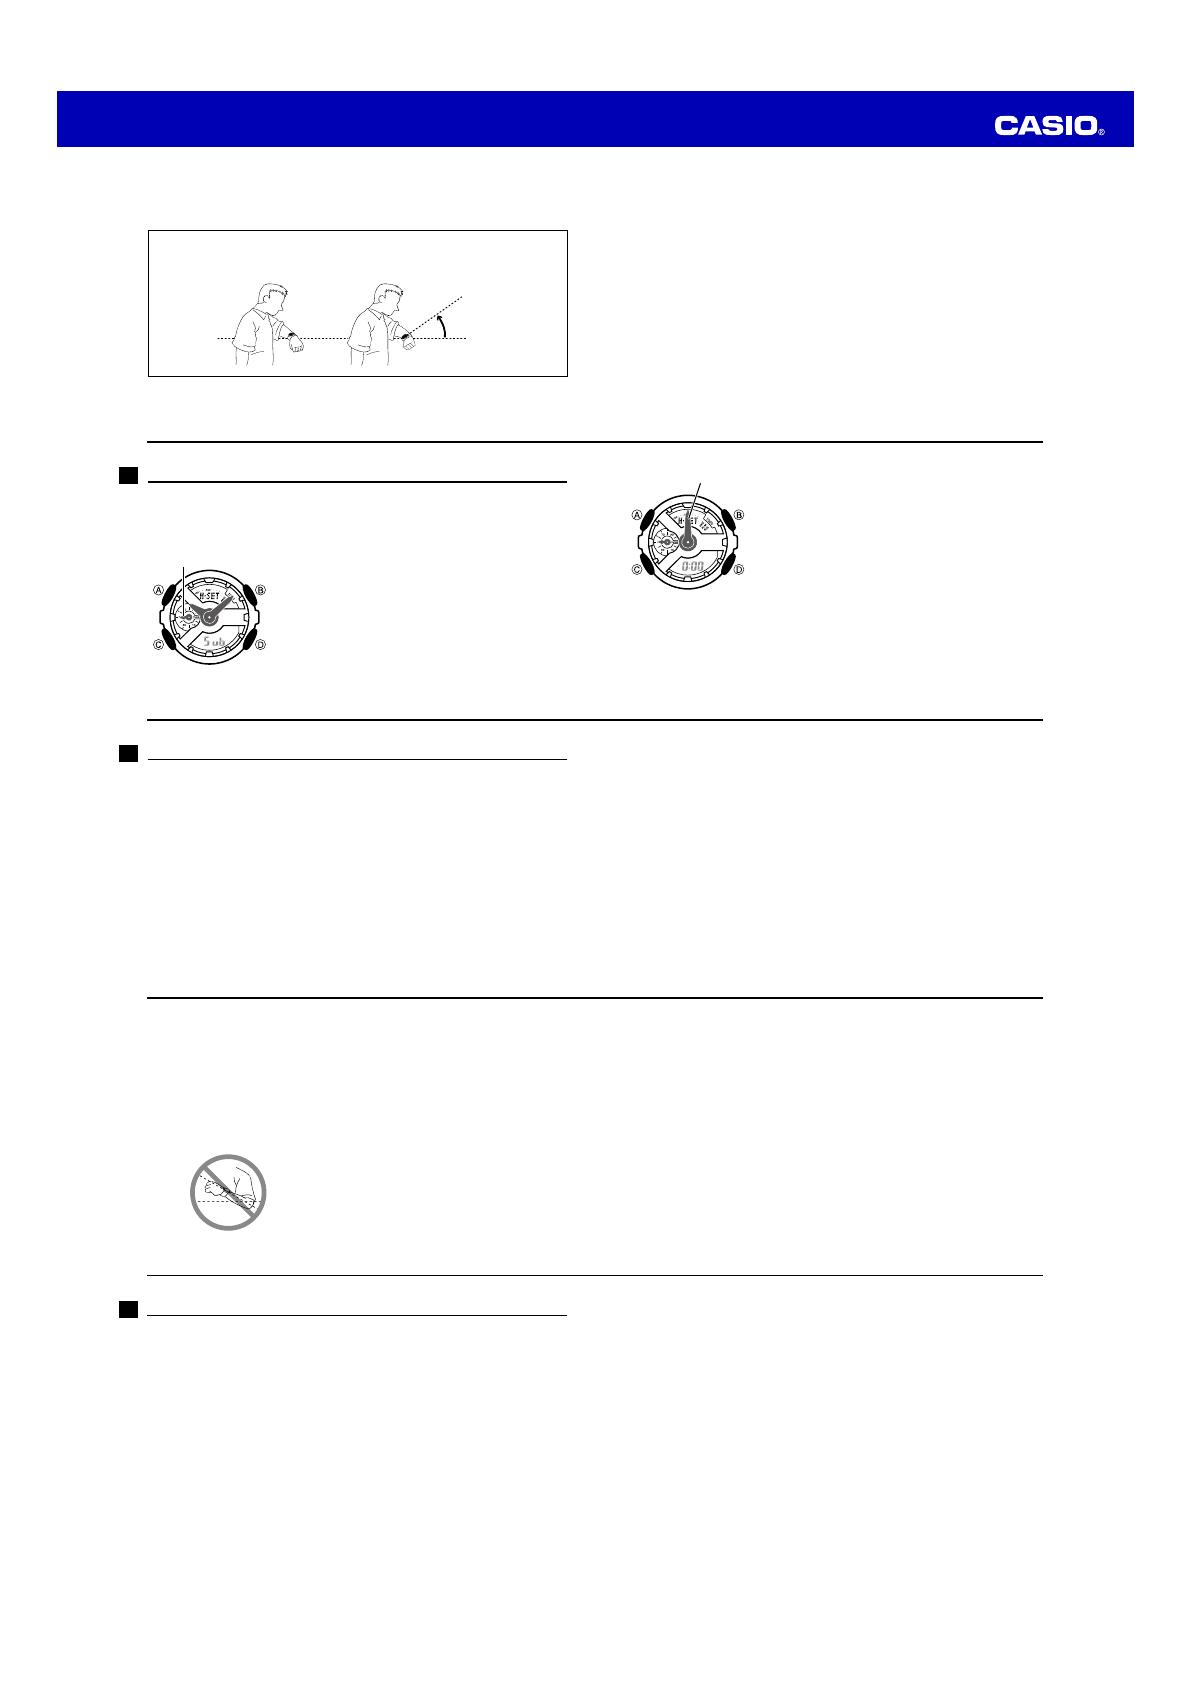
About the Auto Light Switch
Turning on the auto light switch causes illumination to turn on, whenever you position
your wrist as described below in any mode.
Moving the watch to a position that is parallel to the ground and then tilting it
towards you more than 40 degrees causes illumination to turn on.
Wear the watch on the outside of your wrist.
Parallel to
ground
More than
40°
E-41
Warning!
Always make sure you are in a safe place whenever you are reading the
display of the watch using the auto light switch. Be especially careful when
running or engaged in any other activity that can result in accident or injury.
Also take care that sudden illumination by the auto light switch does not
startle or distract others around you.
When you are wearing the watch, make sure that its auto light switch is turned
off before riding a bicycle or operating a motorcycle or any other motor
vehicle. Sudden and unintended operation of the auto light switch can create
a distraction, which can result in a traffi c accident and serious personal injury.
To turn the auto light switch on and off
In the Timekeeping Mode, hold down
%
for about three seconds to toggle the auto
light switch on (auto light switch on indicator displayed) and off (auto light switch on
indicator not displayed).
The auto light switch on indicator remains in all modes while the auto light switch is
turned on.
In order to protect against running down the battery, the auto light switch will turn
off automatically approximately six hours after you turn it on. Repeat the above
procedure to turn the auto light switch back on if you want.
E-42
Hand Home Position Correction
The speed, hour, and minute hands of the watch can be thrown off by exposure to
strong magnetism or impact. The watch is designed to correct speed, hour and minute
hand manually.
To adjust home positions
1. In the Timekeeping Mode, hold down
'
for about three
seconds until
Sub
ashes in the lower digital display.
This is the home position adjustment mode.
2. Check the position of the speed hand.
The speed hand is in the correct home position if it
is pointed at 50 (9 o’clock). If it isn’t, use ' to move
the hand clockwise until it is.
After confi rming that the speed hand is in its correct
home position, press &.
l
l
l
l
l
l
l
l
l
l
l
l
l
l
Speed hand
Correct speed hand
position
E-43
3. Check the positions of the hour and minute hands.
The hands are in the correct home positions if they
are pointed at 12 o’clock. If they aren’t, use '
(clockwise) and % (counterclockwise) to adjust
their positions.
4. When everything is the way you want, press
$
to
return to regular timekeeping.
This will cause the hour and minute hands to move to
the current Timekeeping Mode time and the speed
hand to move to the 0 position.
Pressing
&
here will return to the setting at the
beginning of step 2.
l
l
l
l
l
l
l
l
l
l
l
l
l
Correct hour and
minute hand positions
Hour and minute hands
E-44
Reference
This section contains more detailed and technical information about watch operation.
It also contains important precautions and notes about the various features and
functions of this watch.
Auto Return Features
If you leave the watch with a fl ashing setting on the display for two or three minutes
without performing any operation, the watch will exit the setting mode automatically.
The watch will return to the Timekeeping Mode automatically if you do not perform
any operation for two or three minutes in the Alarm Mode.
High-Speed Movement
The
'
and
%
buttons are used to change setting in various setting modes. In
most cases, holding down these buttons will start high-speed movement.
E-45
Initial Screens
When you enter the Stopwatch Mode, World Time Mode or Alarm Mode, the data you
were viewing when you last exited the mode will appear fi rst.
Timekeeping
Resetting the seconds to
00
while the current count is in the range of 30 to 59
causes the minutes to be increased by 1. In the range of 00 to 29, the seconds are
reset to
00
without changing the minutes.
The year can be set in the range of 2000 to 2099.
The watch’s built-in full automatic calendar makes allowances for different month
lengths and leap years. Once you set the date, there should be no reason to
change it except when battery has replaced.
The current time for all city codes in the Timekeeping Mode and World Time Mode
is calculated in accordance with the Coordinated Universal Time (UTC) for each
city, based on your Home City time setting.
E-46
Illumination Precautions
Illumination may be diffi cult to see when viewed under direct sunlight.
Illumination turns off automatically whenever an alarm sounds.
Frequent use of illumination runs down the battery.
Auto light switch precautions
Avoid wearing the watch on the inside of your wrist. Doing so causes the auto light
switch to operate when it is not needed, which shortens battery life. If you want to
wear the watch on the inside of your wrist, turn off the auto light switch feature.
Illumination may not turn on if the face of the watch is
more than 15 degrees above or below parallel. Make
sure that the back of your hand is parallel to the
ground.
Illumination turns off in about 1.5 seconds or 3
seconds, even if you keep the watch pointed towards
your face.
More than 15 degrees
too high
E-47
Static electricity or magnetic force can interfere with proper operation of the auto
light switch. If illumination does not turn on, try moving the watch back to the
starting position (parallel with the ground) and then tilt it back toward you again. If
this does not work, drop your arm all the way down so it hangs at your side, and
then bring it back up again.
Under certain conditions, illumination may not turn on until about one second after
you turn the face of the watch towards you. This does not necessarily indicate
malfunction of the auto light switch.
You may notice a very faint clicking sound coming from the watch when it is shaken
back and forth. This sound is caused by mechanical operation of the auto light
switch, and does not indicate a problem with the watch.
E-48
Specifi cations
Accuracy at normal temperature:
r
15 seconds a month
Digital Timekeeping:
Hour, minutes, seconds, p.m. (P), month, day, day of the week
Time format: 12-hour and 24-hour
Calendar system: Full Auto-calendar pre-programmed from the year 2000 to 2099
Other: Home City code (can be assigned one of 48 city codes); Standard Time /
Daylight Saving Time (summer time)
Analog Timekeeping:
Hour, minutes (hand moves every 20 seconds)
Stopwatch:
Measuring unit: 1/1000 seconds
Measuring capacity: 99:59'59.999"
Measuring accuracy: ±0.0006%
Measuring modes: Elapsed time, Lap time, Split time
Other: Speed
E-49
Countdown Timer:
Measuring unit: 1 second
Input range: 1 minute to 24 hours (1-minute increments)
Other: Auto-repeat timing
World Time:
48 cities (29 time zones)
Other: Daylight Saving Time/Standard Time, Home City/World Time City
Swapping
Alarms:
Four daily alarms, one snooze alarm, Hourly Time Signal
Illumination:
LED (light-emitting diode), Auto Light Switch; Selectable illumination
duration
Battery:
One lithium battery (Type: CR1220)
Approximate Battery Life: 2 years on type CR1220
(10 seconds of alarm operation per day, one illumination operation (1.5 seconds)
per day)
Operation Guide 5146 5425
L-1
L-2
Pago Pago
Honolulu
Anchorage
Vancouver
Los Angeles
Edmonton
Denver
Mexico City
Chicago
Miami
Toronto
New York
PPG
HNL
ANC
YVR
LAX
YEA
DEN
MEX
CHI
MIA
YTO
NYC
City City
UTC Offset/
Code
GMT Differential
Santiago
Halifax
St. Johns
Rio De Janeiro
Praia
Lisbon
London
Madrid
Paris
Rome
Berlin
Stockholm
City City
UTC Offset/
Code
GMT Differential
City Code Table
–11
–10
–9
–8
–7
–6
–5
–4
–3.5
–3
–1
0
+1
SCL
YHZ
YYT
RIO
RAI
UTC
LIS
LON
MAD
PAR
ROM
BER
STO
L-3
City City
UTC Offset/
Code
GMT Differential
Athens
Cairo
Jerusalem
Moscow
Jeddah
Tehran
Dubai
Kabul
Karachi
Delhi
Dhaka
Yangon
+2
+3
+3.5
+4
+4.5
+5
+5.5
+6
+6.5
ATH
CAI
JRS
MOW
JED
THR
DXB
KBL
KHI
DEL
DAC
RGN
x
Based on data as of December 2013.
x
The rules governing global times (UTC offset and GMT differential) and summer
time are determined by each individual country.
City City
UTC Offset/
Code
GMT Differential
BKK
SIN
HKG
BJS
TPE
SEL
TYO
ADL
GUM
SYD
NOU
WLG
Bangkok
Singapore
Hong Kong
Beijing
Taipei
Seoul
Tokyo
Adelaide
Guam
Sydney
Noumea
Wellington
+7
+8
+9
+9.5
+10
+11
+12
  • Page 1 1
  • Page 2 2
  • Page 3 3
  • Page 4 4
  • Page 5 5
  • Page 6 6

G-Shock GA110MW-7A Owner's manual

Category
Watches
Type
Owner's manual

Ask a question and I''ll find the answer in the document

Finding information in a document is now easier with AI