
SA160E User Manual Rev 3 - Aug 2016 Page
Unit 1, Tir Llwyd Industrial Estate, St Asaph Avenue, Kinmel Bay, Rhyl, Conwy, LL18 5JA
Tel +44 (0)1924 840100 www.prismmedical.co.uk info@prismmedical.co.uk
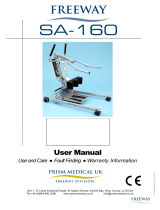
User Manual
Mackworth
Stand Aid
SA160E

SA160E User Manual Rev 3 - Aug 2016 Page 2
1.0 Assembly instructions Page
1.1 Initial Assembly 3
2.0 Stand Aid Features
2.1 Emergency Stop Button 6
2.2 Emergency Lowering 7
2.3 Control Box 8
2.4 Handset 8
3.0 Operating instructions
3.1 To Alter the Leg Width 9
3.2 Positioning 9
3.3 Knee block adjustments 10
3.4 Raising & Lowering 10
3.5 Batteries—recharging 11
4.0 Safety precautions
4.1 Safety precautions 12 & 13
5.0 Safety Checks
5.1 Daily Check List 14
5.2 Warning Notes 14
6.0 Technical Specification
6.1 Dimensions & Weights 15
6.2 Sound levels 15
6.3 Maximum lifting Height & leg width 16
6.4 Electrical detail 16
6.5 SA160 Main Assembly Components 17
7.0 Fault Finding / Maintenance
7.1 Fault Finding 18
7.2 Service / Maintenance 18
7.3 Cleaning & Sterilisation 18
Declaration of Conformity 19
8.0 Test Certificate & Guarantee 20
9.0 Testing and service record
10.1 Initial Information 21
10.2 Service record History 22
10.0 Standing support and Posterior sling 25
Table of Contents
Mackworth SA160E - Stand Aid

SA160E User Manual Rev 3 - Aug 2016 Page 3
1.0 ASSEMBLY INSTRUCTIONS
Mackworth SA160E Stand Aid
1.1 Initial Assembly
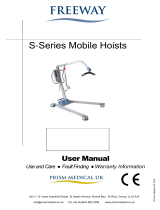
1. Remove carefully from the box:
Boom / Mast assembly
Base unit with legs attached (Base Unit)
Battery pack / charging lead
Hand set control
Foot Plate
Document wallet
SAFETY NOTE: Some of the parts are heavy and will need to be lifted with
care. Heavier items may need two people to lift. ( Please refer to technical
details on page 15
2. Place base unit on level floor surface and lock rear castors.
3. Remove boom/mast assembly from packaging.
Boom / Mast
Assembly
Base Unit with
Legs attached
Foot Plate
Hand set
Battery Pack

SA160E User Manual Rev 3 - Aug 2016 Page 4
1.0 ASSEMBLY INSTRUCTIONS
Mackworth SA160E Stand Aid
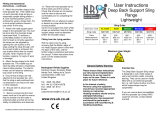
5 The control unit is already fitted to the
mast, so assembly is not required.
Check the emergency stop button (red
button) located on the control box is in
the out position (i.e. out )
6 Fit the battery pack to the control box
making sure it clicks into position in the
top of the bracket, as shown.
Emergency stop button
Mast locking knobs
SAFETY NOTE: Possible finger trap. Keep fingers away from
end of mast when fitting to base unit.
4. Carefully take the boom/mast
assembly and slide bottom of the mast
into the base socket. When the mast is
fully engaged into the base, fit both of
the 2 mast locking knobs and tighten by
hand firmly

SA160E User Manual Rev 3 - Aug 2016 Page 5
8 Fit the lifting actuator into the socket
located on the base of the control unit.
7 Fit the hand control unit to the
hand control socket located on the
base of the control unit.
NOTE: The hand control lead can
only be fitted in one orientation
into its socket. Do not use force to
insert the hand control into its
socket. The plug when correctly
inserted should be pushed firmly
home.
9. Fit the mains cable I into the socket
on the underneath of the control unit.
You have a choice where the mains
cable can be stored, either away from
the hoist or it can be stored at the side
of the battery pack / control unit.
See page 11.

SA160E User Manual Rev 3 - Aug 2016 Page 6
Emergency Stop Button
11. The foot plate is fitted onto the
base by locating it onto the 2 location
pegs either side of the mast, as shown.
2.0 STAND AID FEATURES
2.1 Emergency Stop Button
During all operations and at all times,
the stop button should be in the out
position. In the unlikely event of a
failure of the handset control, it is
possible that the electric ram either
continues to lift or continues to lower.
This may be overridden by pressing the
Emergency stop button to stop the ram.
To re-set the button after it has been
pressed, simply twist it slightly
clockwise and the button will spring
outwards.
NOTE: THE STAND AID WILL NOT OPERATE WITH THE STOP BUTTON
PUSHED IN

SA160E User Manual Rev 3 - Aug 2016 Page 7
Twist Clockwise to Lower
2.2 Emergency Lowering / raising
Manual emergency lowering is facilitated by turning the emergency lowering ring
clockwise. The ring is situated at the top of the actuator where the actuator connects
to the mast.
Electrical emergency lowering: is facilitated by pressing the button on the control
box.
Electrical Emergency
Lowering Button

SA160E User Manual Rev 3 - Aug 2016 Page 8
2.3 Control Box
The control box has been developed for patient lifting devices and the features that
meet the patients needs for a safe and comfortable transfer.
The actuator for the raising / lowering is connected into the bottom of the
control box.
To recharge the batteries the hoist is connected to the mains via a mains lead.
See page 11 regarding ‘Re-charging the batteries’
Handset
Connection
Actuator Connection
Battery Charge
Level Indicator
Raising
Lowering
2.4 Handset
The Stand Aid handset operates 2 functions on the
Stand Aid. They are:-
1. Raises the Boom
2. Lowers the Boom
The handset is attached to the control box via a
flexible cable that is secured in place with a
bayonet type fitting.
The back of the handset has a hook that enables
the user to position the handset anywhere on the
boom whilst attending to the patient.
Clear and easy to understand button diagrams
enable ease of use for the caregiver.
1 2

SA160E User Manual Rev 3 - Aug 2016 Page 9
3.0 OPERATING INSTRUCTIONS
Mackworth SA160E Stand Aid
Before use, you should familiarise yourself with use of the Stand Aid the procedure
for opening / closing the leg sections and raising and lowering the Stand Aid,
including emergency stop/lower and raise functions. Appropriate training in lifting
and handling procedures should be undergone by any person operating a Stand Aid
or sling, for their own and the clients safety and comfort. These instructions are
designed to cover the method of using of the Mackworth Stand Aid .
3.1 To Alter the Leg Width
The legs on the base unit of the Stand Aid are operated by adjusting the leg lever
pedal, as shown in the photo below. To open the legs, press on “open” to close the
legs, press on “close”. Stand Aid manoeuvres can be completed with the legs in
any position.
3.2 Positioning
1. Fit the person to be lifted with a suitable sling. Instruction should be taken in the
fitting of slings to ensure maximum safety and comfort. A full assessment
should be carried out by a qualified person and carers should be trained
in the correct use. (See sling safety)
2. Select the leg position required. Position the Stand Aid near to person to be
lifted. Assuming you are lifting on a level surface do not use the brakes on the
Stand Aid (A documented risk assessment may advise to use the brakes). This
allows the Stand Aid to align its self before lifting. Ensure ALL sling loops are
attached over the safety hooks.
NOTE: It is recommended to only use the brakes when carrying out lifts on / off the
floor, following a risk assessment or when the Stand Aid is not in use & on
charge.
*PLEASE READ THE OPERATING INSTRUCTIONS CAREFULLY*

SA160E User Manual Rev 3 - Aug 2016 Page 10
3.4 Raising & Lowering
1. To raise a person press handset button marked with upward facing arrow.
When the sling straps become taut before the lift is commenced, check the
straps are secure in position over the hooks on the boom before continuing the
lift. When the desired height has been reached, release button and the Stand
Aid will stop.
2. When moving a person use the mast push handle and walk with the Stand Aid
NEVER pull or twist at arms length, this can cause injury to the carer.
3. To a lower person, press and hold handset button marked with downward
facing arrow and Stand Aid will descend. When you have reached desired
level, simply release button and Stand Aid will stop in that position.
3.3 Knee Pad Adjustment
The knee pad can be adjusted either inwards / outwards or raising / lowering the
height.
Moving the Knee pad can be achieved by altering the position of the brackets which
hold the knee pad in place.
To move the knee pad in / out, pull out and twist the location pin by the knee pad,
then move the knee pad to the required position.
To alter the height of the knee pad, pull out and twist the location pin, then move the
knee pad to the required position .
Pull out and twist knob to
change height of knee pad
Pull out and twist knob to
move knee pad in or out

SA160E User Manual Rev 3 - Aug 2016 Page 11
3.5 Batteries:
Re-Charging the Batteries
An audible warning will sound when the batteries need charging and a visual LCD at
the bottom of the control box will display empty. A fully charged hoist will display a
full battery. Do not continue to use the Stand Aid beyond the lifting operation in
progress at the time the warning first sounds.
The batteries are located within the power pack. They are charged through a
socket connected to the base of the control unit. When charging is required, the
mains lead is plugged into a wall socket outlet and the other end into the control box,
as shown on page 5.
NOTE: Emergency Stop Button must be in ‘OUT’ position when charging
1. Plug the charger main plug into a suitable mains outlet and switch the mains
supply ON
2. The amber light will go out once the batteries are fully charged.
Charging is automatic and will fully charge the batteries over a period of eight to
twelve hours
NOTE: Batteries should be kept on charge when the Stand Aid is not in general
use. this ensures ready availability of the Stand Aid and prolongs battery life. The
internal charger in the control box will not allow the batteries to ‘overcharge’. In
accordance with battery manufacturers recommendations, all batteries should be
fully charged for twenty four hours every four months if in storage or not in regular
use.
NOTE: The Stand Aid will not work if the mains lead is connected to the wall
socket.
DO
NOT expose the battery or control box to water
Before using the stand aid, switch OFF the
mains supply and remove the plug from the
socket outlet. The charger lead can either be
wrapped around the side of the control box,
as shown, or stored separately

SA160E User Manual Rev 3 - Aug 2016 Page 12
4.0 SAFETY PRECAUTIONS
Please read and follow the safety precautions listed below. The operation and the
use of the SA160E Stand Aid is straightforward. These basic safety precautions will
help make lifting operations easy and trouble free.
ALWAYS conduct a risk assessment to plan your lifting operations before
commencing.
ALWAYS carry out the DAILY CHECK LIST (next section) before using the Stand
Aid.
ALWAYS read this manual and familiarise yourself with the operating control
and safety features of the Stand Aid before lifting a patient.
ALWAYS check the sling is suitable for the particular patient and is of the
correct size and capacity.
ALWAYS fit the sling according to the instructions in the user manual.
ALWAYS check that the safe working load of the Stand Aid is suitable for the
weight of the patient.
ALWAYS carry out lifting according to the instructions in the sling user manual.
ALWAYS manoeuvre the lift with the handle provided.
ALWAYS lower the patient to the lowest comfortable position before transfers.
ALWAYS apply the brakes when parking a Stand Aid.
NEVER use a sling unless it is recommended for use with the Stand Aid.
NEVER attempt to manoeuvre the lift by pushing on the mast, boom or
patient.
NEVER push a loaded lift at speeds which exceed a slow walking pace.
NEVER push the Stand Aid over uneven or rough ground, particularly if loaded.
NEVER attempt to push or pull a loaded Stand Aid over a floor obstruction which
the castors are unable to ride over easily.
NEVER bump the Stand Aid down steps, loaded or unloaded, this will damage the
castors.
NEVER attempt to negotiate a loaded Stand Aid on a slope.
.
Continued

SA160E User Manual Rev 3 - Aug 2016 Page 13
SAFETY PRECAUTIONS (continued )
NEVER use a sling which is frayed or damaged.
NEVER disconnect or bypass a control or safety feature because is seems
easier to operate the Stand Aid.
NEVER force an operating or safety control. Forcing will only strain or damage
the Stand Aid and may compromise safety.
NEVER use Stand Aids in a shower.
NEVER charge an electric lift in a bathroom or shower room.
NEVER allow water to enter hand set or battery control box or use the Stand Aid
outside in wet conditions.
NEVER dispose of the battery pack in a fire as this may cause an explosion. These
need to be disposed under the W.E.E.E. regulations.
The SA160E’s brakes may be left on or off following a risk assessment of the client
and the environment
YOUR Stand Aid is for patient lifting. DO NOT use it, or allow it to be used for any
other purpose.

SA160E User Manual Rev 3 - Aug 2016 Page 14
5.0 SAFETY CHECK LIST
The following checks are those recommended and are supplementary to
requirements that may be applicable for current Lifting and Handling and other
health and Safety regulations such as The Lifting Operations and Lifting Equipment
Regulations 1998 which may have additional requirements to those set out below
5.1 Daily Check List:
The following checks should be carried out daily before using the Stand Aid:
Make sure the Stand Aid moves freely on its castors
Make sure that leg opening and closing pedal is functioning correctly
Examine the sling hooks on the boom for excessive wear
Raise and lower the Stand Aid by operating the handset If the Stand Aid makes
a bleeping sound DO NOT USE as the batteries need to be re- charged.
Ensure the Stand Aid is off charge before use and all leads are fitted correctly
in their sockets
Make sure the mast is fully engaged and the locking nuts are fully tightened
Examine slings for fraying or other damage. DO NOT use any sling with
fraying or damage to the suspension straps or tears in the body of the sling
5.2 Warning Notes
Your Mackworth SA160E Stand Aid has been manufactured and tested to exceed
BS EN 10535:2006
This does not mean that it can be used without care. ALL OPERATORS should
have read the operating instructions and appreciate this warning section.
1. ALL STAND AIDS are less stable on sloping surfaces. A 5-degree slope is the
maximum permitted and then only with great care.
2. ALL STAND AIDS are less stable when the load is at maximum height.
3. ALL STAND AIDS are less stable when the load is swinging.
4. ALL STAND AIDS are dangerous to the person being carried when used
recklessly or pushed at speed.

SA160E User Manual Rev 3 - Aug 2016 Page 15
6.0 TECHNICAL SPECIFICATION
6.1 Dimensions & Weights
6.2 Sound Levels— Measured in dB A
SA160E
Unloaded
Loaded
Model Specification SA 160E
Maximum Weight Capacity 160 Kgs
Lifting Range 770 - 1675mm
Stand Aid Foot Print ( L x W ) 1250 x 660 mm
Turning Radius 1305mm
Legs Open - External Width 1190mm
Legs Open - Internal Width 1030mm
Legs Closed - External Width 720mm
Legs Closed - Internal Width 560mm
Overall Height of Legs ( Top of Legs to Floor ) 112mm
Ground Clearance ( Undersize of Leg to Floor ) 62mm
Front Twin Castors ( Diameter ) 100mm
Rear Twin Castors ( Diameter ) 100mm
Weights SA 160E
Assembled SA 160 46 Kgs
Mast & Boom ( Including all fittings ) 23 Kgs
Base Assembly 23 Kgs
Battery 3 Kgs

SA160E User Manual Rev 3 - Aug 2016 Page 16
TECHNICAL SPECIFICATION
6.3 Maximum lifting Height & leg width
6.4 Electrical detail
Electrical Specifications
Batteries: - 2 x 12 volt rechargeable sealed lead acid
Battery capacity - 2.9 ampere hours
Charger Input - 230V ac 50/60Hz
Charger Output - n/a
Electric shock protection-
Charger Class 11
Hoist Internal Power Source
Degree of Shock protection -
Hoist Type B
The policy of Prism Medical UK is one of continual improvement and we reserve the
right to modify designs without notice.

SA160E User Manual Rev 3 - Aug 2016 Page 17
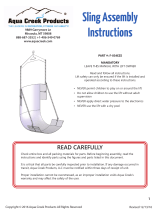
6.5 SA 160E Main Assembly Components
Control Unit
Lockable Rear
castors
Boom
Foot Plate
Battery Box
Handset
Knee Pad
Leg Lever Pedal
Attachment
hooks

SA160E User Manual Rev 3 - Aug 2016 Page 18
7.0 Fault Finding / Maintenance
7.1 Fault Finding
If the hoist will not operate:-
ENSURE THE BATTERY IS CHARGED AND THAT IT IS
ATTACHED CORRECTLY TO THE CONTROL BOX
ENSURE THAT STOP BUTTON IS IN THE OUT POSITION.
MAKE SURE THE CHARGING LEAD IS DISCONECTED FROM
THE MAINS POWER SUPPLY
CHECK THE HANDSET LEAD HAS NOT BEEN PULLED
FROM THE CONTROL BOX SOCKET OR WIRES DAMAGED
If the above checks prove unsuccessful, contact your nearest
MACKWORTH APPROVED AGENT
7.2 Service / Maintenance
Any work performed on the SA160E must be in accordance with the
specifications detailed in the test requirements of BS 10535:2006.
You should also consider if the hoist requires servicing in accordance
with “LOLER REGULATIONS” (Lifting Operations and Lifting Equipment
Regulations 1998).
7.3 Cleaning, Disinfection and Sterilisation
The SA160 E has an anti-microbial coating. This does not replace the
need to clean and maintain the hoist unit.
Routine cleaning: the exterior of the stand aid can be wiped over
with a damp cloth containing a mild soap solution.
Disinfection and Sterilisation: the exterior of the stand aid should
only be disinfected and sterilised using Isopropyl alcohol. Dampen a
cloth with isopropyl alcohol and wipe down the entire stand aid.
DO NOT USE ABRASIVE MATERIALS
DO NOT IMMERSE THE HOIST UNIT.

SA160E User Manual Rev 3 - Aug 2016 Page 19
DECLARATION OF CONFORMITY
Manufacturers Name: Prism Medical UK Ltd
MHRA Registration No: CA 013248
Manufacturers Address: Units 1-4, Tir Llwyd Industrial Estate,
Kinmel Bay, Conwy,
LL18 5JA, UK
Tel +44 (0) 844 980 2296
Fax +44 (0) 844 980 2297
Declares that the manufactured product:-
Product Name: Mackworth - Stand Aid
Model Number (S): SA160E
Product Options: 160 Kg
Conforms to the following European Union Council Directives:-
Directive 93/42/EEC and all amendments up to Directive 2007/47/EC
Classification Class 1, Low Risk Medical Device
Tested in accordance with BS EN ISO 10535:2006 & IEC 60601 3rd Edition
Directive 89/336/EEC for Electromagnetic Compatibility
Supplementary Information:
The undersigned declares the product herewith complies with the requirements set out
above and carries the CE mark accordingly.
The Technical Construction File required by this directive is maintained by the
manufacturer as detailed above.
Signed: Date:

SA160E User Manual Rev 3 - Aug 2016 Page 20
8.0 Test Certificate & Guarantee
TEST CERTIFICATE SA 160E
Safe Working Load: 160Kgs
Serial No: ……………………………………………………………………..
Date of Test: …………………………………………………………………..
This Test Certificate confirms that the above numbered hoist has been fully tested in
accordance with the tests specified in BS EN 10535 and has conformed fully therewith.
Signature of Tester ……………………………………………………
Guarantee
This guarantee does not affect or in any way limit your Statutory Rights
1) Prism Medical UK guarantees the SA 160E supplied as new, against failure within the period
of twenty four months from the date of purchase by virtue of defects in material or
workmanship.
2) The liability of Prism Medical UK under terms of this guarantee shall be limited to the
replacement or the defective part (s) to the sales distributor, dealer, agent, person or entity which
purchased the equipment from Prism Medical UK. In no event shall Prism Medical UK incur
liability for any consequential or unforeseeable losses.
3) This equipment guarantee shall be void if the equipment is not serviced by Prism Medical UK Ltd
authorised agents, in accordance with manufacturer’s recommendations, or if any unauthorised
persons carry out work on the equipment.
4) This guarantee does not apply to failure attributable to normal wear and tear, damage by natural
forces, user neglect or misuse or to deliberate destruction.
Exemptions: Batteries will be guaranteed for a period of 90-days after original purchase.
Page is loading ...
Page is loading ...
Page is loading ...
Page is loading ...
Page is loading ...
Page is loading ...
Page is loading ...
Page is loading ...
-
 1
1
-
 2
2
-
 3
3
-
 4
4
-
 5
5
-
 6
6
-
 7
7
-
 8
8
-
 9
9
-
 10
10
-
 11
11
-
 12
12
-
 13
13
-
 14
14
-
 15
15
-
 16
16
-
 17
17
-
 18
18
-
 19
19
-
 20
20
-
 21
21
-
 22
22
-
 23
23
-
 24
24
-
 25
25
-
 26
26
-
 27
27
-
 28
28


Mackworth SA160E User manual
- Type
- User manual
- This manual is also suitable for
Ask a question and I''ll find the answer in the document
Finding information in a document is now easier with AI
Related papers

Other documents
-
 FREEWAY P12028 Operating instructions
-
 FREEWAY P12004 Operating instructions
-
 NRS Healthcare M07335 Operating instructions
-
 Aqua Creek F-037EZLS User manual
-
 Aqua Creek F-034EZS User manual
-
 NRS Healthcare M40351 Operating instructions
-
 Prism FSG200 User manual
-
 Joerns Healthcare Hoyer User manual
-
Drive Medical STSP450 Owner's manual
-
Invacare RPS 440ee User manual


