Page is loading ...

DTH2S
DTH2SDTH2S
DTH2S
-
--
-
F
F F
F
www.thermomart.com
www.thermomart.comwww.thermomart.com
www.thermomart.com
Please check your controller label. Depends on your order the power supply (operating voltage) could be either 110V or 12V
(12v controller does not need ground wire)
①
①①
①
Specification and
Specification and Specification and
Specification and size:
size:size:
size:
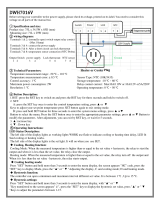
Product size: 180L x 100W x 55D (mm)
Mounting size: 168L x 88W (mm)
②
②②
②
wiring diagram:
wiring diagram:wiring diagram:
wiring diagram:
Terminals 1 & 2: Temperature Output relay contact switch
Terminals 3 & 4: Humidity Output relay contact switch
Terminals 5 & 6: Alarm Output relay contact switch
Terminals 7 & 8: Power supply connection
NTC temperature Sensor: (2 black wire) doesn’t have polarity
Humidity sensor: Red is positive, Yellow is between R & B
and Black is negative
Temperature Controller
Temperature ControllerTemperature Controller
Temperature Controller:
::
:
③
③③
③
Temperature controller
Temperature controller Temperature controller
Temperature controller Technical Parameters
Technical ParametersTechnical Parameters
Technical Parameters:
::
:
- Temperature measurement range: -58 ℉ ~ 230 ℉
- Temperature measurement error: ± 1 ℉ - Sensor Type: NTC (10K/3435)
- Control accuracy & Resolution: 1 ℉ - Relay contact current: Max15A (for temperature output)
- Maximum power consumption: 2W and 3A (for Alarm output)
④
④④
④
Button Description:
Button Description:Button Description:
Button Description:
1. Power 1: To turn the temperature controller ON press the Power1 key. To turn the controller OFF press and hold the
Power1 key for 3 seconds.
2. SET1:
A: To set the temperature (the set point), press the SET1 key once and the controller will go to the “temperature setting”
mode. By pressing ▲ or ▼ keys you can adjust the temperature to your required set point. When the set point is adjusted you
can exit the “temperature setting” mode by pressing the SET1 key again.
B: To set the controller parameters, press and hold the SET1 and Up keys together more than 3 seconds and the controller
will go to the “parameter setting menu”. By pressing ▲ or▼ keys you can select the required parameter from the menu. When
the required parameter is found, press the SET1 key once and the controller will go to the required parameter setting mode.
By pressing ▲ or ▼ keys, you can adjust the parameter that you need. When the parameter is set, you can exit the “parameter
setting mode” by pressing the Power1 key (or wait for 5 seconds and the controller automatically exit this mode).
3. ▲: Increasing Up key
4. ▼: Decreasing Down key
⑤
⑤⑤
⑤
Operating Instructions:
Operating Instructions:Operating Instructions:
Operating Instructions:
LED Status
LED StatusLED Status
LED Status
(light) (light display)
(light) (light display)(light) (light display)
(light) (light display):
::
:
- When the red light beside the “Work1” is ON it shows that the output (heating or cooling ) is working.
- If the light beside the “Work1” flashes, it shows that the controller is on delay.
- If the light beside the “Set1” is ON, it shows that the controller is on setting mode.
Cooling /
ooling / ooling /
ooling / H
HH
Heating function
eating functioneating function
eating functions
ss
s:
::
:
- Cooling mode: When the current temperature is equal or higher than the set point temperature (+ hysteresis), the relay
turns the cooling source ON and when it is less than the set point temperature, the relay turns it OFF.
- Heating mode: When the current temperature is equal or lower than the set point temperature (- hysteresis), the relay turns
the heating source ON and when it is higher than the set point temperature, the relay turns it OFF.
C
CC
Cooling / H
ooling / Hooling / H
ooling / Heating setting
eating settingeating setting
eating setting
(“HC” parameter)
(“HC” parameter)(“HC” parameter)
(“HC” parameter):
::
:
To set the controller on Heating or Cooling mode, press and hold the "SET1 and Up" keys for more than 3 seconds to enter the
“parameter setting menu”. Find the “HC” parameter by pressing ▲ or▼ keys. Press the "SET1" key when you find the “HC” and
then by pressing "▲" or " ▼ " adjust it to “C” for cooling or to “H” for heating mode.
Hysteresis
HysteresisHysteresis
Hysteresis
(Temperature Band)
(Temperature Band)(Temperature Band)
(Temperature Band)
function:
function:function:
function:
To prevent the frequent ON/OFF action of the output a temperature band (called hysteresis or differential set value) is created
between the ON and OFF operations. The controller will use a range (a maximum and minimum) for process control action,
which is between 1℉ to 25℉. For example when the hysteresis is set on 5 and the set point on 50℉, the output ON/OFF action
would be when the temperature goes lower than 45℉ and higher than 55℉.
H
HH
Hysteresis setting
ysteresis settingysteresis setting
ysteresis setting
(“d” parameter)
(“d” parameter)(“d” parameter)
(“d” parameter):
::
:
Press and hold the “SET1 & Up” keys for more than 3 seconds to enter the “parameter setting menu”. Find the “d” parameter
by pressing "▲" or " ▼" keys. Press the “SET1” key when you find “d” and then by pressing "▲" or " ▼" adjust it to any
number from 1 to 25.

Temperature calibration
Temperature calibrationTemperature calibration
Temperature calibration:
::
:
You can calibrate the temperature reading with this function. Correction value can be positive, negative or 0.
Temperature calibration setting
Temperature calibration settingTemperature calibration setting
Temperature calibration setting
(“ CA” parameter)
(“ CA” parameter)(“ CA” parameter)
(“ CA” parameter):
::
:
Press and hold the “SET1 & Up” keys for more than 3 seconds to enter the “parameter setting menu”. Find the “CA” parameter
by pressing "▲" or " ▼" keys. Press the “SET1” key when you find “CA” and then by pressing "▲"or"▼" adjust this parameter.
Delay Protection:
Delay Protection:Delay Protection:
Delay Protection:
In the cooling mode, you can use this parameter to set the controller on the state of compressor boot delay protection. It
prevents breaking the compressor as a result of frequent boot . It also protects the compressor in the state of power cut and
then power on.
You can define the delay time for starting of your cooling machine.
D
DD
Delay setting
elay settingelay setting
elay setting
(“PT” parameter)
(“PT” parameter)(“PT” parameter)
(“PT” parameter):
::
:
Press and hold the “SET1 & Up” keys for more than 3 seconds to enter the “parameter setting menu”. Find the “PT” parameter
by pressing "▲" or "▼" keys. Press the “SET1” key when you find “PT” and then by pressing "▲" or "▼" adjust this parameter.
Higher
HigherHigher
Higher
and lower
and lower and lower
and lower temperature
temperature temperature
temperature functions:
functions:functions:
functions:
By adjusting the higher and lower temperatures you will define the display range of your controller. Narrowing this range will
add to the accuracy of the controller.
Higher
Higher Higher
Higher and
andand
and
lower temperature
lower temperaturelower temperature
lower temperature
setting (“HS” and “LS” parameters)
setting (“HS” and “LS” parameters)setting (“HS” and “LS” parameters)
setting (“HS” and “LS” parameters):
::
:
Press and hold the “SET1 & Up” keys for more than 3 seconds to enter the “parameter setting menu”. Find the “HS” or “LS”
parameters by pressing "▲" or "▼" keys. Press the “SET1” key when you find “HS” or “LS” and then by pressing "▲" or "▼"
adjust this parameter. Please note that your set point has to be always between the HS and LS values.
High and low temperature alarm functions:
High and low temperature alarm functions:High and low temperature alarm functions:
High and low temperature alarm functions:
- If the temperature exceeds the higher alarm temperature “set point temperature + AH” the alarm output relay will be
opened, the controller makes beeping sound and the display will alternately flash between ”H” and the current temperature.
By pressing any key the buzzer alarm will stop and alarm relay output will be closed.
- If the temperature drops to lower than the lower alarm temperature “set point temperature - AL” the alarm output relay will
be opened, the controller makes beeping sound and the display will alternately flash between ”L” and the current temperature.
By pressing any key the buzzer alarm will stop and alarm relay output will be closed.
Setting AL and AH parameters on zero will turn the alarm function off.
High and low temperature alarm settings (“AH” and “AL” parameters):
High and low temperature alarm settings (“AH” and “AL” parameters):High and low temperature alarm settings (“AH” and “AL” parameters):
High and low temperature alarm settings (“AH” and “AL” parameters):
Press and hold the “SET1 & Up” keys for more than 3 seconds to enter the “parameter setting menu”. Find the “AL” or “AH”
parameters by pressing "▲" or "▼" keys. Press the “SET1” key when you find “AL” or “AH” and then by pressing "▲" or "▼"
adjust the temperature. “Set point temperature - AL” is for lower temperature alarm and “Set point temperature + AH” is for
higher temperature alarm. Setting AL and AH parameters on zero will turn the alarm function off.
Parameters setting and definition:
Parameters setting and definition:Parameters setting and definition:
Parameters setting and definition:
Symbol Details Setting range Factory settings Units
HC Heating / cooling H / C C
d Hysteresis or Differential Set Value(temperature band) 1 to 25 1 ℉
LS Lower temperature setting -58 ~ HS -58 ℉
HS Higher temperature setting LS ~ 230 230 ℉
CA Temperature Calibration
-9 To +9 0 ℉
PT Delay Protection time 0 ~ 30 1 Minutes
AH High temperature Alarm Hysteresis 0 ~ 25 1 ℉
AL Low temperature Alarm Hysteresis 0 ~ 25 1 ℉
⑥
⑥⑥
⑥
Error messages and troubleshooting:
Error messages and troubleshooting:Error messages and troubleshooting:
Error messages and troubleshooting:
1) When the controller displays --- it shows that the sensor is disconnected.
2) When the controller displays LLL it shows that the measured temperature by sensor is lower than -58 ℉.
3)
3)3)
3) When the controller displays HHH it shows that the measured temperature by sensor is higher than 230 ℉.
⑦
⑦⑦
⑦
Caution
CautionCaution
Caution:
::
:
The maximum current load of the heating or cooling source must not exceed the output relay contact capacity. It will
damage the unit and may cause fire.
Check the wiring diagram before wiring the unit. Wrong wiring will damage the controller and may cause fire.
Applying extra force on the screws of controller terminals will break the base. Please tighten the screws gently.
Turn the power supply off when you are wiring relays, sensors, .. Otherwise it will damage the unit and may cause fire.
NTC Sensor
NTC SensorNTC Sensor
NTC Sensor
• Measurement range: -58 to 230 ℉
• Cable length (L): 10 ft (3m)
• Sensor type: Water proof Negative Temperature Coefficient sensor 10K

Humidity Controller:
Humidity Controller:Humidity Controller:
Humidity Controller:
Humidity controller Technical Parameters:
Humidity controller Technical Parameters:Humidity controller Technical Parameters:
Humidity controller Technical Parameters:
- Humidity Measuring Range: 5% ~ 99% RH
- Humidity controlling range: 5% ~ 95% RH
- Resolution: 1 % RH
- Accuracy: ±5%RH 10%RH~95%RH 25℃ )
- Relay contact output: Max 15A / 110 ,
-
Alarm output: 3A/110V
-
Temperature coefficient: ±0.2%RH/℃
-
Sensor operating temperature range: -30℃~+80℃
Button (key) Description:
Button (key) Description:Button (key) Description:
Button (key) Description:
1. Power2
Power2Power2
Power2: To turn the controller ON press the Power2 key. To turn the controller OFF press and hold the RST key for 3
seconds.
2. SET
SETSET
SET2
22
2:
A: To set the humidity set point, press the SET2 key once and the controller will go to the “humidity setting” mode. By
pressing ▲ or ▼ keys you can adjust the humidity to your required set point. When the set point is adjusted you can exit the
“humidity setting” mode by pressing the SET2 key again.
B: To set the controller parameters, press and hold the SET2 & Up keys together for more than 3 seconds and the controller
will go to the “parameter setting menu”. By pressing ▲ or▼ keys you can select the required parameter from the menu. When
the required parameter is found, press the SET2 key once and the controller will go to the required parameter setting mode.
By pressing ▲ or ▼ keys, you can adjust the parameter that you need. When the parameter is set, you can exit the “parameter
setting mode” by pressing the Power2 key (or wait for 5 seconds and the controller automatically exit this mode).
3. ▲: Increasing Up key 4. ▼: Decreasing Down key
Operating instructions
Operating instructionsOperating instructions
Operating instructions
LED Status (light display):
LED Status (light display):LED Status (light display):
LED Status (light display):
- When the red light beside the “Work2” is ON it shows that the output (humidifying or dehumidifying) is working.
- If the light beside the “Work2” flashes, it shows that the controller is on delay.
- If the light beside the “Set2” is ON, it shows that the controller is on setting mode.
Humidification/Dehumidification functions:
Humidification/Dehumidification functions:Humidification/Dehumidification functions:
Humidification/Dehumidification functions:
-
--
-
Dehumidification mode:
Dehumidification mode:Dehumidification mode:
Dehumidification mode: When the measured humidity is equal or higher than the (set point humidity + hysteresis), the relay
turns the dehumidifier ON and when it is less than the (set point humidity - hysteresis), the relay turns it OFF.
-
--
-
Humidification mode:
Humidification mode:Humidification mode:
Humidification mode: When the measured humidity is equal or lower than the (set point humidity - hysteresis), the relay
turns the humidifier ON and when it is higher than the (set point humidity + hysteresis), the relay turns it OFF.
Delay protection
Delay protectionDelay protection
Delay protection
This is a safety feature to protect the device that is connected to the unit, from continual switching. It prevents breaking the
humidifier/dehumidifier as a result of frequent turning On and Off.
For example if this parameter is set to “3 minutes”, when the measured humidity is equal or lower than the
(set point humidity
- hysteresis), the working indictor will flash to indicate that the relay action is being delayed (for 3 minutes) and after 3
minutes the light will become solid and the relay will switch the humidifier ON. If this parameter is set to “0” there will be no
time delay.
Delay Protection setting
Delay Protection settingDelay Protection setting
Delay Protection setting
Press and hold the “SET2 & Up” keys for more than 3 seconds to enter the “parameter setting menu”. Find the “PT” parameter
by pressing "▲" or "▼" keys. Press the “SET2” key when you find “PT” and then by pressing "▲" or "▼" adjust this parameter.
By setting it on “0” there will be no time delay.
Higher and lower humidity function
Higher and lower humidity functionHigher and lower humidity function
Higher and lower humidity function
By adjusting the higher and lower humidity, you will define the display range of your controller. Narrowing this range will add
to the accuracy of the controller.
Higher
Higher Higher
Higher and lower humidity setting (“HS” and “LS” parameters):
and lower humidity setting (“HS” and “LS” parameters):and lower humidity setting (“HS” and “LS” parameters):
and lower humidity setting (“HS” and “LS” parameters):
Press and hold the “SET2 & Up” key for more than 3 seconds to enter the “parameter setting menu”. Find the “HS” or “LS”
parameters by pressing "▲" or "▼" keys. Press the “SET2” key when you find “HS” or “LS” and then by pressing "▲" or "▼"
adjust this parameter.
Please note that your set point has to be always in between the HS and LS values.
Humidification
HumidificationHumidification
Humidification
/Dehumidification functions:
/Dehumidification functions:/Dehumidification functions:
/Dehumidification functions:
- Dehumidification mode: When the current humidity is equal or higher than the set point humidity (+ hysteresis), the relay
turns the dehumidification source ON and when it is less than the set point humidity, the relay turns it OFF.
- Humidification mode: When the current humidity is equal or lower than the set point temperature (- hysteresis), the relay
turns the humidification source ON and when it is higher than the set point humidity, the relay turns it OFF.
Humidification / Dehumidification setting (“HC” parameter):
Humidification / Dehumidification setting (“HC” parameter):Humidification / Dehumidification setting (“HC” parameter):
Humidification / Dehumidification setting (“HC” parameter):
To set the controller on Humidification or Dehumidification mode, press
and hold the "SET
2 & Up
" key
s
for more than 3

seconds to enter the “parameter setting menu”. Find the “HC” parameter by pressing
▲
or
▼
keys. Press the "SET
2
" key when
you find the “HC”
and then by pressing "
▲
" or "
▼
" adjust it to “C” for dehumidification or to “H” for humidification mode.
Hysteresis or Differential Set Value (Humidity Band) function:
Hysteresis or Differential Set Value (Humidity Band) function: Hysteresis or Differential Set Value (Humidity Band) function:
Hysteresis or Differential Set Value (Humidity Band) function:
To prevent the frequent ON/OFF action of the output a humidity band (called hysteresis or differential set value) is created
between the ON and OFF operations. The controller will use a range (a maximum and minimum) for the process of controlling
action, which is between 1% to 25%. For example when the hysteresis is set on 5% and the set point on 50%, the output
ON/OFF action would be when the humidity goes lower than 45% and higher than 55%.
Hysteresis s
Hysteresis sHysteresis s
Hysteresis setting (“d” parameter):
etting (“d” parameter):etting (“d” parameter):
etting (“d” parameter):
Press and hold the “SET2 & Up” keys for more than 3 seconds to enter the “parameter setting menu”. Find the “d” parameter
by pressing "▲" or " ▼" keys. Press the “SET2” key when you find “d” and then by pressing "▲" or " ▼" adjust it to any
number from 1 to 25.
Humidity calibration:
Humidity calibration:Humidity calibration:
Humidity calibration:
You can calibrate the humidity reading with this function. Correction value can be positive, negative or 0.
Humidity calibration setting (“ CA” parameter):
Humidity calibration setting (“ CA” parameter):Humidity calibration setting (“ CA” parameter):
Humidity calibration setting (“ CA” parameter):
Press and hold the “SET2 & Up” keys for more than 3 seconds to enter the “parameter setting menu”. Find the “CA” parameter
by pressing "▲" or " ▼" keys. Press the “SET2” key when you find “CA” and then by pressing "▲"or"▼" adjust this parameter.
High and low
High and low High and low
High and low Humidity
HumidityHumidity
Humidity
alarm functions:
alarm functions:alarm functions:
alarm functions:
- If the Humidity exceeds the higher alarm humidity “set point humidity + AH” the alarm output relay will be opened, the
controller makes beeping sound and the display will alternately flash between ”H” and the current humidity. By pressing any
key the buzzer alarm will stop and alarm relay output will be closed.
- If the humidity drops to lower than the lower alarm humidity “set point humidity -
AL” the alarm output relay will be opened,
the controller makes beeping sound and the display will alternately flash between ”L” and the current humidity. By pressing
any key the buzzer alarm will stop and alarm relay output will be closed.
Setting AL and AH parameters on zero will turn the alarm function off.
High and low temperature alarm settings (“AH” and “AL” parameters):
High and low temperature alarm settings (“AH” and “AL” parameters):High and low temperature alarm settings (“AH” and “AL” parameters):
High and low temperature alarm settings (“AH” and “AL” parameters):
Press and hold the “SET2 & Up” keys for more than 3 seconds to enter the “parameter setting menu”. Find the “AL” or “AH”
parameters by pressing "▲" or "▼" keys. Press the “SET2” key when you find “AL” or “AH” and then by pressing "▲" or "▼"
adjust the humidity. “Set point humidity - AL” is for lower humidity alarm and “Set point humidity + AH” is for higher
humidity alarm. Setting AL and AH parameters on zero will turn the alarm function off.
Parameter Menu and Settings
Parameter Menu and SettingsParameter Menu and Settings
Parameter Menu and Settings
Sym
bol
Details
Setting range
Factory Setting
HC
Humidification/Dehumidification
H/C
H
d
Hysteresis or Differential Set Value(Humidity band)
1
-
25
%
1
%
LS
Lower humidity setting
1%
-
HS
0
%
HS
Higher humidity setting
LS
-
99 %
100
%
CA
Humidity
calibration
-
9
to
+9
0 %
PT
Delay protection time
0
-
30
1 minute
AH
High temperature Alarm Hysteresis
0 ~ 25
1%
AL
Low temperature Alarm Hysteresis
0 ~ 25
1%
Error messages and troubleshooting:
Error messages and troubleshooting:Error messages and troubleshooting:
Error messages and troubleshooting:
1) When the controller displays EEE, it shows that the sensor is disconnected.
2) When the controller displays LLL it shows that the measured humidity is lower than LS.
3) When the controller displays HHH it shows that the measured humidity is higher than HS.
4) If the LCD doesn’t light up the connections to power supply terminals and the humidity sensor connections need to be
checked.
Caution:
Caution:Caution:
Caution:
- Avoid using the controller and the sensors in dusty environments.
- Do not submerge the humidity sensor in water or liquid.
- The temperature sensor (NTC sensor) is for calculating the humidity more precisely. The temperature sensor should be
installed in the vicinity of the humidity probe.
- The maximum current load of the humidification or dehumidification sources must not exceed the output relay contact
capacity. It will damage the unit and may cause fire.
- Check the wiring diagram before wiring the unit. Wrong wiring will damage the controller and may cause fire.
-
Applying extra force on the screws of controller terminals will break the board base. Please tighten the screws gently.
- Turn the power supply off while wiring the relays, sensors, … Otherwise it’ll damage the unit and may cause fire.
/