Page is loading ...

8 PERSON 14 ft. x 10 ft. 2 ROOM TENT
User Manual
Manual
del usuario
English. . . . . . . . . . . 3
Español . . . . . . . . . . 8
CARPA DE 2 HABITACIONES PARA 8 PERSONAS 14 pies x 10 pies

Contents
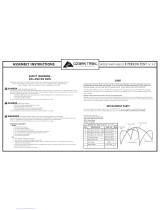
Parts List ...............................3
Safety & Care............................4
Assembly Instrucons . . . . . . . . . . . . . . . . . . .5-6
Tent Folding Instrucons . . . . . . . . . . . . . . . . . . 7
Warranty ........................... 14-17

MODEL NO. 93410116, 14 ft. x 10 ft.
DESCRIPTION
Main Pole
Side Pole
Front Awning Pole
Complete Frame
Guy Ropes
Steel Stakes
93410115M
93410115S
93410115A
93410115ST
A1001
PIN STAKE
A
B
C
D
E
F
2
2
1
1
7
18
PART NO.
KEY
NO.
QTY
REQ.
A
A
B
B
C
Parts List
3
D
E
F

DO NOT LEAVE YOUR TENT SET UP IN DIRECT
SUNLIGHT LONGER THAN NECESSARY. THE SUN’S
ULTRAVIOLET (UV) LIGHT DEGRADES ALMOST
EVERY FABRIC AND MATERIAL. IF LEFT IN
SUNLIGHT FOR PROLONGED PERIODS OF TIME,
FABRIC WILL FADE AND WEAKEN. DO NOT STORE
TENT ON CONCRETE FLOOR. DO NOT SPRAY THE
TENT WITH INSECTICIDE.
Your tent is water repellent, however, it is not waterproof.
During heavy rain, some leakage may occur. Keep
objects from touching the inside of the tent. Such
objects may cause leakage at point of contact. If seam
leakage occurs, it can be controlled by applying a seam
sealer compound.
EXERCISE CARE WHEN USING ELECTRIC DEVICES
IN AND NEAR TENTS.
Although our tents and screen houses are constructed to
rigid specifications, periods of wind or rain soaking the
ground may loosen the stakes and cause the uprights to
sink into the ground. This will weaken the rigidity of the
overall structure. Water pockets may also form in the
roof if the unit is not assembled taut, possibly causing
broken frames and torn fabric.
SAFETY WARNING -
Do’s and Do Not’s
CARBON MONOXIDE GAS WILL KILL YOU
Stoves, heaters, grills, lantern, candles, and other fuel-burning devices that
burn propane, natural gas, charcoal, kerosene, coal, or other fuels produce a
toxic gas called carbon monoxide. Because carbon monoxide gas is invisible,
odorless, and colorless, a dangerous level of carbon monoxide gas can
accumulate in a tent which cannot be detected by sight, smell, or taste. For
these reasons:
• DO NOT use matches, lighters, stoves, heaters, grills, lanterns, candles,
cooking equipment, or other fuel-burning devices inside or near a tent.
• DO NOT build fires inside or near a tent.
• DO NOT leave campfires unattended.
Your failure to follow this warning will cause death, serious injury, or permanent
disability to you or others.
PROTECT YOUR CHILDREN
• DO NOT leave children unattended inside a tent or in camp.
• DO NOT allow children to assemble a tent.
• DO NOT allow children to enter or exit a tent except through the door.
• DO NOT allow children to remain in a closed-up tent on hot days.
Your failure to follow this warning will cause death, serious injury, or permanent
disability to your children.
FLAMMABILITY WARNING KEEP ALL FLAME AND
HEAT SOURCES AWAY FROM THIS TENT FABRIC
This tent is made with flame resistant fabric which meets CPAI-84 specification.
IT IS NOT FIREPROOF. The fabric will burn if left in continuous contact with
any flame source. The application of any foreign substance to the tent fabric
may render the flame-resistant properties ineffective.
Your failure to follow this warning will cause death, serious injury, or permanent
disability to you or others.
CAMPING DO’S AND DON’TS
DO NOT...
1. Do not pitch tent near open fire.
2. Do not leave campfire unattended.
3. Do not leave children unattended inside a tent.
4. Do not use heating, lighting or cooking equipment with open flames
in or near tents.
5. Do not use other than recommended water repellent compounds
on your tent.
6. Do not spray the tent with insecticide.
7. Do not store tent on concrete floor.
DO...
1. Always extinguish campfire before leaving area.
2. Exercise care when using electricity and lighting in and near tents.
3. Make certain your tent is properly ventilated in all weather conditions. In
extreme weather conditions, snow could obstruct airflow and cause
asphyxiation unless cleared frequently.
EVERYONE WHO USES THIS TENT SHOULD READ THIS
MANUAL AND BECOME FAMILIAR WITH ALL SAFETY
WARNINGS AND PRECAUTIONS FOR SAFE USE,
ASSEMBLY, CARE, MAINTENANCE, AND STORAGE.
KEEP THIS MANUAL SO YOU CAN REFER TO IT LATER.
4. Anchor your tent securely to provide additional security
from changing climatic conditions. Snow pegs, skis and/or
heavy rocks may be necessary to supplement tent stakes
and guy ropes.
5. Take your tent down and store properly after camping.
DANGER
Send your request for parts to:
Exxel Outdoors, LLC.
6235 Lookout Road, Boulder, CO 80301
DANGER
WARNING
CARE
Folding Instructions
7
Safety & Care
4

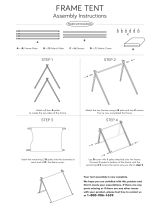
STEP 1: Spread tent out flat, floor side down.
STEP 2: Extend fiberglass tent poles by pulling out each section
and placing it into the metal ferrule connectors. You will have five
poles. The two longest poles (A) are the main tent poles. The next
pair of poles (B) will be used on the sides of the tent. The single
pole with pre-bent ferrules (C) will be used for the front awning on
the tent fly.
STEP 3: While making
sure sleeves are in line
with each other, slide the
main fiberglass tent poles
(A) through the sleeves
that are opposite each
other on the roof of the
tent. Straighten
the
sleeves along the fiberglass sections. Position poles so that they
form an “X” across the tent.
STEP 4: Starting at the back of the tent,
place the ferrule at the end of the poles
onto the pins located on the rings at the
edge of the tent.
STEP 5: (Please read and follow IMPORTANT SAFETY
WARNING that appears before Step 1.) While one adult holds the
end of the tent pole firmly in place on the pin at the rear of the tent,
the other adult should now go into the front door of the tent
and gently lift the roof at the crossed tent poles off the
ground
. When the tent and poles are raised, the first adult who is
at the rear of the tent, goes to the front of the tent, flexes the
fiberglass pole and places the metal ferrule at the end of the main
tent pole onto the pin located on the ring at the base of the tent.
Repeat step for the other main tent pole. Clip
plastic hooks to the fiberglass frame poles.
Locate the fabric ties
attached to the
center of the tent
roof and tie both
poles together.
STEP 6: Stake down tent by
inserting the steel stakes through
the metal rings and stake loops
attached at the base of the
tent. Hammer stakes into
ground at a 45° angle by
using a hammer or mallet.
Make sure to pull tent out even
and tight.
IMPORTANT:
WE ADVISE YOU TO ASSEMBLE THE
TENT ONCE BEFORE GOING CAMPING TO BECOME
FAMILIAR WITH THE ASSEMBLY OF THE TENT.
NOTE: PLEASE LOOK AT THE REPLACEMENT
PARTS DIAGRAM TO SEE HOW YOUR FRAME IS
ASSEMBLED.
TO PROLONG THE LIFE OF THE TENT FLOOR,
SELECT A LEVEL, CLEAN AREA FOR THE CAMPSITE.
TO PREVENT DAMAGE TO THE ZIPPER, UNZIP THE
DOORS TO ALLOW AIR TO ENTER THE TENT.
TO IMPROVE THE WEATHER RESISTANCE OF YOUR
TENT, IT IS ADVISABLE TO USE SEAM SEALER TO
COAT ALL EXPOSED SEAMS. YOU SHOULD APPLY
ONLY TO THE INSIDE SEAMS OF THE TENT AND
UNDERSIDE OF THE TENT FLY. IF APPLIED TO THE
OUTSIDE OF SEAMS, DISCOLORATION OF YOUR
TENT MAY OCCUR. SEAM SEALER IS AVAILABLE IN
THE CAMPING SECTION OF ANY LOCAL SPORTING
GOODS STORE.
WARNING: During assembly of the main room and
side room tent pole, the tent poles are in tension. If the
poles are not held firmly in place by adults during assembly,
the tension in the poles may cause them to break or one end
of the pole to flip up, which could cause serious injury to you
or others involved in assembling the tent. To avoid this
hazard:
• DO HAVE two adults involved in assembling the tent.
• DO HAVE one adult hold the end of the tent pole in
place in the grommets at the crossed tent poles. When
the tent and poles are raised, the first adult who is at
the rear of the tent, goes to the front of the tent and
completes the pole connection into the grommets at the
front of the tent.
Failure to follow this warning could cause serious injury to
you or others involved in assembling this tent.
A ABB
Tent should appear
as shown.
STEP 7: (Please read and follow the IMPORTANT SAFETY
WARNING that appears before Step 1.) To assemble the side
rooms, locate the longer remaining pair of fiberglass poles (B).
Insert one of the pole sections through pole sleeve at the top of the
side room. With an adult on each end of the side room pole,
gently flex the pole into an arch and place the metal tips at the end
of the side room poles onto the pin located on the ring at the base
of the tent. Clip plastic hooks to the fiberglass frame poles.
Repeat the same procedure for the remaining side room.
STEP 8: Place fly over tent so the
front awning is located over the
front of the tent. Attach the fly to
the tent by hooking the
S-hooks located at the fly
corners to the metal rings at the
base of the tent.
WARNING: Elastic cords can snap back and hit your eye.
To reduce the risk of injury to you and others:
• Keep your body and face clear.
• Do not over stretch elastic cords.
• Maintain firm grip on hook.
• Pull the hook toward you; if it slips it will spring away from you.
• Make sure hook is fully clipped to tent before releasing.
• Wear protective eyewear during tent assembly.
Your failure to follow this warning could cause serious injury or
permanent disability.
STEP 9: Insert the fly awning (C) pole into the sleeve at the front
of the fly. Insert the pole ends onto the pins at the base of the tent.
STEP 10: Stake down the vestibule by inserting the stakes
through the stake loops and hammer the stakes into ground at a
45° angle.
STEP 11: Fasten the Velcro
fasteners on the underside of the fly
to the fiberglass poles at all locations.
STEP 12: There are guy ropes located on the front of the
awning and at the ends and back of the tent. Extend the guy
ropes and make a loop at
opposite end of guy rope by
using the slider (as shown)
and place the loop over the
steel stake. Adjust slider to
make guy rope tight and
stake to the ground at a
45° angle.
STEP 13: A divider curtain has been provided with this tent. To
attach it push the hooks through the corresponding loops on the
inside of the tent. A mesh gear loft is also included for the tent
ceiling to hold small items within easy reach.
NOTE: To take down tent, follow steps above in the reverse
order. Be sure to leave door and windows unzipped. Place stakes
into stake bag and poles into pole bag, which are provided. The
tent should be folded into equal parts toward the center of the
tent to distribute the bulk. Fold fly and lay on top of tent. Start a
small tight roll, the width of your carry bag, at the end opposite
the doors. Roll tent toward doors to allow air to escape. Once
rolled, tie a string or rope around tent to hold into place. Place
tent and stake bag into carry bag. Make sure tent is clean and
dry before storing.
Assembly Instructions
5
Tent should appear as shown.
Assembly Instructions
6

DO NOT LEAVE YOUR TENT SET UP IN DIRECT
SUNLIGHT LONGER THAN NECESSARY. THE SUN’S
ULTRAVIOLET (UV) LIGHT DEGRADES ALMOST
EVERY FABRIC AND MATERIAL. IF LEFT IN
SUNLIGHT FOR PROLONGED PERIODS OF TIME,
FABRIC WILL FADE AND WEAKEN. DO NOT STORE
TENT ON CONCRETE FLOOR. DO NOT SPRAY THE
TENT WITH INSECTICIDE.
Your tent is water repellent, however, it is not waterproof.
During heavy rain, some leakage may occur. Keep
objects from touching the inside of the tent. Such
objects may cause leakage at point of contact. If seam
leakage occurs, it can be controlled by applying a seam
sealer compound.
EXERCISE CARE WHEN USING ELECTRIC DEVICES
IN AND NEAR TENTS.
Although our tents and screen houses are constructed to
rigid specifications, periods of wind or rain soaking the
ground may loosen the stakes and cause the uprights to
sink into the ground. This will weaken the rigidity of the
overall structure. Water pockets may also form in the
roof if the unit is not assembled taut, possibly causing
broken frames and torn fabric.
SAFETY WARNING -
Do’s and Do Not’s
CARBON MONOXIDE GAS WILL KILL YOU
Stoves, heaters, grills, lantern, candles, and other fuel-burning devices that
burn propane, natural gas, charcoal, kerosene, coal, or other fuels produce a
toxic gas called carbon monoxide. Because carbon monoxide gas is invisible,
odorless, and colorless, a dangerous level of carbon monoxide gas can
accumulate in a tent which cannot be detected by sight, smell, or taste. For
these reasons:
• DO NOT use matches, lighters, stoves, heaters, grills, lanterns, candles,
cooking equipment, or other fuel-burning devices inside or near a tent.
• DO NOT build fires inside or near a tent.
• DO NOT leave campfires unattended.
Your failure to follow this warning will cause death, serious injury, or permanent
disability to you or others.
PROTECT YOUR CHILDREN
• DO NOT leave children unattended inside a tent or in camp.
• DO NOT allow children to assemble a tent.
• DO NOT allow children to enter or exit a tent except through the door.
• DO NOT allow children to remain in a closed-up tent on hot days.
Your failure to follow this warning will cause death, serious injury, or permanent
disability to your children.
FLAMMABILITY WARNING KEEP ALL FLAME AND
HEAT SOURCES AWAY FROM THIS TENT FABRIC
This tent is made with flame resistant fabric which meets CPAI-84 specification.
IT IS NOT FIREPROOF. The fabric will burn if left in continuous contact with
any flame source. The application of any foreign substance to the tent fabric
may render the flame-resistant properties ineffective.
Your failure to follow this warning will cause death, serious injury, or permanent
disability to you or others.
CAMPING DO’S AND DON’TS
DO NOT...
1. Do not pitch tent near open fire.
2. Do not leave campfire unattended.
3. Do not leave children unattended inside a tent.
4. Do not use heating, lighting or cooking equipment with open flames
in or near tents.
5. Do not use other than recommended water repellent compounds
on your tent.
6. Do not spray the tent with insecticide.
7. Do not store tent on concrete floor.
DO...
1. Always extinguish campfire before leaving area.
2. Exercise care when using electricity and lighting in and near tents.
3. Make certain your tent is properly ventilated in all weather conditions. In
extreme weather conditions, snow could obstruct airflow and cause
asphyxiation unless cleared frequently.
EVERYONE WHO USES THIS TENT SHOULD READ THIS
MANUAL AND BECOME FAMILIAR WITH ALL SAFETY
WARNINGS AND PRECAUTIONS FOR SAFE USE,
ASSEMBLY, CARE, MAINTENANCE, AND STORAGE.
KEEP THIS MANUAL SO YOU CAN REFER TO IT LATER.
4. Anchor your tent securely to provide additional security
from changing climatic conditions. Snow pegs, skis and/or
heavy rocks may be necessary to supplement tent stakes
and guy ropes.
5. Take your tent down and store properly after camping.
DANGER
Send your request for parts to:
Exxel Outdoors, LLC.
6235 Lookout Road, Boulder, CO 80301
DANGER
WARNING
CARE
Folding Instructions
7
Safety & Care
4
• Unzip tent doors and windows and collapse the tent, removing and dissembling the poles.
Place the poles in the pole storage bag and tie shut.
• Remove stakes. Do not remove stakes from the ground by pulling on the stake loops. This may
cause the stake loops to tear out of the seam. Place stakes in stake bag and tie shut.
• Spread tent out at with all loose fabric within the edges of the tent base and distribute evenly.
Try to atten tent as much as possible.
• Fold tent in half, thirds or quarters. (Folding depends on the length of the tent pole section.)
• Fold y and lay on top of the folded tent.
• Place pole bag on back end of tent (trapped air is more easily forced out of the open door when
you are rolling up the tent.) The folded tent should be the width of the pole bag.
• Beginning at the back end, roll your tent tightly around the pole bag, forcing out excess air as
you roll. Keep tent edges straight and pole bag centered as you roll.
• When tent is rolled up, tie strap around it and place into carry bag with stake bag, instruction
sheet, and other miscellaneous parts. If tent won’t t into bag, unroll and reroll more tightly.
• Make certain tent is clean and dry before storing. Store in a dry area off of concrete oor.
• Make certain that all campres are extinguished completely before leaving campsite and that all
trash is put into appropriate trash receptacles or taken with you and disposed of properly.
Tent Folding Instrucon
Fold tent into rectangular shape.
Dimension A should be
close to but not exceed
length of the pole bag.
A
Front of tent
(door unzipped)
BREAKING CAMP

Contenido
Lista de productos........................9
Seguridad y cuidado . . . . . . . . . . . . . . . . . . . . . 10
Instrucciones de montaje .............. 11-12
Instrucciones de plegado de la carpa . . . . . . . 13
Garantía............................ 14-17

A
A
B
B
C
MODELO N.° 93410116, 14 pies x 10 pies
DESCRIPCIÓN
Poste principal
Poste lateral
Poste de toldo frontal
Estructura completa
Cuerdas elásticas
Estacas de acero
93410115M
93410115S
93410115A
93410115ST
A1001
PIN STAKE
A
B
C
D
E
F
2
2
1
1
7
18
PIEZA N.°
N.°
LEY.
CANT.
REQ.
Lista de piezas
9
D
E
F

Instrucciones plegables
13
NO DEJE LA CARPA ARMADA BAJO LA LUZ DEL SOL
DIRECTA MÁS DE LO NECESARIO. LA LUZ
ULTRAVIOLETA (UV) DEL SOL DEGRADA CASI
CUALQUIER TELA Y MATERIAL. SI SE LA DEJA BAJO
LA LUZ DEL SOL POR PERÍODOS PROLONGADOS, LA
TELA SE DESINTEGRARÁ Y DEBILITARÁ. NO
GUARDE LA CARPA SOBRE PISO DE CONCRETO. NO
ROCÍE LA CARPA CON INSECTICIDAS.
Su carpa es repelente al agua, sin embargo, no es
impermeable. Bajo lluvias intensas, es posible que haya alguna
gotera. Evite que los objetos toquen el interior de la carpa.
Dichos objetos pueden causar goteras en el punto de contacto.
Si hay una gotera fuerte, se la puede controlar aplicando un
compuesto sellador.
TENGA CUIDADO AL USAR DISPOSITIVOS
ELECTRÓNICOS DENTRO Y CERCA DE LA CARPA.
Si bien construimos nuestras carpas y gazebos cumpliendo con
especificaciones rigurosas, períodos de viento o lluvia que
humedezcan el suelo podría aflojar las estacas y provocar que
los montantes se hundan en el suelo. Esto debilitará la rigidez
general de la estructura. Si la unidad está armada sin tensión
también se pueden formar bolsas de agua en el techo, lo que
podría romper las estructuras y el tejido.
ADVERTENCIA DE SEGURIDAD
-
Qué hacer y qué no hacer
EL GAS MONÓXIDO DE CARBONO ES MORTAL
Estufas, calentadores, parrillas, linternas, velas y otros dispositivos queman propano, gas
natural, carbón de leña, queroseno, carbón u otros combustibles que producen un gas
tóxico llamado monóxido de carbono. Debido a que el gas monóxido de carbono es invisible,
inodoro e incoloro, se puede acumular un nivel peligroso de gas monóxido de carbono en
una carpa el cual no se puede percibir por visión, olfato o gusto. Por estos motivos:
• NO use fósforos, encendedores, estufas, calentadores, parrillas, linternas, velas,
equipo de cocina u otros dispositivos que quemen combustibles dentro o cerca de una
carpa.
• NO encienda fogatas dentro o cerca de una carpa.
• NO deje las fogatas desatendidas.
No cumplir con esta advertencia resultará en la muerte, lesiones graves o incapacidad
permanente suya o de otras personas.
PROTEJA A SUS NIÑOS
• NO deje a los niños sin supervisión dentro de una carpa o en un campamento.
• NO permita que los niños armen una carpa.
• Los niños SOLO deben entrar o salir de una carpa por la puerta.
• NO permita que los niños se queden en una carpa cerrada en días calurosos.
No cumplir con esta advertencia resultará en la muerte, lesiones graves o incapacidad
permanente de sus niños.
ADVERTENCIA DE INFLAMABILIDAD:
MANTENER LAS LLAMAS Y LAS FUENTES DE CALOR ALEJADAS DEL
TEJIDO DE ESTE TOLDO
Este toldo está fabricado con un tejido que cumple con las normas CPAI-84 de resistencia a
las llamas. NO ES IGNÍFUGO. El tejido arderá si entra en contacto continuo con una llama.
Aplicar cualquier sustancia extraña al tejido del toldo puede anular la resistencia a las
llamas.
No cumplir con esta advertencia resultará en la muerte, lesiones graves o incapacidad
permanente suya o de otras personas.
QUÉ HACER Y QUÉ NO HACER EN UN CAMPAMENTO
NO HACER...
1. No arme la carpa cerca de llamas.
2. No deje las fogatas desatendidas.
3. No deje a los niños sin supervisión dentro de una carpa.
4. No use equipo de generación de calor, iluminación o cocción con llamas dentro o cerca
de las carpas.
5. No use compuestos repelentes al agua que no sean los recomendados
en su carpa.
6. No rocíe la carpa con insecticidas.
7. No guarde la carpa sobre piso de concreto.
HACER...
1. Siempre apague las fogatas antes de abandonar el área.
2. Tenga cuidado al usar electricidad e iluminación dentro y cerca de las carpas.
3. Asegúrese de que la carpa esté bien ventilada ante cualquier condición climática. En
condiciones climáticas extremas, la nieve podría obstruir la ventilación y causar asfixia
a menos que se la desobstruya con frecuencia.
TODO AQUEL QUE USE ESTA CARPA DEBE LEER ESTE MANUAL Y
FAMILIARIZARSE CON TODAS LAS ADVERTENCIAS DE SEGURIDAD
Y PRECAUCIONES DE USO SEGURO, ENSAMBLAJE, CUIDADO,
MANTENIMIENTO Y ALMACENAMIENTO. GUARDE ESTE MANUAL
PARA PODER CONSULTARLO A FUTURO.
4. Ancle su carpa con firmeza para mayor seguridad ante
condiciones climáticas cambiantes. Quizá necesite estacas de
nieve, esquís y/o rocas pesadas para suplementar las estacas y
cuerdas de la carpa.
5. Desarme su carpa y guárdela como corresponde después de
acampar.
PELIGRO
Envíe su solicitud de piezas a:
Exxel Outdoors, LLC.
6235 Lookout Road, Boulder, CO 80301
PELIGRO
ADVERTENCIA
CUIDADO
Seguridad y cuidado
10

PASO 1: Abra la carpa por completo en el piso con el suelo hacia
abajo.
PASO 2: Extienda los postes de fibra de vidrio de la carpa jalando
de cada sección y colocándolas en los conectores de férula
metálicos. Tendrá cinco postes. Los dos postes más largos (A) son
los postes principales de la carpa. El siguiente par de postes (B) se
utilizarán en los laterales de la carpa. El último poste con férulas
curvas (C) se usará con el toldo frontal en el sobretecho de la
carpa.
PASO 3: Mientras se
cerciora de que las
mangas estén alineadas
entre sí, deslice los postes
principales de fibra de
vidrio de la carpa (A) a
través de las mangas
opuestas entre sí en el
techo de la carpa.
Enderece las mangas en
las secciones de fibra de vidrio. Coloque los postes de forma tal
que formen una “X”.
PASO 4: Mirando hacia la parte posterior
de la carpa, coloque la férula que se
encuentra en el extremo de los postes
en los pines ubicados en los aros en
el borde de la carpa.
PASO 5: (Lea y siga la ADVERTENCIA DE SEGURIDAD
IMPORTANTE que se encuentra antes del Paso 1.) Mientras que
uno de los adultos sostiene con firmeza el extremo del poste de la
carpa en el pin del lado posterior de la carpa, el otro adulto debe
colocarse en la puerta frontal o la carpa y elevar con cuidado el
techo y los postes de la carpa. Una vez la carpa y los postes
estén elevados, el primer adulto que se encuentra en la parte
posterior de la carpa se debe dirigir al frente, flexionar el poste de
fibra de vidrio y colocar la férula de metal que se encuentra en el
extremo del poste principal de la carpa, en el pin ubicado en el aro
en la base de la carpa. Repita este paso con el otro poste
principal de la carpa. Enganche los ganchos
plásticos a los postes de
fibra de vidrio de la
estructura.
Encuentre las
cintas de tela en el
centro del techo de la
carpa y ate ambos postes.
PASO 6: Fije la carpa insertando
las estacas de acero a través de
los aros de metal y las ataduras
en la base de la carpa. Clave
las estacas en el piso en un
ángulo de 45° con un
martillo o una maza.
Asegúrese de jalar la carpa de
forma simétrica y con firmeza.
IMPORTANTE:
LE RECOMENDAMOS ENSAMBLAR LA
CARPA UNA VEZ ANTES DE ACAMPAR PARA FAMILIAR-
IZARSE CON EL ENSAMBLAJE DE LA CARPA. NOTA:
CONSULTE EL DIAGRAMA DE LAS PIEZAS DE REEMPLAZO
PARA VER CÓMO SE ARMA LA ESTRUCTURA.
PARA PROLONGAR LA VIDA ÚTIL DEL PISO DE LA CARPA,
SELECCIONE UN ÁREA LIMPIA Y NIVELADA PARA EL
CAMPAMENTO. PARA EVITAR DAÑOS A LA CREMALLERA,
ABRA LAS PUERTAS PARA PERMITIR QUE INGRESE AIRE A
LA CARPA. PARA MEJORAR LA RESISTENCIA A LA
INTEMPERIE DE SU CARPA, SE ACONSEJA USAR UN
SELLADOR DE GOTERAS PARA CUBRIR TODAS LAS
GOTERAS. DEBE APLICARSE SOLO EN EL INTERIOR DE LA
CARPA Y EN EL LADO INFERIOR DEL SOBRETECHO DE LA
CARPA. SI SE LO APLICA EN EL LADO EXTERIOR, ES
POSIBLE QUE LA CARPA PIERDA COLOR. EL SELLADOR DE
GOTERAS ESTÁ DISPONIBLE EN LA SECCIÓN DE
ACAMPADO DE CUALQUIER TIENDA LOCAL DE DEPORTES.
ADVERTENCIA: Durante el ensamblaje del poste de
la habitación principal y lateral, los postes de la carpa están
bajo tensión. Si un adulto no coloca con firmeza los postes
durante el ensamblaje, es posible que la tensión de los
mismos los rompa o que uno de los postes se suelte, lo que
podría provocar lesiones graves a usted y a otras personas
que estén armando la carpa. Para evitar este peligro:
• ASEGÚRESE de que dos adultos armen la carpa;
• ASEGÚRESE de que uno de los adultos sostenga el
extremo del poste de la carpa en su lugar en los ojales
de soporte donde se encuentran los postes cruzados.
Cuando se elevan la carpa y los postes, el primer adulto
que esté del lado posterior de la carpa debe dirigirse al
frente de la misma y completar la conexión de los postes
en los ojales de soporte en el frente de la carpa.
No cumplir con esta advertencia podría resultar en lesiones
graves para usted o las otras personas que estén armando la
carpa.
A ABB
La carpa debería
quedar como se
muestra.
Instrucciones de montaje
Instrucciones de montaje
11
PASO 7: (Lea y siga la ADVERTENCIA DE SEGURIDAD
IMPORTANTE que se encuentra antes del Paso 1.) Para armar
las habitaciones laterales, tome el par restante de postes de fibra
de vidrio largos (B). Inserte una de las secciones del poste a
través de la manga para el poste en la parte superior de la
habitación lateral. Con un adulto de ambos lados del poste de la
habitación lateral, flexione con cuidado el poste para que forme un
arco y coloque las puntas de metal que se encuentran en el
extremo de los postes de la habitación lateral en el pin ubicado en
el aro de la base de la carpa. Enganche los ganchos plásticos a
los postes de fibra de vidrio de la estructura. Repita el mismo
procedimiento con la habitación lateral restante.
PASO 8: Coloque el sobretecho encima de
la carpa de forma tal que el toldo del
frente esté ubicado sobre el frente de
la carpa. Fije el sobretecho a la
carpa enganchando los ganchos
con forma de S que se
encuentran en las esquinas el
sobretecho en los aros de metal
ubicados en la base de la carpa.
ADVERTENCIA: Las cuerdas elásticas pueden rebotar y
golpear su ojo. Para reducir el riesgo de lesiones a usted y otras
personas:
• Mantenga su cuerpo y rostro apartados.
• No estire de más las cuerdas elásticas.
• Sostenga bien el gancho.
• Jale del gancho hacia usted; si se resbala rebotará en
dirección contraria a usted.
• Asegúrese de que el gancho esté bien agarrado a la carpa
antes de soltarlo.
• Use protección ocular mientras arma la carpa.
No cumplir con esta advertencia podría resultar en lesiones
graves o incapacidad permanente.
12
PASO 9: Inserte el poste del toldo (C) en el mango que se
encuentra en el frente del sobretecho. Inserte los extremos del
poste en los pines ubicados en la base de la carpa.
PASO 10: Fije el vestíbulo insertando las
estacas a través de las ataduras y clave las
estacas en el suelo con un ángulo de 45°.
PASO 11: Ajuste las correas de Velcro en el
lado inferior del sobretecho a los postes de fibra de vidrio en
todas las ubicaciones.
PASO 12: Hay cuerdas tipo ubicadas en el frente del toldo y en
los extremos y la parte posterior de la tienda. Extienda las
cuerdas elásticas y haga un nudo en el
extremo opuesto de la cuerda elástica
con el deslizador (como se muestra) y
coloque el nudo encima de la estaca
de acero. Ajuste el deslizador para
estirar la cuerda elástica y fíjela al
piso con una estaca en un ángulo
de 45°.
PASO 13: La carpa incluye una cortina divisora. Para fijarla
pase los ganchos por los nudos correspondientes en el lado
interior de la carpa. También se incluye un almacenador de malla
para el techo de la carpa que permita guardar elementos
pequeños y que queden a mano.
NOTA: Para desarmar la carpa, siga los pasos a la inversa.
Asegúrese de dejar las puertas y ventanas abiertas. Coloque las
estacas en la bolsa para estacas y los postes en la bolsa para
postes (incluidas). Se debe doblar la carpa en cuatro partes
iguales hacia el centro de la misma para distribuir el bulto. Doble
el sobretecho y apóyelo sobre la parte superior de la carpa. Haga
un rollo pequeño y ajustado, del ancho de la bolsa, en el extremo
opuesto de las puertas. Enrolle la carpa hacia las puertas para
que pueda escapar el aire. Una vez enrollada, ate con un hilo o
cuerda la carpa para que no se desarme. Coloque la carpa y la
bolsa para estacas en la bolsa de la carpa. Asegúrese de que la
carpa esté limpia y seca antes de guardarla.
La carpa debería
quedar como
se muestra.

Instrucciones plegables
13
NO DEJE LA CARPA ARMADA BAJO LA LUZ DEL SOL
DIRECTA MÁS DE LO NECESARIO. LA LUZ
ULTRAVIOLETA (UV) DEL SOL DEGRADA CASI
CUALQUIER TELA Y MATERIAL. SI SE LA DEJA BAJO
LA LUZ DEL SOL POR PERÍODOS PROLONGADOS, LA
TELA SE DESINTEGRARÁ Y DEBILITARÁ. NO
GUARDE LA CARPA SOBRE PISO DE CONCRETO. NO
ROCÍE LA CARPA CON INSECTICIDAS.
Su carpa es repelente al agua, sin embargo, no es
impermeable. Bajo lluvias intensas, es posible que haya alguna
gotera. Evite que los objetos toquen el interior de la carpa.
Dichos objetos pueden causar goteras en el punto de contacto.
Si hay una gotera fuerte, se la puede controlar aplicando un
compuesto sellador.
TENGA CUIDADO AL USAR DISPOSITIVOS
ELECTRÓNICOS DENTRO Y CERCA DE LA CARPA.
Si bien construimos nuestras carpas y gazebos cumpliendo con
especificaciones rigurosas, períodos de viento o lluvia que
humedezcan el suelo podría aflojar las estacas y provocar que
los montantes se hundan en el suelo. Esto debilitará la rigidez
general de la estructura. Si la unidad está armada sin tensión
también se pueden formar bolsas de agua en el techo, lo que
podría romper las estructuras y el tejido.
ADVERTENCIA DE SEGURIDAD
-
Qué hacer y qué no hacer
EL GAS MONÓXIDO DE CARBONO ES MORTAL
Estufas, calentadores, parrillas, linternas, velas y otros dispositivos queman propano, gas
natural, carbón de leña, queroseno, carbón u otros combustibles que producen un gas
tóxico llamado monóxido de carbono. Debido a que el gas monóxido de carbono es invisible,
inodoro e incoloro, se puede acumular un nivel peligroso de gas monóxido de carbono en
una carpa el cual no se puede percibir por visión, olfato o gusto. Por estos motivos:
• NO use fósforos, encendedores, estufas, calentadores, parrillas, linternas, velas,
equipo de cocina u otros dispositivos que quemen combustibles dentro o cerca de una
carpa.
• NO encienda fogatas dentro o cerca de una carpa.
• NO deje las fogatas desatendidas.
No cumplir con esta advertencia resultará en la muerte, lesiones graves o incapacidad
permanente suya o de otras personas.
PROTEJA A SUS NIÑOS
• NO deje a los niños sin supervisión dentro de una carpa o en un campamento.
• NO permita que los niños armen una carpa.
• Los niños SOLO deben entrar o salir de una carpa por la puerta.
• NO permita que los niños se queden en una carpa cerrada en días calurosos.
No cumplir con esta advertencia resultará en la muerte, lesiones graves o incapacidad
permanente de sus niños.
ADVERTENCIA DE INFLAMABILIDAD:
MANTENER LAS LLAMAS Y LAS FUENTES DE CALOR ALEJADAS DEL
TEJIDO DE ESTE TOLDO
Este toldo está fabricado con un tejido que cumple con las normas CPAI-84 de resistencia a
las llamas. NO ES IGNÍFUGO. El tejido arderá si entra en contacto continuo con una llama.
Aplicar cualquier sustancia extraña al tejido del toldo puede anular la resistencia a las
llamas.
No cumplir con esta advertencia resultará en la muerte, lesiones graves o incapacidad
permanente suya o de otras personas.
QUÉ HACER Y QUÉ NO HACER EN UN CAMPAMENTO
NO HACER...
1. No arme la carpa cerca de llamas.
2. No deje las fogatas desatendidas.
3. No deje a los niños sin supervisión dentro de una carpa.
4. No use equipo de generación de calor, iluminación o cocción con llamas dentro o cerca
de las carpas.
5. No use compuestos repelentes al agua que no sean los recomendados
en su carpa.
6. No rocíe la carpa con insecticidas.
7. No guarde la carpa sobre piso de concreto.
HACER...
1. Siempre apague las fogatas antes de abandonar el área.
2. Tenga cuidado al usar electricidad e iluminación dentro y cerca de las carpas.
3. Asegúrese de que la carpa esté bien ventilada ante cualquier condición climática. En
condiciones climáticas extremas, la nieve podría obstruir la ventilación y causar asfixia
a menos que se la desobstruya con frecuencia.
TODO AQUEL QUE USE ESTA CARPA DEBE LEER ESTE MANUAL Y
FAMILIARIZARSE CON TODAS LAS ADVERTENCIAS DE SEGURIDAD
Y PRECAUCIONES DE USO SEGURO, ENSAMBLAJE, CUIDADO,
MANTENIMIENTO Y ALMACENAMIENTO. GUARDE ESTE MANUAL
PARA PODER CONSULTARLO A FUTURO.
4. Ancle su carpa con firmeza para mayor seguridad ante
condiciones climáticas cambiantes. Quizá necesite estacas de
nieve, esquís y/o rocas pesadas para suplementar las estacas y
cuerdas de la carpa.
5. Desarme su carpa y guárdela como corresponde después de
acampar.
PELIGRO
Envíe su solicitud de piezas a:
Exxel Outdoors, LLC.
6235 Lookout Road, Boulder, CO 80301
PELIGRO
ADVERTENCIA
CUIDADO
Seguridad y cuidado
10
• Abra las puertas y ventanas de la carpa y desármela, extrayendo y desarmando los postes. Coloque
los postes en la bolsa para postes y ciérrela.
• Quite las estacas. No quite las estacas del suelo jalando de las ataduras. Esto podría provocar que
las ataduras se rompan. Coloque las estacas en la bolsa para estacas y ciérrela.
• Abra bien la carpa asegurándose de que toda la tela suelta quede dentro de los bordes de la base
de la carpa y distribuida equitativamente. Intente aplanar la carpa lo más posible.
• Doble la carpa a la mitad, en tercios o cuartos. (Los pliegues dependen del largo de la sección del
poste de la carpa).
• Doble el sobretecho, si la carpa lo incluye, y apóyelo sobre la carpa plegada.
• Coloque la bolsa para postes en el extremo posterior de la carpa (el aire atrapado saldrá con mayor
facilidad con la puerta abierta al momento de enrollar la carpa.) La carpa plegada debe ser del
tamaño de la bolsa para postes.
• Desde el extremo posterior, enrolle la carpa bien ajustada alrededor de la bolsa para postes, logran-
do que salga el exceso de aire a medida que enrolla. Mantenga los bordes de la carpa derechos y
la bolsa para postes centrada mientras enrolla.
• Cuando la carpa esté enrollada, átela con una cuerda y colóquela en la bolsa de la carpa junto con
la bolsa para estacas, la hoja de instrucciones y otras piezas misceláneas. Si la carpa no entra en
la bolsa, desenróllela y vuélvala a enrollar más ajustada.
• Asegúrese de que la carpa esté limpia y seca antes de guardarla. Guárdela en un área seca lejos
del piso de concreto.
• Asegúrese de apagar las fogatas por completo antes de abandonar el campamento y de tirar toda la
basura en los recipientes adecuados. De lo contrario, o llévesela y deséchela como corresponde.
Instrucciones de plegado de la carpa
Doble la carpa en forma rectangular.
La dimensión A debe
ser aproximada pero no
exceder el largo de la
bolsa para postes.
A
Frente de la carpa
(puerta abierta)
DESARME DEL CAMPAMENTO


DISTRIBUTED BY • DISTRIBUIDO POR:
ALDI INC., BATAVIA, IL 60510
WWW.ALDI.US
AFTER SALES SUPPORT
SERVICIO POSVENTA
45173
MODEL/NO DEL MODELO:
93410116
USA
1-800-325-4121
contactus@wenzelco.com
05/2018
YEAR WARRANTY
/