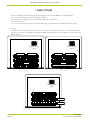
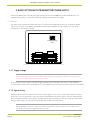
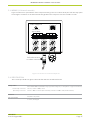
Eurotherm 100 is a versatile instrument offering a range of features designed to meet the needs of demanding industrial applications. Its capabilities include precise measurement and recording of various process parameters like temperature, pressure, flow, and more. Equipped with user-friendly software, it allows for easy configuration and customization of recording sessions. The compact design and rugged construction make it ideal for portable use in challenging environments.
Eurotherm 100 is a versatile instrument offering a range of features designed to meet the needs of demanding industrial applications. Its capabilities include precise measurement and recording of various process parameters like temperature, pressure, flow, and more. Equipped with user-friendly software, it allows for easy configuration and customization of recording sessions. The compact design and rugged construction make it ideal for portable use in challenging environments.


-
 1
1
-
 2
2
-
 3
3
-
 4
4
-
 5
5
-
 6
6
-
 7
7
-
 8
8
-
 9
9
-
 10
10
-
 11
11
-
 12
12
-
 13
13
-
 14
14
-
 15
15
-
 16
16
-
 17
17
-
 18
18
-
 19
19
-
 20
20
-
 21
21
-
 22
22
-
 23
23
-
 24
24
-
 25
25
-
 26
26
-
 27
27
-
 28
28
-
 29
29
-
 30
30


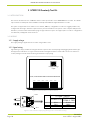
Eurotherm 100 is a versatile instrument offering a range of features designed to meet the needs of demanding industrial applications. Its capabilities include precise measurement and recording of various process parameters like temperature, pressure, flow, and more. Equipped with user-friendly software, it allows for easy configuration and customization of recording sessions. The compact design and rugged construction make it ideal for portable use in challenging environments.
Ask a question and I''ll find the answer in the document
Finding information in a document is now easier with AI
Related papers
-
Eurotherm 100mm Recorders Retro Owner's manual
-
-
Eurotherm 5000 Series Owner's manual
-
-
-
-
-
-
-
Other documents
-
Netgear Stora User manual
-
Omega CT6100 Owner's manual
-
-
-
 Future Design VR18 User manual
-
 Remote Automation Solutions Bristol Digital Circular Chart Recorder series 4500C Owner's manual
-
Omega Speaker Systems Rercorder RD8300 User manual
-
 ABK PA-2088S Owner's manual
-
-


