American Standard Heritage 7100 Series User manual
- Category
- Sanitary ware
- Type
- User manual
This manual is also suitable for

SINGLE-HOLE BAR/PANTRY
FITTINGS WITH SWING SPOUT
Installation
Instructions
34440N
Printed in Mexico
7100 SERIES
7190 SERIES
Thank you for selecting American-Standard...the benchmark
of fine quality for over 100 years.
To ensure that your installation proceeds smoothly--please
read these instructions carefully before you begin.
Certified to comply with ANSI A112.18.1M
U.S. Patent No. 5,819,789
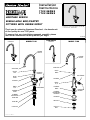
2-HANDLE
7190 SERIES
1-HANDLE
7100 SERIES
HERITAGE SERIES
SWING
SPOUT
SPOUT
NUT
O-RINGS
SNAP
RING
BODY
S/A
CARTRIDGE
HANDLE
SCREW
RUBBER
RING
RUBBER
MOUNTING
WASHER
LOCKNUT
WASHER
AERATOR
SWING
SPOUT
AERATOR
CARTRIDGE
HANDLE
SCREW
RUBBER
MOUNTING
WASHER
LOCKNUT
MODEL 7190 MODEL 7100
SUPPLY
NUT
BODY
S/A
O-RINGS
SNAP
RING
WASHER
RUBBER
RING

Product names listed herein are trademarks of American Standard Inc.
American Standard Inc. 1999
C
SERVICE
1
4
2
CARTRIDGE
SCREEN
SPRING
CLIP
STOP
WASHER
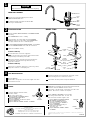
TEST INSTALLED FAUCET
3
Remove AERATOR.
With handle in OFF position, turn on water supplies and check
all connections for leaks.
Operate both handles to flush water lines thoroughly. Check
spout mounting and hose connections for leaks.
Turn handles into OFF position and replace AERATOR.
To change direction of handle rotation,
proceed as follows:
Turn valve to OFF position.
Remove INSERT and HANDLE SCREW.
Slip HANDLE with ADAPTER off.
Remove SPRING CLIP.
Lift STOP WASHER, turn 90° and replace.
Replace SPRING CLIP.
Replace ADAPTER, HANDLE, SCREW, and INSERT.
AERATOR may accumulate dirt causing distorted and reduced
water flow. Remove AERATOR and rinse clean.
If spout drips, operate handles several times from OFF to ON
position. Do not force - handles turn only 90°.
Plastic SCREEN in CARTRIDGE may accumulate
dirt causing reduced water flow. To clean, first
turn off hot and cold water supplies, then:
Remove INSERT and HANDLE SCREW.
Slip HANDLE with ADAPTER off.
Unscrew CARTRIDGE with wrench.
Thoroughly rinse plastic SCREEN at
base of CARTRIDGE.
Replace CARTRIDGE until flange is
tight against valve body.
Turn valves OFF.
Replace ADAPTER, HANDLE, SCREW,
and INSERT.
Turn off hot and cold water supplies before beginning.
CAUTION
Apply the grease (provided) liberally to the SPOUT
O-RING and SNAP RING areas.
Assemble the SPOUT and tighten the SPOUT NUT
until snug on VALVE BODY.
SWING SPOUT ASSEMBLY
FITTING INSTALLATION
Place RUBBER RING in recess of fitting.
Insert inlet tubes (on model 7190 only) and THREADED
SHANK through hole of sink making certain RUBBER RING
is properly seated in the recess of the fitting base.
Assemble RUBBER WASHER, BRASS WASHER, and LOCKNUT
onto the THREADED SHANK from underside of sink deck.
Tighten the LOCKNUT securely.
For Model 7190 Only
Bend the inlet tubes to meet the supply lines.
NOTE: Use the palm of your hand to support the inlet tubes
during bending to avoid kinking of the tubes.
Connect the hot water supply line to the left inlet tube and
the cold water supply line to the right inlet tube using
appropriate connectors.
Connect hot or cold water supply lines to shank using sealant,
appropriate connectors, and coupling nuts.
For Model 7100 Only
SPOUT
SPOUT
NUT
SNAP
RING
SPOUT
O-RINGS
COPPER
INLET TUBES
SHANK
MODEL 7190 MODEL 7100
HOT
COLD
RUBBER
RING
SUPPLY
NUT
BRASS
WASHER
RUBBER
MOUNTING
WASHER
LOCKNUT
RECESS
RECESS
Remove LOCKNUT, BRASS WASHER, and RUBBER WASHER
from fitting.
34440N
HOTLINE FOR HELP
For toll-free information and answers to your questions, call:
1 (800) 223-0068
Weekdays 8:00 a.m. to 7:00 p.m. Eastern Time
Saturdays 8:00 a.m. to 4:00 p.m. Eastern Time
IN CANADA 1-800-387-0369 (TORONTO 1-416-536-5609)
-
 1
1
-
 2
2


American Standard Heritage 7100 Series User manual
- Category
- Sanitary ware
- Type
- User manual
- This manual is also suitable for
Ask a question and I''ll find the answer in the document
Finding information in a document is now easier with AI
Related papers
-
American Standard 7191 Series User manual
-
-
-
-
-
-
-
American Standard 7830.372H.002 Installation guide
-
-