3M 78-6970-9477-5-C User manual
- Category
- Data projectors
- Type
- User manual

July 2007 • 78-6970-9477-5-C • Copyright © 2007, 3M Company. All Rights Reserved.
Product Safety Guide
Guía de la seguridad del producto
Produktsicherheit Führer
Guide de sécurité du produit
ᘸ᱒⌚⪘
닢뽎뀎닊集눺龢
Guida di sicurezza di prodotto
Digital Media System
800 Series


3
3M
™
Digital Media System 800 Series
© 3M 2007. All Rights Reserved.
ENGLISH
Contents
Contents
Introduction
Thank You for Choosing 3M .........................................................................................................................5
Safety Information
Intended Use:.................................................................................................................................................6
SAVE THESE INSTRUCTIONS ..................................................................................................................8
Trademarks ....................................................................................................................................................8
Warranty; Limited Remedy; Limited Liability..............................................................................................8
What's in the Box
Shipping Contents........................................................................................................................................10
What’s Next?................................................................................................................................................10
Product Description
Machine Characteristics...............................................................................................................................11
Parts Identification List................................................................................................................................11
Installation & System Setup
Setting Up the Projector ..............................................................................................................................12
Maintenance
Replacing Projection Lamp .........................................................................................................................16
Reset Lamp Hours .......................................................................................................................................17


5
Introduction
3M
™
Digital Media System 800 Series
© 3M 2007. All Rights Reserved.
ENGLISH
Introduction
Thank You for Choosing 3M
Thank you for choosing 3M equipment. This product has been produced in accordance with 3M’s quality and
safety standards to provide smooth and trouble free use in the years to come.
For optimum performance, please follow the operating instructions carefully. We hope you will enjoy using this
high performance product in your meetings, presentations, and training sessions.

6
Introduction
3M
™
Digital Media System 800 Series
© 3M 2007. All Rights Reserved.
ENGLISH
Safety Information
Please read, understand, and follow all safety information contained in these instructions prior to the use of the
3M
™
Digital Media System 800 Series. Retain these instructions for future reference.
Intended Use:
The 3M
™
Electronic Digital Media System 800 Series was designed, built and tested for use indoors, using 3M
™
brand lamps, 3M
™
brand wall mount hardware and nominal local voltages. This projector is not intended for
household use or use by children. The use of other replacement lamps, outdoor operation or different voltages
has not been tested and could damage the projector or peripheral equipment and/or create a potentially unsafe
operating condition.
3M
™
Multimedia projectors are designed to operate in a normal office and home environment.
• 16˚ to 29˚C (60˚ to 85˚F)
• 10-80% RH (without condensation)
• 0-1828 m (0-6000 feet) above sea level
The ambient operating environment should be free of airborne smoke, grease, oil and other contaminants that can
affect the operation or performance of the projector.
Use of this product in adverse conditions will void the product warranty.
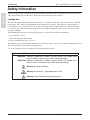
Explanation of Signal Words and Symbols in Safety Labels and Instructions
WARNING:
Indicates a potentially hazardous situation, which if not avoided, could
result in death or serious injury and/or property damage
.
CAUTION:
Indicates a potentially hazardous situation, which if not avoided, may
result in minor or moderate injury and/or property damage.
Warning: Hazardous Voltage
Warning: Hot Surface – High Temperature Lamp
Attention: Read Accompanying Documentation

7
Introduction
3M
™
Digital Media System 800 Series
© 3M 2007. All Rights Reserved.
ENGLISH
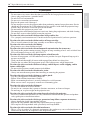
D WARNING
• To reduce the risk associated with hazardous voltage:
- Do not remove any screws other than those specified in the lamp replacement instructions.
- Always plug projector into a grounded outlet.
- Do not use in wet environments.
- Do not use in an outdoor environment.
- Replace the power cord if damaged.
- Do not attempt to service the projector other than performing routine lamp replacement. Service
should only be performed by a 3M authorized service provider. Aside from the projection lamp
module, there are no user serviceable parts inside the unit.
- Do not modify this projector or power cord.
- Disconnect power cord when the projector is not in use, during lamp replacement, and while cleaning.
- Do not allow water or other liquids to enter the projector.
• To reduce the risk associated with hazardous voltage and/or fire:
- Use a properly rated extension cord. Consult an electrical professional if you have questions.
• To reduce the risk associated with hot surface of lamp cartridge:
- Wait at least 60 minutes for the lamp assembly to cool before replacing.
• To reduce the risk associated with choking:
- Keep batteries away from children and pets.
• To reduce the risk associated with environmental contamination due to mercury:
- Hg: Lamp in this product contains mercury. Dispose of lamp according to local, state, or federal laws.
See www.lamprecycle.org or call 1-800-328-1371.
• To reduce the risk associated with lamp rupture related hazards:
- In event of lamp rupture, call 3M authorized service provider for repair. Ruptured lamp repair is
not user serviceable.
- Wash your hands thoroughly if contact with ruptured lamp debris has taken place.
- Ventilate the area where the lamp rupture occurs. The lamp operates at high temperature.
• To reduce the risk associated with hazard voltage, and/or impact, and/or tripping, and/or
intense visible light:
- Do not use this projector around unsupervised children.
• To reduce the risk associated with muscular strain:
- Always use more than one person when installing or removing the projector.
• To reduce the risk associated with impact, and/or pinch:
- Use only 3M supplied wall mounting hardware.
- Follow all installation instructions carefully.
- Make sure mounting hardware is securely anchored to a solid structure.
- Make sure set screws are properly secured to wall mounting plate.
• To reduce the risk associated with impact:
- Use only on smooth or level flat surfaces.
- Do not use on a structure that is prone to vibration, movement, or chance of impact.
- Do not hang on, or place weight on the projection arm.
• To reduce the risk associated with various hazards related to the projector:
- Please read, understand and follow all safety information contained in the operator and product
safety guide prior to installation and use.
• To reduce the risk associated with sharps, premature lamp failure, exposure to mercury:
- Always handle the fragile lamp module with care.
- Replace the lamp module when the lamp replacement message appears.
- Never replace the lamp module with a previously used lamp module.
• To reduce the risk associated with radio interference
- This is a Class A product. In a domestic environment, this product may cause radio interference in
which case the user may be required to take adequate measures.

8
Introduction
3M
™
Digital Media System 800 Series
© 3M 2007. All Rights Reserved.
ENGLISH
D CAUTION
• To reduce the risk associated with pinch:
- Use caution when latching or unlatching the variable position arm collar.
• To reduce the risk associated with explosion, and/or chemicals from leaking battery:
- Use only with battery type AA.
- Orient the battery’s plus (+) and minus (-) terminals according to the markings found on the remote control.
- Do not leave the battery in the remote for an extended period of time.
- Do not heat, disassemble, short, recharge, or expose the batteries to fire or high temperature.
- Do not carry batteries loose in your pocket or purse.
- Avoid eye and skin contact in the event that battery would leak.
- Do not mix used and new batteries.
• To reduce the risk associated with tripping, and/or impact:
- Position the power cord and data cable so that they can not be tripped over.
• To reduce the risk associated with environmental contamination due to battery chemicals and lead:
- Dispose of exhausted batteries and product components in accordance with applicable federal, state and
local regulations.
SAVE THESE INSTRUCTIONS
The information contained in this manual will help you operate and maintain your 3M
™
Digital Media System 800.
Trademarks
The 3M logo and 3M are registered trademarks of 3M Company. Vikuiti is a trademark of 3M Company.
Microsoft, Windows, Windows NT, Word, Excel, PowerPoint, Internet Explorer, and NetMeeting are either
registered trademarks or trademarks of the Microsoft Corporation in the United Sates and/or other countries.
Intel and Pentium are registered trademarks of Intel corporation or its subsidiaries in the U.S. and other countries.
Digital Light Processing is a trademark or registered trademark of Texas Instruments.
eBeam, e-Beam, eBeam Mouse, eBeam Moderator, eBeam Software, ImagePort and eBeam Presenter are
registered trademarks of Luidia, Inc.
Warranty; Limited Remedy; Limited Liability
This product will be free from defects in material and manufacture for a period of one year from the date
of purchase. 3M MAKES NO OTHER WARRANTIES INCLUDING, BUT NOT LIMITED TO, ANY IMPLIED
WARRANTY OF MERCHANTABILITY OR FITNESS FOR A PARTICULAR PURPOSE. If this product is defective
within the warranty period stated above, your exclusive remedy shall be, at 3M's option, to replace or repair the
3M product or refund the purchase price of the 3M product. Except where prohibited by law, 3M will not be
liable for any indirect, special, incidental or consequential loss or damage arising from this 3M product,
regardless of the legal theory asserted. To obtain warranty service outside of the USA, immediately notify the
dealer from which you purchased the product of any defects. In the USA call 1-800-328-1371 for warranty or
repair service.
The warranty for lamps that are included as original equipment in the projectors is for parts only and is effective for
a period of 90 days after the date of purchase of the projector or 180 hours of lamp usage,whichever occurs first.
Important: The above warranty shall be void if the customer fails to operate product in accordance with 3M’s
written instructions. This warranty gives you specific legal rights and you may have other rights that vary from
state to state.

9
Introduction
3M
™
Digital Media System 800 Series
© 3M 2007. All Rights Reserved.
ENGLISH
REGULATORY NOTICES
FCC STATEMENT - CLASS A:
This equipment generates, uses and can radiate radio frequency
energy, and if not installed and used in accordance with the instruction manual may cause interference to
radio communications. It has been tested and found to comply with the limits for a Class “A” computing
device pursuant to Subpart B of Part 15 of the FCC Rules, which are designed to provide reasonable
protection against such interference when operated in a commercial environment. Operation of this
equipment in a residential area is likely to cause interference in which case the user at his/her own
expense will be required to take whatever measures may be required to correct the interference.
EEC STATEMENT
• This machine was tested against the 89/336/EEC (European Economic Community) for EMC (Electro
Magnetic Compatibility) and fulfills these requirements.
• This machine was tested against the 73/23/EEC (European Economic Community) for LVD (Low
Voltage Directive) and fulfills these requirements.
This product is compliant with EU Directive 2002/95/EC (Restriction of Hazardous Substances in Electrical and
Electronic Equipment), as amended by Commission Decision 2005/618/EC on maximum concentration values.
This product is compliant with EU Directive 2002/96/EC on Waste Electrical and Electronic Equipment (WEEE).

What's in the Box
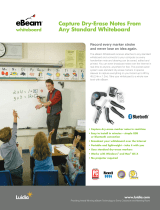
Shipping Contents
The Digital Media System 800 is shipped with some of the necessary cables required for standard VCR, PC or
laptop computer connections. Carefully unpack and verify that you have all of the items shown below. If any of
these items are missing, please contact your place of purchase.
1. Digital Media System 800
2. Remote Control (Two AA Batteries included)
3. Universal Power Cable (5m)
4. Control Panel
5. Operator’s Guide
Keep Your Packing Materials
Save the shipping box and packing materials in the event the Digital Media System 800 should require shipping
to a 3M Service Center for repair. Use packing material to protect projector.
What’s Next?
Take a few minutes to familiarize yourself with the Digital Media System 800 machine characteristics and then
turn to Installation and System Setup.
We hope you will enjoy using this high performance product in your meetings, presentations and training
sessions. This product has been produced in accordance with 3M’s highest quality and safety standards to ensure
smooth and trouble-free use in the years to come.
10
What's in the Box
3M
™
Digital Media System 800 Series
© 3M 2006. All Rights Reserved.
ENGLISH

Product Description
Machine Characteristics
The Digital Media System 800 integrates metal halide lamp and Digital Light Processor (DLP) technology. It
accepts input from computer and/or video sources and projects a super bright image.
The Digital Media System 800 offers the following features:
1. One panel 0.7” DDR DMD projection system
2. Vikuiti
™
Super Close Projection (SCP) technology
3. VGA/SVGA/XGA/SXGA/MAC/(UXGA) PC compatibility
4. NTSC/PAL/SECAM/Composite/S-video/Component (YPbPr/YCbCr)/SDTV (480i, 576i)/EDTV (480p,
576p) /HDTV (720p & 1080i) video compatibility, ability to display 16.7 million colors
5. Auto Image synchronization (Auto-tracking / frequency /position adjustment/source detect/Phase detect)
6. Automatically saves user settings
7. On-screen menu with 9 languages (English, French, German, Portuguese, Spanish, Italian, Japanese,
Tradition Chinese, and Simplified Chinese)
8. Built-in 20W x 2 speakers
9. Self protect timer for hot re-strike of compact P-VIP lamp
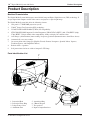
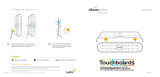
Parts Identification List
1. Projection Head
2. Projection Focus Ring
3. Lamp Change Cover
4. Aluminum Arm
5. Arm Adjust Ring
6. 5 Button Keypad
7. Two speakers
8. Input & Output Interfaces
Product Description
3M
™
Digital Media System 800 Series
ENGLISH
11
© 3M 2006. All Rights Reserved.
1
2
7
5
3
4
8
6

12
3M
™
Digital Media System 800 Series
© 3M 2007. All Rights Reserved.
ENGLISH
Installation and System Setup
Installation & System Setup
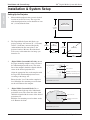
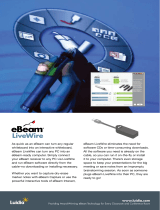
Setting Up the Projector
1. Mount whiteboard/projection screen in desired
location on wall if necessary. The top of the
whiteboard/projecction screen should be at least
86" (2.18 m) from the floor.
86"
(2.18 m)
to floor
Whiteboard/
Projection Screen
Whiteboard/
Projection Screen
2. The Digital Media System 800 Series can
project an image size between 50" (1,270 mm)
and 85" (2,160 mm), measured diagonally
(when mounted on the same plane as the
projected surface). Measure the whiteboard
if necessary to determine the size image you
intend to use.
30"
(762 mm)
40"
(1016 mm)
50"
(1270 mm)
51"
(1295 mm)
68"
(1728 mm)
85"
(2160 mm)
3. (Digital Media System 800, 815 Only) Attach
the paper mounting template to the wall above
the whiteboard/projection screen. The center
line of the template should be aligned with the
center of the desired projection area.
Align the appropriate line on the template with
the top of the whiteboard/projection screen
according to the image size.
Ensure that the "level" line on the template is
level. Mark the five mounting screw locations
on the wall. Remove the template.
Whiteboard/Projection Screen
Wall
Level
Align center line
Alignment for desired image size
Mounting screw location (1 of 5)
Mounting Template
4. (Digital Media System 810 Only) Rest a
mounting shim on the top of the whiteboard/
projection screen. The center line of the shim
should be aligned with the center of the desired
projection area.
Mark the five mounting screw locations on the
wall. Remove the shim.
Whiteboard/Projection Screen
Wall
Align center line
Mounting screw location
(1 of 5)
Shim

13
3M
™
Digital Media System 800 Series
© 3M 2007. All Rights Reserved.
ENGLISH
Installation and System Setup
5. Determine the appropriate anchor to use with
your wall type. Install five anchors at the
marked locations. Install, but do not tighten, five
mounting screws.
Masonry
Hollow Wall
Solid Wall/ Wall Stud
6. (Digital Media System 810 Only) Measure the
thickness of the whiteboard/projection screen to
determine the number of shims needed.
Screen Thickness Number of Shims
0–1" (0–25 mm) 0
1–1.25" (25–32 mm) 1
1.25–1.5" (32–38 mm) 2
1.5–2" (38–51 mm) 3 (maximum)
Hang mounting shim(s) on the screws.
7. Hang the metal mounting plate on the screws
and tighten securely.
Whiteboard/
Projection Screen
Wall
Shim
(810 Only)
Mounting Plate
Mounting
Screws (5)
Screen Thickness
8. Hang the projector by aligning and hooking the
unit on the metal mounting plate.
Note: Ensure locking pin is engaged. You
should hear a click once the unit is securely on
mounting plate.
9. Using 2 people, slightly push up on the unit to
make sure unit is locked on mounting plate

14
3M
™
Digital Media System 800 Series
© 3M 2007. All Rights Reserved.
ENGLISH
Installation and System Setup
10. Attach the safety cable securely to the wall with
an appropriate anchor.
Note: Fully extend safety cable and then secure
to wall. If necessary, use tie wraps to minimize
cable slack.
Attach safety cable securely to stud or solid wall.
Cable should have no slack.
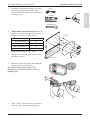
11. Slide the contol panel cable tab into the slot at
the bottom left of the unit.
P
ower Cable
Control Panel Cable
12. Connect the control panel and power cables
as shown.

15
3M
™
Digital Media System 800 Series
© 3M 2007. All Rights Reserved.
ENGLISH
Installation and System Setup
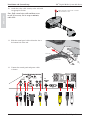
13. (Digital Media System 815 Only) Attach the
Annotation Pod as shown on pages 8–9 of the
Digital Media System 815 eBeam
™
Software for
Interactive Whiteboard Operator’s Guide.
14. Start up the projector by switching on the main
power switch, then pressing the power button on
the projector, the control panel or the remote.
Main Power Switch Power Button
15. Adjust the projector arm length to achieve the
desired image size. Extend the section of the
arm closest to the base first by loosening the
clamp, sliding the arm out, and tightening the
clamp. Extend the second section of the arm as
needed.
16. Focus the image by turning the projection
focus ring.
Extend this section first
Extend this section last
Projection Focus Ring
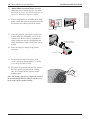
17. To adjust the position of the image on the
screen, refer to the Digital Media System 800
Series Image Alignment Guide.
18. To remove the projector from the wall, remove
the right speaker grill and pull the locking
ring out. Carefully lift the projector off the
mounting plate.
Note: The locking ring may be temporarily retained
in the unlocked position by sliding it into the recess
in the corner of the speaker housing.

16
3M
™
Digital Media System 800 Series
© 3M 2007. All Rights Reserved.
ENGLISH
Maintenance
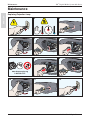
Maintenance
Replacing Projection Lamp
1
11
10
6
12
1
2
3
4
5
7
8
9
2 3
4 5 6
8 9
10 11 12
www.lamprecycle.org
1-800-328-1371
Hg
7

17
3M
™
Digital Media System 800 Series
© 3M 2007. All Rights Reserved.
ENGLISH
Maintenance
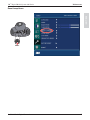
Reset Lamp Hours
Menu

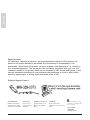
Important Notice
All statements, technical information, and recommendations related to 3M’s products are
based on information believed to be reliable, but the accuracy or completeness is not
guaranteed. Before using this product, you must evaluate it and determine if it is suitable for
your intended application. You assume all risks and liability associated with such use. Any
statements related to the product which are not contained in 3M’s current publications, or any
contrary statements contained on your purchase order shall have no force or effect unless
expressly agreed upon, in writing, by an authorized officer of 3M.
Technical Support Contact:
3M Austin Center 3M Canada 3M Mexico, S.a. de C.V. 3M Europe
Building A145-5N-01 P.O. box 5757 Apartado Postal 14-139 Boulevard de l'Oise
6801 River Place Blvd. London, Ontario Mexico, D.F. 07000 95006 Cerge Pontoise Cedex
Austin, TX 78726-9000 N6A 4TI Mexico France
Printed on 50% recycled
wastepaper, including 10%
Post-consumer
Litho in USA
@3M 2007
78-6970-9477-5
ENGLISH
-
 1
1
-
 2
2
-
 3
3
-
 4
4
-
 5
5
-
 6
6
-
 7
7
-
 8
8
-
 9
9
-
 10
10
-
 11
11
-
 12
12
-
 13
13
-
 14
14
-
 15
15
-
 16
16
-
 17
17
-
 18
18


3M 78-6970-9477-5-C User manual
- Category
- Data projectors
- Type
- User manual
Ask a question and I''ll find the answer in the document
Finding information in a document is now easier with AI
Related papers
Other documents
-
SMART Technologies Unifi 35 (i systems) Template
-
 eBeam EdgeWireless Quick start guide
-
Da-Lite 91269 Datasheet
-
Barco Universal Lamp 600W MH Installation guide
-
BENDIX TCH-005-009 User manual
-
 eBeam 46003190 Quick start guide
-
 eBeam 45033998 Datasheet
-
 eBeam EdgeWireless+Battery Quick Start
-
NEC NP-UM330W User manual
-
 eBeam 46000799 Datasheet


