
WHAT IS IN THE KIT:
23 liters
- 48
1.043-1.048
1.012
4.2-4.4%
(+0.5% if blotting)
20 EBC
Volume
IBU’s
OG
FG
ABV
Colour
A hop-driven, easy-drinking sessionable IPA for when you’re big on hops
but want lower ABV and a higher drinkability.
The aromatic New Zealand hops in this brew scream oral citrus with a
strong overtone of fresh zesty lime served up on a low ABV light malty
brown body.
EASY AS BREW
NZ SESSION IPA
BREW SPECIFICATION
INSTRUCTIONS:
CLEANING & SANITATION
Clean and sanitise all brewing equipment that will come into contact with
your beer (including fermenter, spoons, can openers, thermometers, air
locks, etc.) with a quality no-rinse sanitiser, such as StellarSan.
1
PREPARE INGREDIENT CANS
Fill your kitchen sink with water as hot as your tap water goes and put
your two cans of malt extract in to soen the syrup contents inside to
allow for easier pouring.
2
STEEPING YOUR SPECIALTY GRAINS
Bring 2L of good-tasting water to a gentle boil and add a few tablespoons
of plain sugar to aid in hop extraction. Take your mesh hop sock and add
in 50g of your Wakatu hops (about ½ of the 100g bag) before retying (if
you don’t have a hop sock, you can add these in loose, just make sure to
3
CUT THIS OUT FOR
YOUR TAP HANDLE
KegLand Distribution Pty Ltd© - Easy As Brew - NZ Session IPA – Extract kit
.
.
.
.
.
.
.
.
.
.
.
.
.
.
.
.
.
.
.
.
.
.
.
.
.
.
.
.
.
.
.
.
.
.
.
.
.
2 x Muntons IPA Bitter (1.8kg)
Ingredient Can
1 x 100g Vacuum Sealed NZ Wakatu
Hops (unless substituted)
1 x Danstar Nottingham Yeast (11g).
For beginner instructions on how to home brew,
please check out our guide by following this link.
BREW
EASY AS
BREW
EASY AS

TIPS &
TRICKS
Ferment closer to 17c for a
super clean, crisp beer. 20c+
will get you banana, peach
and apple avours. If your
ferment goes badly, this can
cause some of the ‘home
brew twang’ avour’s you
hear horror stories about.
MY RATING:
APPEARANCE
TASTE
OVERALL
AROMA
1 2 3 4 5
EMAIL US 24/7
beer@kegland.com.au
BREW DAY QUESTION?
Our friendly sta are
ready to help!
KegLand Distribution Pty Ltd© - Easy As Brew - NZ Session IPA – Extract kit
strain the end liquid through a sieve to catch all the green matter).
Remember to keep them as loose as possible to allow for expansion.
Add the hops to the boiling water and start a timer for 10-minutes
exactly. Stir briey to ensure they’re wet evenly. Seal your leover
hops up and put them in the freezer for storage. Kill the ame once
the 10-minutes are up and strain into your fermenter.
ADDING EVERYTHING TO THE FERMENTER
Take your hot boiled hop tea and pour It into your sanitised
fermenter, leaving the hop matter behind. Give the hop bag a
gentle squeeze to get out all of the juices. Take your ingredient
cans out of the hot water in the sink and open them with your
sanitized can opener. Make sure your can top is sanitized too. Pour
the syrupy contents of both cans into the fermenter. A sanitised
silicone spatula or some boiled water can be used to get the rest of
the syrup out. Mix up the contents of the fermenter well with your
sanitised brewing spoon (avoid wood).
Top up your fermenter to the 23-liter mark on your fermenter with
cold water. You want the beer to be below 20˚c by the time you
get to 20-liters, so if its too hot as you’re approaching 19L, you
might want to add some ice cubes.
4
FERMENTING YOUR BEER
This step is arguably the most important to get great tasting
nished beer. Place the fermenter in a part of the house that will
ensure the fermenting beer stays between 16-20˚c (any higher and
you will start to get undesirable avours; any lower and the yeast
may go to sleep). In winter, this can be maintained with a heat belt
and a temperature controller. In Summer, you will need a small
fridge (Gumtree has plenty for next to nothing) to put your
fermenter in with a temperature controller attached.
6
DRY HOPPING
When the bubbling of the airlock stops (usually about a week aer
adding yeast), it’s time to dry hop your beer for maximum hop
avor and aroma. Take your 50g total of leover hop pellets out of
the freezer and sprinkle them evenly and gently into your ferment-
ing beer (use only 25g for a less fruity beer). Make sure you only
open the fermenter wide enough and long enough to do this
quickly – bacteria are the enemy here and you don’t want the
outside air and all its bacteria-lled dust getting into your batch of
beer. Aer letting the dry hop pellets soak in your beer for 3-4
days, it’s time to bottle/keg.
7
KEG/BOTTLE YOUR FINISH BEER
Once your beer has nished fermenting and dry hopping done,
bottle or keg as usual. Please refer to our detailed beginners guide
for tips on how to do this.
8
PITCHING THE YEAST
Open your sachet of yeast with a sanitised pair of scissors. Sprinkle
the contents of the sachet evenly over the beer. Put the sanitised
lid on your full fermenter and wait 5-minutes for the yeast to
rehydrate, then cover the airlock hole with your sanitised thumb
and rock the fermenter back and forth vigorously to aerate it so
the yeast has plenty of oxygen to work well. Put the air lock into
your fermenter lled with a bit of sanitiser.
5
-
 1
1
-
 2
2
Ask a question and I''ll find the answer in the document
Finding information in a document is now easier with AI
Related papers
-
 KegLand KB01417 Operating instructions
-
 KegLand KB01513 Operating instructions
-
 KegLand KB01537 Operating instructions
-
 KegLand KB01873 Operating instructions
-
 KegLand KL09348~KB05449 Operating instructions
-
 KegLand KL09348~KB05377 Operating instructions
-
 KegLand KL09348~KB05161 Operating instructions
-
 KegLand KL09348~KB05161 Operating instructions
-
 KegLand KL09348~KB05089 Operating instructions
-
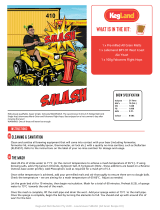 KegLand KL09348~KB05233 Operating instructions
Other documents
-
 WILLIAMSWARN BrewMaster User manual
-
 WILLIAMSWARN BrewMaster User manual
-
 Saice Beer Brew 60 User manual
-
 bsg K54 Operating instructions
-
 bsg K22 Operating instructions
-
 BrewCraft 10197 Operating instructions
-
 bsg K32 Operating instructions
-
 bsg K50 Operating instructions
-
 bsg K30 Operating instructions
-
 bsg K24 Operating instructions


