Chief PAC116 Installation guide
- Category
- Wall & ceiling mounts accessories
- Type
- Installation guide
This manual is also suitable for

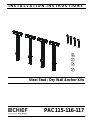
INSTALLATION INSTRUCTIONS
Steel Stud / Dry Wall Anchor Kits
PAC115-116-117

PAC115-116-117 Installation Instructions
2
DISCLAIMER
Milestone AV Technologies and its affiliated corporations and
subsidiaries (collectively "Milestone"), intend to make this
manual accurate and complete. However, Milestone makes no
claim that the information contained herein covers all details,
conditions or variations, nor does it provide for every possible
contingency in connection with the installation or use of this
product. The information contained in this document is subject
to change without notice or obligation of any kind. Milestone
makes no representation of warranty, expressed or implied,
regarding the information contained herein. Milestone assumes
no responsibility for accuracy, completeness or sufficiency of
the information contained in this document.
Chief® is a registered trademark of Milestone AV Technologies.
All rights reserved.
IMPORTANT WARNINGS AND
CAUTIONS!
WARNING: A WARNING alerts you to the possibility of
serious injury or death if you do not follow the instructions.
CAUTION: A CAUTION alerts you to the possibility of
damage or destruction of equipment if you do not follow the
corresponding instructions.
WARNING: Failure to read, thoroughly understand, and
follow all instructions can result in serious personal injury,
damage to equipment, or voiding of factory warranty! It is the
installer’s responsibility to make sure all components are
properly assembled and installed using the instructions
provided.
WARNING: Failure to provide adequate structural strength
for this component can result in serious personal injury or
damage to equipment! It is the installer’s responsibility to
make sure the structure to which this component is attached
can support five times the combined weight of all equipment.
Reinforce the structure as required before installing the
component. The wall to which the mount is being attached
may have a maximum drywall thickness of 5/8" (1.6cm).
WARNING: Exceeding the weight capacity can result in
serious personal injury or damage to equipment! It is the
installer’s responsibility to make sure the combined weight of
all components does not exceed 175 lbs (79.38 kg) or the
maximum weight capacity of the mount to which this
accessory is being installed. This product is NOT designed
for use with articulating wall mounts.
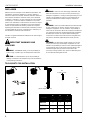
TOOLS/PARTS FOR INSTALLATION
(A)
[1/4-20 toggler anchor]
(B)
1/4-20 x 1-3/4"
(C)
1/4"
A B C
MODEL (qty) (qty) (qty)
PAC115
4 4 4
PAC116
8 8 8
PAC117
28 28 28

Installation Instructions PAC115-116-117
3
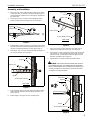
Assembly and Installation
1. Drill a 1/2" hole at the desired location, making sure wall is
at least 1/2" thick. If the wall is made with metal studs, it is
recommended to install the anchor through the drywall and
the metal stud.
2. Hold metal channel on anchor (A) flat alongside plastic
straps and slide channel through hole. (See Figure 1)
Figure 1
3. Holding plastic straps on anchor (A), pull anchor away from
wall until channel rests flush behind wall making sure anchor
channel is positioned vertically on stud. (See Figure 2)
4. Slide plastic cap on anchor (A) towards wall until flange of
cap is flush with wall. (See Figure 2)
Figure 2
5. Snap off plastic straps on anchor at wall by pushing side to
side, snapping off straps level with flange of plastic cap.
(See Figure 3)
6. Repeat steps 1 through 5 for each mounting hole.
Figure 3
7. Place mount over anchors and align mounting holes in
display mount with holes in anchors. (See Figure 4)
8. Insert 1/4-20 x 1-3/4" Phillips pan head screws (B) through
1/4" washer (C), corresponding mounting hole on mount
and into anchor (A) and tighten until flush against mount.
DO NOT overtighten! (See Figure 4)
9. Repeat steps 7 and 8 for remaining mounting holes.
WARNING: IMPROPER INSTALLATION CAN LEAD TO
EQUIPMENT FALLING CAUSING SERIOUS PERSONAL
INJURY OR DAMAGE TO EQUIPMENT! Overtightening of
mounting hardware can damage the steel studs. DO NOT
overtighten mounting hardware!
Figure 4
(A)
Drywall
Plastic Straps
2
(A)
Plastic Cap
Drywall
Anchor Metal Channel
SIDE VIEW
3
Steel Stud
4
Plastic Straps
Drywall
Anchor Metal Channel
Plastic Cap
SIDE VIEW
5
Steel Stud
Drywall
Anchor Metal Channel
Mount
SIDE VIEW
(B)
8
Steel Stud
(C)

PAC115-116-117 Installation Instructions
USA/International A 8401 Eagle Creek Parkway, Savage, MN 55378
P 800.582.6480 / 952.894.6280
F 877.894.6918 / 952.894.6918
Europe A Fellenoord 130 5611 ZB EINDHOVEN, The Netherlands
P +31 (0)40 2668620
F +31 (0)40 2668615
Asia Pacific A Office No. 1 on 12/F, Shatin Galleria
18-24 Shan Mei Street
Fotan, Shatin, Hong Kong
P 852 2145 4099
F 852 2145 4477
Chief Manufacturing, a products division
of Milestone AV Technologies
8809-002003 Rev00
2010 Milestone AV Technologies, a
Duchossois Group Company
www.chiefmfg.com
08/10
-
 1
1
-
 2
2
-
 3
3
-
 4
4


Chief PAC116 Installation guide
- Category
- Wall & ceiling mounts accessories
- Type
- Installation guide
- This manual is also suitable for
Ask a question and I''ll find the answer in the document
Finding information in a document is now easier with AI
Related papers
-
Chief Welder CMA278 User manual
-
-
Chief KSA1020B Installation guide
-
-
-
-
Chief WP21S Installation guide
-
-
Chief WMA2S Installation guide
-