Page is loading ...

ISTRUZIONI PER L’USO E MANUTENZIONE
INSTRUCTIONS FOR USE AND MAINTENANCE
GEBRAUCHSANLEITUNGEN UND WARTUNG
MODE D’EMPLOI ET ENTRETIEN
INSTRUCCIONES PARA EL USO Y MANUTENCION/
INSTRUÇÕES DE UTILIZAÇÃO
SEGATRICE A NASTRO
BAND-SAW MACHINE
BANDSÄGEMASCHINE
SCIE A RUBAN
SIERRA DE CINTA
SERRA DE FITA
CERTIFICATA
CERTIFIED
GEPRÜFT
CERTIFIE
CERTIFICADA
CERTIFICADA
Art. 780 - 782 - 783
www.femi.it

INDICE / INDEX / INHALT / INDEX / INDICE / ÍNDICE
ITALIANO (IT) Manuale originale, Original manual, Handbuch Originalausgabe, Manuel original, Manual original, Manual original ....1 ÷ 6
ENGLISH (EN) Manual translated from the original, manuale tradotto dall’originale .................................................................7 ÷ 12
DEUTSCH (DE) Übersetzung der Originalausgabe des Handbuchs, manuale tradotto dall’originale ...................................13 ÷ 18
FRANCAIS (FR) Manuel traduit à partir de l’original, manuale tradotto dall’originale ..............................................................19 ÷ 24
ESPANOL (ES) Manual translated from the original, manuale tradotto dall’originale ..............................................................25 ÷ 30
PORTUGUÊS (PT) Manual traduzido do original, manuale tradotto dall’originale....................................................................31 ÷ 36

EN
7
1.4 RECOMMENDED AND NOT RECOMMENDED
USAGE
This belt sawing machine was designed and constructed
according to the most advanced technologies and may be
used for all cutting require ments for metals commonly used
in industry and artisanship.
It can cut:
- COMMON STEELS (FE 37...)
- SPECIAL STEELS (C 40, 18NiCrMo5...)
- ALUMINIUM AND ITS ALLOYS
- BRASS
- BRONZE
- STEEL TUBING (FE 35, FE 52...)
- PROFILED SECTIONS IN SHEET METAL AND
ALUMINIUM
It is not suitable for cutting:
- WOOD AND SIMILAR MATERIALS
- BONE AND SIMILAR MATERIALS
ATTENTION: The band saw has been developed
and manufactured to cut in dry condition; the
use of any cooler by lubricating oil makes the
machine unusable.
Consult the relative sections for cutting capacities, the speeds
to use and the type of tools for use according to the material
to be cut and its sec tion. (See list of contents).
1.5 STANDARD SAFETY PROCEDURS
- Do not use the machine in very damp places or in the
presence of infl ammable liquids or gases.
- Do not use it in the open air when general weather and
environmental conditions are unfavourable (eg. explosive
atmospheres, during a storm or rain).
- Wear suitable clothes, without wide sleeves or articles
such as scarves, chains and bracelets which could get
caught in the moving parts.
- Always use personal protection devices: protective
goggles as recom mended by safety standards, gloves
of the right size, headphones or earplugs, and hairnets
if necessary.
- Use the tools recommended in this manual if you want
to achieve the best performance from your sawing
machine.
- Any power cable extensions must be type approved and
comply with safety standards.
- Avoid using the machine if your psycho-physical condition
are pre carious or upset.
1 INTRODUCTION TO USE
Before starting work with your sawing machine, carefully
read this instructions manual so that you are familiar with
the machine and its uses and where it should not be used.
Keep this manual in a safe place.
It is an integral part of the machine and should be used for
reference in operating the machine correctly and in the proper
safety conditions.
Use the machine only and exclusively for the uses specifi ed
below, as recommended in this manual. The machine should
not in any way be tampered with, or forced, or used for
unsuitable purposes.
1.1 SYMBOLS PLACED IN CORRESPONDANCE
WITH USAGE POINTS
Never underestimate the warnings “ATTENTION - CAUTION”
given in this manual.
In order to draw the user’s attention and to preserve safety,
hazardous operation are preceded by symbols and notes
that point out the danger and explain how to behave to
avoid any risk.
These symbols and notes are divided in three categories,
identifi ed by the following words:
ATTENTION: dangerous-behaviours that could cause
serious injuries.
CAUTION: behaviours that could cause slight injuries
or damages to things.
NOTE: the notes preceded by this symbols are
technical and are aimed at making operations
easier.
1.2 SAFETY AND RULES
The machine was designed and built according to the
Community Directives in force: EC/2006/42 - EC/2006/95/
EC/2004/108.
The enclosed CE Declaration of conformity, togheter with the
CE mark on product, essentially comprise and are an integral
part of the machine: both guarantee product conformity with
the aforesaid safety Directives.
INDEX
1.3 SAFETY PLATES/LABELS
The safety plates/labels and indicators present on the
machine, the location of which is shown in the Figure on the
inside cover, are as follows:
- Wear noise protection devices.
- Wear safety masks or goggles.
- Do not insert the hands in this area with the
tool operating. Danger of dragging/cutting.

EN
8
1.6 SAFETY PROCEDURS FOR FURTHER RISK
- Always keep processing residues away from the cutting
area.
- Always use the clamp. The parts to be cut must always
be held fi rmly in the clamp.
- Always keep hands away from the working areas while
the machine is moving: before loading or unloading the
part, release the run button on the hand grip.
- Do not force the machine unnecessarily : excessive
cutting pressure could cause rapid wear to the blade and
negatively infl uence the per formance of the machine in
terms of fi nishes and cutting precision.
1.7 INFORMATION REGARDING NOISE AND
VIBRATIONS
Noise
Noise level at the operator’s work
position (without load) ............................... Leq 81.5 dB (A)
Noise level at the operator’s work position (with load)
Cutting of 80 mm dia. barstock in 9SMnPb28 steel at speed
of 80 m/min .................................................Leq 82.4 dB(A)
Cutting of 60x60 steel profi le with 3 mm wall thickness at
speed of 80 m/min. .....................................Leq 85.6 dB(A)
Test conditions
Sound power (without load) .......................Lwa 92.6 dB (A)
Sound power (with load) ......................................................
Cutting of 80 mm dia. barstock in 9SMnPb28 steel at speed
of 80 m/min ..............................................Lwa 71.4 dB (A)
Cutting of 60x60 steel profi le with 3 mm wall thickness at
speed of 80 m/min. ....................................Lwa 74.6 dB (A)
The measurements were carried out in accordance with
standard UNI EN ISO 3746.
Vibration
Mean frequency-weighted hand - arm acceleration vibration
exposure does not exceed 2.5 m/s².
The measurements were carried out in accordance with
standards UNI EN ISO 5349-1 and 5349-2.
The emission levels indicated are not necessarily safety
levels. Although there is a relationship between the emissions
and exposure levels, the values shown cannot be used for
establishing the need for further precautions. There are other
factors which infl uence the exposure levels of operators, such
as the features of the work place, presence of other sources
of noise, number of machines running, etc.
The exposure levels may also vary between countries.
This information is necessary for the user for better evaluation
of the risks and hazards deriving from noise.
NOTE: Personal hearing protection should be
used, such as headphones or earplugs.
1.8 INFORMATION ABOUT THE
ELECTROMAGNETIC COMPATIBILITY
The European regulations on safety and, in particular, the
Direc tive 2004/108/CE contemplate that all the equipment be
equipped with shield ing devices against radio interferences
both from and towards the outside.
This machine is equipped with fi lters both on the motor and
on the power supply through which the machine is safe and
in compliance with above regulations.
Tests were carried out according to EN 55014-1, EN
55014-2 regulations.
1.9 DESCRIPTION OF THE MACHINE (Fig.1)
The belt sawing machine consists of two basic parts: the
machine body 5 complete with motor and drive 7 which is
integrated into lower part, consisting of the clamp 11 and the
base 13, by means of the swivel support 9.
Here is a list of the main parts with the number indicating it
in the draw ing.
Legend Fig. 1
1. Command grip
2. Blade tension handwheel
4. Sliding blade guide
5. Machine body
6. Blade
7. Motor
8. Control box
9. Bar stop
10. Clamp (vice)
11. Morsa
12. Clamp drive
13. Base
WEIGHT: ..................................................... 780 XL - 17 Kg
........................................................782 XL - 783 XL 16 kg
SIZE: .......................................................85 x 36 x H65 cm.
..........................................in maximum overall dimensions.
PACKAGING SIZE: .................................72 x 34 x H52 cm.
2 INSTALLATION
2.1 REMOVING THE PACKING
Remove the wooden frame which protects the machine
during transit.
Try not to damage the frame as you may have to move the
machine long distances or store it for long periods.
2.2 HANDLING (Fig. 2)
As the machine is not heavy (Kg. 16), it can be lifted and
moved by a single person by gripping it from the machine
body 5, duly clamped (see pint 2.3).
2.3 TRANSPORT (Fig. 2)
It is necessary to low the saw body till the lower position
and fi x it to the base : it is suffi cient to insert the pin U in
the hole in the body, then lift the machine, gripping it as
showed in Fig. 2.
For transport the machine, it is better to place it in the box it
was when purchased.
Ensure it is placed in the correct position indicated by the
arrows on the packaging.
Pay careful attention to the ideogram printed on the box as
they provide all necessary information for palletization and
stacking of boxes.
Tying the load down with ropes or safety belts is raccomended
during transportation to prevent the load from sliding or
falling.
2.4 POSITION/WORK STATION (Fig. 3)
Place the machine on a suffi ciently fl at workbench so that the
machine has the better possible stability. Should you wish
to fi x the machine in place, use the special holes located
on the base.

EN
9
In respect of ergonomic criteria during cutting operations,
the work bench must be positioned at such a height that
the clamp level is between 90 and 95 cm from the ground
(see Fig. 3).
ATTENTION: Make sure that the machine is placed
in a working area with suitable environmental
conditions and lighting.
The general conditions of the working environment
are of fun damental importance for accident
prevention.
2.5 ELECTRICAL CONNECTIONS
Check that the mains to which the machine is connected is
earthed in accordance with current safety regulations and
that the power point is in good condition.
Remember that there should be a magnetothermic protective
device fit ted upstream of the mains to protect all the
conductors from short cir cuits and overloads.
This protective device should be selected according to the
electrical features of the machine listed below:
Nominal voltage ...................................................230 Volt ~
Nominal frequency ............................................50/60 Hertz
Max programmed absorbed value ....................2,5 Ampere
Nominal input power .............................780 XL - 850 Watts
..................................................782 XL/783 XL - 950 Watts
Power factor ..................................................................0,92
Nominal speed ..................................10.000-23.000 Giri/m’
Insulation ................................................................Classe F
Type of service ..........................intermittent S4-20 % 5 min
In case of power failure in mains, while you wait for
power to be restored there is no danger hazard may
arise: in fact, the electronic governor O or main switch
D is also equipped with a reset function which prevents
the machine from restarting automatically.
The motor of your sawing machine (electronic version)
is equipped with a protective heat circuit breaker which
interrupts the power supply when the temperature of the
coils rises too high.
When the power supply is interrupted, wait for normal
reset.
3 ADJUSTING (Fig. 4-5-6-7-8)
3.1 TENSION OF THE BLADE (Fig. 4)
Turn the handwheel B in a clockwise direction until it locks.
ATTENTION: If the tension is too high, the blade
tends to escape from the guide. In this case,
slacken the blade tension by turning of one/two
turns the handwheel B in a anti clockwise direc-
tion.
3.2 BAR STOP (Fig. 5)
Use the bar stop supplied if you have to do several cuts on
pieces of the same length.
In this way you do not have to repeat the same measurement
each time.
Screw rod E into the hole of the base and fasten it with nuts F.
Slacken the handwheel G and place the stop L at the correct
distance from the blade. Tighten handwheel G again.
3.3 CUTTING ANGLE (Fig. 6)
The band saw can cut at an angle varying from 0 to 45
degrees: it is suffi cient to slacken the handle I and turn
the swiwel support J towards the respective limit stops H
and K.
For all intermediate angles, turn the swiwel support J until
the mark M on the support matches the corresponding
position on the plate.
Then lock the rotating support J again.
3.4 CUTTING SPEED (Fig. 7)
Two speed version
Depending on the type of material and its section (see
CUTTING TABLE) you can choose two different cutting speed
60 or 80 m/min. by means of the switch N.
Electronic version
Your sawing machine is equipped with CESC (Constant
Electronic Speed Control), which allows gradual and
continuous variation of the cutting speed, adapting it to the
type and dimension of the material to be cut (see cutting
table).
To select the most suitable speed, use the speed control knob
O to increase or decrease the speed as you require.
Example:
Stainless Steel: 30 m/min. position 1
Common Steel: 40-60 m/min. position 2-3-4
Allum. Alloy: 80 m/min. position 6
Pipes/sections: 70-80 m/min. position 5-6
3.5 SLIDING BLADE GUIDE (Fig. 8)
The sliding blade guide P with integrated protection fi tted on
your saw ing machine is used to perform the cut while guiding
the necessary part of the blade and fully protecting the part
not used in the cutting process.
Slacken the knobs Q and slide the blade guide P so as to
move it closer to or further from the part to be cut, as shown
in the fi gure.
ATTENTION: If this adjustment is not done, the
part of the blade not used in the cutting process
will be exposed and this will create an extra risk of
contact, besides altering the quality of the cut.
3.6 BEARINGS BLADE GUIDE (Fig. 9)
The blade-guide on the outside of the sawing machine are
eccentric and adjustable so as to simplify blade replacement
and to keep it guided as its best.
They must always touch the blade slightly, so that they rotate
when the blade passes, but must not be completly locked.
In order to approach or remove the eccentric blade-guide,
gently turn the head of the screws S using a 10 mm.
wrenches key.
4 USE
4.1 RUNNING IN THE BLADE
ATTENTION: If the correct running in procedure
is not performed, the blade’s cutting precision
may be irreparably compromised.
To obtain the best performance, the bi-metal blades fi tted on
your saw ing machine must be run in for a short period. For
this reason the fi rst two or three cuts should be done where
possible on a solid piece D.40-50 mm, using a very slight

EN
10
- slacken the handle Q and slide the blade guide P as far
as it will go, following the direction on the arrow (Fig.
8);
- remove the protective casing unscrewing the four
screws;
- slacken the blade tension, turning the handwheel B in a
anti-clockwise direction;
- using a 10 mm. spanner, slacken the exagonal nuts R
on the two blade guides on the outside of the blade (Fig.
9);
- with the same spanner gently turn the head of the screws
on the same blade-guide in a anti-clockwise direction so
as to move the bearings far enogh away from the blade
to enable you to extract it easily from the guides;
- extract the blade fi rst from the guides and then from the
rubber coated pulleys;
- insert the new blade fi rst between the guides and then
onto the rubber coated pulleys, with the teeth facing as
showed in picture 9;
- put the blade under tension again as described in point
3.1 and reposi tion the two outer blade guides in slight
contact with the blade, turn ing the head of the screws S
in a clockwise direction;
- lock the two exagonal nuts R again;
- replace the protective casing, being careful to insert the
blade between the straps of the protection T;
- reposition the blade guides P in the correct position for
the next cut.
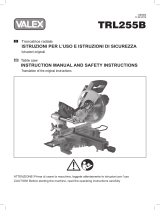
4.4 CUTTING CAPACITY (Fig. 10)
The table below specifi es the cutting capacity at 0 and 45
degrees which may be obtained in normal conditions of use
described in this manual and without placing any other object
between the jaws of the clamp.
pressure on the blade, and gradually increasing pressure
in subsequent cuts. To gauge the correct pressure in normal
operating conditions defi ned by this manual (see cutting
table), consider for example that the fi rst cut on solid steel
(eg. C40) D.50 mm should be done in about 4 minutes.
After running-in, the same piece may easily be cut in about
2 minutes. If the running-in process is done correctly, the
fi nish and precision of the cut will be of better quality and
the blade will last longer.
4.2 WORKING (Fig. 7)
Two speed version
Push the green button “1” of the main switch D to anable
machine oper ation.
Electronic version
Turn the main switch D to position 1: in doing the switch
comes on and machine is ready for operation.
ATTENTION: Before starting any cutting
operation, check that all the protections are
complete and in the correct position.
Once you have completed all the procedures and operations
described so far, you may start the working processes.
To perform the cut, move to the front of the machine and grip
the hand grip with your right hand.
ATTENTION: Keep your left hand away from the
cutting area and on no account try to reach it
when cutting is in process.
Using the index fi nger of your right hand, press the run button
A (Fig. 4) and gradually lower the machine body until it comes
lightly into contact with the part to be cut.
Now begin to apply gradual pressure on the part and
complete the cut.
ATTENTION: Always release button A between
one cutting operation and another, while you are
positioning the part. do not try to block it or alter
its functional characteristics in any way.
Electronic version
If the machine suddenly stops after numerous consecutive
cuts, do not be alarmed.
The heat protector device of the motor has been activated,
breaking the power supply when the temperature of the coils
reaches the threshold limit defi ned by the insulation class,
to prevent damage to the motor.
In this case, release the button A and wait for automatic reset
which usually takes place after a few minutes.
Your sawing machine is equipped with an electronic speed
governor which also includes a motor protection function
obtained by means of an amperometric limiter. In this way can
not absorb an amount of current greater than the set one,
expressed by the maximum value of absorption (see 2.5).
If the limiter trips while the machine is in operation, slightly
decrease the cutting pressure in addition, this enables
to safeguard the blade life and performance and to obtain
always a sharp and clean cut.
4.3 REPLACING THE BLADE (Fig. 9)
CAUTION: When you perform this operation,
always wear protective gloves to avoid contact
with the teeth of the blade.
- check that the main switch D is at position 0;
0°
45°
105
102x102
105x93
72
68x68
70x60
SECTION ANGLE
CUTTING
CAPACITY (mm)
780 XL
782 XL
783 XL
105
95x95
100x86
65
65x65
65x60

EN
11
ATTENTION: Never hold the pieces to be cut in
your hand.
When the pieces to be cut are profi led sections, fl at pieces
or special shapes, refer to the examples shown in the
fi gures.
If the thickness of the profi led section is to be very thin,
an outline should be fi tted which copies the profi le inside
the profi led section itself to stop it being crushed between
the jaws.
4.6 CUTTING TABLE
Two speed version
MATERIAL: ............M42 (acciaio per molle + acciaio HSS)
EXTENSION : .......................................................mm 1330
HEIGHT: ....................................................................mm 13
THICKNESS:..........................................................mm 0,65
TOOTHING: ...................................................standard 8/12
....................................................................optional 6-14-18
6 MAINTENANCE
6.1 REGULAR MAINTENANCE
The operations of ordinary maintenance, which may also be
performed by non-specialist personnel, are all described in
the previous sections and here below.
1. Before performing any maintenance operation, disconnect
the machine electric plug from the wall outlet.
2. During maintenance operations, always wear personal
protection (safety goggles and gloves).
3. Remove the processing residues from the cutting
area and the blade guides whenever necessary.
You are advised to use a suction device or a brush.
ATTENTION: Do not use jets of compressed air.
4. If you do not intend to use the sawing machine for a
long time, clean it and put it in a dry place if possible.
In these cases it is advisable to slacken off the blade so
that it is not kept tight for no reason.
6.2 ASSISTENCE
Should it be necessary to call qualified personnel for
operations of extraordinary maintenance, or in the case of
repairs, under guarantee or at a later date, you should always
contact an authorized service centre or the factory directly, if
there is no service centre in your area.
6.3 DISPOSAL OF THE MACHINE AND ACKAGING
INFORMATION FOR USERS
In accordance with art. 13 of Legislative Decree
25th July 2005, no. 151 “Implementation
of Directives 2002/95/EEC, 2002/96/EEC
and 2003/108/EEC, relative to reducing the
use of hazardous substances in electrical and electronic
appliances and the disposal of waste”, please take note of
the following:
• The crossed out wheelie bin symbol found on the
appliance or on the packaging, indicates that the product
must be disposed of separately from ordinary household
waste when it reaches the end of its working life.
• The user must consign the unwanted appliance to
an authorized differentiated waste disposal centre for
electrical and electronic goods, or alternatively, hand it
over to the relative dealer on purchasing a new appliance
of the same type on the basis of a one to one ratio.
4.5 CORRECT POSITIONING OF THE PIECE IN THE
CLAMP
The pieces to be cut should be fi tted directly between the
jaws without adding other objects.
5 ACCESSORIES
5.1 CHOISE OF BLADE
Your sawing machine is equipped with a bi-metal blade
measuring 1330x13x0.65 mm with variable toothing, for use
in the majority of cuts possible with this machine.
For special requirements (see cutting table point 4.6), for
example, for cutting large solid sections or profi led sections
or corner pieces of small thickness, there are also blades
avail-able with 6, 14 or 18 teeth per inch.
Electronic version

EN
12
Defective motor, power cable or
plug.
Blown electric panel fuses.
No voltage in the mains system.
The overload cutout has tripped.
Motor overheating.
Motor overload caused by excessive
cutting pressure.
Motor breakdown.
The setting of the H and K retainers
(point 3.3) is inaccurate.
Excessive cutting pressure (on
pipes and sec tion bars).
Incorrect blade toothing in relation
to the piece to cut.
Incorrect adjustment of the eccentric
and slid ing blade-guides
Incorrect cutting speed in relation to
the piece to cut.
The piece is wrongly positioned
in the vice.
Poor blade tension.
The blade is worn or its toothing
is not right for the thickness of the
piece being cut.
Excessive cutting pressure.
Incorrect eccentric blade-guide
adjustment.
Excessive wear of the pulley rubber
linings.
The blade slips on the pulleys,
caused by oil or grease required
for cutting operations.Check blade
tension (point 3.1).
The motor does not
work.
Overload cutout
tripped.
Inaccurate cutting
angle at 90° - 45°.
Inaccurate
cut squaring.
Cut fi nish is coarse
or corrugated
The blade tends to
protrude from the
guides.
Specialized personnel should check the machine; do not
attempt to repair the motor by yourself.
Check fuse integrity and replace, if necessary.
Check for voltage in the mains system.
Release the run button and wait a few minutes for the
overload cutout to reset.
Check that motor air intakes are clear.
Perform the cut on the piece at the correct pres sure
Specialized personnel should check the machine; do not
attempt to repair the machine by yourself.
Set the retainers by unloosening the fastening screws and
re-positioning them.
Decrease cutting pressure.
Check the cutting parameters (blade toothing, cutting
speed) in the cuts table (point 4.6).
Check blade-guide adjustment (points 3.5 and 3.6).
Check piece positioning and clamping in the vice (point
4.5).
Check blade tension (point 3.1).
Check the cutting parameters (blade toothing, cutting
speed) in the cuts table (point 4.6).
Decrease cutting pressure.
Check eccentric blade-guide adjustment (point 3.6).
Specialized personnel should check the pulleys and
replace them if necessary.
Never use any type of lubricant or coolant for the cutting
operations; specialized personnel should check and, if
necessary, replace the pul leys.
PROBLEMS PROBLEMS CAUSES SOLUTIONS SUGGESTED
• Differentiated disposal, to enable possible recycling or
environmentally compatible elimination of the appliance,
helps to limit undesirable effects on health and the
environment and promotes the reuse and/or recycling of
the materials which went into making up the appliance.
ATTENTION: Sanctions, in accordance with the
relative legislation in force in the country of use,
will be imposed on the user if the appliance is
disposed of illegally. to you.to you.
7 TROUBLESHOOTING

DICHIARAZIONE DI CONFORMITÁ CE
DEL COSTRUTTORE FEMI S.p.A.
Via Salieri, 33-35 - 40024 Castel San Pietro Terme (BO) - ITALY
Tel. +39-051-941866 - Fax +39-051-6951332
E-Mail: [email protected] - http://www.femi.it
Dichiara che la: SEGATRICE A NASTRO
780XL-782XL-783XL
è conforme alle disposizioni contenute nelle Direttive:
2006/42/CE - 2004/108/CE - 2006/95/CE
COMPLIANCE DECLARATION CE
OF THE BUILDER FEMI S.p.A.
Via Salieri, 33-35 - 40024 Castel San Pietro Terme (BO) - ITALY
Tel. +39-051-941866 - Fax +39-051-6951332
E-Mail: [email protected] - http://www.femi.it
Declare the: BAND-SAW MACHINE
780XL-782XL-783XLL
is in compliance with the rules contents in the Directives:
EC/2006/42 - EC/2004/108 - EC/2006/95
CE KONFORMITATS ERKLARUNG
DES HERSTELLER FEMI S.p.A.
Via Salieri, 33-35 - 40024 Castel San Pietro Terme (BO) - ITALY
Tel. +39-051-941866 - Fax +39-051-6951332
E-Mail: [email protected] - http://www.femi.it
Erklart dass: BANDSÄGEMASCHINE
780XL-782XL-783XL
ist konform mit der Direktiven:
2006/42/EG - 2004/108/EG - 2006/95/EG
DECLARATION DE CONFORMITE CE
DU CONSTRUCTEUR FEMI S.p.A.
Via Salieri, 33-35 - 40024 Castel San Pietro Terme (BO) - ITALY
Tel. +39-051-941866 - Fax +39-051-6951332
E-Mail: [email protected] - http://www.femi.it
Declare que la: SCIE A RUBAN
780XL-782XL-783XL
est conforme aux disposition contenues dans les Directives: CEE
2006/42/CE - 2004/108/CE - 2006/95/CE
DECLARATION DE CONFORMIDAD CE
DEL CONSTRUCTOR FEMI S.p.A.
Via Salieri, 33-35 - 40024 Castel San Pietro Terme (BO) - ITALY
Tel. +39-051-941866 - Fax +39-051-6951332
E-Mail: [email protected] - http://www.femi.it
Declara que la: SIERRA DE CINTA
780XL-782XL-783XL
esta conforme a las disposiciones contenide en la Directivas:
2006/42/CE - 2004/108/CE - 2006/95/CE
DECLARAÇÃO DE CONFORMIDADE CE
DO CONSTRUTTORE FEMI S.p.A.
Via Salieri, 33-35 - 40024 Castel San Pietro Terme (BO) - ITALY
Tel. +39-051-941866 - Fax +39-051-6951332
E-Mail: [email protected] - http://www.femi.it
Declara que a: SERRA DE FITA
780XL-782XL-783XL
suivindo as regras exigidas no contendo da Directivas:
2006/42/CE - 2004/108/CE - 2006/95/CE
INGOMBRO PER ETICHETTA
07/04/2010
Persona autorizzata a costituire il fascicolo tecnico
Person authorized to create the technical fi le
Zur Ausarbeitung der technischen Dokumentation bevollmächtigte Person
Personne autorisée à établir le dossier technique
Persona autorizada a crear el documento técnico
Pessoa atorizada a constituir o fascículo técnico
MAURIZIO CASANOVA

6.90.14.64
40024 CASTEL SAN PIETRO TERME (BO) ITALY
Via Salieri, 33-35
Tel. +39-051/941866 Fax +39-051/6951332
E-Mail: [email protected]
www.femi.it
/