Page is loading ...

Ready. Set. Go.
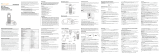
Vonage Box
TM
Quick Start Guide

FROM US:
Start here.
Things you will need:
Congratulations and welcome to Vonage! Now that you have your Vonage Box
TM
, it’s time to
enjoy exceptional home phone service, including a wide range of helpful calling features.
Just follow these step-by-step instructions to get going and start dialing.
YOUR OWN:
Vonage Box
TM
Vonage Blue Ethernet Cable Vonage Power Supply
Broadband Internet connection
Ethernet cable
(required only if you are connecting to a computer)
Phone cord
Phone

Get Ready.
Did you purchase your Vonage Box
TM
at a retail store?
Did you purchase your Vonage Box
TM
online or over the phone?
Choose Your Instructions:
You will need to activate your phone service before continuing. Go to
http://www.vonage.com/activate and follow the easy steps. Then, return to
this Quick Start Guide and continue with the instructions.
If you purchased your Vonage Box
TM
online or over the phone, it’s already
activated. Please choose your instructions below based on your home computer
setup and then proceed to the next page.
If you have a router that connects multiple computers
or other devices.
If you have a DSL or cable modem that connects to a single
computer without a router.
A
B
FOLLOW
FOLLOW
2

3
Set.
Using the Vonage Box
TM
with your router:
1
RouterAC Outlet
Unplug your router.

RESET
Power Internet Ethernet Phone
1
Phone
2
Vonage Blue
Ethernet Cable
4
A
2
Router
Connect the supplied blue Ethernet cable to the blue port on the
Vonage Box
TM
and connect the other end to an open Ethernet (LAN)
port on your router. Listen for the click to ensure that the cable is rmly
in place. If you do not have an available Ethernet port on your router, go to
Step 3, otherwise you may proceed to Step 4.

RESET
Vonage Blue
Ethernet Cable
Your
Ethernet Cable
Power Internet Ethernet Phone
1
Phone
2
5
3
Router Computer
A
If you do not have an available Ethernet port on your router, remove your
computer’s Ethernet cable from your router’s Ethernet port, and connect
it to the yellow port on the back of the Vonage Box
TM
. Then connect the
supplied blue Ethernet cable to the blue port on the Vonage Box
TM
and
connect the other end to the open Ethernet port on your router. Listen
for the click to ensure that the cable is rmly in place. After you have powered
up the Vonage Box in Step 5, your computer light will turn on.
Continued

6
4
RouterAC Outlet
Plug your router’s power cord into the AC outlet.
Wait about two minutes for your router to complete its power-up sequence.
(Use of a surge protector is recommended.)

RESET
Power Internet Ethernet Phone
1
Phone
2
Vonage Blue
Ethernet Cable
Vonage
Power Supply
7
5
RouterAC Outlet
Connect the Vonage Power Supply to the orange Power port on the
Vonage Box
TM
and plug the other end into an AC outlet.
The Power light should come on. Wait a few minutes for the Internet and
Phone 1 lights to turn on. If the Phone 1 light blinks slowly, you have a new
voicemail waiting.
A
Continued
For more help in understanding the blue LED light
sequence that will appear on top of your Vonage
Box
TM
at this point, see page 15.

RESET
Vonage Blue
Ethernet Cable
Vonage
Power Supply
Your
Phone Cord
Power Internet Ethernet Phone
1
Phone
2
8
6
RouterAC Outlet Phone
Connect your phone cord to the green port (Phone 1) on the back of
the Vonage Box
TM
and connect the other end to your phone. Listen for
the click to ensure it is rmly in place, and pick up your phone to check for a
dial tone. You are now set to place a call.
For more help in understanding the blue LED light
sequence that will appear on top of your Vonage
Box
TM
at this point, see page 15.

9
1
ComputerAC Outlet Modem
Set.
Unplug your modem’s cord from the AC outlet and turn off your computer.
Using the Vonage Box
TM
with your DSL or cable modem:

RESETRESET
Power Internet Ethernet Phone
1
Phone
2
Your
Ethernet Cable
10
2
ComputerModem
B
Unplug your Ethernet cable from your modem and connect it to the
yellow port on the Vonage Box
TM
. Listen for the click to ensure that the cable
is rmly in place. Leave the other end connected to your computer.

RESET
Power Internet Ethernet Phone
1
Phone
2
Vonage Blue
Ethernet Cable
Your
Ethernet Cable
11
3
Modem Computer
B
Continued
Connect one end of the blue Ethernet cable to the Ethernet (LAN) port
on your modem and connect the other end to the blue port on the
Vonage Box
TM
. Listen for the click to ensure that the cable is rmly in place.

12
4
AC Outlet Modem
Plug in your modem’s power cord into the AC outlet. Wait about two
minutes for your modem to complete its power-up sequence. (Use of a surge
protector is recommended.)

RESET
Power Internet Ethernet Phone
1
Phone
2
Vonage
Power Supply
Vonage Blue
Ethernet Cable
Your
Ethernet Cable
13
5
Modem ComputerAC Outlet
B
Continued
For more help in understanding the blue LED light
sequence that will appear on top of your Vonage
Box
TM
at this point, see page 15.
Connect the Vonage Power Supply to the orange Power port on the
Vonage Box
TM
and plug the other end into a power source. (Use of a
surge protector is recommended.) The Power light should come on. Wait a
few minutes for the Internet and Phone 1 lights to turn on.
If the Phone 1 light blinks slowly, you have a new voicemail waiting.

RESET
Power Internet Ethernet Phone
1
Phone
2
Vonage
Power Supply
Vonage Blue
Ethernet Cable
Your
Ethernet Cable
Your
Phone Cord
14
6
Modem ComputerAC Outlet Phone
For more help in understanding the blue LED light
sequence that will appear on top of your Vonage
Box
TM
at this point, see page 15.
Connect your phone cord to the green port (Phone 1) on the Vonage
Box
TM
and connect the other end to your phone. Listen for the click to
ensure that the cord is rmly in place. Check for a dial tone.
Turn your computer on and wait for it to complete the power-up
sequence.
The Computer light on the Vonage Box
TM
will turn on.

15
Go.
Understanding the blue LED lights on your Vonage Box
TM
:
POWER INTERNET ETHERNET PHONE LINES 1-2
Pick up
your
phone.
Listen for
a dial
tone.
A solid blue light indicates
the unit is powered on.
A solid blue light indicates
the unit is connected to the
Internet.
If it’s off, your Internet cable
may not be securely connected
or your modem/router may be
turned off.
If it’s blinking, you may
have a problem with your
Internet connection.
A solid blue light indicates
that a device such as a
computer or another router
is connected to the unit’s
Ethernet (LAN) port.
A solid blue light indicates you
can place and receive calls.
If it’s blinking slowly, you have
a voicemail message waiting
for you.
If it’s off, the unit is unable
to register with the Vonage
Network.
If it’s blinking quickly, you
may have a problem with your
phone or home phone wiring.

Place a call.
Interested in extending your home phone
calling plan rates to a mobile phone?
Find out more about Vonage
®
Extensions
®
at www.vonage.com.
Need help?
visit http://www.vonage.com/gettingstarted
for installation videos, guides and other online support.
call us at 866.243.4357 (1-VONAGEHELP)
©2014 Vonage Inc.
Follow us @vonage facebook.com/vonage
/