Page is loading ...

2
IMPORTANT NOTE
Important notes for users in the U.K.
Mains plug
This apparatus is fitted with an approved 13 Amp plug.
To change a fuse in this type of plug proceed as follows:
1 Remove fuse cover and fuse.
2 Fix new fuse which should be a BS1362 5 Amp, A.S.T.A.
or BSI approved type.
3 Refit the fuse cover.
If the fitted plug is not suitable for your socket outlets, it
should be cut off and an appropriate plug fitted in its
place.
If the mains plug contains a fuse, this should have a value
of 5 Amp. If a plug without a fuse is used, the fuse at the
distribution board should not be greater than 5 Amp.
Note: The severed plug must be disposed of to avoid a
possible shock hazard should it be inserted into a 13 Amp
socket elsewhere.
How to connect a plug
The wires in the mains lead are coloured with the
following code: blue = neutral (N),
brown = live (L).
¶ As these colours may not correspond with the colour
markings identifying the terminals in your plug, proceed
as follows:
–Connect the blue wire to the terminal marked N or
coloured black.
–Connect the brown wire to the terminal
marked L or coloured red.
–Do not connect either wire to the earth terminal in the
plug, marked E (or e) or coloured green (or green and
yellow).
Before replacing the plug cover, make certain that the
cord grip is clamped over the sheath of the lead - not
simply over the two wires.
Copyright in the U.K.
Recording and playback of material may require consent.
See Copyright Act 1956 and The Performer’s Protection
Acts 1958 to 1972.
Important Note
Norge
Typeskilt finnes på apparatens underside.
Observer: Nettbryteren er sekundert innkoplet.
Den innebygde netdelen er derfor ikke frakoplet
nettet så lenge apparatet er tilsluttet
nettkontakten.
For å redusere faren for brann eller elektrisk støt, skal
apparatet ikke utsettes for regn eller fuktighet.
Italia
DICHIARAZIONE DI CONFORMITA’
Si dichiara che l’apparecchio MX-1050D, MX-1060D
Philips risponde alle prescrizioni dell’art. 2 comma 1 del
D.M. 28 Agosto 1995 n. 548.
Fatto a Eindhoven
Philips Consumer Electronics
Philips, Glaslaan 2
5616 JB Eindhoven, The Netherlands

3
English
Deutsch Español
Nederlands
Italiano
Français
∂ÏÏËÓÈο Português Suomi Dansk Svenska
Polski
Index
INDEX
English -------------------------------------------------------- 5
Français ------------------------------------------------------30
Español ------------------------------------------------------ 56
Deutsch ----------------------------------------------------- 82
Nederlands ----------------------------------------------- 108
Italiano ----------------------------------------------------- 134
Svenska ---------------------------------------------------- 160
Dansk ------------------------------------------------------ 186
Suomi ------------------------------------------------------ 212
Português ------------------------------------------------- 238
∂ÏÏËÓÈο -------------------------------------------------- 264
Polski------------------------------------------------------- 290

4
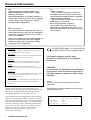
General Information
The DVD VIDEO player is in conformity with
the EMC directive and low-voltage directive.
CAUTION
VISIBLE AND INVISIBLE LASER RADIATION WHEN
OPEN AVOID EXPOSURE TO BEAM
ADVARSEL
SYNLIG OG USYNLIG LASERSTRÅLING VED ÅBNING
UNDGÅ UDSÆTTELSE FOR STRÅLING
VARNING
SYNLIG OCH OSYNLIG LASERSTRÅLNING NÄR
DENNA DEL ÄR ÖPPNAD BETRAKTA EJ STRÅLEN
VARO!
AVATTAESSA OLET ALTTIINA NÄKYVÄLLE JA
NÄKYMÄTTÖMÄLLE LASER SÄTEILYLLE. ÄLÄ KATSO
SÄTEESEEN
VORSICHT
SICHTBARE UND UNSICHTBARE LASERSTRAHLUNG
WENN ABDECKUNG GEÖFFNET NICHT DEM
STRAHL AUSSETSEN
ATTENTION
RAYONNEMENT LASER VISIBLE ET INVISIBLE EN CAS
D’OUVERTURE EXPOSITION DANGEREUSE AU
FAISCEAU
GENERAL INFORMATION
This product complies with the radio
interference requirements of the European
Community.
CAUTION
Use of controls or adjustments or performance
of procedures other than herein may result in
hazardous radiation exposure or other unsafe
operation.
NOTE:
PICTURES SHOWN MAY BE DIFFERENT BETWEEN
COUNTRIES.
NEVER MAKE OR CHANGE CONNECTIONS WITH THE
POWER SWITCHED ON.
DK
Advarsel: Usynlig laserstråling ved åbning når
sikkerhedsafbrydere er ude af funktion. Undgå
utsættelse for stråling.
Bemærk: Netafbryderen er sekundært indkoblet og
ofbryder ikke strømmen fra nettet. Den indbyggede
netdel er derfor tilsluttet til lysnettet så længe
netstikket sidder i stikkontakten.
S
Klass 1 laseraparat
Varning! Om apparaten används på annat sätt än i
denna bruksanvisning specificerats, kan användaren
utsättas för osynlig laserstrålning, som överskrider
gränsen för laserklass 1.
Observera! Stömbrytaren är sekundärt kopplad och
bryter inte strömmen från nätet. Den inbyggda
nätdelen är därför ansluten till elnätet så länge
stickproppen sitter i vägguttaget.
SF
Luokan 1 laserlaite
Varoitus! Laitteen käyttäminen muulla kuin
tässä käyttöohjeessa mainitulla tavalla saattaa
altistaa käyttäjän turvallisuusluokan 1 ylittävälle
näkymättömälle lasersäteilylle.
Oikeus muutoksiin varataan. Laite ei saa olla
alttiina tippu-ja roiskevedelle.
Huom. Toiminnanvalitsin on kytketty
toisiopuolelle, eikä se kytke laitetta irti
sähköverkosta. Sisäänrakennettu verkko-osa on
kytkettynä sähköverkkoon aina silloin, kun pistoke
on pistorasiassa.
Manufactured under license from Dolby Laboratories.
“Dolby” and the double-D symbol are trademarks of Dolby
Laboratories. Confidential Unpublished Works. ©1992-
1997 Dolby Laboratories, Inc. All rights reserved.
This product incorporates copyright protection technology
that is protected by method claims of certain U.S. patents
and other intellectual property rights owned by Macrovision
Corporation and other rights owners. Use of this copyright
protection technology must be authorised by Macrovision
Corporation, and is intended for home and other limited
viewing uses only unless otherwise authorised by
Macrovision Corporation. Reverse engineering or
disassembly is prohibited.
Laser
Type Semiconductor laser GaAIAs
Wave length 650nm
Output Power 7mW
Beam divergence 60 degree

5
English
Contents
Introduction
Package contents .......................................................6
DVD discs ................................................................... 6
Player Zones ...............................................................6
General Information .................................................6
Environmental Information......................................6
Installation ...................................................................6
Cleaning Discs ............................................................ 6
Functional Overview
Front Panel ..................................................................7
Remote Control ........................................................8
Connections
Rear Panel ............................................................ 9–10
Analogue Audio Connections .............................. 10
Video Connections ................................................ 11
Digital/Optical Audio Connections .................... 11
System Setup
Setting up the Digital Cinema system ................ 12
Speakers Placement ............................................... 12
Speakers Setup ................................................. 12–13
Subwoofer Setup .................................................... 13
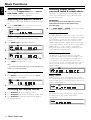
Basic Functions
Selecting the source ............................................... 14
Adjusting the master volume ............................... 14
Adjusting the tone .................................................. 14
Muting the sound .................................................... 14
Dimming the display screen ................................. 14
Selecting output modes - surround
sound & sound effects .................................... 14–15
Tuner
Manual tuning .......................................................... 16
Automatic tuning .................................................... 16
Tuning to a weak FM station ................................ 16
Preset Radio Stations............................................. 16
RDS ..................................................................... 16–17
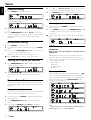
Clock/Timer
Setting the Clock .................................................... 18
Setting the On/Off Timer...................................... 18
Activating/Deactivating On/Off Timer ............... 18
Setting the Sleep Timer ......................................... 18
DVD/CD Operation
Loading Discs .......................................................... 19
When the DVD is playing ..................................... 19
Active Navigation Menu (DVD) ................... 19–20
Playing a music CD ................................................. 20
When the music CD is playing ............................ 20
Active Navigation Menu (music CD) ................. 21
On screen messages .............................................. 22
Disc Setup Menu
Language ............................................................... 23
Subtitle .................................................................. 23
TV Aspect............................................................. 24
Audio Set ...................................................... 24–25
Digital Out ........................................................... 26
Parental Control ................................................. 26
Panel Keys Lock .................................................. 27
On Screen ............................................................ 27
Programme-music CD........................................... 28
Index (DVD) ............................................................ 28
Specifications ............................................ 29
CONTENTS

6
English
Introduction
INTRODUCTION
Package contents
This DVD/CD player-AV Surround Receiver is
supplied with the following items :
– a remote control with two AAA batteries
– an AM loop antenna and an FM wire antenna
– an audio and video cable for connection with
your TV
– a scart cable
– five speakers and including five speaker cables
– an active subwoofer, including a connection cable
and a power cable
– this instruction booklet
If any item is damaged or missing, contact your retailer or
Philips.
DVD discs
Your Philips DVD Receiver player will play digital video discs
conforming to the universal DVD Video standard. In
addition to DVD Video discs, you will be able to play audio
CDs.
DVD Video discs have “Titles” and “Chapters”. There can
be several Titles on one disc and each Title can contain
several Chapters. Titles and Chapters are numbered (e.g.
Title 1, Title 2, etc., and Chapter 1, 2, 3, etc.).
Usually one Title will show the disc publisher and studio
logos. Under another Title is the featue film itself. Other
Titles can contain trailers for other films also available, or
introduction notes from the film, or alternative endings for
the film. There are many possibilities with Digital Versatile
Discs.
Chapters within the main Title allow you to search quickly
for a specific point on the disc. Many discs have a “Chapter
Menu”, sometimes called “Scene Index” or “Scene Menu”,
that displays the first shot from each Chapter and allows
you to select a shot and play the disc from that point
onwards. DVD discs can be PAL or NTSC. This player can
play both types (as long as the zone is correct formatted).
DVD discs allow up to eight languages and 32 subtitles on a
single disc. You can select and change the language and
subtitle to suit yourself. You can play the whole disc or just
part of it and view it from different angles. However,
availability of these features varies among discs. Check the
disc menu or outer case to see if such features (for
example, subtitles, angles) are available on the disc.
Player Zones
There are six world zones for the distribution of DVD
Discs. The zone your player is intended for is indicated on
the “Zone Label”. This should be the same as the label on
discs available in your region. If you have any difficulty
playing a disc, make sure the disc is the same zone as your
player.
1
Region 1
2
Region 2
3
Region 3
4
Region 4
5
Region 5
6
Region 6
General Information
Anti-copy disc protection
Some DVD discs have anti-copying devices. When playing
these discs through a television will give the highest quality
picture. However, you will not be able to record the disc
through a VCR.
Environmental Information
All unnecessary packaging has been omitted. We have tried
to make the packaging easy to separate into three materials:
cardboard (box), polystyrene foam (buffer) and
polyethylene (bags, protective foam sheet).
Your system consists of materials which can be recycled
and reused if disassembled by a specialised company. Please
observe the local regulations regarding the disposal of
packaging materials, exhausted batteries and old equipment.
Installation
● Place the player on a flat, hard and stable surface.
● There must be sufficient room in front of the player for the
drawer to open.
● In a cabinet, allow about 10cm (4 inch) of free space all
around the player for adequate ventilation.
● Do not expose your player to extreme temperatures or
humidity.
Cleaning Discs
● When a disc becomes dirty, clean it with a cleaning cloth.
Wipe the disc from the centre out, in a straight line.
● Do not use solvents such as benzene, thinner, commercially
available cleaners, or anti-static spray intended for analogue
discs.

7
English
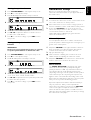
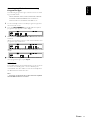
Functional Overview
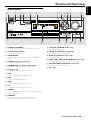
Front Panel
DVD /CD PL AYER
-
DIGITAL AV SURROUND RECEIVER
POWER/STANDBY
PRESETS FREQUENCY
▲
SURR. MODE
FREQUENCY
▲
SOURCE SELECT
CDR
VCR
TUNER
TV
PAUSE
OPEN
/
CLOSE
STOP
NEXT
PLAY
PREV
VOLUME
DIGITAL CINEMA CENTER
1
3
4
5
6
7
8
9
0
! @
#$%
^
*
&
2
DVD
1 POWER / STANDBY y
– to switch between Power On and Standby modes.
2 Standby LED indicator
– to indicate Standby mode.
3 SURR. MODE
– to select various surround modes or soundfield
modes.
4 PRESETS (Tuner mode only)
– to select preset function.
5 FREQUENCY 4 3 (Tuner mode only)
– to tune the radio frequency down or up.
6 Display screen
– to display details for user’s information.
7 VCR
– to select the VCR as the input source.
8 DVD
– to select the DVD/CD mode.
9 CDR
– to select the CDR as the input source.
0 TV
– to select the TV as the input source.
! TUNER
– to select the Tuner mode. It can also switch between
MW and FM band.
@ VOLUME
– to adjust the master volume. Turn clockwise to
increase and anti-clockwise to decrease.
# STOP Ç (DVD/CD mode only)
– to stop playing the disc.
$ PAUSE Å (DVD/CD mode only)
– to freeze the picture and sound.
% PLAY £ (DVD/CD mode only)
– to play the disc.
^ PREV S / NEXT T (DVD/CD mode only)
– to skip to the previous or next chapter/track.
& OPEN/CLOSE 0 (DVD/CD mode only)
– to open or close the disc tray.
* Disc Tray
FUNCTIONAL OVERVIEW

8
English
FUNCTIONAL OVERVIEW
9
!
0
@
#
9
8
7
6
5
4
3
2
1
§
0
^
%
$
&
*
(
)
¡
™
£
≤
∞
MUTE
DISPLAY OPEN/CLOSE
123
456
789
0
SLEEPTITLE
MENU
SYSTEM DISC EXIT
TONE MODE
MENU
VOL
FM MODE SEARCH DISPLAY
RDS RDS
VCR
TV
CDR
TUNER
DVD
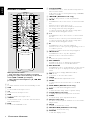
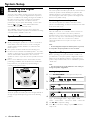
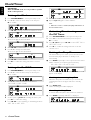
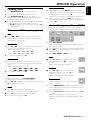
Remote Control
Notes for remote control:
– First, select the source you wish to control by
pressing one of the source select keys on the remote
control (DVD or TUNER, for example).
– Then select the desired function (
É
,
Q
,
R
for example).
1 y
– to switch between Power On and Standby modes.
2 VCR
– to select VCR as the input source.
3 TV
– to select TV as the input source.
4 CDR
– to select CDR as the input source.
5 TUNER
– to select Tuner mode. It can also switch between
MW and FM band.
6 DVD
– to select the DVD/CD mode.
7 SYSTEM MENU
– in DVD/CD mode, to enter the Disc Setup Menu or
Disc Contents Menu.
– in all other modes, to enter System Setup : SPEAKER,
CLOCK or TIMER.
8 S / T (DVD/CD mode only)
– to skip to the previous or next chapter/track.
9 à / á
– in DVD/CD mode, to fast reverse or fast forward the
disc.
– in Tuner mode, to tune down or up.
– in Tone mode, to adjust the treble/bass tone level.
– use during menu and setup navigation.
– to select movement direction in Disc Setup /Disc
Contents /Active Navigation menus.
0 ( / )
– in DVD/CD mode, to slow reverse or slow forward
the disc.
– in Tuner mode, to select a preset channel number.
– to select movement direction in Disc Setup /Disc
Contents /Active Navigation menus.
! £
– in DVD/CD mode, to start disc playback.
– in Tuner mode, to enter preset programming mode or
to confirm a preset.
– to enter or confirm menu and setup navigation.
@ Ç FM Mode
– in DVD/CD mode, to stop disc playback.
– in Tuner mode, to select Mono/Stereo.
# Å
– to freeze the picture and sound.
$ RDS SEARCH
– in DVD mode, press to display the Index Menu.
– in Tuner mode, press to search RDS station.
% RDS DISPLAY
– in DVD/CD mode, to set the limits for section repeat.
– in CD mode, press to display the CD Programme
Menu.
– in Tuner mode, to display RDS information.
^ VOL +/-
– to increase or decrease the volume.
& TONE
– to select Bass/Treble adjustment mode.
* MODE
– to select various surround modes or soundfield
modes.
( DISC MENU (DVD/CD mode only)
– to enter or exit Active Navigation Menu.
) EXIT
– to leave the Disc Setup Menu or System Setup.
¡ TITLE (DVD mode only)
– to display the Title Menu if present on the disc.
™ SLEEP
– to set the sleep (auto-off) timer function.
£ Numeric Keys (0-9)
– for direct access of preset channels or for use in Disc
Player menus.
≤ MUTE
– to mute or unmute the sound.
∞ OPEN/CLOSE (DVD/CD mode only)
– to open or close the disc tray.
§ DISPLAY
– to dim the display screen.

9
English
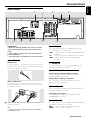
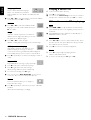
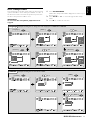
Rear Panel
1
0
2
3
4
5
9 8
6
7
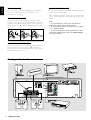
IMPORTANT!
– Before connecting the AC power cord to the wall
outlet, ensure that all other connections have been
made.
– Never make or change any connections with the
power switched on.
– The type plate is located at the rear of the system.
1 ANTENNA
FM Antenna
For FM reception, connect the FM antenna to the FM
terminal. Move the antenna in various directions until
the clearest signal is received.
AM Loop Antenna
For AM reception, connect the AM loop antenna to
the AM terminal. Position the loop antenna to receive
the clearest sound.
1
2
● Fully insert the stripped portion of the antenna into the
terminals as shown.
Note:
– Position the antenna as far as possible from a TV, VCR or
other radiation source.
2 AUDIO IN
For connecting analogue (Left/Right) audio signals
from external sources to the unit.
VCR – connect to Video Cassette Recorder AUDIO OUT
terminal
TV – connect to Television AUDIO OUT terminal
CDR – connect to CD Recorder AUDIO OUT
terminal
3 VIDEO IN
For connecting to the corresponding VIDEO OUT
terminal on a VCR, TV or CDR.
4 DIGITAL OUT (in DVD/CD mode only)
Digital Coaxial Output RCA terminal
For connecting to external equipment that has a
digital COAXIAL IN terminal.
Digital Optical Output terminal
For connecting to external equipment that has a
digital OPTICAL IN terminal.
5 SCART OUT
For connecting to the SCART IN terminal on the TV
using the supplied scart cable.
Audio Out on/off switch
For switching on or off the audio signal from the AV
CONNECTOR to your TV.
6 VIDEO OUT
For connecting to external equipment with VIDEO IN
terminals for viewing or recording.
REC – connect to VCR or other recording device
MON– connect to TV or Monitor
Connections
CONNECTIONS

10
English
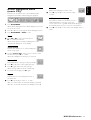
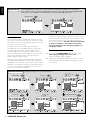
7 AUDIO OUT
For connecting analogue (Left/Right) audio signals to
external recording devices such as VCR or Tape
Recorder for recording.
8 FRONT SPEAKERS
Connect the left front speaker to the “L” terminals,
the right front speaker to the “R” terminals and centre
speaker to the “C” terminals. Connect the coloured
(marked) wire to "+" and the black (unmarked) wire
to "-".
12 mm
abc
9 SURROUND SPEAKERS
Connect the left surround speaker to “SL” terminals
and the right surround speaker to “SR” terminals.
Connect the coloured (marked) wire to "+" and the
black (unmarked) wire to "-".
0 SUBWOOFER OUT
Connect this terminal to the AUDIO INPUT terminal
of the powered subwoofer.
After completing all the connections, connect the AC
power cord of the player and subwoofer to the wall
outlet.
Notes:
– To prevent damage to circuits, never short-circuit the
positive and negative speaker output terminals.
– Do not connect more than one speaker to any one pair of
+/- speaker terminals.
– Do not connect speakers with an impedance lower than
the speakers supplied. Please refer to the SPECIFICATIONS
section of this manual.
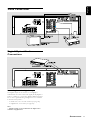
Analogue Audio Connections
CONNECTIONS

11
English
Video Connections
Digital/Optical Audio
Connections
CONNECTIONS
Recording from the digital output
The digital output can be used to record digitally a
multichannel surround sound audio signal (Dolby Digital or
DTS) to a CD-R. To convert the digital multichannel signal
into a stereo signal, following settings have to be activated
in the Disc Setup Menu :
– In “Audio Set”, set to 2 audio channel (see page 25)
– In “Digital Out”, set to PCM (see page 26)
Note:
– Digital recording is not possible when the digital source
material is copy-protected.

12
English
System Setup
Setting up the Digital
Cinema system
You must connect all the speakers and set up the system
properly in order to enjoy the Digital Cinema experience
at home. You will have the feeling of being in the middle of
the action, because sound is coming from everywhere
around you. The subwoofer can enhance the bass
performance of your system dramatically. Look for discs
with the marks which indicates the
material is encoded for surround sound.
The availability of the various surround sound modes
depends on the number of speakers used and the incoming
sound information available on the disc.
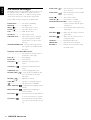
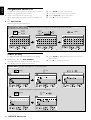
Speakers Placement
General hints for positioning
● Avoid positioning the speakers in a corner or on the floor
as this will boost the bass tones too much. Placing the
speakers behind curtains, furniture, etc., will reduce the
treble response.
● The speakers should be visible from the listening area.
● For the best surround effects, install all speakers. If a centre
speaker or subwoofer is not connected, the sound from the
unused channel will be distributed to the connected
speakers in order to reproduce the best possible surround
sound.
● Each room has different acoustic characteristics and the
positioning possibilities often are limited. You can find the
best position for your speakers by experimenting or
referring to the picture below.
Positioning the front speakers
The front speakers should be placed to the right and left at
an angle of approximately 45 degrees from the listening
position.
Positioning the centre speaker
The centre speaker should be placed in the centre between
both front speakers and should always be placed in line
with the television (e.g. underneath or on top of the TV).
The best height for the centre speaker is the height of the
listener’s ears (while seated).
Positioning the surround speakers
The surround speakers should face each other and be
placed at normal listening ear level or mounted on the wall
at the back of the room.
Positioning the Subwoofer
Place the subwoofer on a solid floor where resonance is
unlikely to occur. The subwoofer can be positioned
anywhere in the room because it is not possible to locate
the source of deep tones. Nevertheless, you should not
place it in the centre of a room, the bass could be
extremely weakened. Do not place an object on the
subwoofer.
Note:
– To avoid magnetic interference with the picture on your TV,
do not position the front speakers too close to the TV.
Speakers Setup
Before operating your system in TV, VCR or CDR mode,
you will need to set up the speaker configuration and the
distance from the listening position to each speaker. For
speaker setup in DVD mode, refer to “DVD/CD operation
- Audio Set”.
Note:
– It is only necessary to set the parameters once unless you
change the speaker configuration.
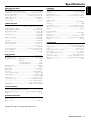
Setting the speaker size
1 Press SYSTEM MENU to enter System Setup mode.
2 Press £ to select Speaker Setup.
3 Press £ to select Speaker Size Setup mode.
4 Use ( / ) to select a different speaker :
“LR“ – front left/right, “LRG“– large, “SML“– small,
“CEN“ – centre, “SUR“ – surround or “SUB“ – subwoofer.
5 Use à / á to adjust the setting.
6 Press £ to save these settings or press EXIT to leave
setup mode.
SYSTEM SETUP

13
English
Setting the speaker distance
1 Press SYSTEM MENU to enter System Setup mode.
2 Press £ to select Speaker Setup.
3 Press ( / ) until Speaker Distance Setup is selected.
4 Press £ to enter Speaker Distance Setup mode.
5 Use ( / ) to select a different speaker.
6 Use à / á to adjust the distance to match as close as
possible to the actual distance.
7 Press £ to save these settings or press EXIT to leave
setup mode.
Setting each speaker’s relative volume
balance
IMPORTANT!
Please sit at your usual listening position to correctly
set up the speaker balance to match each other.
1 Press SYSTEM MENU to enter System Setup mode.
2 Press £ to select Speaker Setup.
3 Use ( / ) until Speaker Level Setup is selected.
4 Press £ to enter Speaker Level Setup mode.
5 Use ( / ) to select a different speaker channel :
“Lch, Cch, Rch, LSUR, RSUR, SUB”.
6 Use à / á to adjust the level of a particular speaker until
it matches the other speakers.
7 Press £ to save these settings or press EXIT to leave
setup mode.
SYSTEM SETUP
Subwoofer Setup
Before you operate the subwoofer, complete the
subwoofer connections. Switch on your player and select
the sound source.
Switch on/off the subwoofer
1 To activate the subwoofer, set the on/off switch at the
rear of the subwoofer to ‘ON’ position.
● If the subwoofer is not to be used for a longer period of
time, it is advisable to set the on/off switch to ‘OFF’ position.
2 Rotate the VOLUME knob at the front panel of
subwoofer until you hear a click, clockwise to switch
on and anti-clockwise to switch off.
➜ The LED indicator will light up in green when the
subwoofer is switched on.
Volume Adjustment
You can adjust the subwoofer to suit the sound level of
your front speakers. Reinforcing the bass sound gives you a
greater sense of atmosphere.
1 Adjust the VOLUME on the player until the sound from
the front speakers is not distorted. If it is distorted, the
sound from the subwoofer also will be distorted.
2 Play your favourite songs.
● Male vocal tunes containing bass sounds are the most
suitable samples for adjusting the subwoofer volume.
3 Adjust the VOLUME on the subwoofer to determine the
loudness of the bass sound from the subwoofer.
Phase Selector
Use PHASE SELECTOR located at the rear of the
subwoofer to select the phase polarity. Selecting the
polarity at either 0˚ or 180˚ may determine better bass
reproduction effect in certain listening environments
(depending on the type of front speakers and the position
of the subwoofer). It also may change the expanse and
tightness of the sound, and affect the feeling of the sound
field. Select the setting that provides the sound you prefer
when you are in your normal listening position.
Repeat the adjustment for Volume and Phase Polarity to
suit your preference. After you have adjusted the
subwoofer to the settings you desire, use the VOLUME
control on the player to adjust the volume of the
subwoofer and the other speakers. You will not need to
adjust the subwoofer settings again, even when you change
the volume level of the player.

14
English
Selecting the source
● Press one of the SOURCE SELECT buttons (VCR, TV,
CDR, TUNER or DVD) to select the input source.
➜ The selected source will be displayed.
Adjusting the master volume
The master volume adjusts all speaker channels at the same
time.
● Rotate the VOLUME knob on the front panel (or press
VOL +/- on the remote control).
Adjusting the tone
The tone controls only affect the front left and right
speakers.
1 Press TONE once to select Bass adjustment.
2 Press TONE again to select Treble adjustment.
● While in Bass or Treble adjustment mode, press à / á to
adjust the selected Bass or Treble level.
3 Press TONE for the third time to exit.
Note:
– If no button is pressed within a few seconds, the player will
exit the tone mode automatically.
Muting the sound
1 Press MUTE to mute the speaker output, the “MUTE”
icon will appear on the display.
2 To restore the volume, press MUTE again.
Dimming the display screen
1 Press DISPLAY will dim the display by a third.
2 Press DISPLAY again will dim the display by another third.
3 Press DISPLAY the third time will return the display to
the original brightness.
BASIC FUNCTIONS
Basic Functions
Selecting output modes -
surround sound & sound effects
The number of output modes varies according to the
system setup and the input source. A list of all output
modes is shown below.
IMPORTANT!
For proper surround sound, make sure you have
followed the Connections and System Setup
procedure fully.
● Press SURR. MODE (or MODE on the remote control)
to select the available output modes.
Dolby Digital Surround
The Dolby Digital Surround system requires connection of
all five speakers (front left, centre, front right, surround right,
surround left) for correct surround sound reproduction.
This 5.1 channel digital surround format allows for five
individual full-range (20Hz - 20kHz) channels plus an LFE
(Low Frequency Effects) channel for the low-range (20Hz -
120kHz) effects. It creates a realistic sound similar to
theatre and cinema. A large number of DVD discs have
recorded in Dolby Digital Surround.
Dolby Pro Logic Surround
The Dolby Pro Logic Surround system is a specially
encoded two channel analogue format that will produce
sound through four speaker channels (front left, centre,
front right, mono surround) when a Dolby Pro Logic
Decoder is used. It is also compatible with stereo systems
but the user will only have two channels (Front Left &
Right) of sound.
Dolby 3 Stereo
Dolby 3 Stereo produces sound through three speaker
channels (front left, centre, front right) from a two channel
analogue signal. It is not a surround format, so it does not
require surround speakers.
Stereo
All sound is reproduced and played through the front left
and right speakers. This enables standard stereo
reproduction.

15
English
BASIC FUNCTIONS
Soundfield Effects
The digital Soundfield Effects can recreate the effects of
sounds reflected from walls or ceilings to obtain the sound
presence of real environments.
STADIUM
This mode recreates a large stadium effect using very long
reverberation times.
STAGE
This effect recreates a stage environment, emphasizing
sound from the front speakers.
HALL
The surround effect recreates a hall using lots of reflections.
Suitable for orchestral music such as classical and opera.
DISCO
This surround effect generates a feeling of being in a disco
or club. It is suitable for all types of music that are played in
discos.
LIVE
This soundfield effect is suitable for all types of music.

16
English
Manual tuning
1 Press TUNER to select tuner mode.
➜After 2 seconds, the display will show the current
waveband and frequency.
2 To switch between FM and MW waveband, press TUNER
again.
3 Press FREQUENCY 4 or 3 (or à / á on the remote
control) repeatedly to change the frequency. The frequency
changes in 50kHz steps in FM and 9kHz steps in MW
waveband.
Automatic tuning
1 Press TUNER to select tuner mode.
2 To switch between FM and MW waveband, press TUNER
again.
3 Press and hold FREQUENCY 4 or 3 for more than one
second to activate auto tuning mode.
➜When a station is reached, auto tuning stops.
● Repeat steps 2–3 to search for other radio stations.
Tuning to a weak FM station
1 Press FREQUENCY 4 or 3 repeatedly to tune in the
weak FM station manually.
2 Press FM MODE (Ç) to switch to mono mode. This
should reduce the noise and make the station easier to
hear.
Preset Radio Stations
When a preset station is selected, the preset number will
appear shortly and the display will show the waveband and
frequency.
Storing Preset Radio Stations
You can store up to 20 stations in the FM waveband and 20
stations in the MW waveband in the memory.
1 In tuner mode, press TUNER to switch between FM and
MW waveband.
2 Press FREQUENCY 4 or 3 to tune in the desired
station.
3 Press and hold PRESETS until “PRESET” icon flashes.
4 Press ( / ) (or numeric keys 0-9 on the remote control)
to select the desired preset channel number to store.
5 Press PRESETS again to store the radio station.
● Repeat steps 2–5 to store other preset radio stations.
Selecting Preset Radio Stations
1 In tuner mode, press TUNER to switch between FM and
MW waveband.
2 Press PRESETS and followed by FREQUENCY 4 or 3
(or ( / ) on the remote control) to select the desired
preset station.
● You can also use the remote control’s direct access numeric
keys.
RDS
IMPORTANT!
RDS functions are only available in areas that use the
RDS system.
RDS (Radio Data System) is a broadcasting service that
allows FM stations to send additional information along
with the regular FM radio signal. This additional information
can contain the following :
– Station Name
– Radio Text
– Programme Type
– Frequency
Displaying RDS data
When an RDS radio station is received, the RDS icon ( Ç )
and station name (if available) will appear on the display.
While receiving an RDS radio station, you can change the
display information by pressing RDS DISPLAY on the
remote control repeatedly.
Note:
– If the tuned station is not transmitting an RDS signal or not
an RDS station, “NO PS” will be displayed.
Tuner
TUNER

17
English
Searching for RDS radio stations using
Programme Type
The following programme types exist and can be received
by your Radio Tuner :
NEWS, AFFAIRS, INFO, SPORTS, EDUCATE, DRAMA,
CULTURE, SCIENCE, VARIED, POP M, ROCK M,
MOR M, LIGHT M, CLASSICS, OTHERS M, etc..
1 To automatically search for an RDS programme type, first
select FM radio mode.
2 Press the RDS SEARCH repeatedly until the required
programme type appears on the display.
3 Press and hold FREQUENCY 4 or 3 until auto-search is
activated.
➜The search will stop when a radio station with the same
programme type is detected.
➜After a few seconds, the station name will appear on the
display.
● To continue searching for another RDS station within the
same programme type, repeat step 3.
RDS Clock
Some RDS stations may transmit the time. If the clock has
not been set manually (“AM 12:00” will flash); the
current RDS clock time will be stored automatically when
the RDS station transmits the time.
Note:
– If you have set the clock, the set time will not be replaced
when the RDS clock time is received.
TUNER

18
English
CLOCK/TIMER
Clock/Timer
IMPORTANT!
When in DVD/CD mode, it is not possible to operate
clock or timer function.
Setting the Clock
1 Press SYSTEM MENU to enter System Setup mode.
2 Press ( / ) to select the Clock Setup mode and press
£ to confirm.
3 Press à / á to change between 12 and 24 hour mode.
4 Press £ to enter clock adjustment mode.
➜The clock digits for the hours flash.
5 Press à / á to set the hour.
6 Press ( / ) to change the minute field.
➜The clock digits for the minutes flash.
7 Press à / á to set the minute.
8 Press £ to confirm the setting and return to normal
mode.
Setting the On/Off Timer
1 Press SYSTEM MENU to enter System Setup mode.
2 Press ( / ) to select the Timer Setup mode and press
£ to confirm.
3 Press ( / ) to select set on timer or set off timer :
“ON TIME” or “OFF TIME”.
4 Press £ to enter set time mode.
5 Set time (refer to point 5-7 of “Setting the Clock”) and
press £ to confirm the setting.
6 Press à / á to select activating or deactivating the timer :
“SET ON” or “SET OFF”.
7 Press £ to confirm and return to the last selected source.
● Repeat steps 1-5 again to set the Off Time.
Note:
– When the “on time” is reached, the player will switch on to
the last selected source.
Activating/Deactivating
On/Off Timer
1 Press SYSTEM MENU to enter System Setup mode.
2 Press ( / ) to select the Timer Setup mode and press
£ to confirm.
3 Press £ twice and press à / á to select “SET ON” or
“SET OFF” mode.
4 Press £ to confirm the setting and return to the last
selected source.
Setting the Sleep Timer
This feature allows you to select a preset amount of time
after which the player will switch to standby mode
automatically.
● Press SLEEP repeatedly to select a preset amount of time.
➜ The selections are as follows (time in minutes):
90 ™ 60 ™ 30 ™ 15 ™ OFF ™ 90 …
➜ When the Sleep Timer is activated, the “SLEEP” icon will
appear on the display.
Checking the remaining Sleep Time
When the Sleep Timer is switched on, you can check the
remaining time before the player switches to standby
mode.
● Press SLEEP once.
➜ The remaining time will be displayed.
Cancelling the Sleep Timer
To switch off the Sleep Timer after it has been activated.
● Press SLEEP repeatedly until “OFF” is displayed.

19
English
DVD/CD OPERATION
Loading Discs
1 Press OPEN/CLOSE 0 to open the disc tray.
2 Load your chosen disc in the tray, label side up.
3 Press OPEN/CLOSE 0 again to close the tray.
➜ There will be a short delay while the player identifies the
disc and reads the menu from the disc.
● Some discs will start playing automatically, others will display
the Disc Contents Menu. If the menu is presented,
use à / á or ( / ) to select a play option, then press £
to confirm the selection.
When the DVD is playing
Skip
● Press S or T to skip backward or forward by a
Chapter. Each press will take the disc to the beginning of
the previous or next chapter.
Fast Search
1 Press à or á to reverse or fast forward. There are four
speeds; each press will increase the speed.
➜ The sound will be muted.
61 = 62 = 63 = 64 = 61 ...
OR 51 = 52 = 53 = 54 = 51 ...
2 To resume normal play, press £ .
Slow Motion
1 Press( or ) to play slow motion picture backward or
forward. There are four speeds; each press will reduce the
speed.
➜ The sound will be muted.
⁄⁄
⁄⁄
⁄1 =
⁄⁄
⁄⁄
⁄2 =
⁄⁄
⁄⁄
⁄3 =
⁄⁄
⁄⁄
⁄4 =
⁄⁄
⁄⁄
⁄1 ...
OR
!!
!!
!1 =
!!
!!
!2 =
!!
!!
!3 =
!!
!!
!4 =
!!
!!
!1 ...
2 To resume normal play, press £ .
Disc Contents Menu
1 While playing a disc, press SYSTEM MENU.
➜The “Disc Contents Menu” will be displayed.
2 Press à / á or ( / ) to select a desired feature and press
£ to confirm the selection.
Pause
1 Press Å to temporarily stop playing the disc.
➜The picture freezes and the sound will be muted.
● Press Å again will show the next frame of picture.
2 To resume normal play, press £ .
Stop/Resume Stop
1 While playing a disc, press Ç once will select “Resume
Stop” mode. The disc can resume playback from the point
at which it stopped when you press £ .
➜ In resume stop mode, you can display the Setup Menu.
2 While resume stop mode, pressÇ again to enter stop
mode. The disc will start playback from the beginning when
you press £ .
Active Navigation Menu (DVD)
A number of operations can be done with the Active
Navigation Menu without interrupting disc playback.
1 Press DISC MENU.
➜ The Active Navigation Menu will be displayed across the
top of the TV screen.
2 Press ( or ) to move through the Active Navigation Menu.
● Press T to go directly to the second part of the Active
Navigation Menu.
3 Press DISC MENU or EXIT to exit.
Title
● Press à or á to select a title from a multi-
title DVD disc and press £ to confirm the
selection.
➜ The selected title will be displayed.
Chapter
● Press à or á to select a chapter from a
multi-chapter DVD disc and press £ to
confirm the selection.
➜ The selected chapter will be displayed.
Time Search
This function enables you to select and play the
disc from any point.
1 Select TIME SEARCH in the Active Navigation Menu.
➜ The figure appears on the screen is the elapsed time for
the current playing title.
2 Use the numeric keys to enter the time, then press £
to confirm.
➜ The disc will play from the time you selected.
➜ The associated chapter and elapsed playing time will be
displayed.
DVD/CD Operation

20
English
Language/Sound
There could be alternative language
tracks or 2 channel and 5.1 channel
audio available on a disc. All discs are different in this
respect.
● Press à or á to cycle through the sound tracks available
on the disc, then press £ to confirm.
Subtitle
● Press à or á to select the available subtitle
languages or to turn off the subtitle, then press
£ to confirm.
Angle
If the disc contains sequences recorded from
different camera angles, this allows you to view
the picture from different angles.
● Press à or á to select an angle.
➜After a while, playback changes to the selected angle.
OSD (on screen display)
If the OSD is switched on, it will serve as an
additional display for messages on the top
corner of the screen, e.g. STOP, PLAY, which will appear
momentarily when you press a remote control button.
● Press £ repeatedly to set On Screen Display to “ON” or
“OFF”.
Repeat A-B
Repeat A-B allows a passage to play repeatedly.
1 Press £ at the start of the desired passage.
2 Press £ again at the end of the passage.
➜The passage will now repeat continuously.
3 To resume normal play, press £ again.
● You can also press RDS DISPLAY on the remote
control to direct access to Repeat A-B mode.
Zoom
The zoom function allows you to enlarge or
reduce the video image.
● Press £ repeatedly to select the zoom factor : 1.0x, 2.0x
and 0.5x.
➜The picture will change accordingly.
Playing a music CD
1 Load a music CD in the disc tray.
2 Press £ to start playback.
● You can use the numeric keys on the remote control to
directly select a desired track, then press £ to confirm.
When the music CD is playing
Skip
● Press S or T to skip backward or forward. Each
press will take the disc to the beginning of the previous or
next track.
● If the RANDOM mode is switched on, skip will jump a
RANDOM number of tracks.
Fast Search
1 Press à or á to reverse or fast forward the disc. There
are three speeds; each press will increase the speed until
the maximum speed is reached.
2 Press £ to revert to normal speed playback.
Pause
1 Press Å to temporarily stop playing the disc.
➜ The sound will be muted.
2 To resume normal play, pressÅ again or £ .
DVD/CD OPERATION

21
English
Active Navigation Menu
(music CD)
A number of operations can be done with the Active
Navigation Menu without interrupting disc playback.
1 Press DISC MENU.
➜The Active Navigation Menu will be displayed across the
top of the TV screen.
2 Press ( or ) to move through the Active Navigation Menu.
3 Press DISC MENU or EXIT to exit.
Track
● Press à or á to select a track and press
£ to confirm the selection.
➜The track number and elapsed playing time of the
current track will appear on the display.
Time Search
This function enables you to select and play the
disc from any point.
● Use the numeric keys on the remote control to enter
the time, then press £ to confirm.
➜The disc will play from the time you entered.
Repeat A-B
Repeat A-B allows a passage to play repeatedly.
1 Press £ at the start of the required passage.
2 Press £ again at the end of the passage.
➜The passage will now repeat continuously.
3 To resume normal play, press £ again.
Repeat
This function is to repeat playback a track or
the whole disc.
● Press £ repeatedly to select “1” or “ALL”.
➜If “1” is selected, the current track will play repeatedly.
➜If “ALL” is selected, the whole disc will play repeatedly.
DVD/CD OPERATION
Random
All the tracks will play in random order.
● Press £ repeatedly to select random “ON”
or “OFF”.
OSD (on screen display)
If the OSD is switched on, it will serve as an
additional display for messages on the top
corner of the screen, e.g. STOP, PLAY, which will appear
momentarily when you press a remote control button.
● Press £ repeatedly to select On Screen Display “ON” or
“OFF”.
Page is loading ...
Page is loading ...
Page is loading ...
Page is loading ...
Page is loading ...
Page is loading ...
Page is loading ...
Page is loading ...
-
 1
1
-
 2
2
-
 3
3
-
 4
4
-
 5
5
-
 6
6
-
 7
7
-
 8
8
-
 9
9
-
 10
10
-
 11
11
-
 12
12
-
 13
13
-
 14
14
-
 15
15
-
 16
16
-
 17
17
-
 18
18
-
 19
19
-
 20
20
-
 21
21
-
 22
22
-
 23
23
-
 24
24
-
 25
25
-
 26
26
-
 27
27
-
 28
28
-
 29
29


Ask a question and I''ll find the answer in the document
Finding information in a document is now easier with AI
Related papers
Other documents
-
Technicolor - Thomson DPL930VD-RECEIVER User manual
-
Premier SX-013DVDR User manual
-
Denon AVR-981 User manual
-
Denon AVR-2802 User manual
-
Denon AVR-1403 User manual
-
Pure Acoustics SR-5001 User manual
-
Marantz SR6001 User manual
-
JVC RX-DP15B - AV Receiver User manual
-
ONKYO TX-SR403 User manual
-