Page is loading ...

Max UL Load Capacity: 80 lb (36.3 kg)
ISSUED: 01-17-06 SHEET #: 202-9091-1
Features:
• Fits 15" to 37" flat panel screens
• One-touch tilt for effortless positioning and adjustment of the screen
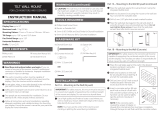
Installation and Assembly:
Universal Tilt Wall Mount for 15" - 37" Screens
Model: MT80A TILT
R
This product is intended for use with UL
Listed products and must be installed by a
qualified professional installer.
Visit the Westinghouse Web Site at www.westinghousedigital.com For customer care call 1-866-287-5555.

2 of 8
ISSUED: 01-17-06 SHEET #: 202-9091-1
Note: Read entire instruction sheet before you start installation and assembly.
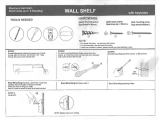
Tools Needed for Assembly
• stud finder ("edge to edge" stud finder is recommended)
• phillips screwdriver
• drill
• 1/4" bit for concrete and cinder block wall
• 1/2" bit for metal stud wall
• 5/32" bit for metal or wood stud wall
• level
Accessories
• Metal Stud Fastener Kit (ACC 215) (Not evaluated by UL)
• Video Conferencing Shelf (ACC 309) (Not evaluated by UL)
• Accessory Shelves (PM 600, PM 610) (Not evaluated by UL)
• Do not begin to install your Westinghouse product until you have read and understood the instructions and warnings
contained in this Installation Sheet. If you have any questions regarding any of the instructions or warnings, please
call customer care at 1-866-287-5555.
• This product should only be installed by a qualified professional.
• Make sure that the wall will safely support the combined load of the equipment and all attached hardware and compo-
nents.
• Never exceed the Maximum UL Load Capacity of 80 lb (36.3 kg).
• If mounting to wood wall studs, make sure that mounting screws are anchored into the center of the studs. Use of an
"edge to edge" stud finder is highly recommended.
• Always use an assistant or mechanical lifting equipment to safely lift and position equipment.
• Tighten screws firmly, but do not overtighten. Overtightening can damage the items, greatly reducing their holding
power.
WARNING
Table of Contents
Parts List..............................................................................................................................................................................3
Installation to Single Wood Stud Wall...................................................................................................................................4
Installation to Solid Concrete or Cinder Block .......................................................................................................................5
Attaching Adapter Plate to Flat Panel Screen ......................................................................................................................6
Installing and Removing Flat Panel Screen ...........................................................................................................................7
Adjusting the Tilt Angle of the Flat Panel Screen..................................................................................................................7
For customer care call 1-866-287-5555.

3 of 8
ISSUED: 01-17-06 SHEET #: 202-9091-1
Description Qty Part #
A
adapter plate 1 095-4346
B
tilt assembly 1 095-0360
C
Alligator® anchor 2 590-0097
D
M4 x 10 mm phillips screw 4 504-9012
E
M4 x 20 mm phillips screw 4 504-9020
F
retaining spacer 4 590-5005
G
#14 x 2-1/2" hex head wood screw 2 5S1-015-C03
H
M5 x 6 mm screw 1 520-1023
Parts List
GC D E F
A
B
H

4 of 8
ISSUED: 01-17-06 SHEET #: 202-9091-1
Installation to Single Wood Stud Wall
1
Use a stud finder to locate the edges of the stud. Use of an edge-to-edge stud finder is highly recommended. Based
on its edges, draw a vertical line down the stud’s center. Place tilt assembly (B) on wall as a template, making sure
that the two mounting holes are over the stud centerline. Level tilt assembly, and mark the center of the two holes.
Drill two 5/32" (4 mm) dia. holes 2-1/2" (65 mm) deep. Make sure that the tilt assembly is level, secure it using two
#14 x 2-1/2" wood screws (G) as shown.
Skip to step 2 on page 6.
• Make sure that the wall will safely support the combined load of the equipment and all attached hardware and
components.
WARNING
• Tighten wood screws so that tilt assembly is firmly attached, but do not overtighten. Overtightening can damage the
screws, greatly reducing their holding power.
• Never tighten in excess of 80 in. • lb (9 N.M.).
• Make sure that mounting screws are anchored into the center of the stud. The use of an "edge to edge" stud finder is
highly recommended.
• Hardware provided is for attachment of mount through standard thickness drywall or plaster into wood studs. Installers
are responsible to provide hardware for other types of mounting situations.
WARNING
G
B

5 of 8
ISSUED: 01-17-06 SHEET #: 202-9091-1
Installation to Solid Concrete or Cinder Block
1
Make sure that tilt assembly (B) is level, use it as a
template to mark two mounting holes. Drill two 1/4"
(6 mm) dia. holes to a minimum depth of 2-1/2"
(64 mm). Insert anchors (C) in holes flush with wall
as shown (right). Place tilt assembly over anchors
and secure with two #14 x 2-1/2" screws (G). Level,
then tighten all fasteners.
• When installing Westinghouse wall mounts on cinder block, verify that you have a minimum of 1-3/8" of actual con-
crete thickness in the hole to be used for the concrete anchors. Do not drill into mortar joints! Be sure to mount in a
solid part of the block, generally 1" minimum from the side of the block. Cinder block must meet ASTM C-90 specifica-
tions. It is suggested that a standard electric drill on slow setting is used to drill the hole instead of a hammer drill to
avoid breaking out the back of the hole when entering a void or cavity.
• Concrete must be 2000 psi density minimum. Lighter density concrete may not hold concrete anchor.
• Make sure that the wall will safely support the combined load of the equipment and all attached hardware and
components.
WARNING
CUTAWAY VIEW
INCORRECT
concrete
surface
1
3
2
Drill holes and insert anchors (C).
CORRECT
Place assembly (B) over anchors (C) and secure with screws (G).
Tighten all fasteners.
wall
plate
plaster/
dry wall
concrete
wall plate
concrete
plaster/
dry wall
• Always attach concrete expansion anchors directly to
load-bearing concrete.
• Never attach concrete expansion anchors to concrete
covered with plaster, drywall, or other finishing mate-
rial. If mounting to concrete surfaces covered with a
finishing surface is unavoidable, the finishing surface
must be counterbored as shown below. Be sure
concrete anchors do not pull away from concrete
when tightening screws. If plaster/drywall is thicker
than 5/8", custom fasteners must be supplied by
installer.
WARNING
B
• Tighten screws so that wall plate is firmly attached,
but do not overtighten. Overtightening can damage
screws, greatly reducing their holding power.
• Never tighten in excess of 80 in. • lb (9 N.M.).
WARNING
C
G
G
CINDER BLOCK
SOLID
CONCRETE
B
C
C

6 of 8
ISSUED: 01-17-06 SHEET #: 202-9091-1
F
*For screens with a hole
pattern in a pocket,
spacers (F) go between
adapter plate (A) and
screen.
FOR VESA
®
75 MOUNTING PATTERN:
Choose hole pattern as shown below. Attach adapter
plate (A) to back of screen using four M4 x 10 mm
screws (D) as shown below.
*Note: If hole pattern is in a pocket, attach adapter
plate (A) to back of screen using four M4 x 20 mm
screws (E) and four retaining spacers (F) as indicated
below.
Attaching Adapter Plate to Flat Panel Screen
• If screws don't get three complete turns in the screen inserts or if screws bottom out and bracket is still not tightly
secured, damage may occur to screen or product may fail.
WARNING
D
FOR VESA 100 MOUNTING PATTERN:
Choose hole pattern as shown below. Attach adapter
plate (A) to back of screen using four M4 x 10 mm
screws (D) as shown below.
D
2
A
A

7 of 8
ISSUED: 01-17-06 SHEET #: 202-9091-1
Attach screen to tilt assembly (B). Tighten M5 x 6
mm screw (H) to lock screen to tilt assemby.
Note: For security models, use security driver (I) to
tighten M5 x 6 mm screws (H).
To remove screen from mount, loosen screw (H) and
lift screen off of mount.
Installing and Removing Flat Panel Screen
3
A
SCREEN
• Do not lift more weight than you can handle. Use
additional man power or mechanical lifting equipment
to safely handle placement of the screen.
• Failure to lock adapter plate (A) with screw (H) can
cause screen to come off mount if hit accidentally.
• Do not tighten screws with excessive force.
Overtightening can cause damage to mount. Tighten
screws to 20 in. • lb (2.26 N.M.) maximum torque.
CAUTION
WARNING
fig. 3
Adjust tension knob on right side of mount shown in
figure 4 to desired tension to balance your screen
size and weight.
Note: If knob is inaccessible, remove screen from
mount, adjust tension knob to desired tension to
balance your screen size and weight, and reattach
screen to mount as stated in step 3.
Push or pull from top or bottom of screen to adjust
tilt as shown in figure 4. The tilt can be adjusted to a
maximum of 15° forward or 5° backward.
4
Adjusting the Tilt Angle of the Flat Panel Screen
• Be careful not to pinch fingers when pushing screen
from the bottom.
CAUTION
• Do not tighten screws with excessive force.
Overtightening can cause damage to mount. Tighten
screws to 40 in. • lb (4.5 N.M.) maximum torque.
CAUTION
fig. 4
TENSION KNOB
H
B

8 of 8
ISSUED: 01-17-06 SHEET #: 202-9091-1
Limited Five-Year Warranty
Westinghouse Digital Electronics warrants to original end-users of this Westinghouse display mounting product (the
“Product”) that the Product will be free from defects in material and workmanship, under normal use, for a period of five (5)
years from the date of purchase by the original end-user, subject to the following terms and conditions:
REPAIR OR REPLACEMENT – For a period of five (5) years from the original date of purchase, Westinghouse Digital
Electronics will repair any defect in material or workmanship in the Product, or, at its option, replace a defective Product.
Replacement parts and products will be warranted for either the remainder of the original warranty period or ninety (90)
days from the date of delivery to the end-user, whichever occurs last.
OBTAINING WARRANTY SERVICE – To obtain warranty services, you must either personally deliver or ship the Product
to Westinghouse Digital Electronics, freight prepaid. Please call Westinghouse Digital Electronics at (866) 287-5555 to
obtain a Return Merchandise Authorization (“RMA”) and for other instructions regarding return and replacement or repair of
the Product. Westinghouse Digital Electronics will not accept Products delivered to it without an RMA.
EXCLUSIONS TO WARRANTY – This warranty does not cover damage caused by (a) service or repairs by anyone other
than personnel authorized by Westinghouse Digital Electronics, (b) the failure to utilize proper packing when returning the
product, (c) improper installation or the failure to follow Product instructions or warnings, or (d) misuse or accident, in
transit or otherwise.
PROOF OR ORIGINAL PURCHASE – A sales receipt, invoice, or other proof of purchase specifying the original date of
purchase within the five (5) year warranty period must be presented to obtain warranty service. This warranty extends to
the original purchaser and is not transferable.
EITHER REPAIR OR REPLACEMENT IS YOUR EXCLUSIVE REMEDY UNDER THIS WARRANTY. EXCEPT TO THE
EXTENT PROHIBITED BY LAW, WESTINGHOUSE DIGITAL SHALL NOT BE LIABLE FOR ANY INCIDENTAL OR
CONSEQUENTIAL DAMAGES CLAIMED TO ARISE FROM BREACH OF ANY EXPRESS OR IMPLIED WARRANTY ON
THIS PRODUCT. ANY IMPLIED WARRANTY OF MERCHANTABILITY OR FITNESS FOR A PARTICULAR PURPOSE
ON THIS PRODUCT IS LIMITED IN DURATION AND SCOPE TO THE TERMS OF THIS WARRANTY.
Some States do not allow the exclusion or limitation of incidental or consequential damages, or allow limitations on how
long an implied warranty lasts, so the above limitation may not apply to you. This warranty gives specific legal rights, and
you may also have other rights which vary from State to State.
Westinghouse Digital Electronics, LLC
12150 Mora Drive
Santa Fe Springs, CA 90670
Tel. (562) 236-9800
Fax. (562) 236-9898
and Westinghouse are trademarks of Westinghouse Electric Corporation and are used under license.
/