
Quick Start Guide
CMS 3.0 SERIES
In-Ceiling loudspeakers
CMS 503 PI Backcan
CMS 603 PI 16 OHM Backcan
CMS 803 PI 16 OHM Backcan

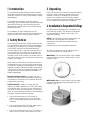
3 Unpacking
Every Tannoy product is carefully inspected before
shipment. After unpacking, please inspect your
product to ensure no damage has occurred in
transit. In the unlikely event of damage, please
notify your dealer and retain all shipping materials
as your dealer may require return shipment.
4 Installation in Suspended Ceilings
An optional pre-install backcan is available for all
pre-install (PI) models. The backcan is designed
for pre-installation in newly constructed, non-
suspended ceilings.
NOTE: The CMS 603 and 803 models have the
transformer pre-attached to the inside of
the backcan; the CMS 503 models have the
transformer
pre-attached to the loudspeaker assembly.
1. Attach the backcan to a secure xing point.
This can be done one of three ways:
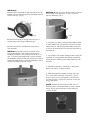
METHOD 1: Fix to a secure point using suitable
xings attached to the four xing holes on the PI
backcan. (Fig.1)
.
METHOD 2: Fix to a secure point using suitable
xings and the exible straps attached to the PI
backcan. (Fig. 2)
1 Introduction
This Quick Start Guide (QSG) provides the basic
information required to install and connect the pre-
install (PI) versions of Tannoy CMS Series in-ceiling
loudspeakers.
For additional information, including product
technology, photo identication of product features,
dimensional drawings, and complete technical
specications, please refer to the full CMS Series
Operation Manual.
For installation of CMS Series blind-mount
versions, please refer to either the CMS BM Quick
Start Guide or the full CMS Operation Manual.
2 Safety Notices
Some regional construction codes require the use
of a secondary method of securing loudspeakers
in ceiling to provide security of a back-up support.
A secondary support line should be attached
from the safety loop on the rear of the product to
a source point on the ceiling. For PI models, the
secondary support line should be attached from
the back of the driver chassis to a source point on
the ceiling. Please consult the relevant construction
codes in your region.
When using a power driver to install the product, it
is essential to use the correct torque level settings
to avoid over tightening and damage to the ceiling
material or clamps. Recommended torque setting:
1.5 Nm Tannoy will not be held responsible for any
damages caused by the improper installation of
these loudspeakers.
Electrical Safety Notice: to comply with the
standard UL1480, metal-clad exible conduit (BX)
is required for connection to the terminal block for
proper earth grounding.
SAFETY NOTE: In order to comply with the
relevant re safety regulations (i.e. BS 5839:1998),
it is required that in the event of re, that failure of
the circuit to which the loudspeaker is connected
does not occur before evacuation of the building is
complete. Suitable measures include:
• Use of terminal blocks (for connection to
primary) with a melting point of not less than
650°C, for example constructed from ceramic
materials;
• Use of terminal blocks of a lower melting point
but protected with thermal insulation;
• Use of terminal blocks such that, on melting, an
open-circuit or a short-circuit does not occur.
Fig.1
Fig.2

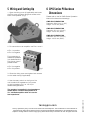
METHOD 3:
a. Attach the PI backcan to the optional pre-mount
plaster ring using the xing points provided with the
pre-mount ring. (Fig 3).
b. Secure the wings of the pre-mount ring to a
secure xing point using suitable xings.
2. Attach conduit to the backcan using one of
two methods:
METHOD 1: Use the clamp at the back of the
pre-install backcan. The product will accept a
squeeze connector with a thread size of up to 22
mm. To remove the cable clamp, simply unscrew
the threaded washer (under the wiring cover) which
holds the cable clamp in place and replace it with a
conduit squeeze connector. (Fig.4)
METHOD 2: Use any of the three knock-out points
at the sides of the backcan (19 mm, 22 mm or
28 mm diameter). (Fig 5)
3. If conduit not used, run approved speaker cable
to the installed can. Terminate in the top-mounted
cable clamp or with an approved cable connector
in one of the three knock-out points at the sides of
the backcan.
4. Cut a hole in the proper ceiling location using the
supplied cut-out template (self-adhesive backing)
and a pad saw. Place the pre-install backcan over
the hole.
5. Proceed to Section 5 following on wiring and
setting up. Return to Step 6 below.
6. Slide the speaker assembly through the hole.
Turn the screws (denoted “Screw Fix”) clock-
wise on the front of the speaker to extend the
mounting wings. Tighten the screws until a rm
grip is achieved.
(NOTE: Screws have a PoziDriv head; use of a
PoziDriv driver is recommended). If using a power
driver, Tannoy recommends a torque setting of
1.5 Nm. (Fig.6)
Fig.1
Fig.2
Fig.3
Fig.4
Fig.5
Fig.6

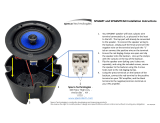
5 Wiring and Setting Up
1. Open the wiring cover (if applicable) and locate
the Euro-type connector plug and socket at the
back of the speaker. (Fig.1)
2. For connection to an amplier, use Pins 1 and 2
3. Close the wiring cover and tighten both screws
on the cable clamp (if applicable).
4. Use the rotary switch on the front of the
unit to select low impedance (LoZ) mode
or high impedance (70 V or 100 V) for
distributed applications.
The speaker is supplied in low impedance
mode. Never connect the speaker to a
70 / 100 Volt amplier while it is set for
low impedance.
6 CMS Series PI Backcan
Dimensions
Please refer to the full CMS Series Operation
Manual for dimensional drawings.
CMS 503 PI BACKCAN
Diameter: 288.0 mm (11.34”)
Height: 153.5 mm (6.04”)
CMS 603 PI BACKCAN
Diameter: 351 mm (13.82”)
Height: 168.5 mm (6.63”)
CMS 803 PI BACKCAN
Diameter: 397 mm (15.63”)
Height: 168.5 mm (6.63”)
Fig.1
• Pin 1 is positive
• Pin 2 is negative
For connection to
additional speakers
in a distributed line,
Pins 3 and 4 are in
parallel where:
• Pin 3 is negative
• Pin 4 is positive
Fig.1
Fig.2
tannoypro.com
6481 0670 / 231115
Tannoy operates a policy of continuous research and development. The introduction of new materials or
manufacturing methods will always equal or exceed the published specications. All specications are
subject to change without notice. Copyright (c) 2015 Music Group Innovation SC Ltd. All rights reserved.
-
 1
1
-
 2
2
-
 3
3
-
 4
4


Tannoy CMS 503 PI BACKCAN Quick start guide
- Type
- Quick start guide
- This manual is also suitable for
Ask a question and I''ll find the answer in the document
Finding information in a document is now easier with AI
Related papers
-
Tannoy CMS 503ICT PI User manual
-
Tannoy CMS 603DC PI Quick start guide
-
-
Tannoy CMS 503ICT LP Quick start guide
-
Tannoy CMS 603DC BM Quick start guide
-
Tannoy CMS 803 PI 16 OHM BACKCAN Quick start guide
-
Tannoy CMS 503DC BM Quick start guide
-
-
-
Other documents
-
 Speco Technologies SPG6MT 6.5 Inch 25-70V In-Ceiling Speaker Operating instructions
-
ML Accessories 5FTT5KIT User manual
-
Legrand Nuvo Fire-Rated Speaker Backcan Operating instructions
-
OWI 2X2AMP-R2S61SVC User manual
-
Martin Audio ACS-55T User Guides
-
JBL 24C/CT User manual
-
OWI AMP-CATIC6 User manual
-
-
Phase Technology CM42-EZs User manual
-
Electro-Voice EVID FM-Series User manual
